2002 NISSAN PATHFINDER change time
[x] Cancel search: change timePage 2 of 288
MODIFICATION OF YOUR
VEHICLEThis vehicle should not be modified. Modi-
fication could affect its performance,
safety or durability, and may even violate
governmental regulations. In addition,
damage or performance problems result-
ing from modification may not be covered
under NISSAN warranties.WHEN READING THE MANUALThis manual includes information for all
options available on this model. Therefore,
you may find some information that does
not apply to your vehicle.
All information, specifications and illustrations
in this manual are those in effect at the time of
printing. NISSAN reserves the right to change
specifications or design at any time without
notice.
IMPORTANT INFORMATION
ABOUT THIS MANUALYou will see various symbols in this manual.
They are used in the following ways:
WARNING
This is used to indicate the presence of a
hazard that could cause death or serious
personal injury. To avoid or reduce the
risk, the procedures must be followed
precisely.
CAUTION
This is used to indicate the presence of a
hazard that could cause minor or moder-
ate personal injury or damage to your
vehicle. To avoid or reduce the risk, the
procedures must be followed carefully.If you see this symbol, it meansDo not do
thisorDo not let this happen.
SIC0697
Z
01.9.21/R50-D/V5
X
Page 60 of 288
COMPASS DISPLAYPush the switch when the ignition key is in the
ACC or ON position. The direction will be
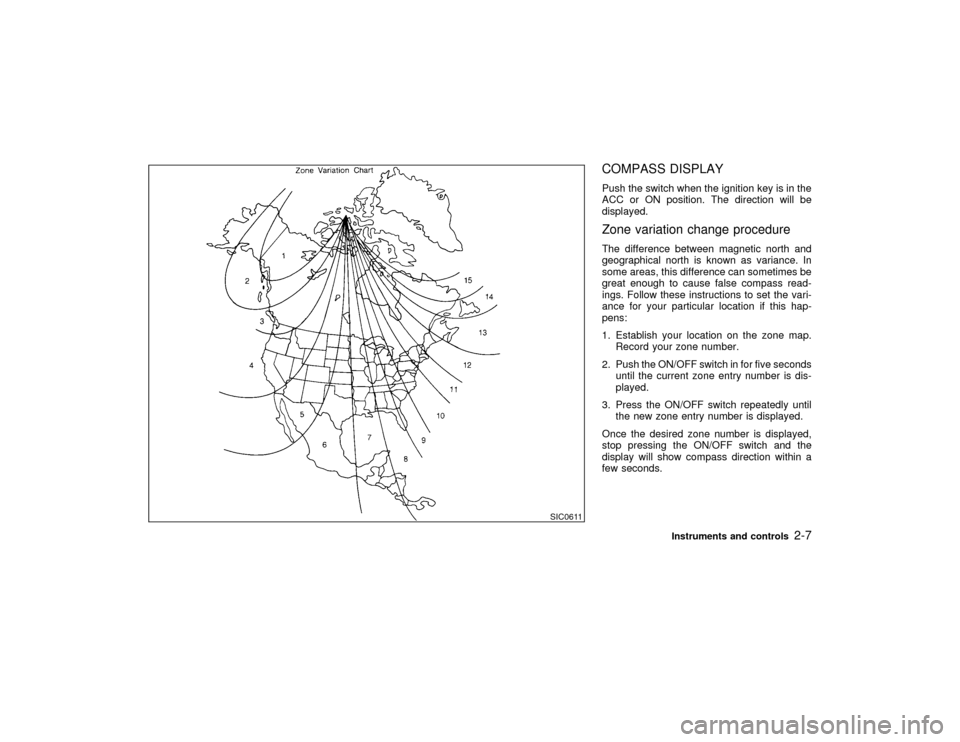
displayed.Zone variation change procedureThe difference between magnetic north and
geographical north is known as variance. In
some areas, this difference can sometimes be
great enough to cause false compass read-
ings. Follow these instructions to set the vari-
ance for your particular location if this hap-
pens:
1. Establish your location on the zone map.
Record your zone number.
2. Push the ON/OFF switch in for five seconds
until the current zone entry number is dis-
played.
3. Press the ON/OFF switch repeatedly until
the new zone entry number is displayed.
Once the desired zone number is displayed,
stop pressing the ON/OFF switch and the
display will show compass direction within a
few seconds.
SIC0611
Instruments and controls
2-7
Z
01.9.21/R50-D/V5
X
Page 75 of 288
WARNING
When the daytime running light system
is active, tail lights on your vehicle are
not on. It is necessary at dusk to turn on
your headlights. Failure to do so could
cause an accident injuring yourself and
others.
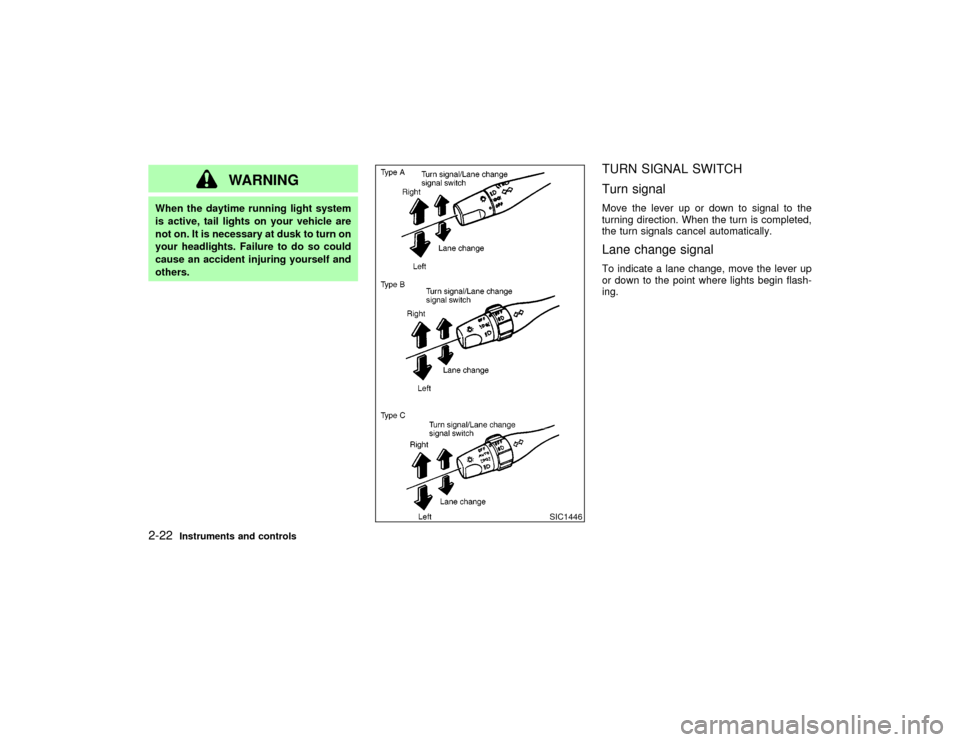
TURN SIGNAL SWITCH
Turn signalMove the lever up or down to signal to the
turning direction. When the turn is completed,
the turn signals cancel automatically.Lane change signalTo indicate a lane change, move the lever up
or down to the point where lights begin flash-
ing.
SIC1446
2-22
Instruments and controls
Z
01.9.21/R50-D/V5
X
Page 96 of 288

2. Press the training button on the garage
door opener motor unit (which may activate
a training light).
NOTE:
Following step 2, there are 30 seconds
in which to initiate step 3.
3. Firmly press and release the programmed
HomeLink
button. Press and release the
HomeLinkbutton a second time to com-
plete the training process. (Some garage
door openers may require you to do this
procedure a third time to complete the
training.)
The garage door opener should now recognize
the HomeLinkUniversal Transceiver and ac-
tivate when the HomeLink
button is pressed.
The remaining two buttons may now be pro-
grammed (if not yet programmed, follow steps
2 through 4 in the ªProgramming HomeLink
º
procedures earlier in this section).
REPROGRAMMING A SINGLE
HomeLink
BUTTON
To reprogram an HomeLink
Universal Trans-
ceiver button, complete the following.
1. Press and hold the desired HomeLink
button.Do notrelease the button until step
4 has been completed.2. When the indicator light begins to flash
slowly (after 20 seconds), position the
hand-held transmitter 2 to 5 inches (50 to
127 mm) away from the HomeLink
sur-
face.
3. Press and hold the hand-held transmitter
button.
4. The HomeLink
indicator light will flash,
first slowly and then rapidly. When the
indicator light begins to flash rapidly, re-
lease both buttons.
The HomeLink
Universal Transceiver button
has now been reprogrammed. The new device
can be activated by pushing the HomeLink
button that was just programmed. This proce-
dure will not affect any other programmed
HomeLink
buttons.
IF YOUR VEHICLE IS STOLENIf your vehicle is stolen, you should change the
codes of any non-rolling code device that has
been programmed into HomeLink
. Consult
the Owner's Manual of each device or call the
manufacturer or dealer of those devices for
additional information.
When your vehicle is recovered, you will
need to reprogram the HomeLinkUniver-
sal Transceiver with your new transmitter
information.FCC Notice:
This device complies with FCC rules part
15. Operation is subject to the following
two conditions: (1) This device may not
cause harmful interference and (2) This
device must accept any interference that
may be received, including interference
that may cause undesired operation.
The transmitter has been tested and com-
plies with FCC and DOC/MDC rules.
Changes or modifications not expressly
approved by the party responsible for com-
pliance could void the user's authority to
operate the device.
DOC: ISTC 1763K1313
FCC I.D.: CB2V67690
Instruments and controls
2-43
Z
01.9.21/R50-D/V5
X
Page 107 of 288
windows are fully open.
To stop lowering the windows, release the
UNLOCK button.
To start lowering the windows, press the UN-
LOCK button again for 3 more seconds.
This function will operate after the ignition
switch is off and 45 seconds passed or either
the front door is opened.Using the panic alarmIf you are near your vehicle and feel threat-
ened, you may activate the alarm to call atten-
tion as follows:
1. Push the PANIC button on the keyfob for
longer than 0.5 seconds.
2. The theft warning alarm and headlights will
stay on for 30 seconds.
3. The panic alarm stops when:
IIt has run for 30 seconds, or
IThe LOCK or the UNLOCK button is
pressed, or
IThe panic button is pushed on the keyfob
for more than 0.5 seconds.
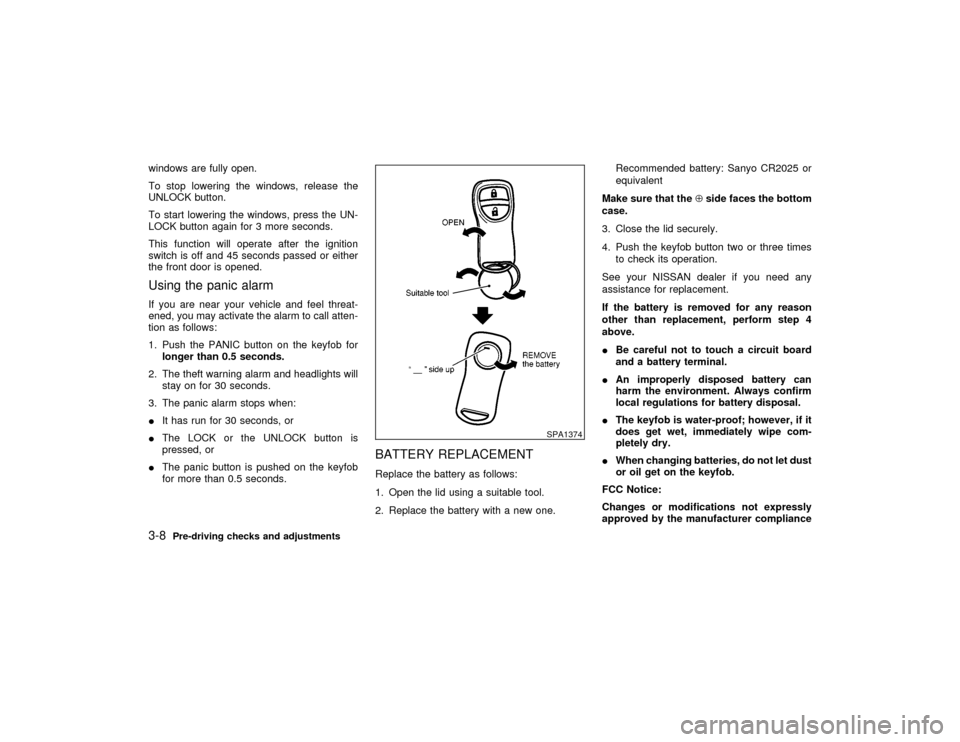
BATTERY REPLACEMENTReplace the battery as follows:
1. Open the lid using a suitable tool.
2. Replace the battery with a new one.Recommended battery: Sanyo CR2025 or
equivalent
Make sure that theÅside faces the bottom
case.
3. Close the lid securely.
4. Push the keyfob button two or three times
to check its operation.
See your NISSAN dealer if you need any
assistance for replacement.
If the battery is removed for any reason
other than replacement, perform step 4
above.
IBe careful not to touch a circuit board
and a battery terminal.
IAn improperly disposed battery can
harm the environment. Always confirm
local regulations for battery disposal.
IThe keyfob is water-proof; however, if it
does get wet, immediately wipe com-
pletely dry.
IWhen changing batteries, do not let dust
or oil get on the keyfob.
FCC Notice:
Changes or modifications not expressly
approved by the manufacturer compliance
SPA1374
3-8
Pre-driving checks and adjustments
Z
01.9.21/R50-D/V5
X
Page 128 of 288

Turn the ignition key to ACC or ON and press
the power on switch to turn on the radio. If you
listen to the radio with the engine not running,
the key should be turned to the ACC position.
Radio reception is affected by station signal
strength, distance from radio transmitter, build-
ings, bridges, mountains and other external
influences. Intermittent changes in reception
quality normally are caused by these external
influences.
Using a cellular phone in or near the ve-
hicle may influence radio reception quality.Radio receptionYour radio system is equipped with state-of-
the-art electronic circuits to enhance radio
reception. These circuits are designed to ex-
tend reception range, and to enhance the
quality of that reception.
However there are some general characteris-
tics of both FM and AM radio signals that can
affect radio reception quality in a moving ve-
hicle, even when the finest equipment is used.
These characteristics are completely normal in
a given reception area, and do not indicate any
malfunction in your radio system.
Remember that a moving vehicle is not the
ideal place to listen to a radio. Because of the
movement, reception conditions will constantlychange. Buildings, terrain, signal distance and
interference from other vehicles can work
against ideal reception. Described below are
some of the factors that can affect your radio
reception.
FM RADIO RECEPTIONRange: FM range is normally limited to 25 to
30 miles (40 to 48 km), with monaural (single
channel) FM having slightly more range than
stereo FM. External influences may some-
times interfere with FM station reception even
if the FM station is within 25 miles (40 km). The
strength of the FM signal is directly related to
the distance between the transmitter and re-
ceiver. FM signals follow a line-of-sight path,
exhibiting many of the same characteristics as
light. For example they will reflect off objects.
Fade and drift: As your vehicle moves away
SAA0306
AUDIO SYSTEM
Heater, air conditioner and audio systems
4-11
Z
01.9.21/R50-D/V5
X
Page 134 of 288
cassette tape will begin to play.
CAUTION
Do not force the cassette tape into the
tape door. This could cause player dam-
age.
If the system is turned off by pushing the
ON×OFF/VOL control knob with the cassette
tape still in the player, the tape will resume
playing when the system is turned back on.
PLAY:
IWhen the TAPE button is pushed with the
system turned off and a tape loaded, the
system will come on and the tape will play.
IWhen the TAPE button is pushed with
either the radio or compact disc turned on
and the tape loaded, the compact disc or
the radio will automatically be turned off
and the tape will play.
FF (Fast Forward), REW
(Rewind):
Push the(fast forward) button to fast
forward the tape. To rewind the tape, push the
(rewind) button. Either the FF or REW
symbol illuminates on the right side of thedisplay window. To stop the FF or REW func-
tion, press the
(fast forward) or
(re-
wind) again, or the TAPE button.
APS (Automatic Program
Search) FF, APS REW:
When the(APS FF) button is pushed
while the tape is being played, the next pro-
gram will start to play from the beginning. Push
the
(APS FF) button several times to skip
through programs. The tape will advance the
number of times the button is pushed (up to
nine programs).
When the
(APS REW) button is pushed
once, the program being played starts over
from the beginning. Push the
(APS
REW) button several times to skip back sev-
eral selections. The tape will go back the
number of times the button is pushed. Either
the FF or REW symbol flashes on the right
side of the display window while searching for
the selection.
This system searches for the blank intervals
between selections. If there is a blank interval
within one program or there is no interval
between programs, the system may not stop in
the desired or expected location.
PROG (Program):
Push the PROG button to change the tapeside while the tape is being played.
The cassette tape will automatically change
directions to play the other side when the first
side is completed.
Dolby NR (Noise Reduction):
Push the Dolby NR
button for Dolby NR
encoded tapes to reduce high frequency tape
noise. The indicator will come on.
Dolby noise reduction manufactured under li-
cense from Dolby Laboratories Licensing Cor-
poration. Dolby NR and the double-D symbol
are trademarks of Dolby Laboratories
Licensing Corporation.
Metal or chrome tape usage:
The cassette player will be automatically set to
high performance play when playing a metal or
chrome cassette tape.TAPE EJECT:
When this button is pushed with the tape
loaded, the tape will be ejected.
When the tape is ejected while it is being
played, the system will be turned off.
Compact Disc (CD) player operationTurn the ignition key to the ACC or ON position
and insert the compact disc into the slot with
the label side facing up. The compact disc will
Heater, air conditioner and audio systems
4-17
Z
01.9.21/R50-D/V5
X
Page 135 of 288
be guided automatically into the slot and start
playing.
After loading the disc, the number of tracks on
the disc and the play time will appear on the
display.
If the radio or tape is already operating, it will
automatically turn off and the compact disc will
play.
CAUTION
Do not force the compact disc into the
slot. This could damage the player.
If the system has been turned off while the
compact disc was playing, pushing the
ON×OFF/VOL control knob will start the com-
pact disc.
8 cm diameter compact discs can also be used
without an adapter.
PLAY:
When the CD/CHG button is pushed with the
system off and the compact disc loaded, the
system will turn on and the compact disc will
start to play.
When the CD/CHG button is pushed with the
compact disc loaded but the tape or the radioplaying, the tape or radio will automatically be
turned off and the compact disc will start to
play.
FF (Fast Forward), REW
(Rewind):
When the(fast forward) or
(rewind)
button is pushed while the compact disc is
being played, the compact disc will play while
fast forwarding or rewinding. When the button
is released, the compact disc will return to
normal play speed.
APS (Automatic Program
Search) FF, APS REW:
When the(APS FF) button is pushed
while the compact disc is being played, the
program next to the present one will start to
play from its beginning. Push several times to
skip through programs. The compact disc will
advance the number of times the button is
pushed. (When the last program on the com-
pact disc is skipped through, the first program
will be played.) When the
(APS REW)
button is pushed, the program being played
returns to its beginning. Push several times to
skip back through programs. The compact disc
will go back the number of times the button is
pushed.
PROG (Program):
When the PROG button is pushed while the
compact disc is being played, the play pattern
will change as follows:
no mark: All the programs will be played
repeatedly in sequence.
1: Only one program (the one being played
when the PROG button is pushed) will be
repeated.
RANDOM: Programs will be played at random,
not following the sequence on the compact
disc. The same program may be repeated
twice.
When the compact disc is ejected, the
play pattern will automatically change to
no mark.
CD EJECT:
When the CD EJECT button is pushed with the
compact disc loaded, the compact disc will be
ejected.
When the button is pushed twice consecutively
the compact disc will be ejected further than
when pushed once.
When this button is pushed while the compact
disc is being played, the compact disc will
come out and the system will turn off.
4-18
Heater, air conditioner and audio systems
Z
01.9.21/R50-D/V5
X