2002 NISSAN PATHFINDER roof
[x] Cancel search: roofPage 53 of 288

2 Instruments and controlsInstrument panel ....................................................... 2-2
Meters and gauges ................................................... 2-3
Speedometer and odometer ................................ 2-3
Tachometer .......................................................... 2-4
Engine coolant temperature gauge ...................... 2-4
Fuel gauge ........................................................... 2-5
Compass and outside temperature display (if so
equipped) .................................................................. 2-6
Outside temperature display ................................ 2-6
Compass display .................................................. 2-7
Warning/indicator lights and audible reminders ........ 2-9
Checking bulbs ..................................................... 2-9
Warning lights....................................................... 2-9
Indicator lights .................................................... 2-13
Audible reminders .............................................. 2-15
Security systems ..................................................... 2-15
Vehicle security system ...................................... 2-15
Nissan vehicle immobilizer system .................... 2-17
Windshield wiper and washer switch ...................... 2-18
Rear window wiper and washer switch................... 2-18
Glass hatch and outside mirror (if so equipped)
defogger switch ...................................................... 2-19
Headlight and turn signal switch ............................. 2-19
Headlight switch ................................................. 2-20Turn signal switch .............................................. 2-22
Fog light switch (if so equipped) ............................. 2-23
Front fog light switch .......................................... 2-23
Hazard warning flasher switch ................................ 2-23
Horn......................................................................... 2-24
Heated seats (if so equipped) ................................. 2-24
Clock ....................................................................... 2-25
Adjusting the time............................................... 2-25
Power outlet (if so equipped) .................................. 2-25
Cigarette lighter and ashtray (if so equipped) ........ 2-26
Storage .................................................................... 2-27
Tray .................................................................... 2-27
Coin box (if so equipped) ................................... 2-27
Glasses case ...................................................... 2-28
Cup holders ........................................................ 2-28
Glove box ........................................................... 2-29
Console box ....................................................... 2-30
Luggage hooks ................................................... 2-32
Cargo net............................................................ 2-33
Tonneau cover (if so equipped) ......................... 2-33
Luggage rack (if so equipped) ........................... 2-34
Windows .................................................................. 2-35
Power windows .................................................. 2-35
Sunroof (if so equipped) ......................................... 2-36
Z
01.9.21/R50-D/V5
X
Page 54 of 288

Electric sunroof................................................... 2-36
Interior lights (if so equipped) ................................. 2-38
Personal lights......................................................... 2-39
Vanity mirror light (if so equipped) .......................... 2-40
HomeLink
Universal Transceiver (if so
equipped) ................................................................ 2-40
Programming HomeLink
................................... 2-41
Programming HomeLinkfor Canadian
customers ........................................................... 2-41Operating the integrated HomeLink
Universal
Transceiver ......................................................... 2-42
Programming trouble-diagnosis.......................... 2-42
Clearing the programmed information................ 2-42
Rolling code programming ................................. 2-42
Reprogramming a single HomeLinkbutton...... 2-43
If your vehicle is stolen ...................................... 2-43
Z
01.9.21/R50-D/V5
X
Page 89 of 288

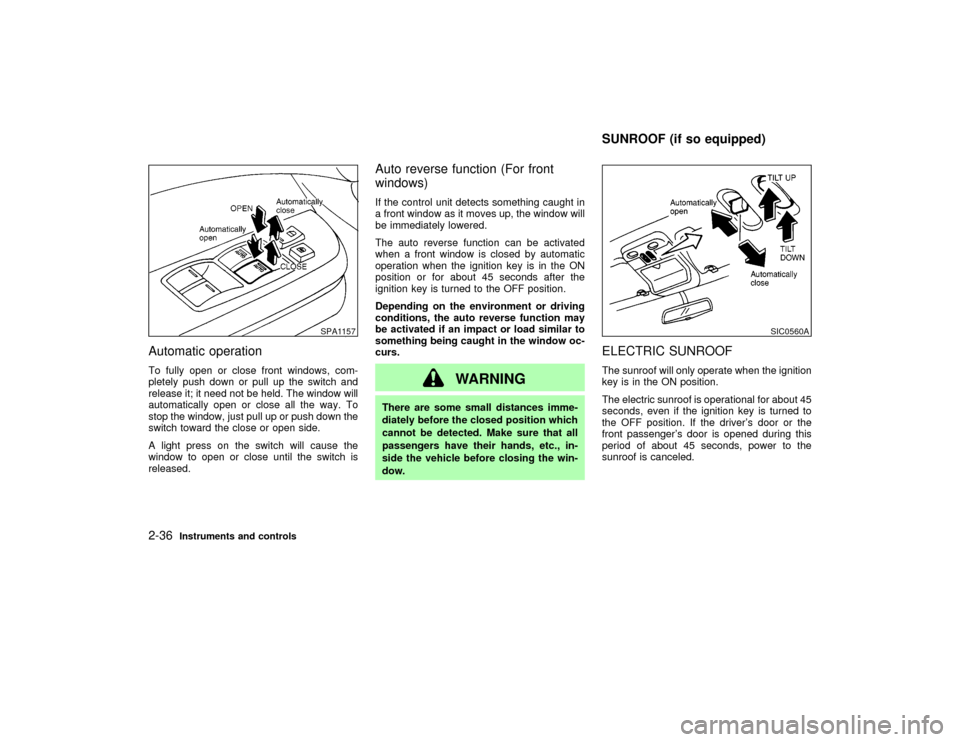
Automatic operationTo fully open or close front windows, com-
pletely push down or pull up the switch and
release it; it need not be held. The window will
automatically open or close all the way. To
stop the window, just pull up or push down the
switch toward the close or open side.
A light press on the switch will cause the
window to open or close until the switch is
released.
Auto reverse function (For front
windows)If the control unit detects something caught in
a front window as it moves up, the window will
be immediately lowered.
The auto reverse function can be activated
when a front window is closed by automatic
operation when the ignition key is in the ON
position or for about 45 seconds after the
ignition key is turned to the OFF position.
Depending on the environment or driving
conditions, the auto reverse function may
be activated if an impact or load similar to
something being caught in the window oc-
curs.
WARNING
There are some small distances imme-
diately before the closed position which
cannot be detected. Make sure that all
passengers have their hands, etc., in-
side the vehicle before closing the win-
dow.
ELECTRIC SUNROOFThe sunroof will only operate when the ignition
key is in the ON position.
The electric sunroof is operational for about 45
seconds, even if the ignition key is turned to
the OFF position. If the driver's door or the
front passenger's door is opened during this
period of about 45 seconds, power to the
sunroof is canceled.
SPA1157
SIC0560A
SUNROOF (if so equipped)
2-36
Instruments and controls
Z
01.9.21/R50-D/V5
X
Page 90 of 288

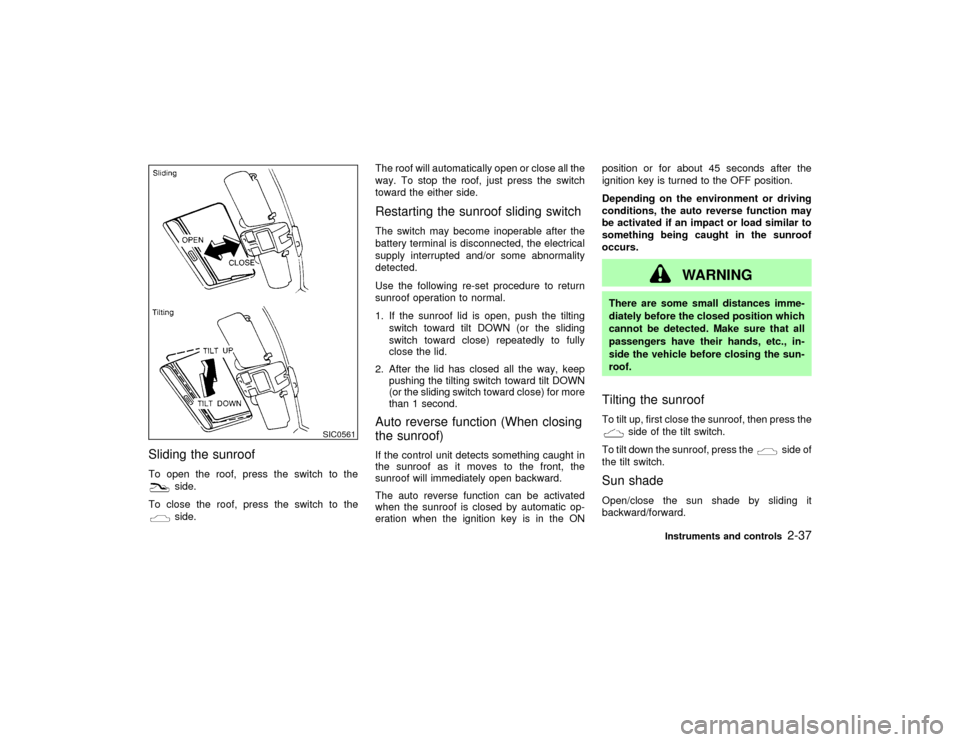
Sliding the sunroofTo open the roof, press the switch to the
side.
To close the roof, press the switch to theside.The roof will automatically open or close all the
way. To stop the roof, just press the switch
toward the either side.
Restarting the sunroof sliding switchThe switch may become inoperable after the
battery terminal is disconnected, the electrical
supply interrupted and/or some abnormality
detected.
Use the following re-set procedure to return
sunroof operation to normal.
1. If the sunroof lid is open, push the tilting
switch toward tilt DOWN (or the sliding
switch toward close) repeatedly to fully
close the lid.
2. After the lid has closed all the way, keep
pushing the tilting switch toward tilt DOWN
(or the sliding switch toward close) for more
than 1 second.Auto reverse function (When closing
the sunroof)If the control unit detects something caught in
the sunroof as it moves to the front, the
sunroof will immediately open backward.
The auto reverse function can be activated
when the sunroof is closed by automatic op-
eration when the ignition key is in the ONposition or for about 45 seconds after the
ignition key is turned to the OFF position.
Depending on the environment or driving
conditions, the auto reverse function may
be activated if an impact or load similar to
something being caught in the sunroof
occurs.
WARNING
There are some small distances imme-
diately before the closed position which
cannot be detected. Make sure that all
passengers have their hands, etc., in-
side the vehicle before closing the sun-
roof.Tilting the sunroofTo tilt up, first close the sunroof, then press the
side of the tilt switch.
To tilt down the sunroof, press the
side of
the tilt switch.
Sun shadeOpen/close the sun shade by sliding it
backward/forward.
SIC0561
Instruments and controls
2-37
Z
01.9.21/R50-D/V5
X
Page 91 of 288

The shade will open automatically when the
sunroof is opened. However, it must be closed
manually.
WARNING
IIn an accident you could be thrown
from the vehicle through an open
sunroof. Always use seat belts and
child restraints.
IDo not allow anyone to stand up or
extend any portion of their body out
of the opening while the vehicle is in
motion or while the sunroof is clos-
ing.
CAUTION
IRemove water drops, snow, ice or
sand from the sunroof before open-
ing.
IDo not place any heavy object on the
sunroof or surrounding area.
If the sunroof does not closeHave your NISSAN dealer check and repair
the sunroof.
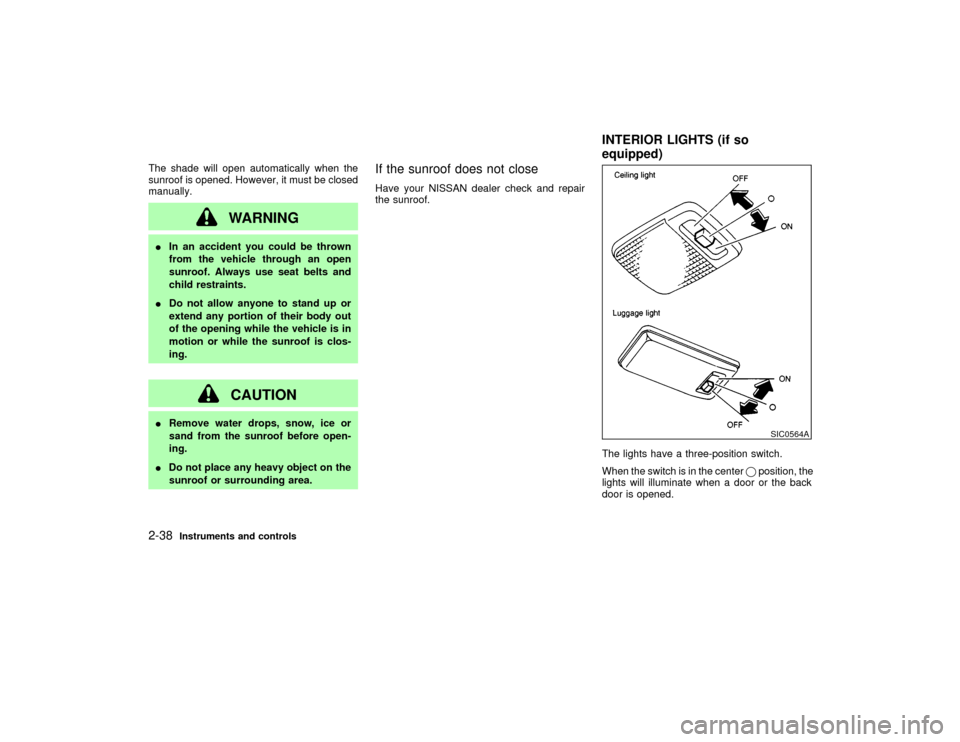
The lights have a three-position switch.
When the switch is in the centerqposition, the
lights will illuminate when a door or the back
door is opened.
SIC0564A
INTERIOR LIGHTS (if so
equipped)
2-38
Instruments and controls
Z
01.9.21/R50-D/V5
X
Page 107 of 288

windows are fully open.
To stop lowering the windows, release the
UNLOCK button.
To start lowering the windows, press the UN-
LOCK button again for 3 more seconds.
This function will operate after the ignition
switch is off and 45 seconds passed or either
the front door is opened.Using the panic alarmIf you are near your vehicle and feel threat-
ened, you may activate the alarm to call atten-
tion as follows:
1. Push the PANIC button on the keyfob for
longer than 0.5 seconds.
2. The theft warning alarm and headlights will
stay on for 30 seconds.
3. The panic alarm stops when:
IIt has run for 30 seconds, or
IThe LOCK or the UNLOCK button is
pressed, or
IThe panic button is pushed on the keyfob
for more than 0.5 seconds.
BATTERY REPLACEMENTReplace the battery as follows:
1. Open the lid using a suitable tool.
2. Replace the battery with a new one.Recommended battery: Sanyo CR2025 or
equivalent
Make sure that theÅside faces the bottom
case.
3. Close the lid securely.
4. Push the keyfob button two or three times
to check its operation.
See your NISSAN dealer if you need any
assistance for replacement.
If the battery is removed for any reason
other than replacement, perform step 4
above.
IBe careful not to touch a circuit board
and a battery terminal.
IAn improperly disposed battery can
harm the environment. Always confirm
local regulations for battery disposal.
IThe keyfob is water-proof; however, if it
does get wet, immediately wipe com-
pletely dry.
IWhen changing batteries, do not let dust
or oil get on the keyfob.
FCC Notice:
Changes or modifications not expressly
approved by the manufacturer compliance
SPA1374
3-8
Pre-driving checks and adjustments
Z
01.9.21/R50-D/V5
X
Page 122 of 288

AIR CONDITIONER OPERATIONStart the engine, move the fan control dial to
the desired (1 to 4) position and push in the air
conditioner button to activate the air condi-
tioner. When the air conditioner is on, cooling
and dehumidifying functions will be added to
the heater operation.
The air conditioner cooling function oper-
ates only when the engine is running.CoolingThis mode is used to cool and dehumidify.
1. Push the air recirculation button to the off
position.
2. Turn the air control dial to the
position.
3. Turn on the fan control dial.
4. Push on the air conditioner button. The
indicator light will come on.
5. Turn the temperature control dial to the
desired position.
IFor quick cooling when the outside tem-
perature is high, push the air recirculation
button to the on position. Be sure to return
the air recirculation button to the off position
for normal cooling.
Dehumidified heatingThis mode is used to heat and dehumidify.
1. Push the air recirculation button to the off
position.
2. Turn the air control dial to the
posi-
tion.
3. Turn on the fan control dial.
4. Push on the air conditioner button. The
indicator light will come on.
5. Turn the temperature control dial to the
desired position.
Dehumidified defoggingThis mode is used to defog the windows and
dehumidify.
1. Push the air recirculation button to the off
position.
2. Turn the air control dial to the
posi-
tion.
3. Turn on the fan control dial.
4. Push on the air conditioner button. The
indicator light will come on.
5. Turn the temperature control dial to the
desired position.
Operating tipsIKeep windows and sun roof closed while
the air conditioner is in operation.
IAfter parking in the sun, drive for two or
three minutes with the windows open to
vent hot air from the passenger compart-
ment. Then, close the windows. This will
allow the air conditioner to cool the interior
more quickly.
IThe air conditioning system should be
operated for about ten minutes at least
once a month. This helps prevent dam-
age to the system due to lack of lubrica-
tion.
IIf the coolant temperature gauge exceeds
the hot position, turn the air conditioner off.
For additional information, see ªIf your ve-
hicle overheatsº in the ª6. In case of emer-
gencyº section.AIR FLOW CHARTSThe following charts show the button and dial
positions formaximum and quickheating,
cooling or defrosting.The air recirculation
switch should always be in the off position
for heating and defrosting.Heater, air conditioner and audio systems
4-5
Z
01.9.21/R50-D/V5
X
Page 154 of 288

fastened. This will keep you and your
passengers in position when driving
over rough terrain.
IBefore driving up or down grades,
check the road surface for bumps or
potholes. Be sure to climb a gentle
slope and descend a gentle slope.
IDo not drive across steep slopes.
Instead drive either straight up or
straight down the slopes. Off-road
vehicles can tip over sideways much
more easily than they can forward or
backward.
IMany hills are too steep for any ve-
hicle. If you drive up them, you may
stall. If you drive down them, you may
not be able to control your speed. If
you drive across them, you may roll
over.
IDo not shift gears while driving on
downhill grades as this could cause
loss of control of the vehicle.
IBe sure to use the engine brake. The
foot brake performance may be re-duced, resulting in a possible acci-
dent.
IStay alert when driving to the top of a
hill. At the top there could be a drop-
off or other hazard that could cause
an accident.
IStay alert when driving to the top of a
hill. At the top there could be a drop-
off or other hazard that could cause
an accident.
IIf your engine stalls or you cannot
make it to the top of a steep hill, never
attempt to turn around. Your vehicle
could tip or roll over. Always back
straight down in R (Reverse) gear.
Never back down in N (Neutral) or
with the clutch depressed (manual
transmission vehicles), using only
the brake, as this could cause loss of
control.
IHeavy braking going down a hill
could cause your brakes to overheat
and fade, resulting in loss of control
and an accident. Apply brakes lightlyand use a low gear to control your
speed.
IUnsecured cargo can be thrown
around when driving over rough ter-
rain. Properly secure all cargo so it
will not be thrown forward and cause
injury to you or your passengers.
ITo avoid raising the center of gravity
excessively, do not exceed the rated
capacity of the roof rack and evenly
distribute the load. Secure heavy
loads in the cargo area as far forward
and as low as possible. Do not equip
the vehicle with tires larger than
specified in this manual. This could
cause your vehicle to roll over.
IDo not grip the inside or spokes of
the steering wheel when driving of-
froad. The steering wheel could move
suddenly and injure your hands. In-
stead drive with your fingers and
thumbs on the outside of the rim.
IBefore operating the vehicle, ensure
that the driver and all passengers
Starting and driving
5-5
Z
01.9.21/R50-D/V5
X