2002 NISSAN PATHFINDER ESP
[x] Cancel search: ESPPage 22 of 288

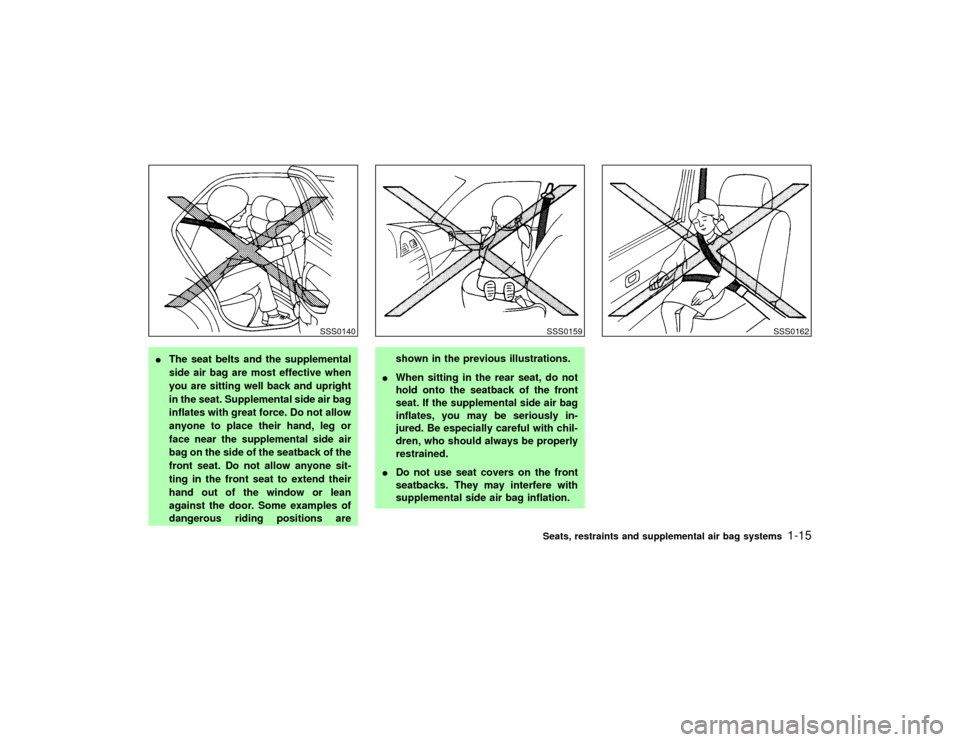
IThe seat belts and the supplemental
side air bag are most effective when
you are sitting well back and upright
in the seat. Supplemental side air bag
inflates with great force. Do not allow
anyone to place their hand, leg or
face near the supplemental side air
bag on the side of the seatback of the
front seat. Do not allow anyone sit-
ting in the front seat to extend their
hand out of the window or lean
against the door. Some examples of
dangerous riding positions areshown in the previous illustrations.
IWhen sitting in the rear seat, do not
hold onto the seatback of the front
seat. If the supplemental side air bag
inflates, you may be seriously in-
jured. Be especially careful with chil-
dren, who should always be properly
restrained.
IDo not use seat covers on the front
seatbacks. They may interfere with
supplemental side air bag inflation.
SSS0140
SSS0159
SSS0162
Seats, restraints and supplemental air bag systems
1-15
Z
01.9.21/R50-D/V5
X
Page 31 of 288

hicle than there are seat belts.
IIf the seat belt warning light glows
continuously while the ignition is
turned ON with all doors closed and
all seat belts fastened, it may indicate
a malfunction in the system. Have the
system checked by your NISSAN
dealer.
IOnce the pre-tensioner seat belt has
activated, it cannot be reused and
must be replaced together with the
retractor. See your NISSAN dealer.
IRemoval and installation of the pre-
tensioner seat belt system compo-
nents should be done by an autho-
rized NISSAN dealer.
IAll seat belt assemblies including re-
tractors and attaching hardware
should be inspected after any colli-
sion by your NISSAN dealer. NISSAN
recommends that all seat belt assem-
blies in use during a collision be
replaced unless the collision was mi-
nor and the belts show no damageand continue to operate properly.
Seat belt assemblies not in use dur-
ing a collision should also be in-
spected and replaced if either dam-
age or improper operation is noted.
IAll child restraints and attaching
hardware should be inspected after
any collision. Always follow the re-
straint manufacturer's inspection in-
structions and replacement recom-
mendations. The child restraints
should be replaced if they are dam-
aged.
CHILD SAFETYChildren need adults to help protect them.
They need to be properly restrained.
The proper restraint depends on the child's
size. Generally, infants (up to about 1 year and
less than 20 lb (9 kg)) should be placed in rear
facing child restraints. Front facing child re-
straints are available for children who outgrow
rear facing child restraints.
WARNING
Infants and children need special pro-
tection. The vehicle's seat belts may not
fit them properly. The shoulder belt may
come too close to the face or neck. The
lap belt may not fit over their small hip
bones. In an accident, an improperly
fitting seat belt could cause serious or
fatal injury. Always use appropriate child
restraints.
All US states and provinces of Canada require
the use of approved child restraints for infants
and small children. See ªChild restraintsº later
in this section.
In addition, there are many types of child
restraints available for larger children which
should be used for maximum protection.
NISSAN recommends that all preteens and
children be restrained in the rear seat if
possible. According to accident statistics,
children are safer when properly restrained
in the rear seat than in the front seat.
This is especially important because your
vehicle has a Supplemental Restraint Sys-
1-24
Seats, restraints and supplemental air bag systems
Z
01.9.21/R50-D/V5
X
Page 70 of 288

with the key or keyfob. The alarm will not stop
if the ignition switch is turned to ACC or ON.
The alarm may be activated when the glass
hatch is opened quickly with a key after the
alarm has been set.
If the system does not operate as de-
scribed above, have it checked by your
NISSAN dealer.NISSAN VEHICLE IMMOBILIZER
SYSTEMThe Nissan Vehicle Immobilizer System will
not allow the engine to start without the use of
the registered Nissan Vehicle Immobilizer Sys-
tem key.
If the engine fails to start using the registered
Nissan Vehicle Immobilizer System key (for
example, when interference is caused by an-
other Nissan Vehicle Immobilizer System key,
an automated toll road device or automated
payment device on the key ring), restart the
engine using the following procedures:
1. Leave the ignition switch in the ON position
for approximately 5 seconds.
2. Turn the ignition switch to the OFF or LOCK
position, and wait approximately 10 sec-
onds.3. Repeat step 1 and 2.
4. Restart the engine while holding the device
(which may have caused the interference)
separate from the registered Nissan Ve-
hicle Immobilizer System key.
If the no start condition re-occurs, NISSAN
recommends placing the registered Nissan
Vehicle Immobilizer System key on a separate
key ring to avoid interference from other de-
vices.
Statement related to section 15 of FCC
rules for Nissan Vehicle Immobilizer Sys-
tem
(CONT ASSY - IMMOBILIZER)
This device complies with part 15 of the
FCC Rules and RSS-210 of Industry
Canada. Operation is subject to the follow-
ing two conditions;
(1) This device may not cause harmful
interference, and (2) this device must ac-
cept any interference received, including
interference that may cause undesired op-
eration of the device.
CHANGES OR MODIFICATIONS NOT EX-
PRESSLY APPROVED BY THE MANUFAC-
TURE RESPONSIBLE FOR COMPLIANCE
COULD VOID THE USER'S AUTHORITY TO
OPERATE THE EQUIPMENT.
Security indicator lightThis light blinks whenever the ignition switch is
in the LOCK, OFF or ACC position. This
function indicates the security systems
equipped on the vehicle are operational.
If the Nissan Vehicle Immobilizer System is
malfunctioning, this light will remain on while
the ignition key is in the ON position.
If the light still remains on and/or the en-
gine will not start, see your NISSAN dealer
for Nissan Vehicle Immobilizer System ser-
vice as soon as possible. Please bring all
Nissan Vehicle Immobilizer System keys
that you have when visiting your NISSAN
dealer for service.
Instruments and controls
2-17
Z
01.9.21/R50-D/V5
X
Page 88 of 288

POWER WINDOWS
WARNING
IMake sure that all passengers have
their hands, etc. inside the vehicle
before closing the windows. Use the
window lock switch to prevent unex-
pected use of the power windows.
IDo not leave children unattended in-
side the vehicle. They could unknow-ingly activate switches or controls
and become trapped in a window.
Unattended children could become
involved in serious accidents.
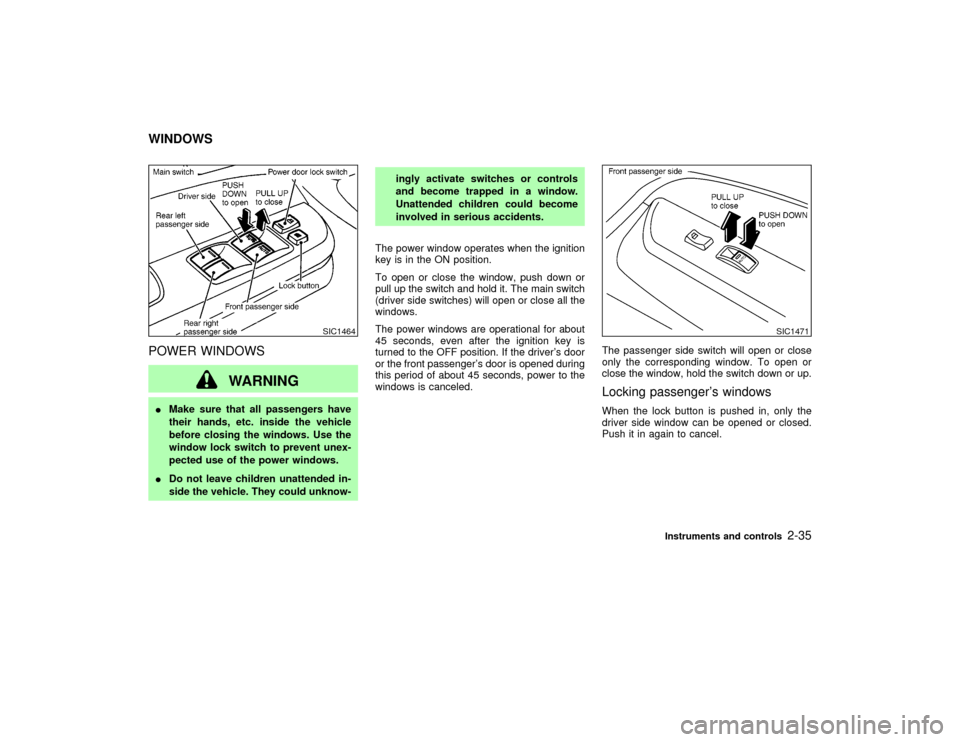
The power window operates when the ignition
key is in the ON position.
To open or close the window, push down or
pull up the switch and hold it. The main switch
(driver side switches) will open or close all the
windows.
The power windows are operational for about
45 seconds, even after the ignition key is
turned to the OFF position. If the driver's door
or the front passenger's door is opened during
this period of about 45 seconds, power to the
windows is canceled.The passenger side switch will open or close
only the corresponding window. To open or
close the window, hold the switch down or up.
Locking passenger's windowsWhen the lock button is pushed in, only the
driver side window can be opened or closed.
Push it in again to cancel.
SIC1464
SIC1471
WINDOWS
Instruments and controls
2-35
Z
01.9.21/R50-D/V5
X
Page 96 of 288

2. Press the training button on the garage
door opener motor unit (which may activate
a training light).
NOTE:
Following step 2, there are 30 seconds
in which to initiate step 3.
3. Firmly press and release the programmed
HomeLink
button. Press and release the
HomeLinkbutton a second time to com-
plete the training process. (Some garage
door openers may require you to do this
procedure a third time to complete the
training.)
The garage door opener should now recognize
the HomeLinkUniversal Transceiver and ac-
tivate when the HomeLink
button is pressed.
The remaining two buttons may now be pro-
grammed (if not yet programmed, follow steps
2 through 4 in the ªProgramming HomeLink
º
procedures earlier in this section).
REPROGRAMMING A SINGLE
HomeLink
BUTTON
To reprogram an HomeLink
Universal Trans-
ceiver button, complete the following.
1. Press and hold the desired HomeLink
button.Do notrelease the button until step
4 has been completed.2. When the indicator light begins to flash
slowly (after 20 seconds), position the
hand-held transmitter 2 to 5 inches (50 to
127 mm) away from the HomeLink
sur-
face.
3. Press and hold the hand-held transmitter
button.
4. The HomeLink
indicator light will flash,
first slowly and then rapidly. When the
indicator light begins to flash rapidly, re-
lease both buttons.
The HomeLink
Universal Transceiver button
has now been reprogrammed. The new device
can be activated by pushing the HomeLink
button that was just programmed. This proce-
dure will not affect any other programmed
HomeLink
buttons.
IF YOUR VEHICLE IS STOLENIf your vehicle is stolen, you should change the
codes of any non-rolling code device that has
been programmed into HomeLink
. Consult
the Owner's Manual of each device or call the
manufacturer or dealer of those devices for
additional information.
When your vehicle is recovered, you will
need to reprogram the HomeLinkUniver-
sal Transceiver with your new transmitter
information.FCC Notice:
This device complies with FCC rules part
15. Operation is subject to the following
two conditions: (1) This device may not
cause harmful interference and (2) This
device must accept any interference that
may be received, including interference
that may cause undesired operation.
The transmitter has been tested and com-
plies with FCC and DOC/MDC rules.
Changes or modifications not expressly
approved by the party responsible for com-
pliance could void the user's authority to
operate the device.
DOC: ISTC 1763K1313
FCC I.D.: CB2V67690
Instruments and controls
2-43
Z
01.9.21/R50-D/V5
X
Page 102 of 288

LOCKING WITH KEY
ManualTo lock the door, turn the key towards the front
of the vehicle. To unlock, turn it towards the
rear.PowerThe power door lock system allows you to lock
or unlock all doors including the back door
simultaneously.
ITurning the driver's door key to the front of
the vehicle will lock all doors.ITurning the driver's door key one time to
the rear of the vehicle will unlock the corre-
sponding door. From that position, return-
ing the key to neutral (where the key can
only be removed and inserted.) and turning
it to the rear again within 5 seconds will
unlock all doors.
FRONT WINDOW OPEN/CLOSE
WITH KEYTurn the driver's door key to the unlock posi-
tion and hold for about 1 second, the front
windows will begin to lower.
To stop opening, turn the key to the neutral
position.
To close the front windows with the door key
cylinder, turn the key to the lock position and
hold for about 1 second.
To stop closing, turn the key to the neutral
position.
In the event of a hand in the way, or other
obstruction, the auto reverse function will acti-
vate.
LOCKING WITH INSIDE LOCK
KNOBPushing or pulling the door inside lock knob to
the lock or unlock will lock or unlock the
corresponding door.
To lock from the outside without a key, move
the inside lock knob to the LOCK position.
Then close the door. When locking the door
this way, be certain not to leave the key inside
the vehicle.
SPA0383
PD1160M
Pre-driving checks and adjustments
3-3
Z
01.9.21/R50-D/V5
X
Page 103 of 288

LOCKING WITH POWER DOOR
LOCK SWITCH (if so equipped)Operating the lock-unlock switch will lock or
unlock all doors including the back door simul-
taneously.
All door locks will be engaged when the power
door lock switch is moved to the LOCK posi-
tion with the driver's or front passenger's door
open. Then close the door and all doors will be
locked.
When the power door lock switch is moved to
the LOCK position while any front doors is
open and a key is in the ignition switch, alldoors will lock once and then unlock automati-
cally.
CHILD SAFETY REAR DOOR
LOCKChild safety locking helps prevent doors from
being opened accidentally, especially when
small children are in the vehicle.
When the lever is in the lock position, the
rear door can be opened only from the
outside.
SPA0944
SPA0841
3-4
Pre-driving checks and adjustments
Z
01.9.21/R50-D/V5
X
Page 109 of 288

WARNING
Do not drive with the rear door open.
This could allow dangerous exhaust
gases to be drawn into the vehicle. See
ªPrecautions when starting and drivingº
in the ª5. Starting and drivingº section
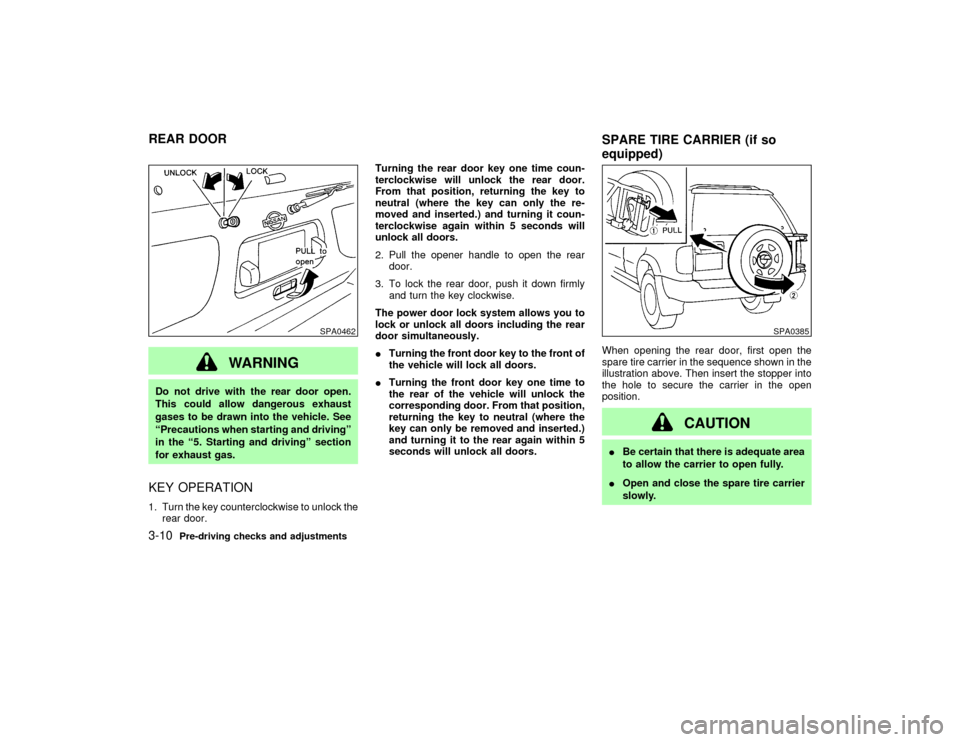
for exhaust gas.KEY OPERATION1. Turn the key counterclockwise to unlock the
rear door.Turning the rear door key one time coun-
terclockwise will unlock the rear door.
From that position, returning the key to
neutral (where the key can only the re-
moved and inserted.) and turning it coun-
terclockwise again within 5 seconds will
unlock all doors.
2. Pull the opener handle to open the rear
door.
3. To lock the rear door, push it down firmly
and turn the key clockwise.
The power door lock system allows you to
lock or unlock all doors including the rear
door simultaneously.
ITurning the front door key to the front of
the vehicle will lock all doors.
ITurning the front door key one time to
the rear of the vehicle will unlock the
corresponding door. From that position,
returning the key to neutral (where the
key can only be removed and inserted.)
and turning it to the rear again within 5
seconds will unlock all doors.When opening the rear door, first open the
spare tire carrier in the sequence shown in the
illustration above. Then insert the stopper into
the hole to secure the carrier in the open
position.
CAUTION
IBe certain that there is adequate area
to allow the carrier to open fully.
IOpen and close the spare tire carrier
slowly.
SPA0462
SPA0385
REAR DOOR
SPARE TIRE CARRIER (if so
equipped)3-10
Pre-driving checks and adjustments
Z
01.9.21/R50-D/V5
X