2002 NISSAN PATHFINDER ECU
[x] Cancel search: ECUPage 191 of 288
the vehicle to move. This is especially
true for vehicle with limited slip dif-
ferential carriers.
IDo not allow passengers to stay in
the vehicle while it is on the jack.
Carefully read the following instructions.
1. Place the jack directly under the jack-up
point.
The jack should be used on level firm
ground.
2. Loosen each wheel nut one or two turns by
turning counterclockwise with the wheel nut
wrench.
Do not remove the wheel nuts until the tire
is off the ground.
3. Carefully raise the vehicle until the tire
clears the ground. To lift the vehicle, se-
curely hold the jack lever and rod with both
hands as shown above. Remove the wheel
nuts, and then remove the wheel. Do not
remove the brake drum with the wheel.
Installing the spare tire1. Clean any mud or dirt from the surface
between the wheel and hub.
2. Carefully put the wheel on and tighten the
wheel nuts finger tight.
3. With the wheel nut wrench, tighten wheel
nuts alternately and evenly until they are
tight.
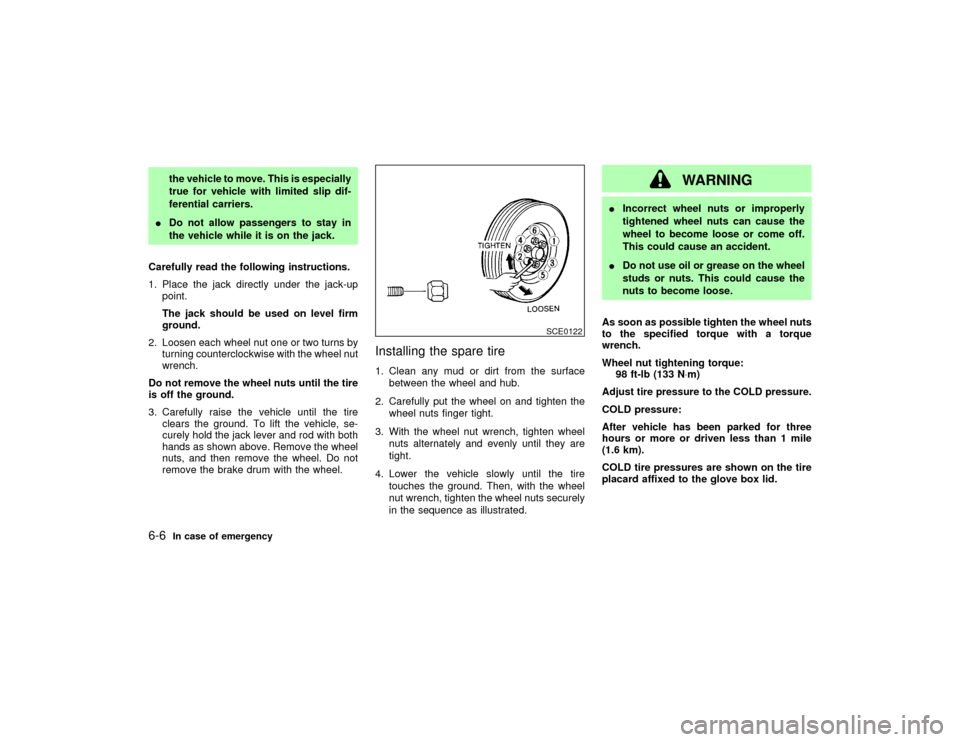
4. Lower the vehicle slowly until the tire
touches the ground. Then, with the wheel
nut wrench, tighten the wheel nuts securely
in the sequence as illustrated.
WARNING
IIncorrect wheel nuts or improperly
tightened wheel nuts can cause the
wheel to become loose or come off.
This could cause an accident.
IDo not use oil or grease on the wheel
studs or nuts. This could cause the
nuts to become loose.
As soon as possible tighten the wheel nuts
to the specified torque with a torque
wrench.
Wheel nut tightening torque:
98 ft-lb (133 N×m)
Adjust tire pressure to the COLD pressure.
COLD pressure:
After vehicle has been parked for three
hours or more or driven less than 1 mile
(1.6 km).
COLD tire pressures are shown on the tire
placard affixed to the glove box lid.
SCE0122
6-6
In case of emergency
Z
01.9.21/R50-D/V5
X
Page 192 of 288
WARNING
Retighten the wheel nuts when the ve-
hicle has been driven for 600 miles
(1,000 km) (also in cases of a flat tire,
etc.).
5. Securely store the spare tire and jacking
equipment in the vehicle.
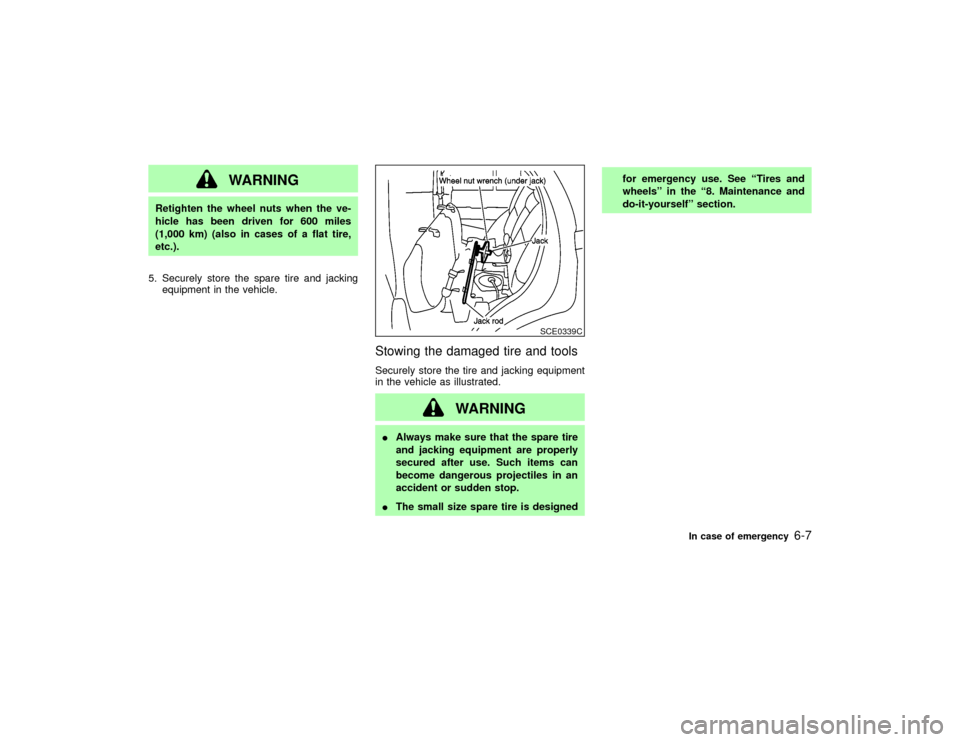
Stowing the damaged tire and toolsSecurely store the tire and jacking equipment
in the vehicle as illustrated.
WARNING
IAlways make sure that the spare tire
and jacking equipment are properly
secured after use. Such items can
become dangerous projectiles in an
accident or sudden stop.
IThe small size spare tire is designedfor emergency use. See ªTires and
wheelsº in the ª8. Maintenance and
do-it-yourselfº section.
SCE0339C
In case of emergency
6-7
Z
01.9.21/R50-D/V5
X
Page 198 of 288
TOWING RECOMMENDED BY
NISSAN
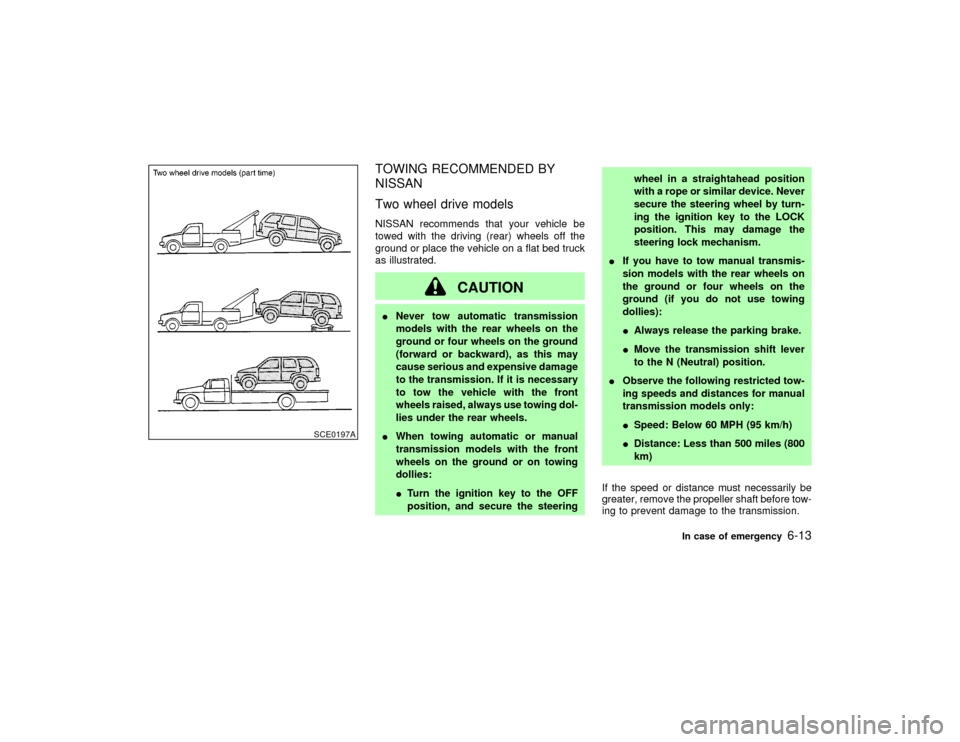
Two wheel drive modelsNISSAN recommends that your vehicle be
towed with the driving (rear) wheels off the
ground or place the vehicle on a flat bed truck
as illustrated.
CAUTION
INever tow automatic transmission
models with the rear wheels on the
ground or four wheels on the ground
(forward or backward), as this may
cause serious and expensive damage
to the transmission. If it is necessary
to tow the vehicle with the front
wheels raised, always use towing dol-
lies under the rear wheels.
IWhen towing automatic or manual
transmission models with the front
wheels on the ground or on towing
dollies:
ITurn the ignition key to the OFF
position, and secure the steeringwheel in a straightahead position
with a rope or similar device. Never
secure the steering wheel by turn-
ing the ignition key to the LOCK
position. This may damage the
steering lock mechanism.
IIf you have to tow manual transmis-
sion models with the rear wheels on
the ground or four wheels on the
ground (if you do not use towing
dollies):
IAlways release the parking brake.
IMove the transmission shift lever
to the N (Neutral) position.
IObserve the following restricted tow-
ing speeds and distances for manual
transmission models only:
ISpeed: Below 60 MPH (95 km/h)
IDistance: Less than 500 miles (800
km)
If the speed or distance must necessarily be
greater, remove the propeller shaft before tow-
ing to prevent damage to the transmission.
SCE0197A
In case of emergency
6-13
Z
01.9.21/R50-D/V5
X
Page 199 of 288
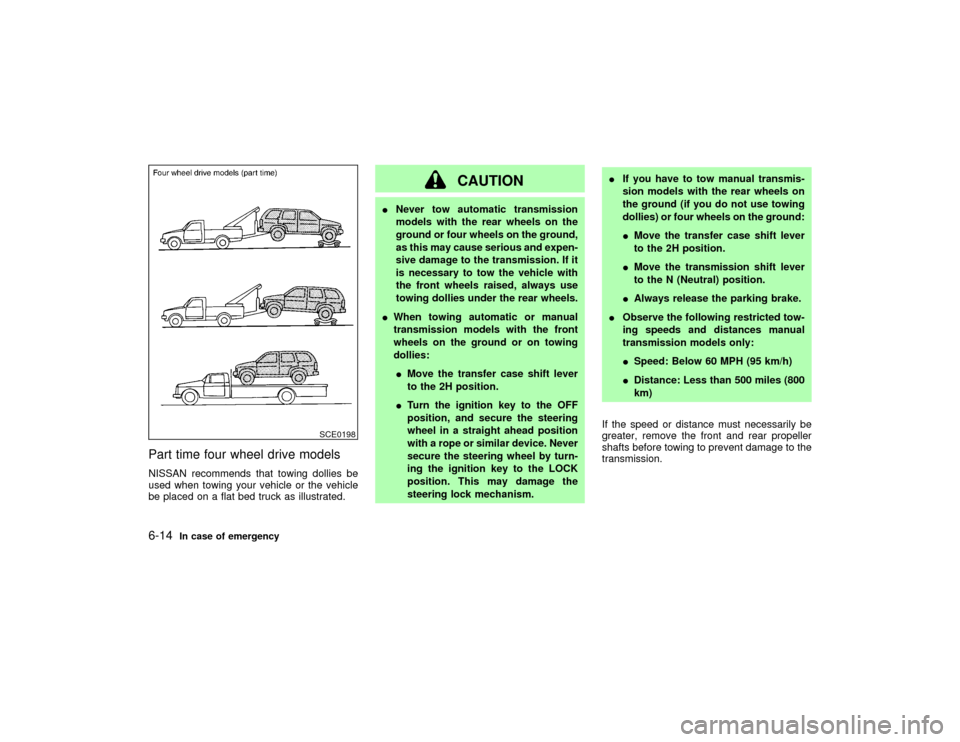
Part time four wheel drive modelsNISSAN recommends that towing dollies be
used when towing your vehicle or the vehicle
be placed on a flat bed truck as illustrated.
CAUTION
INever tow automatic transmission
models with the rear wheels on the
ground or four wheels on the ground,
as this may cause serious and expen-
sive damage to the transmission. If it
is necessary to tow the vehicle with
the front wheels raised, always use
towing dollies under the rear wheels.
IWhen towing automatic or manual
transmission models with the front
wheels on the ground or on towing
dollies:
IMove the transfer case shift lever
to the 2H position.
ITurn the ignition key to the OFF
position, and secure the steering
wheel in a straight ahead position
with a rope or similar device. Never
secure the steering wheel by turn-
ing the ignition key to the LOCK
position. This may damage the
steering lock mechanism.IIf you have to tow manual transmis-
sion models with the rear wheels on
the ground (if you do not use towing
dollies) or four wheels on the ground:
IMove the transfer case shift lever
to the 2H position.
IMove the transmission shift lever
to the N (Neutral) position.
IAlways release the parking brake.
IObserve the following restricted tow-
ing speeds and distances manual
transmission models only:
ISpeed: Below 60 MPH (95 km/h)
IDistance: Less than 500 miles (800
km)
If the speed or distance must necessarily be
greater, remove the front and rear propeller
shafts before towing to prevent damage to the
transmission.
SCE0198
6-14
In case of emergency
Z
01.9.21/R50-D/V5
X
Page 212 of 288

Wheel nuts*:
When checking the tires, make sure no nuts
are missing, and check for any loose nuts.
Tighten if necessary.
Tire rotation*:
Tires should be rotated every 7,500 miles
(12,000 km). However, the timing for tire rota-
tion may vary according to your driving habits
and road surface conditions.
Wheel alignment and balance:
If the vehicle should pull to either side while
driving on a straight and level road, or if you
detect uneven or abnormal tire wear, there
may be a need for wheel alignment.
If the steering wheel or seat vibrates at normal
highway speeds, wheel balancing may be
needed.
For additional information regarding tires, refer
to ªImportant Tire Safety Informationº in the
Warranty Information Booklet (US) or ªTire
Safety Informationº in the Warranty Informa-
tion booklet (Canada).
Windshield:Clean the windshield on a regu-
lar basis. Check the windshield at least every
six months for cracks or other damage. Have a
damaged windshield repaired by a qualified
repair facility.Windshield wiper blades*:
Check for cracks or wear if they do not wipe
properly.
Doors and engine hood:
Check that all doors and the engine hood,
operate properly. Also ensure that all latches
lock securely. Lubricate hinges, latches, rollers
and links if necessary. Make sure that the
secondary latch keeps the hood from opening
when the primary latch is released.
When driving in areas using road salt or other
corrosive materials, check lubrication fre-
quently.
Inside the vehicleLights*:
Clean the headlights on a regular basis. Make
sure that the headlights, stop lights, tail lights,
turn signal lights, and other lights are all oper-
ating properly and installed securely. Also
check headlight aim.INTERIOR MAINTENANCEThe maintenance items listed here should be
checked on a regular basis, such as when
performing periodic maintenance, cleaning the
vehicle, etc.Warning lights and chimes:
Make sure that all warning lights and chimes
are operating properly.
Windshield wiper and washer*:
Check that the wipers and washer operate
properly and that the wipers do not streak.
Windshield defroster:
Check that the air comes out of the defroster
outlets properly and in sufficient quantity when
operating the heater or air conditioner.
Steering wheel:
Check for changes in the steering conditions,
such as excessive freeplay, hard steering or
strange noises.
Seats:
Check seat position controls such as seat
adjusters, seatback recliner, etc. to ensure
they operate smoothly and that all latches lock
securely in every position. Check that the head
restraints move up and down smoothly and
that the locks (if so equipped) hold securely in
all latched positions.
Seat belts:
Check that all parts of the seat belt system
(e.g. buckles, anchors, adjusters and retrac-
Maintenance and do-it-yourself
8-3
Z
01.9.21/R50-D/V5
X
Page 213 of 288

tors) operate properly and smoothly, and are
installed securely. Check the belt webbing for
cuts, fraying, wear or damage.
Accelerator pedal:
Check the pedal for smooth operation and
make sure the pedal does not catch or require
uneven effort. Keep the floor mats away from
the pedal.
Clutch pedal*:
Make sure the pedal operates smoothly and
check that it has the proper free travel.
Brakes:
Check that the brakes do not pull the vehicle to
one side when applied.
Brake pedal and booster*:
Check the pedal for smooth operation and
make sure it has the proper distance under it
when depressed fully. Check the brake
booster function. Be certain to keep floormats
away from the pedal.
Parking brake*:
Check that the lever has the proper travel and
confirm that your vehicle is held securely on a
fairly steep hill with only the parking brake
applied.Automatic transmission P (Park) position
mechanism:
On a fairly steep hill check that your vehicle is
held securely with the selector lever in the P
position without applying any brakes.
Under the hood and vehicleThe maintenance items listed here should be
checked periodically e.g. each time you check
the engine oil or refuel.
Windshield washer fluid*:
Check that there is adequate fluid in the tank.
Engine oil level*:
Check the level after parking the vehicle on a
level spot and turning off the engine. (Be sure
to wait a few minutes to allow the oil to drain
back into the sump.)
Brake and clutch fluid levels*:
Make sure that the brake and clutch fluid level
is between the MAX and MIN lines on the
reservoir.
Power steering fluid level* and lines:
Check the level when the fluid is cold and the
engine is turned off. Check the lines for proper
attachment, leaks, cracks, etc.Automatic transmission fluid level*:
Check the level after putting the selector lever
in P (Park) with the engine idling.
Engine coolant level*:
Check the coolant level when the engine is
cold.
Radiator and hoses:
Check the front of the radiator and clean off
any dirt, insects, leaves, etc., that may have
accumulated. Make sure the hoses have no
cracks, deformation, rot or loose connections.
Engine drive belts*:
Make sure that no belt is frayed, worn, cracked
or oily.
Battery*:
Check the fluid level in each cell. It should be
between the MAX and MIN lines.
Vehicles operated in high temperatures or
under severe conditions require frequent
checks of the battery fluid level.
Exhaust system:
Make sure there are no loose supports, cracks
or holes. If the sound of the exhaust seems
unusual or there is a smell of exhaust fumes,
immediately locate the trouble and correct it.
8-4
Maintenance and do-it-yourself
Z
01.9.21/R50-D/V5
X
Page 214 of 288
See ªPrecautions when starting and drivingº in
the ª5. Starting and drivingº section for exhaust
gas (carbon monoxide).
Underbody:
The underbody is frequently exposed to corro-
sive substances such as those used on icy
roads or to control dust. It is very important to
remove these substances, otherwise rust will
form on the floor pan, frame, fuel lines and
around the exhaust system. At the end of
winter, the underbody should be thoroughly
flushed with plain water, being careful to clean
those areas where mud and dirt may accumu-
late. For additional information, see ªCleaning
exteriorº in the ª7. Appearance and careº sec-
tion.
Fluid leaks:
Check under the vehicle for fuel, oil, water or
other fluid leaks after the vehicle has been
parked for a while. Water dripping from the air
conditioner after use is normal. If you should
notice any leaks or if gasoline fumes are
evident, check for the cause and have it cor-
rected immediately.When performing any inspection or mainte-
nance work on your vehicle, always take care
to prevent serious accidental injury to yourself
or damage to the vehicle. The following are
general precautions which should be closely
observed.
WARNING
IPark the vehicle on a level surface,
apply the parking brake securely and
block the wheels to prevent the ve-
hicle from moving. For a manual
transmission, move the shift lever to
Neutral. For an automatic transmis-
sion, move the selector lever to the P
(Park) position.
IBe sure the ignition key is in the OFF
or LOCK position when performing
any replacement or repair.
IIf you must work with the engine
running, keep your hands, clothing,
hair and tools away from moving fans
belts and any other moving parts.
IIt is advisable to secure or remove
any loose clothing and any jewelry,such as rings, watches, etc. before
working on your vehicle.
IAlways wear eye protection when-
ever you work on your vehicle.
IIf you must run the engine in an
enclosed space such as a garage, be
sure there is proper ventilation for
exhaust gases to escape.
INever get under the vehicle while it is
supported only by a jack. If it is nec-
essary to work under the vehicle,
support it with safety stands.
IKeep smoking materials, flame and
sparks away from fuel and battery.
IYour vehicle is equipped with an au-
tomatic engine cooling fan. It may
come on at any time without warning,
even if the ignition key is in the OFF
position and the engine is not run-
ning. To avoid injury, always discon-
nect the negative battery cable before
working near the fan.
IOn gasoline engine models with theMAINTENANCE PRECAUTIONS
Maintenance and do-it-yourself
8-5
Z
01.9.21/R50-D/V5
X
Page 221 of 288

3. Open the air release plug(s) to drain the
coolant.
4. Flush the cooling system by running fresh
water through the radiator.
IWaste coolant must be disposed of
properly.
ICheck your local regulations.
5. Close the radiator drain plugs and engine
block drain plugs securely.
6. See the ª9. Technical and consumer infor-
mationº section for cooling system capacity.
Fill the radiator slowly with the proper mix-ture of coolant and water. Fill the reservoir
tank slowly up to the MAX level. Then install
the radiator cap and close the air release
plug(s).
7. Start the engine and warm it up until it
reaches normal operating temperature.
Then race the engine 2 or 3 times under no
load.
Watch the coolant temperature gauge for
signs of overheating.
8. Stop the engine. After it completely cools
down, refill the radiator up to the filler
opening. Fill the reservoir tank up the MAX
level.
9. Check the radiator drain plug and engine
block drain plugs for any sign of leakage.
SDI1110SDI1189
SDI0419
8-12
Maintenance and do-it-yourself
Z
01.9.21/R50-D/V5
X