2002 NISSAN PATHFINDER ECU
[x] Cancel search: ECUPage 70 of 288

with the key or keyfob. The alarm will not stop
if the ignition switch is turned to ACC or ON.
The alarm may be activated when the glass
hatch is opened quickly with a key after the
alarm has been set.
If the system does not operate as de-
scribed above, have it checked by your
NISSAN dealer.NISSAN VEHICLE IMMOBILIZER
SYSTEMThe Nissan Vehicle Immobilizer System will
not allow the engine to start without the use of
the registered Nissan Vehicle Immobilizer Sys-
tem key.
If the engine fails to start using the registered
Nissan Vehicle Immobilizer System key (for
example, when interference is caused by an-
other Nissan Vehicle Immobilizer System key,
an automated toll road device or automated
payment device on the key ring), restart the
engine using the following procedures:
1. Leave the ignition switch in the ON position
for approximately 5 seconds.
2. Turn the ignition switch to the OFF or LOCK
position, and wait approximately 10 sec-
onds.3. Repeat step 1 and 2.
4. Restart the engine while holding the device
(which may have caused the interference)
separate from the registered Nissan Ve-
hicle Immobilizer System key.
If the no start condition re-occurs, NISSAN
recommends placing the registered Nissan
Vehicle Immobilizer System key on a separate
key ring to avoid interference from other de-
vices.
Statement related to section 15 of FCC
rules for Nissan Vehicle Immobilizer Sys-
tem
(CONT ASSY - IMMOBILIZER)
This device complies with part 15 of the
FCC Rules and RSS-210 of Industry
Canada. Operation is subject to the follow-
ing two conditions;
(1) This device may not cause harmful
interference, and (2) this device must ac-
cept any interference received, including
interference that may cause undesired op-
eration of the device.
CHANGES OR MODIFICATIONS NOT EX-
PRESSLY APPROVED BY THE MANUFAC-
TURE RESPONSIBLE FOR COMPLIANCE
COULD VOID THE USER'S AUTHORITY TO
OPERATE THE EQUIPMENT.
Security indicator lightThis light blinks whenever the ignition switch is
in the LOCK, OFF or ACC position. This
function indicates the security systems
equipped on the vehicle are operational.
If the Nissan Vehicle Immobilizer System is
malfunctioning, this light will remain on while
the ignition key is in the ON position.
If the light still remains on and/or the en-
gine will not start, see your NISSAN dealer
for Nissan Vehicle Immobilizer System ser-
vice as soon as possible. Please bring all
Nissan Vehicle Immobilizer System keys
that you have when visiting your NISSAN
dealer for service.
Instruments and controls
2-17
Z
01.9.21/R50-D/V5
X
Page 84 of 288
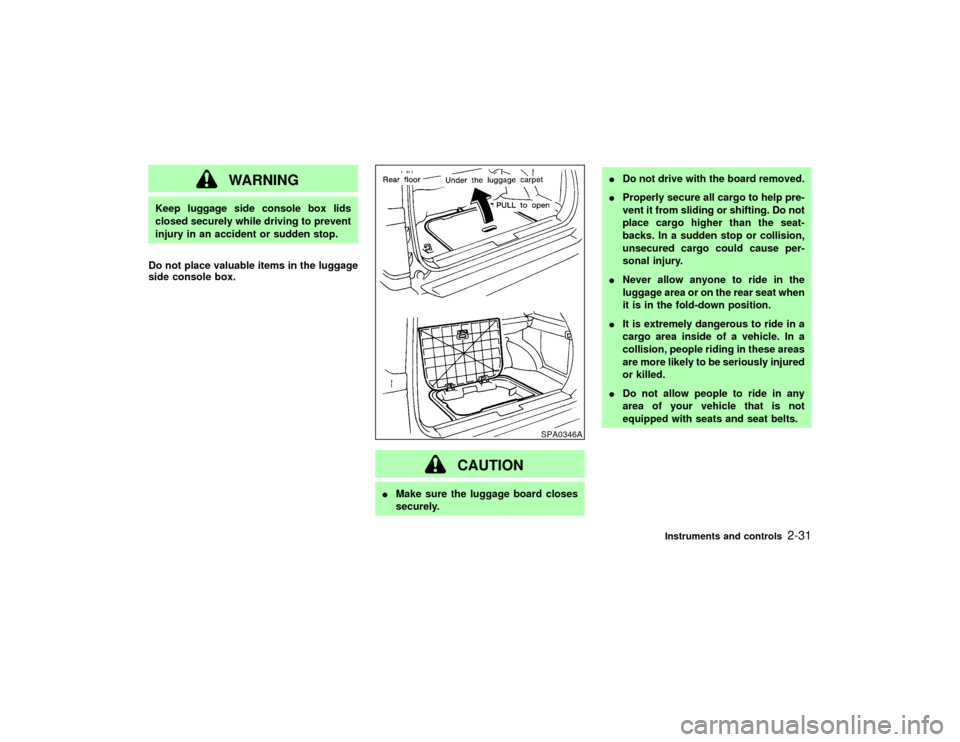
WARNING
Keep luggage side console box lids
closed securely while driving to prevent
injury in an accident or sudden stop.
Do not place valuable items in the luggage
side console box.
CAUTION
IMake sure the luggage board closes
securely.IDo not drive with the board removed.
IProperly secure all cargo to help pre-
vent it from sliding or shifting. Do not
place cargo higher than the seat-
backs. In a sudden stop or collision,
unsecured cargo could cause per-
sonal injury.
INever allow anyone to ride in the
luggage area or on the rear seat when
it is in the fold-down position.
IIt is extremely dangerous to ride in a
cargo area inside of a vehicle. In a
collision, people riding in these areas
are more likely to be seriously injured
or killed.
IDo not allow people to ride in any
area of your vehicle that is not
equipped with seats and seat belts.
SPA0346A
Instruments and controls
2-31
Z
01.9.21/R50-D/V5
X
Page 85 of 288
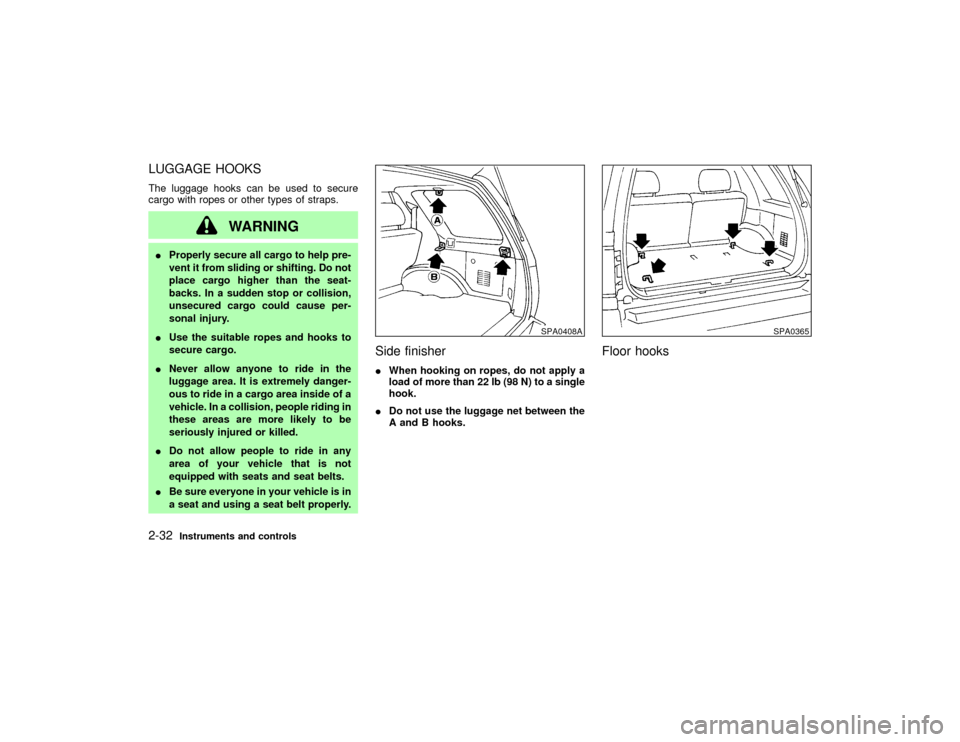
LUGGAGE HOOKSThe luggage hooks can be used to secure
cargo with ropes or other types of straps.
WARNING
IProperly secure all cargo to help pre-
vent it from sliding or shifting. Do not
place cargo higher than the seat-
backs. In a sudden stop or collision,
unsecured cargo could cause per-
sonal injury.
IUse the suitable ropes and hooks to
secure cargo.
INever allow anyone to ride in the
luggage area. It is extremely danger-
ous to ride in a cargo area inside of a
vehicle. In a collision, people riding in
these areas are more likely to be
seriously injured or killed.
IDo not allow people to ride in any
area of your vehicle that is not
equipped with seats and seat belts.
IBe sure everyone in your vehicle is in
a seat and using a seat belt properly.
Side finisherIWhen hooking on ropes, do not apply a
load of more than 22 lb (98 N) to a single
hook.
IDo not use the luggage net between the
A and B hooks.
Floor hooks
SPA0408A
SPA0365
2-32
Instruments and controls
Z
01.9.21/R50-D/V5
X
Page 86 of 288
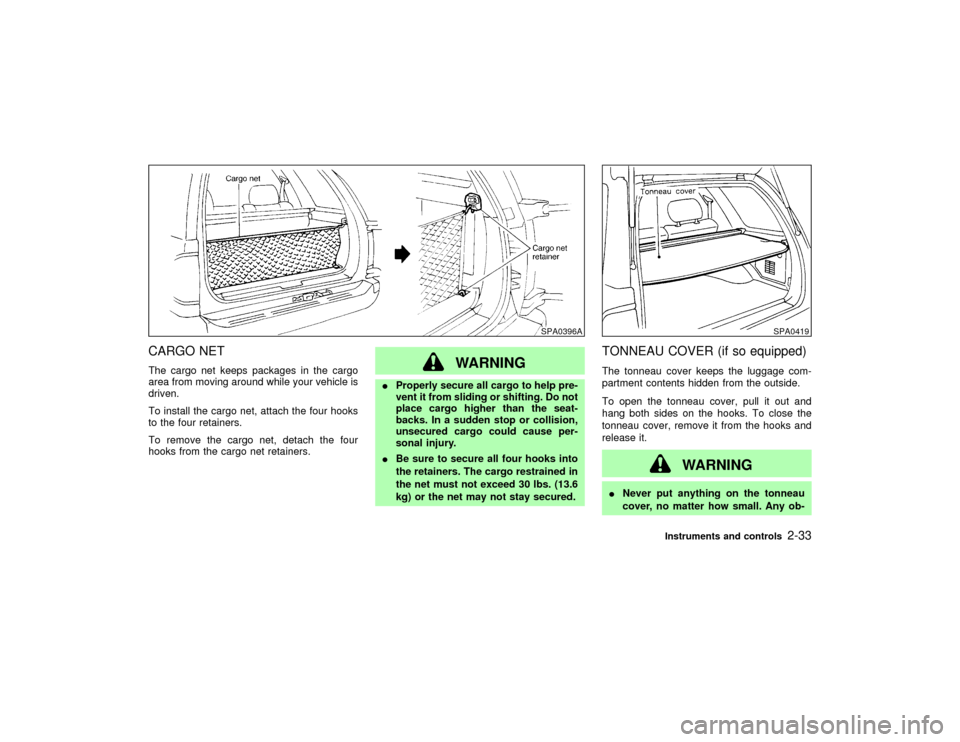
CARGO NETThe cargo net keeps packages in the cargo
area from moving around while your vehicle is
driven.
To install the cargo net, attach the four hooks
to the four retainers.
To remove the cargo net, detach the four
hooks from the cargo net retainers.
WARNING
IProperly secure all cargo to help pre-
vent it from sliding or shifting. Do not
place cargo higher than the seat-
backs. In a sudden stop or collision,
unsecured cargo could cause per-
sonal injury.
IBe sure to secure all four hooks into
the retainers. The cargo restrained in
the net must not exceed 30 lbs. (13.6
kg) or the net may not stay secured.
TONNEAU COVER (if so equipped)The tonneau cover keeps the luggage com-
partment contents hidden from the outside.
To open the tonneau cover, pull it out and
hang both sides on the hooks. To close the
tonneau cover, remove it from the hooks and
release it.
WARNING
INever put anything on the tonneau
cover, no matter how small. Any ob-
SPA0396A
SPA0419
Instruments and controls
2-33
Z
01.9.21/R50-D/V5
X
Page 87 of 288
ject on it could cause an injury in an
accident or sudden stop.
IDo not leave the tonneau cover in the
vehicle with it disengaged from the
holder.
IProperly secure all cargo to help pre-
vent it from sliding or shifting. Do not
place cargo higher than the seat-
backs. In a sudden stop or collision,
unsecured cargo could cause per-
sonal injury.
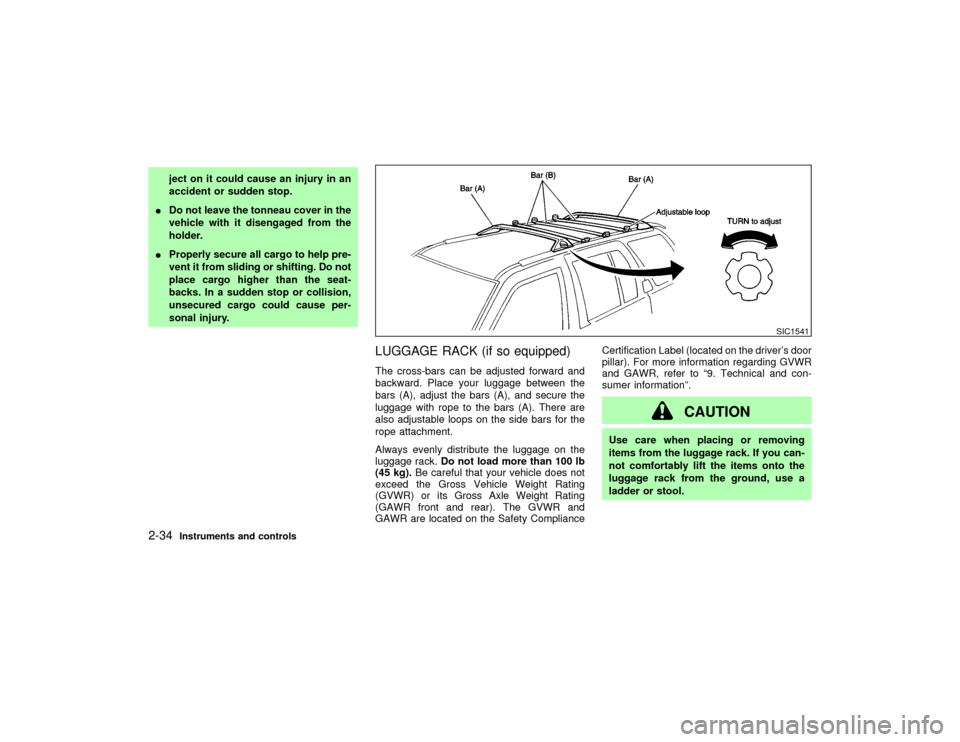
LUGGAGE RACK (if so equipped)The cross-bars can be adjusted forward and
backward. Place your luggage between the
bars (A), adjust the bars (A), and secure the
luggage with rope to the bars (A). There are
also adjustable loops on the side bars for the
rope attachment.
Always evenly distribute the luggage on the
luggage rack.Do not load more than 100 lb
(45 kg).Be careful that your vehicle does not
exceed the Gross Vehicle Weight Rating
(GVWR) or its Gross Axle Weight Rating
(GAWR front and rear). The GVWR and
GAWR are located on the Safety ComplianceCertification Label (located on the driver's door
pillar). For more information regarding GVWR
and GAWR, refer to ª9. Technical and con-
sumer informationº.
CAUTION
Use care when placing or removing
items from the luggage rack. If you can-
not comfortably lift the items onto the
luggage rack from the ground, use a
ladder or stool.
SIC1541
2-34
Instruments and controls
Z
01.9.21/R50-D/V5
X
Page 93 of 288
IInserting or removing a key from the ignition
switch
These lights will turn on again when any of the
above operations is performed after the lights
have turned off automatically. (The lights will
turn off 30 minutes after the latest operation of
the above as well.)
CAUTION
ITurn off the interior, personal and
vanity mirror lights when you leave
the vehicle.
IDo not use for extended periods of
time with the engine stopped. This
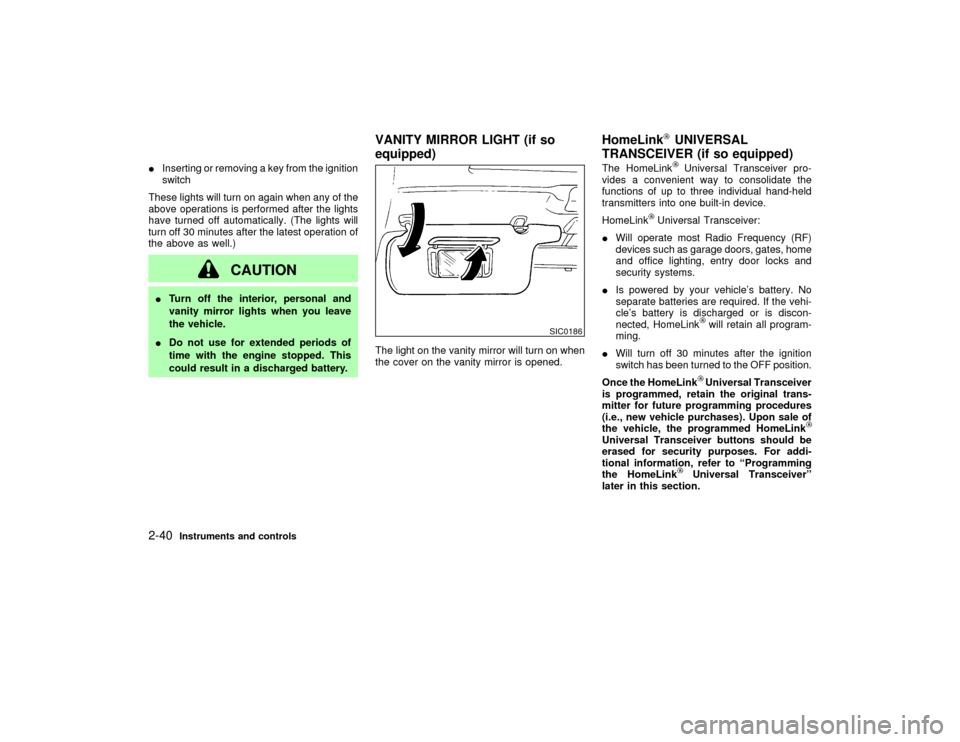
could result in a discharged battery.The light on the vanity mirror will turn on when
the cover on the vanity mirror is opened.The HomeLink
Universal Transceiver pro-
vides a convenient way to consolidate the
functions of up to three individual hand-held
transmitters into one built-in device.
HomeLink
Universal Transceiver:
IWill operate most Radio Frequency (RF)
devices such as garage doors, gates, home
and office lighting, entry door locks and
security systems.
IIs powered by your vehicle's battery. No
separate batteries are required. If the vehi-
cle's battery is discharged or is discon-
nected, HomeLink
will retain all program-
ming.
IWill turn off 30 minutes after the ignition
switch has been turned to the OFF position.
Once the HomeLinkUniversal Transceiver
is programmed, retain the original trans-
mitter for future programming procedures
(i.e., new vehicle purchases). Upon sale of
the vehicle, the programmed HomeLink
Universal Transceiver buttons should be
erased for security purposes. For addi-
tional information, refer to ªProgramming
the HomeLink
Universal Transceiverº
later in this section.
SIC0186
VANITY MIRROR LIGHT (if so
equipped)HomeLink
UNIVERSAL
TRANSCEIVER (if so equipped)
2-40
Instruments and controls
Z
01.9.21/R50-D/V5
X
Page 107 of 288

windows are fully open.
To stop lowering the windows, release the
UNLOCK button.
To start lowering the windows, press the UN-
LOCK button again for 3 more seconds.
This function will operate after the ignition
switch is off and 45 seconds passed or either
the front door is opened.Using the panic alarmIf you are near your vehicle and feel threat-
ened, you may activate the alarm to call atten-
tion as follows:
1. Push the PANIC button on the keyfob for
longer than 0.5 seconds.
2. The theft warning alarm and headlights will
stay on for 30 seconds.
3. The panic alarm stops when:
IIt has run for 30 seconds, or
IThe LOCK or the UNLOCK button is
pressed, or
IThe panic button is pushed on the keyfob
for more than 0.5 seconds.
BATTERY REPLACEMENTReplace the battery as follows:
1. Open the lid using a suitable tool.
2. Replace the battery with a new one.Recommended battery: Sanyo CR2025 or
equivalent
Make sure that theÅside faces the bottom
case.
3. Close the lid securely.
4. Push the keyfob button two or three times
to check its operation.
See your NISSAN dealer if you need any
assistance for replacement.
If the battery is removed for any reason
other than replacement, perform step 4
above.
IBe careful not to touch a circuit board
and a battery terminal.
IAn improperly disposed battery can
harm the environment. Always confirm
local regulations for battery disposal.
IThe keyfob is water-proof; however, if it
does get wet, immediately wipe com-
pletely dry.
IWhen changing batteries, do not let dust
or oil get on the keyfob.
FCC Notice:
Changes or modifications not expressly
approved by the manufacturer compliance
SPA1374
3-8
Pre-driving checks and adjustments
Z
01.9.21/R50-D/V5
X
Page 109 of 288
WARNING
Do not drive with the rear door open.
This could allow dangerous exhaust
gases to be drawn into the vehicle. See
ªPrecautions when starting and drivingº
in the ª5. Starting and drivingº section
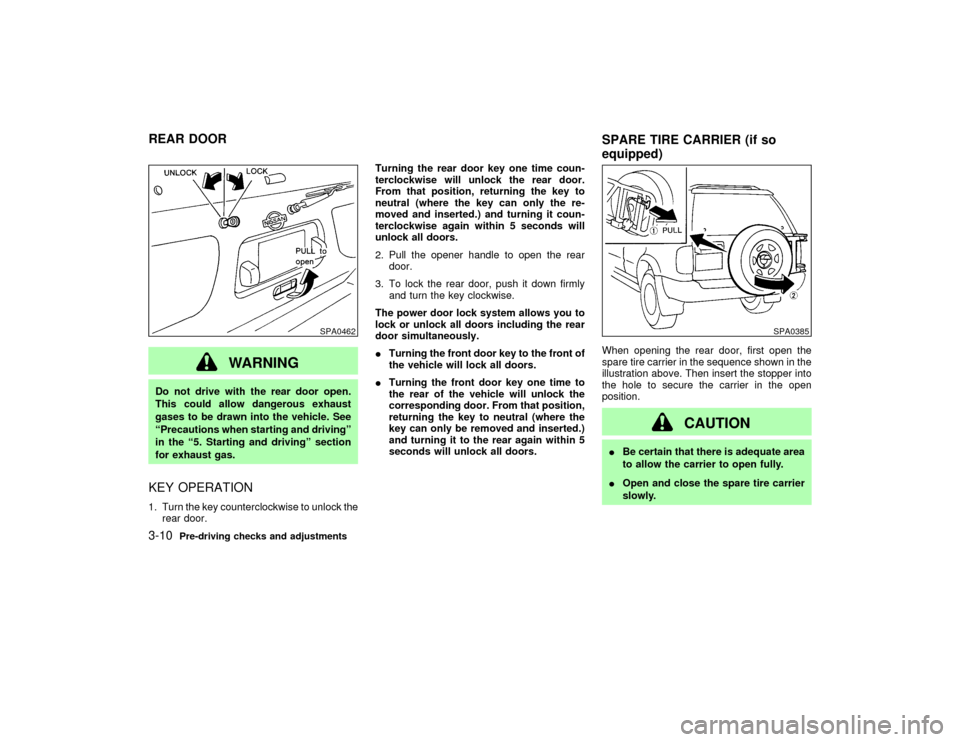
for exhaust gas.KEY OPERATION1. Turn the key counterclockwise to unlock the
rear door.Turning the rear door key one time coun-
terclockwise will unlock the rear door.
From that position, returning the key to
neutral (where the key can only the re-
moved and inserted.) and turning it coun-
terclockwise again within 5 seconds will
unlock all doors.
2. Pull the opener handle to open the rear
door.
3. To lock the rear door, push it down firmly
and turn the key clockwise.
The power door lock system allows you to
lock or unlock all doors including the rear
door simultaneously.
ITurning the front door key to the front of
the vehicle will lock all doors.
ITurning the front door key one time to
the rear of the vehicle will unlock the
corresponding door. From that position,
returning the key to neutral (where the
key can only be removed and inserted.)
and turning it to the rear again within 5
seconds will unlock all doors.When opening the rear door, first open the
spare tire carrier in the sequence shown in the
illustration above. Then insert the stopper into
the hole to secure the carrier in the open
position.
CAUTION
IBe certain that there is adequate area
to allow the carrier to open fully.
IOpen and close the spare tire carrier
slowly.
SPA0462
SPA0385
REAR DOOR
SPARE TIRE CARRIER (if so
equipped)3-10
Pre-driving checks and adjustments
Z
01.9.21/R50-D/V5
X