2002 NISSAN MAXIMA change time
[x] Cancel search: change timePage 1 of 247
ForewordWelcome to the growing family of new
NISSAN owners. This vehicle is delivered to
you with confidence. It was produced using
the latest techniques and strict quality control.
This manual was prepared to help you under-
stand the operation and maintenance of your
vehicle so that you may enjoy many miles of
driving pleasure. Please read through this
manual before operating your vehicle.
A separate Service and Maintenance Guide
and Warranty Information Booklet explains
details about the warranties covering your
vehicle and vehicle maintenance sched-
ules. Additionally, a separate Customer
Care/Lemon Law Booklet (U.S. only) will
explain how to resolve any concerns you
may have with your vehicle, as well as
clarify your rights under your state's
lemon law.
Your NISSAN dealer knows your vehicle best.
When you require any service or have any
questions, he will be glad to assist you with
the extensive resources available to him.READ FIRST Ð THEN DRIVE
SAFELYBefore driving your vehicle please read
your Owner's Manual carefully. This will
ensure familiarity with controls and main-
tenance requirements, assisting you in thesafe operation of your vehicle.
WARNING
IMPORTANT SAFETY INFORMA-
TION
REMINDERS FOR SAFETY!Follow these important driving rules to
help ensure a safe and comfortable trip
for you and your passengers!
INever drive under the influence of al-
cohol or drugs.
IAlways observe posted speed limits
and never drive too fast for condi-
tions.
IAlways use your seat belts and appro-
priate child restraint systems. Preteen
children should be seated in the rear
seat.
IAlways provide information about the
proper use of vehicle safety features
to all occupants of the vehicle.
IAlways review this Owner's Manual
for important safety information.
MODIFICATION OF YOUR
VEHICLEThis vehicle should not be modified. Modi-
fication could affect its performance,
safety or durability, and may even violate
governmental regulations. In addition,
damage or performance problems result-
ing from modification may not be covered
under NISSAN warranties.WHEN READING THE MANUALThis manual includes information for all
options available on this model. Therefore,
you may find some information that does
not apply to your vehicle.
All information, specifications and illustrations
in this manual are those in effect at the time of
printing. NISSAN reserves the right to change
specifications or design at any time without
notice.
Z
01.9.21/A33-D/V5.0
X
Page 64 of 247
WARNING
When the daytime running light system
is active, tail lights on your vehicle are
not on. It is necessary at dusk to turn on
your headlights. Failure to do so could
cause an accident injuring yourself and
others.TURN SIGNAL SWITCH
Turn signalMove the lever up or down to signal the turning
direction. When the turn is completed, the turn
signals cancel automatically.Lane change signalTo indicate a lane change, move the lever up
or down to the point where lights begin flash-
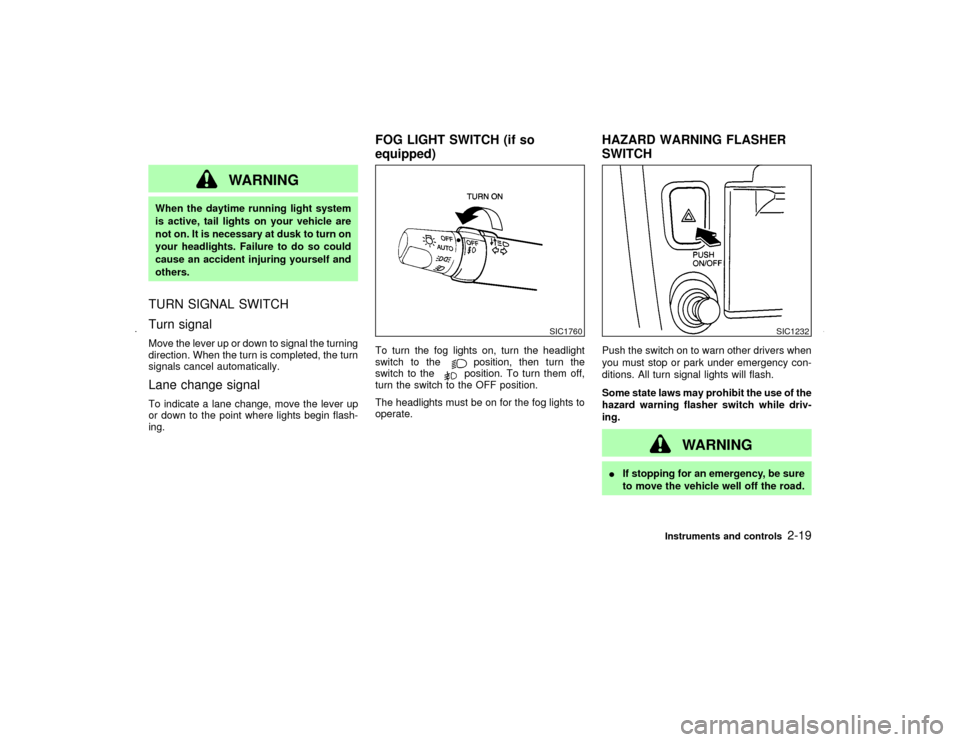
ing.To turn the fog lights on, turn the headlight
switch to the
position, then turn the
switch to theposition. To turn them off,
turn the switch to the OFF position.
The headlights must be on for the fog lights to
operate.Push the switch on to warn other drivers when
you must stop or park under emergency con-
ditions. All turn signal lights will flash.
Some state laws may prohibit the use of the
hazard warning flasher switch while driv-
ing.
WARNING
IIf stopping for an emergency, be sure
to move the vehicle well off the road.
SIC1760
SIC1232
FOG LIGHT SWITCH (if so
equipped)HAZARD WARNING FLASHER
SWITCH
Instruments and controls
2-19
Z
01.9.21/A33-D/V5.0
X
Page 76 of 247

When the ignition switch is turned to ON,
modes of the trip computer can be selected by
pushing once on the trip mode switch. The
following modes can be selected:Outside air temperature (ICY Ð ÉF
or ÉC)The outside air temperature is displayed in ÉF
or ÉC.
The outside air temperature mode includes a
low temperature warning feature: below 37ÉF
(3ÉC), the outside air temperature mode is
automatically selected and ICY indicator will
illuminate in order to draw the driver's atten-tion. Press the mode switch if you wish to
return to the mode that was selected before
the warning occurred. The ICY indicator will
continue blinking as long as the temperature
remains below 39ÉF (4ÉC).
Distance to empty (dte Ð mile or
km)The distance to empty (dte) mode provides
you with an estimation of the distance that can
be driven before refueling. The dte is con-
stantly being calculated, based on the amount
of fuel in the fuel tank and the actual fuel
consumption.
The display is updated every 30 seconds.
The dte mode includes a low range warning
feature: when the fuel level is low, the dte
mode is automatically selected and the digits
blink in order to draw the driver's attention.
Press the mode switch if you wish to return to
the mode that was selected before the warning
occurred. The dte mark (dte) will remain blink-
ing until the vehicle is refuelled.
When the fuel level drops even lower, the dte
display will change to (
).
NOTE:
IIf the amount of fuel added while the
ignition switch is OFF is small, the dis-play just before the ignition switch is
turned OFF may continue to be dis-
played.
IWhen driving uphill or rounding curves,
the fuel in the tank shifts, which may
momentarily change the display.
Average fuel consumption
(
or
)
The Average fuel consumption mode shows
the average fuel consumption since the last
reset. Resetting is done by pressing the mode
switch for more than approximately 1 second.
The display is updated every 30 seconds. At
about the first 1/3 miles (500 m) after a reset,
the display shows (
).
Average speed (
or
)
The average speed mode shows the average
vehicle speed since last reset. Resetting is
done by pressing the mode switch for more
than approximately 1 minute. The display is
updated every 30 seconds. The first 30 sec-
onds after a reset, the display shows (
).
Journey timeThe journey time mode shows the time since
the last reset. The displayed time can be reset
by pressing the mode switch for more than
approximately 1 second.
SIC1750
Instruments and controls
2-31
Z
01.9.21/A33-D/V5.0
X
Page 94 of 247

Recommended battery: Sanyo CR2025 or
equivalent
Make sure that theÅside faces the
bottom case.
3. Close the lid securely.
4. Push the keyfob button two or three times
to check its operation.
See your NISSAN dealer if you need any
assistance for replacement.
If the battery is removed for any reason
other than replacement, perform step 4
above.
IBe careful not to touch a circuit board
and a battery terminal.
IAn improperly disposed battery can
harm the environment. Always confirm
local regulations for battery disposal.
IThe keyfob is water-resistant; however,
if it does get wet, immediately wipe com-
pletely dry.
IWhen changing batteries, do not let dust
or oil get on the keyfob.
FCC Notice:
Changes or modifications not expressly
approved by the manufacturer compliancecould void the user's authority to operate
the equipment. This device complies with
Part 15 of the FCC Rules and RSS-210 of
Industry Canada. Operation is subject to
the following two conditions: (1) This de-
vice may not cause harmful interference,
and (2) this device must accept any inter-
ference received, including interference
that may cause undesired operation of the
device.
Pre-driving checks and adjustments
3-9
Z
01.9.21/A33-D/V5.0
X
Page 122 of 247
turned off and the last radio station played will
come on.
The FM stereo indicator ST will glow during
FM stereo reception. When the stereo broad-
cast signal is weak, the radio will automatically
change from stereo to monaural reception.
TUNE (Tuning):WARNING
The radio should not be tuned while
driving so full attention may be given to
vehicle operation.
Use these buttons for manual tuning. To move
quickly through the channels, hold either of the
TUNE buttons down for more than 0.5 sec-
onds.
SEEK tuning:
Push the SEEK button
or
, to tune
from high to low or low to high frequencies and
stops at the next broadcasting station.
SCAN tuning:
Push the SCAN tuning button to tune from low
to high frequencies and stops at each broad-
casting station for 5 seconds. Pushing thebutton again during this 5 seconds period will
stop SCAN tuning and the radio will remain
tuned to that station.
If the SCAN tuning button is not pushed within
5 seconds, SCAN tuning moves to the next
station.
Station memory operations:
Twelve stations can be set for the FM band
(six for FM1, six for FM2) and six stations can
be set for the AM band.
1. Tune to the desired station using the SEEK,
SCAN or TUNE button.
2. Select the desired station and keep pushing
any of the desired station memory buttons
(1 to 6) until a beep sound is heard. (The
radio mutes when the select button is
pushed.)
3. The indicator ch2 will then come on and the
sound will resume. Memorizing is now com-
plete.
4. Other buttons can be set in the same
manner.
If the battery cable is disconnected, or if the
fuse blows, the radio memory will be can-
celled. In that case, reset the desired stations.
(Automatic preset) button:
To select the preset FM, AM or PTY station
(type B only), push the AUTOP button for less
than 1.5 seconds.
To preset the FM, AM or PTY station, push the
AUTOP button for more than 1.5 seconds.Program type Ð type B only:
When PTY button is pressed during FM mode,
the PTY name of the current tuned station is
displayed. During this time if the PTY data
code is zero, or the data is unreadable; the
display will show NONE.
1. PTY selection mode
PTY name selection can be done by the
up/down TUNE button
or
in the
PTY selection mode.
It is possible to shift the PTY name by one
step, with one push of the up/down tuning
button
or
.
PTY name selection can also be achieved by
pressing the preset buttons.
Initial PTY names are stored in the preset
buttons; but these can be changed by pressing
the preset buttons for more than 1.5 seconds
when the desired PTY name is in the display.
Heater, air conditioner and audio systems
4-17
Z
01.9.21/A33-D/V5.0
X
Page 125 of 247

fast forwarding or rewinding. When the button
is released, the compact disc will return to
normal play speed.
APS (Automatic Program
Search) FF, APS REW:
When the(APS FF) button is pushed
while the compact disc is being played, the
program next to the present one will start to
play from its beginning. Push several times to
skip through programs. The compact disc will
advance the number of times the button is
pushed. (When the last program on the com-
pact disc is skipped through, the first program
will be played.) When the
(APS REW)
button is pushed, the program being played
returns to its beginning. Push several times to
skip back through programs. The compact disc
will go back the number of times the button is
pushed.
SCAN tuning:
Push the SCAN tuning button while playing
CD, and it stops the CD program for 5 sec-
onds. Pushing the button again during this 5
second period will stop SCAN tuning and the
CD program is continued. If the SCAN tuning
button is not pushed within 5 seconds, SCAN
tuning moves to the next CD program.
REPEAT (RPT):
When the RPT play button is pushed while the
compact disc is being played, the play pattern
can be changed as follows:1CDRPT
¯
1CDMIX
¬
1 TR (Track) RPT
CD EJECT:
When the CD EJECT button is pushed with the
compact disc loaded, the compact disc will be
ejected.
When this button is pushed while the compact
disc is being played, the compact disc will
come out and the system will turn off.
If the compact disc comes out and is not
removed, it will be pulled back into the slot
to protect it. (except 8 cm diameter com-
pact discs)
CD IN indicator:
CD IN indicator appears on the display when
the CD is loaded with the system on.
Compact disc (CD) changer
operation (Type B)Turn the ignition key to the ACC or ON position
and insert the compact disc into the slot with
the label side facing up. The compact disc willbe guided automatically into the slot and start
playing.
After loading the disc, the number of tracks on
the disc and the play time will appear on the
display.
If the radio or tape is already operating, it will
automatically turn off and the compact disc will
play.
4-20
Heater, air conditioner and audio systems
Z
01.9.21/A33-D/V5.0
X
Page 126 of 247
CAUTION
Do not force the compact disc into the
slot. This could damage the player.
If the system has been turned off while the
compact disc was playing, pushing the
ON×OFF/VOL control knob will start the com-
pact disc.
8 cm diameter compact discs can also be used
without an adapter.
button:
To insert a CD in the CD changer, push the
LOAD button for less than 1.5 seconds. Select
the loading slot by pushing the CD insert select
button (1 to 6), then insert the CD.
To insert 6 CDs to the CD changer, push the
LOAD button for more than 1.5 seconds.
The inserted slot numbers will illuminate on the
display.PLAY:
When the CD6 button is pushed with the
system off and the compact disc loaded, the
system will turn on and the compact disc will
start to play.When the CD6 button is pushed with the
compact disc loaded with the tape or the radio
playing, the tape or radio will automatically be
turned off and the compact disc will start to
play.
FF (Fast Forward), REW
(Rewind):
When the(fast forward) or
(rewind)
button is pushed while the compact disc is
being played, the compact disc will play while
fast forwarding or rewinding. When the button
is released, the compact disc will return to
normal play speed.
APS (Automatic Program
Search) FF, APS REW:
When the(APS FF) button is pushed
while the compact disc is being played, the
program next to the present one will start to
play from its beginning. Push several times to
skip through programs. The compact disc will
advance the number of times the button is
pushed. (When the last program on the com-
pact disc is skipped through, the first program
will be played.) When the
(APS REW)
button is pushed, the program being played
returns to its beginning. Push several times to
skip back through programs. The compact disc
will go back the number of times the button is
pushed.CD PLAY button:
To change CD, push the CD play select button
(1 to 6).
SCAN tuning:
When the SCAN tuning button is pushed for
less than 1.5 seconds while the CD is being
played, the beginning of all the CD programs in
each track will be played for 10 seconds in
sequence.
When the SCAN tuning button is pushed for
more than 1.5 seconds while the CD is being
played, the first program in all the CDs will be
played for 10 seconds.
Pushing the button again during this 10 sec-
ond period will stop SCAN tuning.
If the SCAN tuning button is not pushed within
10 seconds, SCAN tuning moves to the next
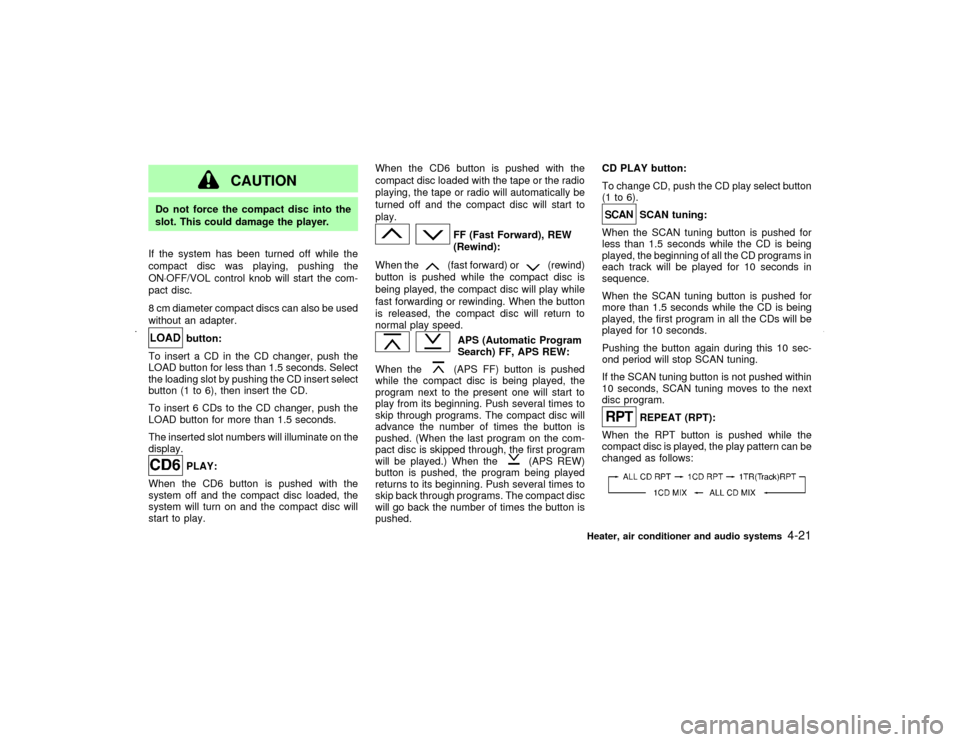
disc program.REPEAT (RPT):
When the RPT button is pushed while the
compact disc is played, the play pattern can be
changed as follows:
Heater, air conditioner and audio systems
4-21
Z
01.9.21/A33-D/V5.0
X
Page 129 of 247
display during radio operation. During cassette
tape operation, TAPE illuminates in the dis-
play.FM-AM radio operation
FM-AM band select:
Pushing the FM-AM band select button will
change the band as follows:
AM,AM (preset station),FM1,FM2,
FM (preset station),AM
When FM/AM band select button is pushed
while the ignition switch is in the ACC or ON,
the radio will come on at the station last
played.
The last station played will also come on when
the power knob is turned to ON.
If a compact disc or tape is playing when the
FM/AM band select button is turned to ON, the
compact disc or tape will automatically be
turned off and the last radio station played will
come on.
The FM stereo indicator, ST illuminates during
FM stereo reception. When the stereo broad-
cast signal is weak, the radio automatically
changes from stereo to monaural reception.
TUNE (Tuning):WARNING
The radio should not be tuned while
driving so full attention may be given to
vehicle operation.
Use these buttons for manual tuning. To move
quickly through the channels, hold either of the
TUNE buttons down for more than 0.5 sec-
onds.
SCAN tuning:
Push the SCAN tuning button and SCAN will
illuminate in the display window. SCAN tuning
begins from high to low or low to high frequen-
cies and stops at each broadcasting station for
5 seconds. Pushing the button again during
this 5 second period stops SCAN tuning and
the radio remains tuned to that station.
If any of the SEEK/SCAN tuning buttons are
not pushed within 5 seconds, SCAN tuning
moves to the next station.
Station memory (and preset) operations:
Twelve stations can be set for the FM band
(six for FM1, six for FM2) and six stations canbe set for the AM band.
1. Tune to the desired station using the SCAN
or TUNE buttons.
2. Select the desired station and keep pushing
any of the desired station memory buttons
(1 to 6) until a beep sound is heard. The
radio mutes when the select button is
pushed.)
3. The indicator ch2 will come on and the
sound will resume. Memorizing is now com-
plete.
4. Other station select buttons can be set in
the same manner.
If the battery cable is disconnected, or if the
radio fuse opens, the radio memory is can-
celled. In that case, reset the desired stations.
Program type:
When PTY button is pressed during FM mode,
the PTY name of the current tuned station is
displayed. During this time if the PTY data
code is zero, or the data is unreadable; the
display will show NONE.
1. PTY selection mode
PTY name selection can be done by the
up/down TUNE button
or
in the
PTY selection mode.
4-24
Heater, air conditioner and audio systems
Z
01.9.21/A33-D/V5.0
X