2002 NISSAN ALTIMA lights
[x] Cancel search: lightsPage 153 of 249

tion of any malfunction. If the computer
senses any malfunction, it switches the anti-
lock brake system OFF and turns on the
ABS brake warning light in the dashboard.
The brake system then operates normally,
but without anti-lock assistance.
If the light comes on during the self-test or
while driving, take the vehicle to an autho-
rized NISSAN dealer for repair.
WARNING
The anti-lock brake system is a sophis-
ticated device, but it cannot prevent
accidents resulting from careless or
dangerous driving techniques. It can
help maintain vehicle control during
braking on slippery surfaces, but re-
member that the stopping distance on
slippery surfaces will be longer than on
normal surfaces, even with the anti-
lock brake system. Stopping distances
may also be longer on rough, gravel or
snow covered roads, or if you are using
tire chains. Always maintain a safe dis-
tance from the vehicle in front of you.
Ultimately, the responsibility for safety
of self and others rests in the hands of
the driver.cTire type and condition of tires may
also affect braking effectiveness.
When replacing tires, install the
specified size of tire on all four
wheels.
cWhen installing a spare tire, make
sure it is the proper size and type as
specified on the tire placard. For tire
placard location information, refer to
ªTire placardº in the ``Technical and
consumer information'' section of
this manual.
Refer to ``Wheels and tires'' in the
``Maintenance and do-it-yourself'' sec-
tion of this manual.When driving on slippery surfaces or sud-
denly avoiding obstacles on roads, the ve-
hicle might swerve or slip. With the vehicle
traction control system, sensors detect
these movements and control the braking
and engine output to help improve vehicle
stability while driving.
cWhen the traction control system is op-
erating, the slip indicator in the instru-
ment panel blinks.
cIf the slip indicator blinks, the vehicle is
under slippery conditions. Be sure to
drive carefully. See ªSlip indicator lightº,
and ªtraction control off indicator lightº in
the ªInstruments and controlsº section.
cIf a malfunction occurs in the system,
the
andindicator lights come
on in the meter panel.
As long as these warning lights are on,
the traction control function is canceled.
The vehicle will behave like a vehicle
without the system.
TRACTION CONTROL
SYSTEM (TCS)
5-20Starting and driving
ZX
Page 164 of 249

Always follow the instructions below.
Failure to do so could result in damage
to the charging system and cause per-
sonal injury.
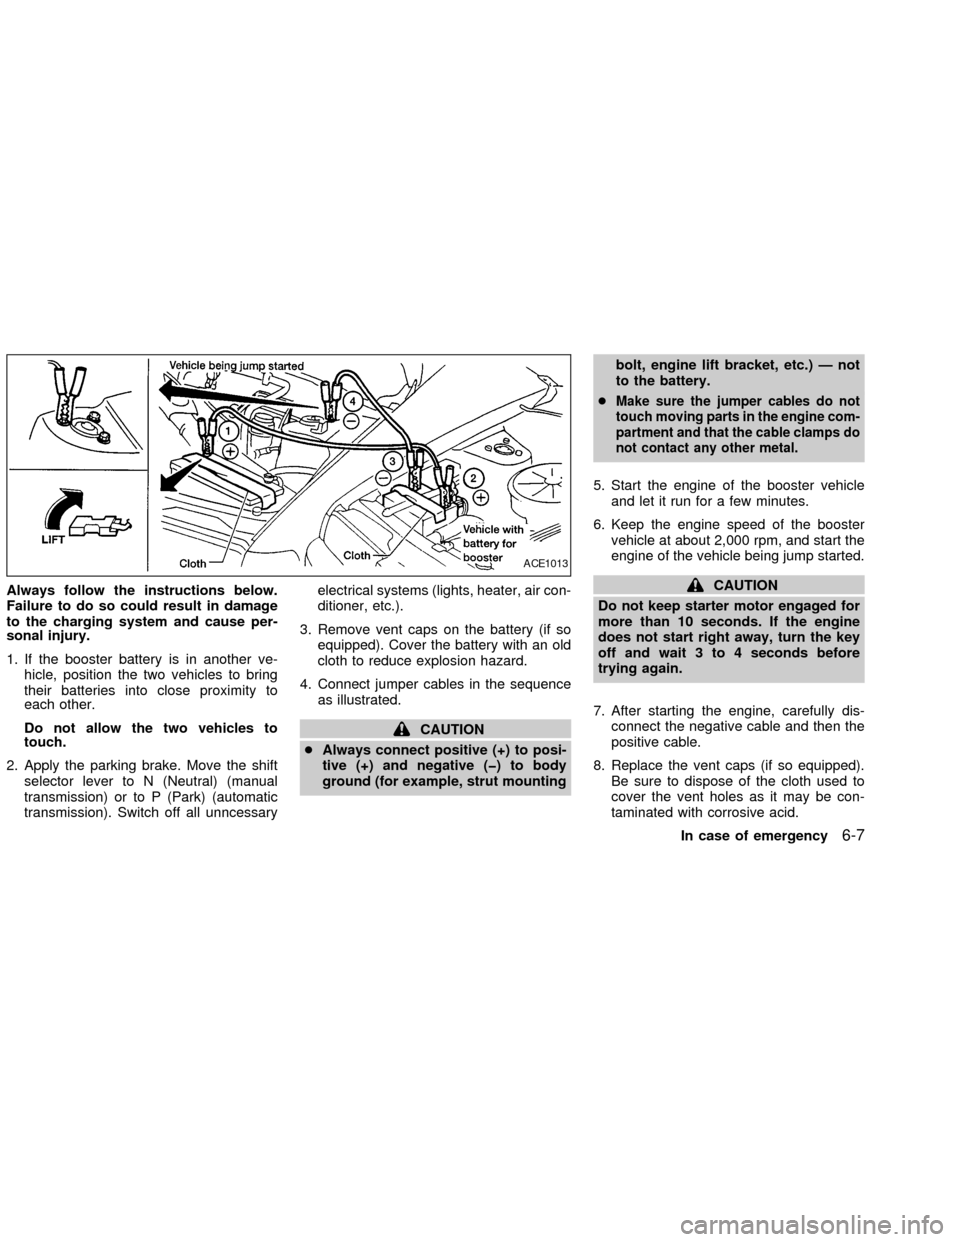
1. If the booster battery is in another ve-
hicle, position the two vehicles to bring
their batteries into close proximity to
each other.
Do not allow the two vehicles to
touch.
2. Apply the parking brake. Move the shift
selector lever to N (Neutral) (manual
transmission) or to P (Park) (automatic
transmission). Switch off all unncessaryelectrical systems (lights, heater, air con-
ditioner, etc.).
3. Remove vent caps on the battery (if so
equipped). Cover the battery with an old
cloth to reduce explosion hazard.
4. Connect jumper cables in the sequence
as illustrated.
CAUTION
cAlways connect positive (+) to posi-
tive (+) and negative (þ) to body
ground (for example, strut mountingbolt, engine lift bracket, etc.) Ð not
to the battery.
c
Make sure the jumper cables do not
touch moving parts in the engine com-
partment and that the cable clamps do
not contact any other metal.
5. Start the engine of the booster vehicle
and let it run for a few minutes.
6. Keep the engine speed of the booster
vehicle at about 2,000 rpm, and start the
engine of the vehicle being jump started.
CAUTION
Do not keep starter motor engaged for
more than 10 seconds. If the engine
does not start right away, turn the key
off and wait 3 to 4 seconds before
trying again.
7. After starting the engine, carefully dis-
connect the negative cable and then the
positive cable.
8. Replace the vent caps (if so equipped).
Be sure to dispose of the cloth used to
cover the vent holes as it may be con-
taminated with corrosive acid.
ACE1013
In case of emergency6-7
ZX
Page 178 of 249

Lights ....................................................................8-30
Headlights ........................................................8-30
Front park/turn/sidemarker light ......................8-31
Fog lights .........................................................8-31
Exterior and interior lights ...............................8-32Wheels and tires ..................................................8-38
Tire pressure ...................................................8-38
Types of tires ...................................................8-38
Tire chains .......................................................8-39
Changing tires and wheels ..............................8-40
ZX
Page 180 of 249

During the normal day-to-day operation of
the vehicle, general maintenance should be
performed regularly as prescribed in this
section. If you detect any unusual sounds,
vibrations or smells, be sure to check for the
cause or have an authorized NISSAN
dealer do it promptly. In addition, you should
notify an authorized NISSAN dealer if you
think that repairs are required.
When performing any checks or mainte-
nance work, closely observe the precau-
tions in this section.
EXPLANATION OF GENERAL
MAINTENANCE ITEMS
Additional information on the following
items with ``*'' is found later in this sec-
tion.
Outside the vehicle
The maintenance items listed here should
be performed from time to time, unless
otherwise specified.
Tires*Check the pressure with a gauge at
least once a month and always prior to long
distance trips, including the spare, and ad-
just to the specified pressure if necessary.Check carefully for damage, cuts or exces-
sive wear.
Wheel nuts*When checking the tires, make
sure no wheel nuts are missing, and check for
any loose wheel nuts. Tighten if necessary.
Tire rotation*Tires should be rotated every
7,500 miles (12,000 km).
Wheel alignment and balanceIf the ve-
hicle should pull to either side while driving
on a straight and level road, or if you detect
uneven or abnormal tire wear, there may be
a need for wheel alignment.
If the steering wheel or seat vibrates at
normal highway speeds, wheel balancing
may be needed.
WindshieldClean the windshield on a
regular basis. Check the windshield at least
every six months for cracks or other dam-
age. Have a damaged windshield repaired
by a qualified repair facility.
Windshield wiper blades*Check for
cracks or wear if they do not wipe properly.
Doors and hoodCheck that the doors and
the hood operate properly. Also ensure that
all latches lock securely. Lubricate hinges,
latches, latch pins, rollers and links as nec-essary. Make sure that the secondary latch
keeps the hood from opening when the
primary latch is released.
When driving in areas using road salt or
other corrosive materials, check lubrication
frequently.
Lights*Clean the headlights on a regular
basis. Make sure that the headlights, stop
lights, tail lights, turn signal lights, and other
lights are all operating properly and installed
securely. Also check headlight aim.
Inside the vehicle
The maintenance items listed here should
be checked on a regular basis, such as
when performing periodic maintenance,
cleaning the vehicle, etc.
Warning lights and chimesMake sure all
warning lights and chimes are operating
properly.
Windshield wiper and washer*Check that
the wipers and washer operate properly and
that the wipers do not streak.
Windshield defrosterCheck that the air
comes out of the defroster outlets properly
and in sufficient quantity when operating the
heater or air conditioner.
GENERAL MAINTENANCE
Maintenance and do-it-yourself8-3
ZX
Page 206 of 249

Replace the battery in the keyfob as follows:
1. Open the lid using a coin.
2. Replace the battery with a new one.
Recommended battery: Sanyo CR2025
or equivalent.3. Close the lid securely.
4. Press the
button, then thebutton
two or three times to check the keyfob
operation.
Each time the
button is pressed, thehazard lights flash once.
If the battery is removed for any reason
other than replacement, perform step 4.
cAn improperly disposed battery can
hurt the environment. Always confirm
local regulations for battery disposal.
cThe keyfob is water-resistant; how-
ever, if it does get wet, immediately
wipe completely dry.
cThe operational range of the keyfob
extends to approximately 33 ft (10 m)
from the vehicle. This range may vary
with conditions.
FCC Notice:
Changes or modifications not expressly
approved by the manufacturer for com-
pliance could void the user's authority to
operate the equipment.
This device complies with part 15 of the
FCC Rules and RSS-210 of Industry
Canada.
LPD0081
KEYFOB BATTERY
REPLACEMENT
Maintenance and do-it-yourself8-29
ZX
Page 207 of 249

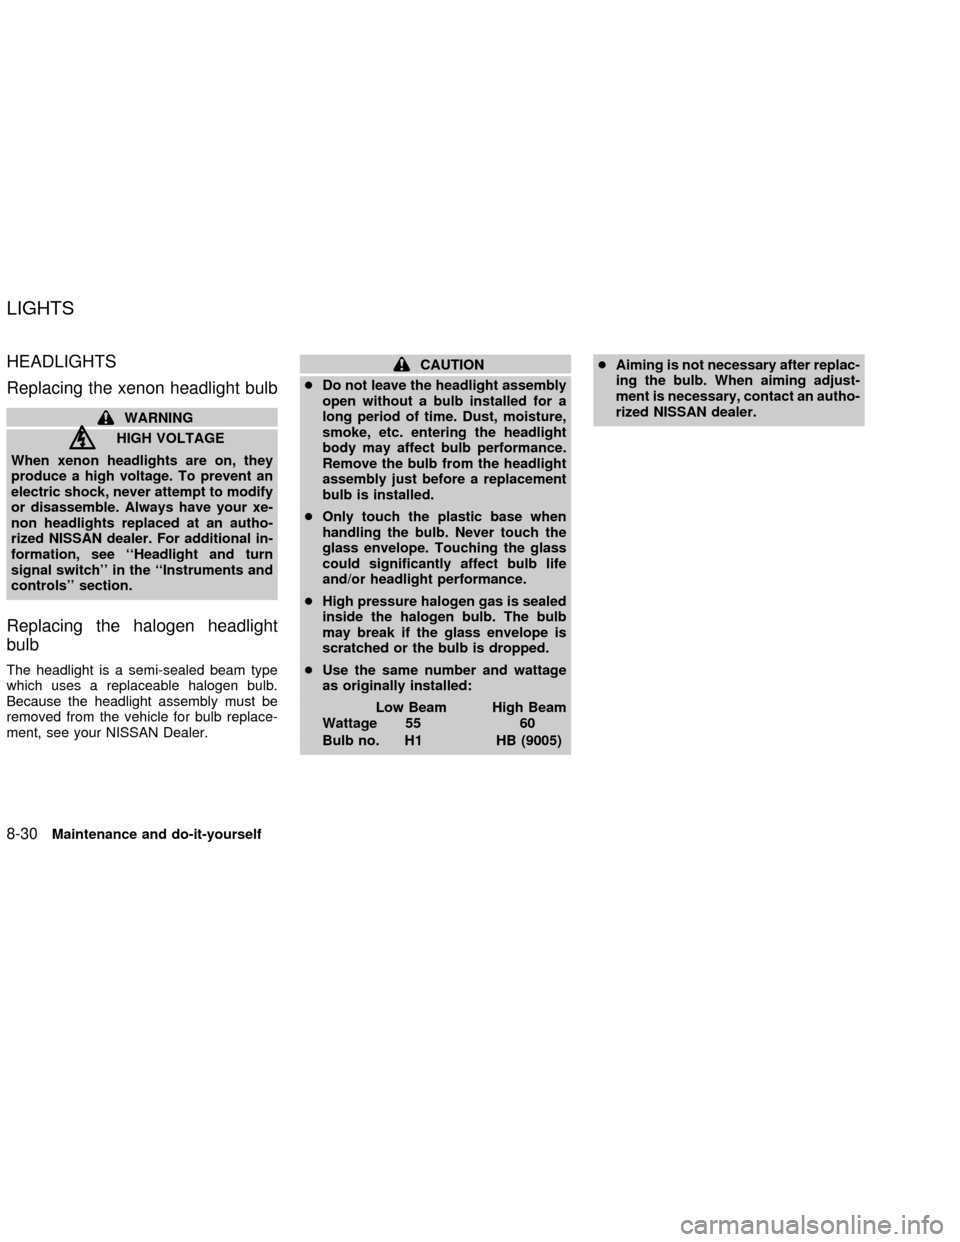
HEADLIGHTS
Replacing the xenon headlight bulb
WARNING
HIGH VOLTAGE
When xenon headlights are on, they
produce a high voltage. To prevent an
electric shock, never attempt to modify
or disassemble. Always have your xe-
non headlights replaced at an autho-
rized NISSAN dealer. For additional in-
formation, see ``Headlight and turn
signal switch'' in the ``Instruments and
controls'' section.
Replacing the halogen headlight
bulb
The headlight is a semi-sealed beam type
which uses a replaceable halogen bulb.
Because the headlight assembly must be
removed from the vehicle for bulb replace-
ment, see your NISSAN Dealer.
CAUTION
cDo not leave the headlight assembly
open without a bulb installed for a
long period of time. Dust, moisture,
smoke, etc. entering the headlight
body may affect bulb performance.
Remove the bulb from the headlight
assembly just before a replacement
bulb is installed.
cOnly touch the plastic base when
handling the bulb. Never touch the
glass envelope. Touching the glass
could significantly affect bulb life
and/or headlight performance.
cHigh pressure halogen gas is sealed
inside the halogen bulb. The bulb
may break if the glass envelope is
scratched or the bulb is dropped.
cUse the same number and wattage
as originally installed:
Low Beam High Beam
Wattage 55 60
Bulb no. H1 HB (9005)cAiming is not necessary after replac-
ing the bulb. When aiming adjust-
ment is necessary, contact an autho-
rized NISSAN dealer.
LIGHTS
8-30Maintenance and do-it-yourself
ZX
Page 208 of 249

FRONT
PARK/TURN/SIDEMARKER
LIGHT
Bulb replacement requires the removal of
the headlight assembly. If replacement is
required, see your NISSAN dealer.
FOG LIGHTS
Replacing the fog light bulb
1. Disconnect the negative (-) battery cable.
2. Remove the two splash shield screws
(see illustration).
3. Position the splash shield aside to allow
access to the fog light bulb.
4. Disconnect the fog light electrical con-
nector.
5. Rotate the fog light bulb counterclock-
wise and pull it out of the fog light assem-
bly.
6. Follow the instructions in reverse order to
install a new bulb.
LDI0114LDI0115
Maintenance and do-it-yourself8-31
ZX
Page 209 of 249

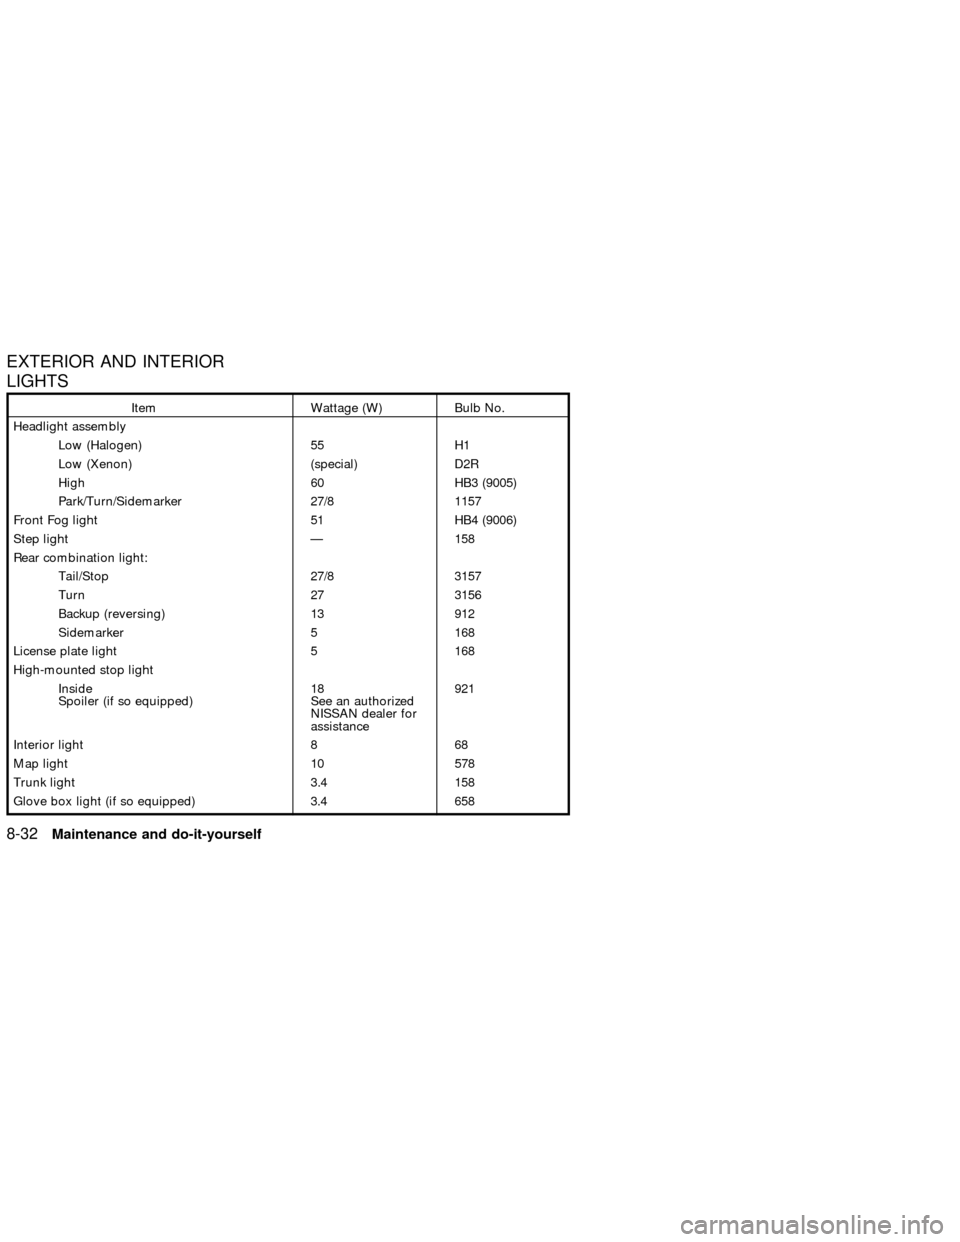
EXTERIOR AND INTERIOR
LIGHTS
Item Wattage (W) Bulb No.
Headlight assembly
Low (Halogen) 55 H1
Low (Xenon) (special) D2R
High 60 HB3 (9005)
Park/Turn/Sidemarker 27/8 1157
Front Fog light 51 HB4 (9006)
Step light Ð 158
Rear combination light:
Tail/Stop 27/8 3157
Turn 27 3156
Backup (reversing) 13 912
Sidemarker 5 168
License plate light 5 168
High-mounted stop light
Inside
Spoiler (if so equipped)18
See an authorized
NISSAN dealer for
assistance921
Interior light 8 68
Map light 10 578
Trunk light 3.4 158
Glove box light (if so equipped) 3.4 658
8-32Maintenance and do-it-yourself
ZX