2002 NISSAN ALTIMA fog light
[x] Cancel search: fog lightPage 107 of 249

cfor maximum cooling when using the air
conditioner
Air conditioner button
(if so equipped)
This button is provided only on vehicles
equipped with an air conditioner.
Start the engine, turn the fan control dial to
the desired (1 to 4) position and push the
A/C button to turn on the air conditioner.
The indicator light comes on when the air
conditioner is operating. To stop the air
conditioner, push the switch again.
The air conditioner cooling function op-
erates only when the engine is running.
HEATER OPERATION
Heating
This mode is used to direct heated air to the
foot outlets. Some air also flows from the
defroster outlets.
1. Push the
button to the off position
for normal heating.
2.
Turn the air control dial to theposition.
3. Move the fan control dial to the desired
position.4. Move the temperature control dial to the
desired position between the middle and
the HOT position.
Ventilation
This mode directs outside air to the side and
center ventilators.
1. Turn the air control dial to the
po-
sition.
2. Push the
button in.
3. Move the fan control dial to the desired
position.
4. Move the temperature control dial to the
desired position.
Defrosting or defogging
This mode is used to defrost/defog the
windows.
1.
Turn the air control dial to theposition.
2. Move the fan control dial to the desired
position.
3. Move the temperature control dial to the
desired position between the middle and
the HOT position.
cTo quickly remove ice or fog from thewindows, turn on the fan control dial to 4
and the temperature control dial to the
full HOT position.
cWhen the
position is selected, the
air conditioner automatically turns on
(however, the indicator light will not illu-
minate). This dehumidifies the air which
helps defog the windshield. The air recir-
culation mode automatically turns off,
allowing outside air to be drawn into the
passenger compartment which helps de-
fog the windshield.
Bi-level heating/cooling
This mode directs air from the side, center
and foot outlets.
1. Push the
button to the off position.
2.
Turn the air control dial to theposition.
3. Move the fan control dial to the desired
position.
4. Move the temperature control dial to the
desired position.
Heating and defogging
This mode heats the interior and defogs the
windshield.
1.
Turn the air control dial to theposition.
4-4Heater, air conditioner and audio systems
ZX
Page 108 of 249

2. Move the fan control dial to the desired
position.
3. Move the temperature control dial to the
desired position between the middle and
the HOT position.
Operating tips
cClear snow and ice from the wiper
blades and air inlet in front of the
windshield. This improves heater op-
eration.
cWhen the
orpositions are
selected, the air recirculation mode auto-
matically turns off.
Outside air is drawn into the passenger
compartment to improve the defogging
performance.
AIR CONDITIONER OPERATION
(if so equipped)
Start the engine, move the fan control dial to
the desired (1 to 4) position and push in the
A/C button to activate the air conditioner.
When the air conditioner is on, cooling and
dehumidifying functions are added to the
heater operation.
The air conditioner cooling function op-
erates only when the engine is running.
Cooling
This mode is used to cool and dehumidify
the air.
1. Push the
button to the off position.
2. Turn the air control dial to the
po-
sition.
3. Move the fan control dial to the desired
position.
4. Push on the air conditioner button. The
indicator light comes on.
5. Move the temperature control dial to the
desired position.
cFor quick cooling when the outside tem-
perature is high, push the
button to
the on position (Indicator light on). Be
sure to return the
button to the off
position for normal cooling.
Dehumidified heating
This mode is used to heat and dehumidify.
1. Push the
button to the off position.
2. Turn the air control dial to the
po-
sition.
3. Move the fan control dial to the desired
position.4. Push on the air conditioner button. The
indicator light comes on.
5. Move the temperature control dial to the
desired position.
Dehumidified defogging
This mode defogs the windows and dehu-
midifies the air.
1. Turn the air control dial to the
posi-
tion.
When the
position is selected, the
air conditioner automatically turns on
(however, the indicator light will not illu-
minate). This dehumidifies the air which
helps defog the windshield. The air recir-
culation mode automatically turns off,
allowing outside air to be drawn into the
passenger compartment which helps de-
fog the windshield.
2. Move the fan control dial to the desired
position.
3. Move the temperature control dial to the
desired position.
Outside air is drawn into the passenger
compartment to improve the defogging per-
formance.
Heater, air conditioner and audio systems
4-5
ZX
Page 113 of 249

cAdjust the temperature dial to about 75ÉF
(24ÉC) for normal operation.
cThe temperature of the passenger com-
partment will be maintained automati-
cally. Air flow distribution and fan speed
are also controlled automatically.
Heating (ECON)
The air conditioner does not activate. When
you need to heat only, use this mode.
1. Push the ECON (Economy) button on.
(ECON will be displayed.)
2. Turn the temperature dial to the left or
right to set the desired temperature.
cThe temperature of the passenger com-
partment will be maintained automati-
cally. Air flow distribution and fan speed
are also controlled automatically.
cDo not set the temperature lower than
the outside air temperature. Otherwise
the system may not work properly.
cNot recommended if windows fog up.
Dehumidified defogging
1. Push the DEF buttonon. The in-
dicator light on the button will come on.2. Turn the temperature dial to the left or
right to set the desired temperature.
cTo quickly remove ice from the outside of
the windows, push the manual fan con-
trol button
and set to the maxi-
mum position
.
cAs soon as possible after the windshield
is clean, push the AUTO button to return
to the auto mode.
cWhen the DEF button
is pushed,
the air conditioner will automatically be
turned on at outside temperatures above
23ÉF (þ5ÉC) to defog the windshield, and
the air recirculate mode will automatically
be turned off.
Outside air is drawn into the passenger
compartment to improve the defogging
performance.
MANUAL OPERATION
Fan speed control
Push the fan control buttonto manu-
ally control the fan speed.
Push the AUTO button to return to auto-
matic control of the fan speed.
Air recirculation
Push the air recirculation buttonto
recirculate interior air inside the vehicle. The
indicator light on the switch will come on.
Push it again to make the air inlet controlled
automatically (FRESH, REC/FRE and RE-
CIRCULATION). The indicator will go out.
The air recirculation button will not be acti-
vated when the air conditioner is in DEF
mode.
Air flow control
Pushing the manual air flow control button
selects the air outlet to:
: Air flows from center and side ventila-
tors.
: Air flows from center and side ventila-
tors and foot outlets.
: Air flows mainly from foot outlets.
: Air flow from defroster and foot out-
lets.
To turn system off
Push the OFF button.
4-10Heater, air conditioner and audio systems
ZX
Page 178 of 249

Lights ....................................................................8-30
Headlights ........................................................8-30
Front park/turn/sidemarker light ......................8-31
Fog lights .........................................................8-31
Exterior and interior lights ...............................8-32Wheels and tires ..................................................8-38
Tire pressure ...................................................8-38
Types of tires ...................................................8-38
Tire chains .......................................................8-39
Changing tires and wheels ..............................8-40
ZX
Page 208 of 249

FRONT
PARK/TURN/SIDEMARKER
LIGHT
Bulb replacement requires the removal of
the headlight assembly. If replacement is
required, see your NISSAN dealer.
FOG LIGHTS
Replacing the fog light bulb
1. Disconnect the negative (-) battery cable.
2. Remove the two splash shield screws
(see illustration).
3. Position the splash shield aside to allow
access to the fog light bulb.
4. Disconnect the fog light electrical con-
nector.
5. Rotate the fog light bulb counterclock-
wise and pull it out of the fog light assem-
bly.
6. Follow the instructions in reverse order to
install a new bulb.
LDI0114LDI0115
Maintenance and do-it-yourself8-31
ZX
Page 209 of 249

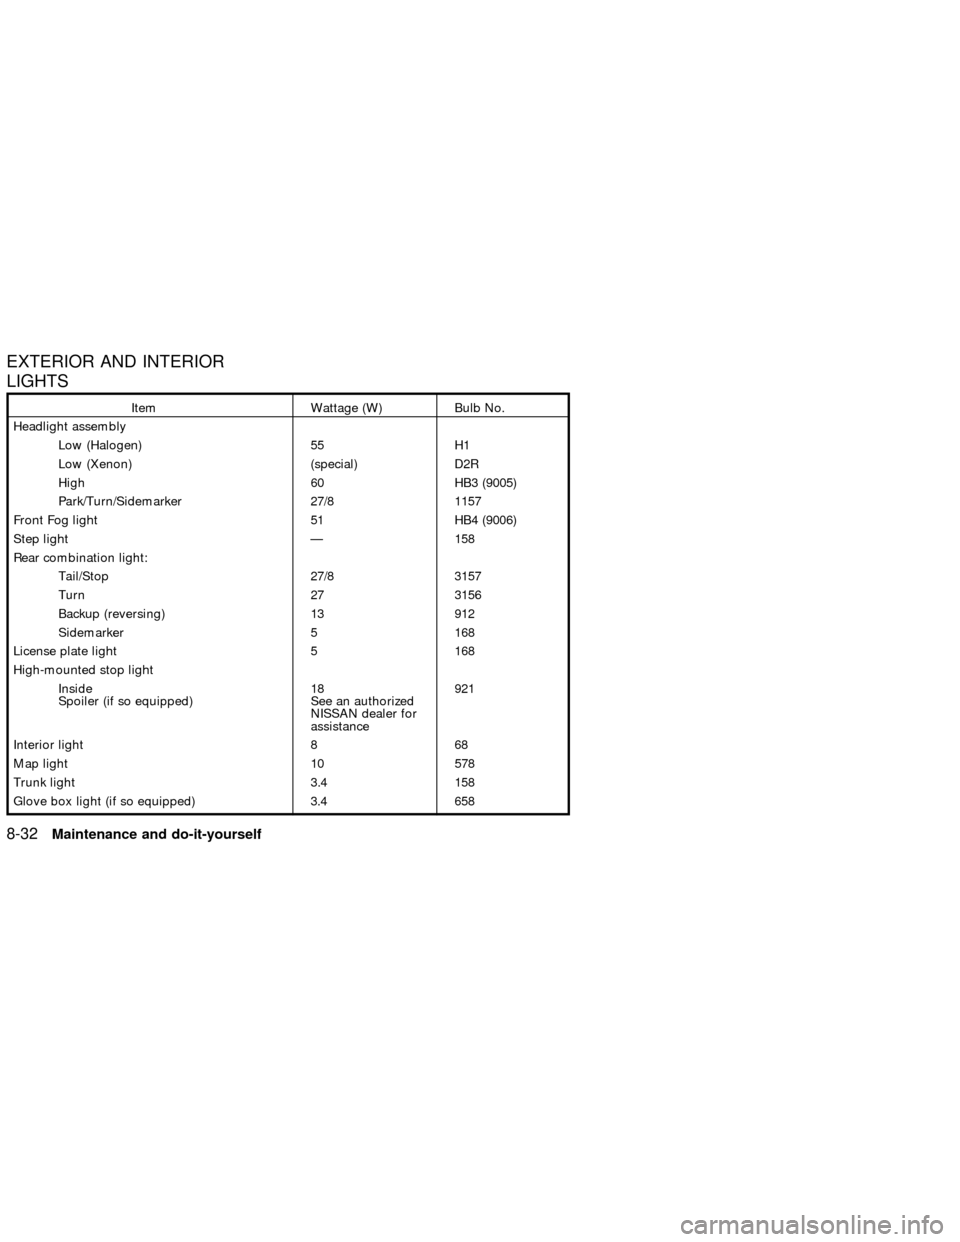
EXTERIOR AND INTERIOR
LIGHTS
Item Wattage (W) Bulb No.
Headlight assembly
Low (Halogen) 55 H1
Low (Xenon) (special) D2R
High 60 HB3 (9005)
Park/Turn/Sidemarker 27/8 1157
Front Fog light 51 HB4 (9006)
Step light Ð 158
Rear combination light:
Tail/Stop 27/8 3157
Turn 27 3156
Backup (reversing) 13 912
Sidemarker 5 168
License plate light 5 168
High-mounted stop light
Inside
Spoiler (if so equipped)18
See an authorized
NISSAN dealer for
assistance921
Interior light 8 68
Map light 10 578
Trunk light 3.4 158
Glove box light (if so equipped) 3.4 658
8-32Maintenance and do-it-yourself
ZX
Page 210 of 249

1. Map light
2. Interior light
3. Step light
4. Fog light
5. Rear combination light
6. License plate light
7. Trunk light
8. High-mount stoplight
9. Headlamp assembly
LDI0086
Maintenance and do-it-yourself8-33
ZX
Page 243 of 249

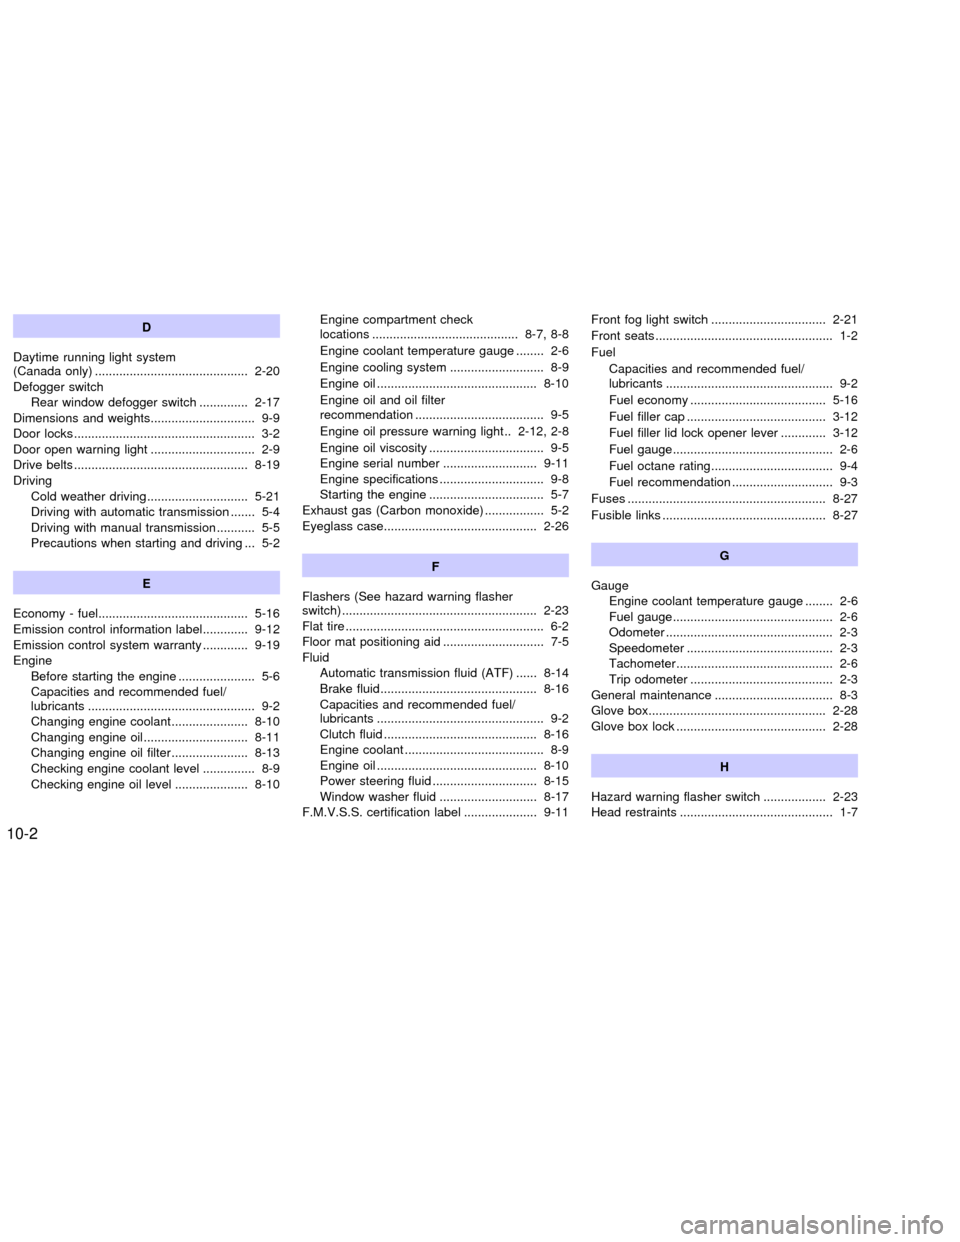
D
Daytime running light system
(Canada only) ............................................ 2-20
Defogger switch
Rear window defogger switch .............. 2-17
Dimensions and weights.............................. 9-9
Door locks .................................................... 3-2
Door open warning light .............................. 2-9
Drive belts .................................................. 8-19
Driving
Cold weather driving............................. 5-21
Driving with automatic transmission ....... 5-4
Driving with manual transmission ........... 5-5
Precautions when starting and driving ... 5-2
E
Economy - fuel........................................... 5-16
Emission control information label............. 9-12
Emission control system warranty ............. 9-19
Engine
Before starting the engine ...................... 5-6
Capacities and recommended fuel/
lubricants ................................................ 9-2
Changing engine coolant...................... 8-10
Changing engine oil.............................. 8-11
Changing engine oil filter...................... 8-13
Checking engine coolant level ............... 8-9
Checking engine oil level ..................... 8-10Engine compartment check
locations .......................................... 8-7, 8-8
Engine coolant temperature gauge ........ 2-6
Engine cooling system ........................... 8-9
Engine oil .............................................. 8-10
Engine oil and oil filter
recommendation ..................................... 9-5
Engine oil pressure warning light .. 2-12, 2-8
Engine oil viscosity ................................. 9-5
Engine serial number ........................... 9-11
Engine specifications .............................. 9-8
Starting the engine ................................. 5-7
Exhaust gas (Carbon monoxide) ................. 5-2
Eyeglass case............................................ 2-26
F
Flashers (See hazard warning flasher
switch) ........................................................ 2-23
Flat tire ......................................................... 6-2
Floor mat positioning aid ............................. 7-5
Fluid
Automatic transmission fluid (ATF) ...... 8-14
Brake fluid............................................. 8-16
Capacities and recommended fuel/
lubricants ................................................ 9-2
Clutch fluid ............................................ 8-16
Engine coolant ........................................ 8-9
Engine oil .............................................. 8-10
Power steering fluid .............................. 8-15
Window washer fluid ............................ 8-17
F.M.V.S.S. certification label ..................... 9-11Front fog light switch ................................. 2-21
Front seats ................................................... 1-2
Fuel
Capacities and recommended fuel/
lubricants ................................................ 9-2
Fuel economy ....................................... 5-16
Fuel filler cap ........................................ 3-12
Fuel filler lid lock opener lever ............. 3-12
Fuel gauge.............................................. 2-6
Fuel octane rating................................... 9-4
Fuel recommendation ............................. 9-3
Fuses ......................................................... 8-27
Fusible links ............................................... 8-27
G
Gauge
Engine coolant temperature gauge ........ 2-6
Fuel gauge.............................................. 2-6
Odometer ................................................ 2-3
Speedometer .......................................... 2-3
Tachometer............................................. 2-6
Trip odometer ......................................... 2-3
General maintenance .................................. 8-3
Glove box................................................... 2-28
Glove box lock ........................................... 2-28
H
Hazard warning flasher switch .................. 2-23
Head restraints ............................................ 1-7
10-2
ZX