2002 NISSAN ALTIMA battery
[x] Cancel search: batteryPage 86 of 249

and hold the HomeLinkTbutton (note step 2
through 4 under ``Programming HomeLinkT'')
while you press and re-press (``cycle'') your
hand-held transmitters every 2 seconds until
the indicator light flashes rapidly (indicating
successful programming).
NOTE:
If programming a garage door opener, etc.,
it is advised to unplug the device during the
``cycling'' process to prevent possible dam-
age to the garage door opener components.
OPERATING THE HomeLinkT
UNIVERSAL TRANSCEIVER
The HomeLinkTUniversal Transceiver (once
programmed) may now be used to activate the
garage door, etc. To operate, simply press the
appropriate programmed HomeLinkTUniversal
Transceiver button. The red indicator light will
illuminate while the signal is being transmitted.
PROGRAMMING TROUBLE-
DIAGNOSIS
If the HomeLinkTdoes not quickly learn the
hand-held transmitter information:
creplace the hand-held transmitter batter-
ies with new batteries.cposition the hand-help transmitter with its
battery area facing away from the
HomeLinkTsurface.
cpress and hold both the HomeLinkTand
hand-held transmitter buttons without in-
terruption.
cposition the hand-held transmitter 2 to 5
inches (50 to 127 mm) away from the
HomeLinkTsurface. Hold the transmitter
in that position for up to 15 seconds. If
HomeLinkTis not programmed within
that time, try holding the transmitter in
another position - keeping the indicator
light in view at all times.
If you continue to have programming diffi-
culties, please contact the NISSAN Con-
sumer Affairs Department. The phone num-
bers are located in the Foreword of this
owner's manual.
CLEARING THE PROGRAMMED
INFORMATION
Individual buttons cannot be cleared, how-
ever to clear all programming, press and
hold the two outside buttons and release
when the indicator light begins to flash
(approximately 20 seconds)
ROLLING CODE PROGRAMMING
Rolling code garage door openers (or other
rolling code devices) which are ``code pro-
tected'' and manufactured after 1996, may
be determined by the following:
A. Reference the garage door opener Own-
er's Manual for verification.
B. The hand-held transmitter appears to
program the HomeLinkTUniversal
Transceiver but does not activate the
garage door.
C. Press and hold the trained HomeLinkT
button. If the garage door opener has the
rolling code feature, the HomeLinkTindi-
cator light will flash rapidly, then remains
on after 2 seconds.
To program the HomeLinkTUniversal
Transceiver to a garage door opener with
the rolling code feature, follow these instruc-
tions after completing the ``Programming
HomeLinkT'' (the aid of a second person
may make the following procedures quicker
and easier).
1. Locate the training button on the garage
door opener motor unit. Exact location
and color of the button may vary by
Instruments and controls
2-37
ZX
Page 88 of 249

3 Pre-driving checks and adjustments
Keys .......................................................................3-2
Nissan vehicle immobilizer system
(NVIS) keys .......................................................3-2
Doors ......................................................................3-2
Locking with key ................................................3-3
Locking with inside lock knob............................3-3
Locking with power door lock switch.................3-4
Child safety rear door lock ................................3-4
Remote keyless entry system (if so equipped)......3-5
How to use remote keyless entry
system ...............................................................3-5
Battery replacement ..........................................3-8
Hood .......................................................................3-9
Trunk lid................................................................3-10
Opener operation ............................................3-10Key operation ..................................................3-11
Interior trunk lid release...................................3-11
Fuel filler lid ..........................................................3-12
Opener operation ............................................3-12
Fuel filler cap ...................................................3-12
Steering wheel .....................................................3-13
Tilt operation ....................................................3-13
Telescopic operation .......................................3-14
Sun visors.............................................................3-14
Vanity mirrors ..................................................3-14
Mirrors ..................................................................3-15
Inside mirror.....................................................3-15
Automatic anti-glare inside mirror
(if so equipped)................................................3-15
Outside mirror remote control .........................3-16
ZX
Page 95 of 249

BATTERY REPLACEMENT
Replace the battery in the keyfob as follows:
1. Open the lid using a coin.
2. Replace the battery with a new one.Recommended battery: Sanyo CR2025
or equivalent.
3. Close the lid securely.
4. Press the
button, then thebut-
ton two or three times to check thekeyfob operation.
Each time the
button is pressed, the
hazard lights flash once.
If the battery is removed for any reason
other than replacement, perform step 4.
cAn improperly disposed battery can
hurt the environment. Always confirm
local regulations for battery disposal.
cThe keyfob is water-resistant; how-
ever, if it does get wet, immediately
wipe completely dry.
cThe operational range of the keyfob
extends to approximately 33 ft (10 m)
from the vehicle. This range may vary
with conditions.
FCC Notice:
Changes or modifications not expressly
approved by the manufacturer for com-
pliance could void the user's authority to
operate the equipment.
This device complies with part 15 of the
FCC Rules and RSS-210 of Industry
Canada.
Operation is subject to the following two
conditions: (1) This device may not
LPD0081
3-8Pre-driving checks and adjustments
ZX
Page 120 of 249

TUNE/FF-REV
WARNING
The radio should not be tuned while
driving so full attention may be given to
vehicle operation.
Use the
orbuttons for manual tun-
ing. To move quickly through the channels,
hold the tuning buttons down.
SEEK tuning
Push SEEK/TRACK (or). SEEK
tuning begins from low to high frequencies or
high to low frequencies, depending on which
button is pressed, and stops at the next
broadcasting station. If using the up button,
once the highest broadcasting station is
reached, the radio continues in the SEEK
mode at the lowest broadcasting station. If
using the down button, once the lowest
broadcasting station is reached, the radio
continues in the SEEK mode at the highest
broadcasting station.
SCAN tuning
Push the SCAN button. SCAN illuminates in
the display window. Scan tuning begins
from low to high frequencies or from high to
low frequencies. Scan tuning stops at each
broadcasting station that has sufficient sig-
nal strength for 5 seconds. When scanning,
SCAN blinks in the display. Pushing the
SCAN button again during this 5 second
period stops Scan tuning and the radio
remains tuned to that station.
Station memory operation þ Travel Pre-
set is OFF
Each preset mode (A, B or C) has 6 presets,
capable of storing any combination of AM,
FM and FM RDS stations.
Press the PRESET ABC button to change
between the presets:
A!B!C
The radio displays icon A, B or C to indicate
which set of presets is active.
To store a radio station in a preset:
1. Select the desired preset by pressing
PRESET ABC.
2. Tune to the desired station.3. Press the desired station select button
(>2 seconds.)
4. A beep will sound indicating memoriza-
tion is complete.
5. Other station select buttons can be set in
the same manner.
If the battery cable is disconnected, or if the
radio fuse opens, the radio memory is can-
celled. In that case, reset the desired sta-
tions.
Turning ON Travel Preset
1. Press the TRAVEL preset button (<1.5
seconds). The TRAVEL icon shows in
the display.
2. The radio selects the strongest stations
in the area and stores them in Travel
Presets A, B and C. 12 FM stations and
6 AM stations are the default settings. To
change the default settings, see ªEditing
Travel Presetº later in this section.
3. When finished storing radio stations, the
radio tunes to the first stored preset of
Travel Preset A.
4. If the radio cannot find any stations, the
Heater, air conditioner and audio systems
4-17
ZX
Page 125 of 249

TUNE/FF-REV
WARNING
The radio should not be tuned while
driving so full attention may be given to
vehicle operation.
Use the
orbuttons for manual tun-
ing. To move quickly through the channels,
hold the tuning buttons down.
SEEK tuning
Push SEEK/TRACK (or). SEEK
tuning begins from low to high frequencies or
high to low frequencies, depending on which
button is pressed, and stops at the next
broadcasting station. If using the up button,
once the highest broadcasting station is
reached, the radio continues in the SEEK
mode at the lowest broadcasting station. If
using the down button, once the lowest
broadcasting station is reached, the radio
continues in the SEEK mode at the highest
broadcasting station.
SCAN tuning
Push the SCAN button. SCAN illuminates in
the display window. Scan tuning begins
from low to high frequencies or from high to
low frequencies. Scan tuning stops at each
broadcasting station that has sufficient sig-
nal strength for 5 seconds. When scanning,
SCAN blinks in the display. Pushing the
SCAN button again during this 5 second
period stops Scan tuning and the radio
remains tuned to that station.
Station memory operation þ Travel Pre-
set is OFF
Each preset mode (A, B or C) has 6 presets,
capable of storing any combination of AM,
FM and FM RDS stations.
Press the PRESET ABC button to change
between the presets:
A!B!C
The radio displays icon A, B or C to indicate
which set of presets is active.
To store a radio station in a preset:
1. Select the desired preset by pressing
PRESET ABC.
2. Tune to the desired station.3. Press the desired station select button
(>2 seconds.)
4. When the indicator illuminates in the
station selection button, a beep will
sound indicating memorization is com-
plete. For FM stations, the indicator will
turn green. For AM stations, the indicator
will turn amber.
5. Other station select buttons can be set in
the same manner.
If the battery cable is disconnected, or if the
radio fuse opens, the radio memory is can-
celled. In that case, reset the desired sta-
tions.
Turning ON Travel Preset
1. Press the TRAVEL preset button (<1.5
seconds). The TRAVEL icon shows in
the display.
2. The radio selects the strongest stations
in the area and stores them in Travel
Presets A, B and C. 12 FM stations and
6 AM stations are the default settings. To
change the default settings, see ªEditing
Travel Presetº later in this section.
3. When finished storing radio stations, the
4-22Heater, air conditioner and audio systems
ZX
Page 134 of 249

5 Starting and driving
Precautions when starting and driving ...................5-2
Exhaust gas (carbon monoxide) .......................5-2
Three-way catalyst ............................................5-2
Avoiding collision and rollover ...........................5-3
Drinking alcohol/drugs and driving ....................5-4
Ignition switch .........................................................5-4
Automatic transmission .....................................5-4
Manual transmission..........................................5-5
Key positions .....................................................5-5
Nissan vehicle immobilizer system
(NVIS) ................................................................5-6
Before starting the engine ......................................5-6
Starting the engine .................................................5-7
Driving the vehicle ..................................................5-7
Automatic transmission .....................................5-7
Manual transmission........................................5-11
Parking brake .......................................................5-13
Cruise control (if so equipped) .............................5-14
Precautions on cruise control ..........................5-14Cruise control operations ................................5-14
Break-in schedule ................................................5-15
Increasing fuel economy ......................................5-16
Parking/parking on hills ........................................5-17
Power steering .....................................................5-18
Brake system........................................................5-18
Braking precautions .........................................5-18
Anti-lock brake system (ABS)
(if so equipped)................................................5-19
Traction control system (TCS) .............................5-20
Cold weather driving ............................................5-21
Freeing a frozen door lock ..............................5-21
Anti-freeze .......................................................5-21
Battery .............................................................5-21
Draining of coolant water ................................5-21
Tire equipment.................................................5-22
Special winter equipment ................................5-22
Driving on snow or ice.....................................5-22
Engine block heater (if so equipped) ..............5-23
ZX
Page 137 of 249

DRINKING ALCOHOL/DRUGS
AND DRIVING
WARNING
Never drive under the influence of alco-
hol or drugs. Alcohol in the bloodstream
reduces coordination, delays reaction
time and impairs judgement. Driving after
drinking alcohol increases the likelihood
of being involved in an accident injuring
yourself and others. Additionally, if you
are injured in an accident, alcohol can
increase the severity of the injury.
NISSAN is committed to safe driving. How-
ever, you must choose not to drive under
the influence of alcohol. Every year thou-
sands of people are injured or killed in
alcohol related accidents. Although the local
laws vary on what is considered to be
legally intoxicated, the fact is that alcohol
affects all people differently and most
people underestimate the effects of alcohol.
Remember, drinking and driving don't mix!
And that's true for drugs, too (over the
counter, prescription, and illegal drugs).
Don't drive if your ability to operate your
vehicle is impaired by alcohol, drugs, or
some other physical condition.AUTOMATIC TRANSMISSION
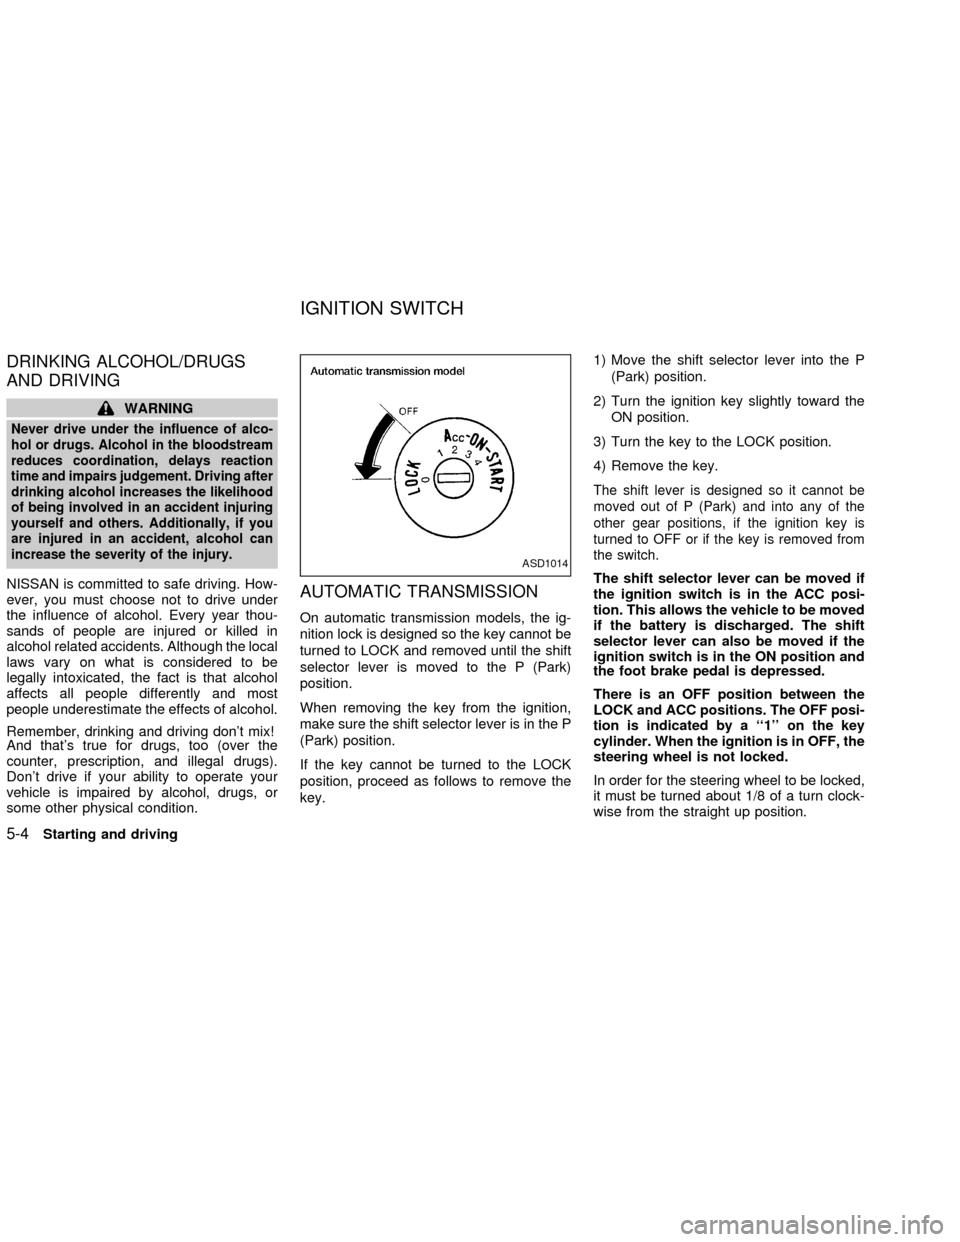
On automatic transmission models, the ig-
nition lock is designed so the key cannot be
turned to LOCK and removed until the shift
selector lever is moved to the P (Park)
position.
When removing the key from the ignition,
make sure the shift selector lever is in the P
(Park) position.
If the key cannot be turned to the LOCK
position, proceed as follows to remove the
key.1) Move the shift selector lever into the P
(Park) position.
2) Turn the ignition key slightly toward the
ON position.
3) Turn the key to the LOCK position.
4) Remove the key.
The shift lever is designed so it cannot be
moved out of P (Park) and into any of the
other gear positions, if the ignition key is
turned to OFF or if the key is removed from
the switch.
The shift selector lever can be moved if
the ignition switch is in the ACC posi-
tion. This allows the vehicle to be moved
if the battery is discharged. The shift
selector lever can also be moved if the
ignition switch is in the ON position and
the foot brake pedal is depressed.
There is an OFF position between the
LOCK and ACC positions. The OFF posi-
tion is indicated by a ``1'' on the key
cylinder. When the ignition is in OFF, the
steering wheel is not locked.
In order for the steering wheel to be locked,
it must be turned about 1/8 of a turn clock-
wise from the straight up position.
ASD1014
IGNITION SWITCH
5-4Starting and driving
ZX
Page 143 of 249

P (Park):
Use this selector position when the vehicle
is parked or when starting the engine. Make
sure the vehicle is completely stopped. For
maximum safety, depress the brake pedal,
then move the lever to the P (Park) position.
The brake pedal must be depressed any
time the selector lever is moved to P (Park).
Apply the parking brake. When parking on a
hill, apply the parking brake first, then move
the lever to the P (Park) position.
R (Reverse):
Use this position to back up. Always be sure
the vehicle is completely stopped when
selecting R (Reverse). The brake pedal
must be depressed to move the selector
lever from P (Park), N (Neutral), or any drive
position to R (Reverse).
N (Neutral):
Neither forward nor reverse gear is engaged.
The engine can be started in this position.
You may shift to N (Neutral) and restart a
stalled engine while the vehicle is moving.
D (Drive):
Use this position for all normal forward
driving.3 (Third gear):
For driving up or down long slopes where
engine braking would be advantageous.
2 (Second gear):
Use for hill climbing or engine braking on
downhill grades.
Do not exceed 68 MPH (110 km/h) in the 2
(Second gear) position.
1 (Low gear):
Use this position when climbing steep hills
slowly or driving slowly through deep snow,
sand or mud, or for maximum engine brak-
ing on steep downhill grades.
Do not exceed 37 MPH (60 km/h) in the 1
(Low gear) position.
Shift lock release
If the battery is discharged, the shift selector
lever may not be moved from the P (Park)
position even with the brake pedal de-
pressed.
To move the shift selector lever, release the
shift lock. The selector lever can be moved
to N (Neutral). However, the steering wheel
will be locked unless the ignition switch is
turned to the ON position. This allows the
vehicle to be moved if the battery is dis-
charged.
To push the shift lock release button, per-
LSD0024
5-10Starting and driving
ZX