2002 Mercury Villager brake light
[x] Cancel search: brake lightPage 93 of 256

•Press OFF.
Pressing OFF will erase the
previously programmed set speed.
To return to a previously set speed
•Press RES/ACCEL. For
RES/ACCEL to operate, the
vehicle speed must be faster than
48 km/h (30 mph).
Indicator light
•Standard analog instrument
cluster
The“CRUISE”light comes on when
the ON control is pressed.
The“SET”light comes on when either the COAST/SET or RES/ACCEL
controls are pressed. The“SET”light turns off when the cruise CANCEL
control is pressed or the brake is applied. Both the“CRUISE”and“SET”
lights turn off when the OFF control is pressed or the ignition is turned
to the OFF position.
•Optional electronic instrument
cluster
This light comes on when either the
COAST/SET or RES/ACCEL controls are pressed. It turns off when the
cruise CANCEL control is pressed, the brake is applied or the ignition is
turned to the OFF position.
CANCEL ON
OFFRES
ACCEL
COAST
SET
CANCEL ON
OFFRES
ACCEL
COAST
SET
CRUISE SET
CRUISE
Driver Controls
93
Page 157 of 256

•steering wheel is turned when getting in or out of the vehicle
Make sure the corresponding lights illuminate or illuminate briefly. If a
light fails to illuminate, have the vehicle serviced.
•If the driver’s safety belt is fastened, the
light may not illuminate.
Starting the engine
Note:Whenever you start your vehicle, release the key as soon as the
engine starts. Excessive cranking could damage the starter.
1. Turn the key to 4 (START)
without pressing the accelerator
pedal and release as soon as the
engine starts. The key will return to
3 (ON).
2. If the temperature is above–12°C
(10°F) and the engine does not
start within five seconds on the first
try, turn the key to OFF, wait 10
seconds and try again.
3. If the temperature is below -12°C (10°F) and the engine does not
start in 15 seconds on the first try, turn the key OFF and wait 10
km/h0 1020304050
60
70
80
90
100MPH
TRIP A
RPM x 1000
20406080
100
120
140
160
0 1234
5
6
7
8F
H
CE
CRUISE SETPRND2P1
SERVICE
ENGINE
SOONABSAIR
BAGABSO/D
OFF
OUTSIDE TEMP
INST ECONOMY
AVG. ECONOMY
TO EMPTY
PRND21FUEL DOOR UNLEADED FUEL ONLY CRUISE
MPH
km/h
km
F
EH
C
1/2N
O
R
M
A
L
012345
6
78
P!BRAKE
X 1000
RPMTRIP 1
TRIP 2 ˚F ˚C
MILES/BAL
L/100 km
4
3
2
1
Driving
157
Page 159 of 256

Occasional brake noise is normal and often does not indicate a
performance concern with the vehicle’s brake system. In normal
operation, automotive brake systems may emit occasional or intermittent
squeal or groan noises when the brakes are applied. Such noises are
usually heard during the first few brake applications in the morning;
however, they may be heard at any time while braking and can be
aggravated by environmental conditions such as cold, heat, moisture,
road dust, salt or mud. If a“metal-to-metal,”“continuous grinding”or
“continuous squeal”sound is present while braking, the brake linings
may be worn-out and should be inspected by a qualified service
technician.
If you are driving down a long or steep hill, shift to a lower gear.
Do not apply your brakes continuously, as they may overheat
and become less effective.
Anti-lock brake system (ABS) (if equipped)
On vehicles equipped with an anti-lock braking system (ABS), a noise
from the hydraulic pump motor and pulsation in the pedal may be
observed during ABS braking events. Pedal pulsation coupled with noise
while braking under panic conditions or on loose gravel, bumps, wet or
snowy roads is normal and indicates proper functioning of the vehicle’s
anti-lock brake system. The ABS performs a self-check after you start
the engine and begin to drive away. A brief mechanical noise may be
heard during this test. This is normal. If a malfunction is found, the ABS
warning light will come on. If the vehicle has continuous vibration or
shudder in the steering wheel while braking, the vehicle should be
inspected by a qualified service technician.
The ABS operates by detecting the
onset of wheel lockup during brake
applications and compensates for
this tendency. The wheels are
prevented from locking even when
the brakes are firmly applied. The
accompanying illustration depicts
the advantage of an ABS equipped
vehicle (on bottom) to a non-ABS
equipped vehicle (on top) during hard braking with loss of front braking
traction.
Driving
159
Page 160 of 256

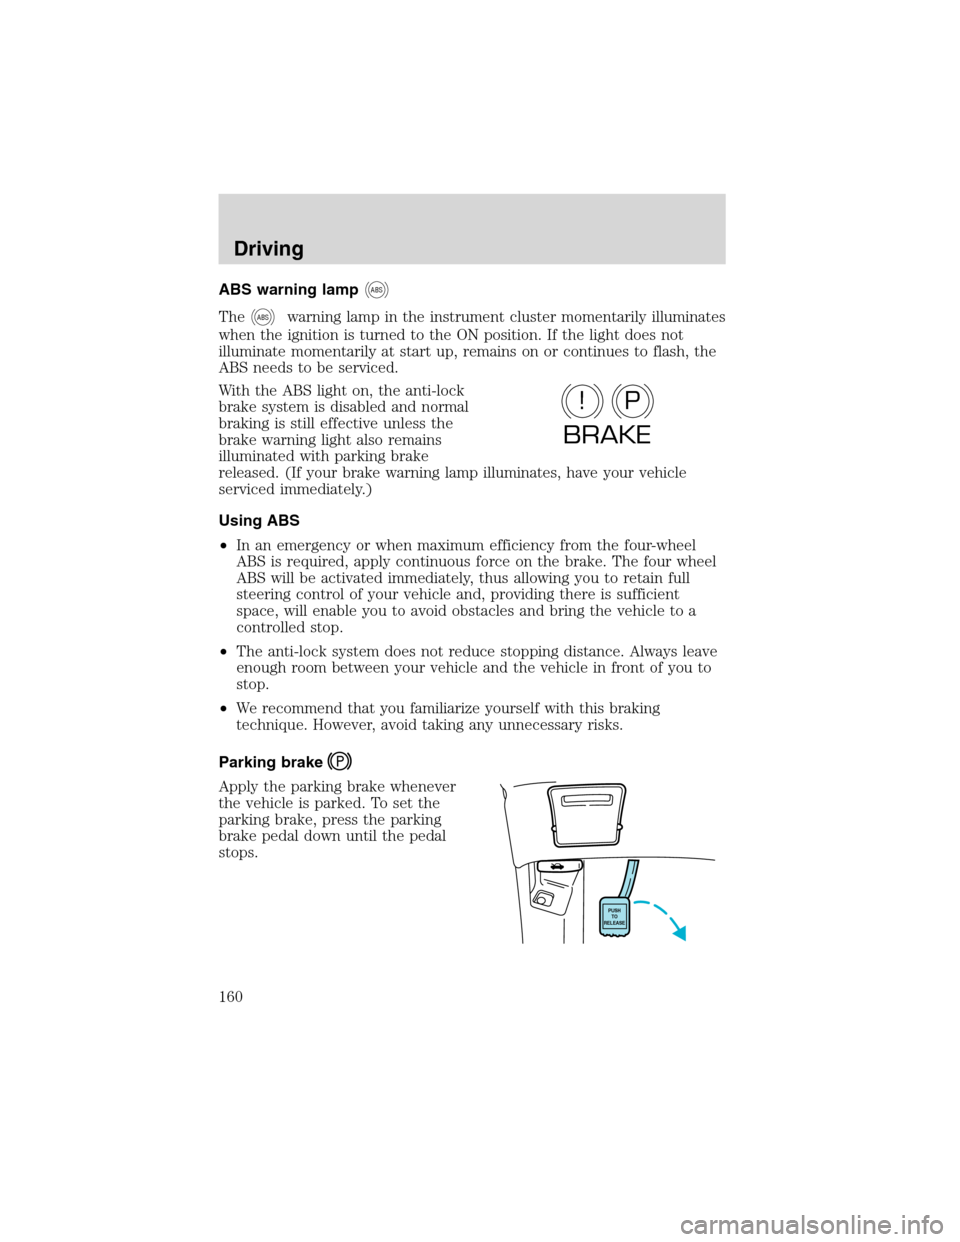
ABS warning lampABS
TheABSwarning lamp in the instrument cluster momentarily illuminates
when the ignition is turned to the ON position. If the light does not
illuminate momentarily at start up, remains on or continues to flash, the
ABS needs to be serviced.
With the ABS light on, the anti-lock
brake system is disabled and normal
braking is still effective unless the
brake warning light also remains
illuminated with parking brake
released. (If your brake warning lamp illuminates, have your vehicle
serviced immediately.)
Using ABS
•In an emergency or when maximum efficiency from the four-wheel
ABS is required, apply continuous force on the brake. The four wheel
ABS will be activated immediately, thus allowing you to retain full
steering control of your vehicle and, providing there is sufficient
space, will enable you to avoid obstacles and bring the vehicle to a
controlled stop.
•The anti-lock system does not reduce stopping distance. Always leave
enough room between your vehicle and the vehicle in front of you to
stop.
•We recommend that you familiarize yourself with this braking
technique. However, avoid taking any unnecessary risks.
Parking brake
Apply the parking brake whenever
the vehicle is parked. To set the
parking brake, press the parking
brake pedal down until the pedal
stops.
P!
BRAKE
PUSH
TO
RELEASE
Driving
160
Page 162 of 256

•Uneven vehicle loading
•High crown in center of road
•High crosswinds
•Wheels out of alignment
•Loose or worn suspension components
AUTOMATIC TRANSAXLE OPERATION
Brake-shift interlock
This vehicle is equipped with a brake-shift interlock feature that prevents
the gearshift lever from being moved from P (Park) when the ignition is
in the ON position unless brake pedal is depressed.
If you cannot move the gearshift lever out of P (Park) with ignition in
the ON position and the brake pedal depressed:
1. Apply the parking brake, turn ignition key to OFF/LOCK, then remove
the key.
2. Insert the key and turn it to ACC. Apply the brake pedal and shift to
N (Neutral).
3. Start the vehicle.
Do not drive your vehicle until you verify that the brakelamps
are working.
If your vehicle gets stuck in mud or snow it may be rocked out by
shifting from forward and reverse gears, stopping between shifts, in a
steady pattern. Press lightly on the accelerator in each gear.
Do not rock the vehicle if the engine is not at normal operating
temperature or damage to the transmission may occur.
Do not rock the vehicle for more than a few minutes or damage
to the transmission and tires may occur or the engine may
overheat.
Always set the parking brake fully and make sure the gearshift is
latched in P (Park). Turn the ignition to the LOCK position and
remove the key whenever you leave your vehicle.
Driving
162
Page 167 of 256

Once through the water, always try the brakes. Wet brakes do not stop
the vehicle as effectively as dry brakes. Drying can be improved by
moving your vehicle slowly while applying light pressure on the brake
pedal.
Driving through deep water where the transaxle is submerged
may allow water into the transaxle and cause internal damage.
Have the fluid checked and, if water is found, replace the fluid.
VEHICLE LOADING
Before loading a vehicle, familiarize yourself with the following terms:
•Base Curb Weight:Weight of the vehicle including any standard
equipment, fluids, lubricants, etc. It does not include occupants or
aftermarket equipment.
•Payload:Combined maximum allowable weight of cargo, occupants
and optional equipment. The payload equals the gross vehicle weight
rating minus base curb weight.
•GVW (Gross Vehicle Weight):Base curb weight plus payload
weight. The GVW is not a limit or a specification.
•GVWR (Gross Vehicle Weight Rating):Maximum permissible total
weight of the base vehicle, occupants, optional equipment and cargo.
The GVWR is specific to each vehicle and is listed on the Safety
Certification Label on the driver’s door pillar.
•GAWR (Gross Axle Weight Rating):Carrying capacity for each axle
system. The GAWR is specific to each vehicle and is listed on the
Safety Certification Label on the driver’s door pillar.
•GCWR (Gross Combined Weight Rating):Maximum permissible
combined weight of towing vehicle (including occupants and cargo)
and the loaded trailer.
•Maximum Trailer Weight Rating:Maximum weight of a trailer the
vehicle is permitted to tow. The maximum trailer weight rating is
determined by subtracting the vehicle curb weight for each
engine/transmission combination, any required option weight for trailer
towing and the weight of the driver from the GCWR for the towing
vehicle.
•Maximum Trailer Weight:maximum weight of a trailer the loaded
vehicle (including occupants and cargo) is permitted to tow. It is
determined by subtracting the weight of the loaded trailer towing
vehicle from the GCWR for the towing vehicle.
•Trailer Weight Range:Specified weight range that the trailer must
fall within that ranges from zero to the maximum trailer weight rating.
Driving
167
Page 178 of 256

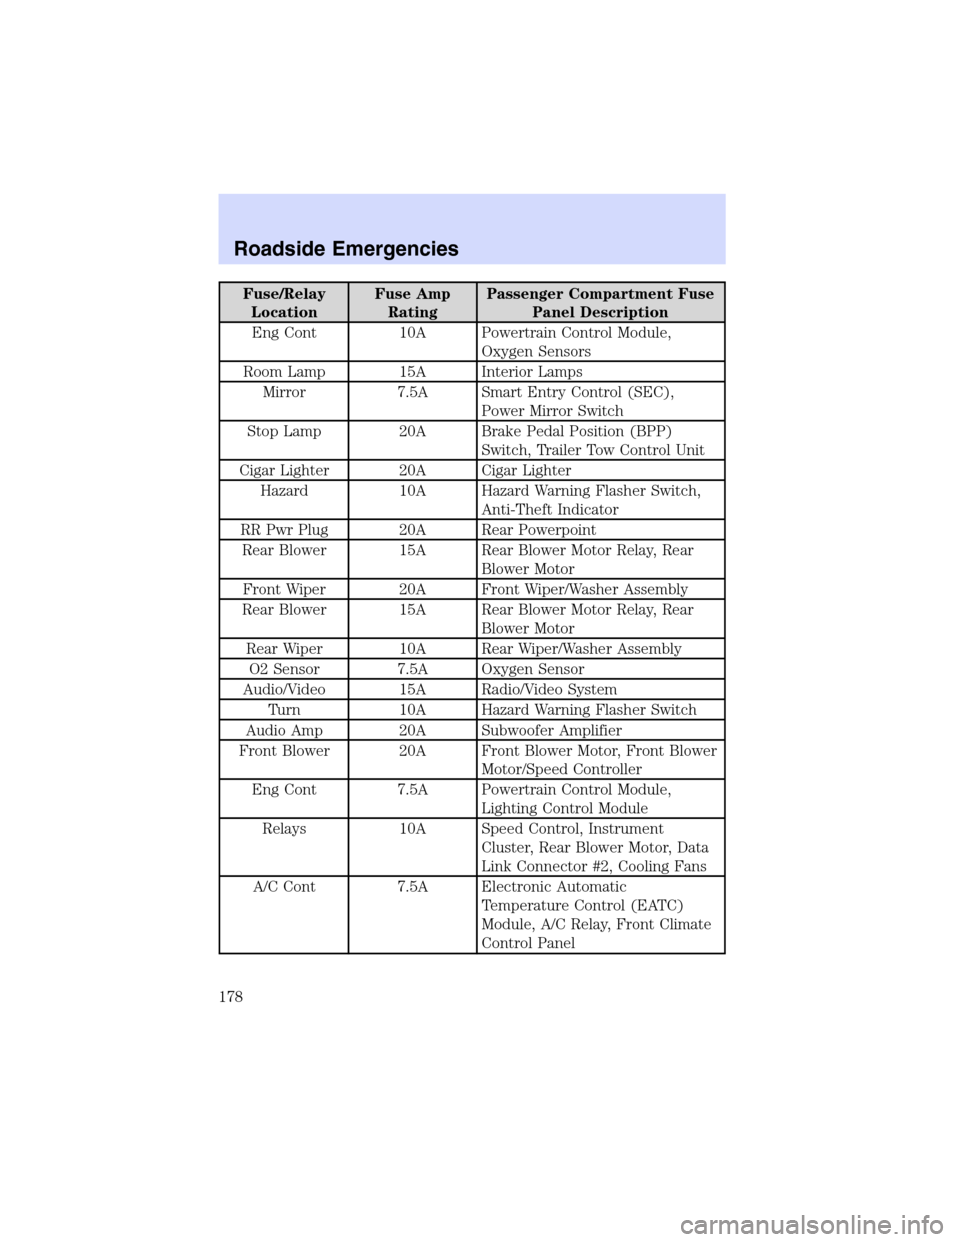
Fuse/Relay
LocationFuse Amp
RatingPassenger Compartment Fuse
Panel Description
Eng Cont 10A Powertrain Control Module,
Oxygen Sensors
Room Lamp 15A Interior Lamps
Mirror 7.5A Smart Entry Control (SEC),
Power Mirror Switch
Stop Lamp 20A Brake Pedal Position (BPP)
Switch, Trailer Tow Control Unit
Cigar Lighter 20A Cigar Lighter
Hazard 10A Hazard Warning Flasher Switch,
Anti-Theft Indicator
RR Pwr Plug 20A Rear Powerpoint
Rear Blower 15A Rear Blower Motor Relay, Rear
Blower Motor
Front Wiper 20A Front Wiper/Washer Assembly
Rear Blower 15A Rear Blower Motor Relay, Rear
Blower Motor
Rear Wiper 10A Rear Wiper/Washer Assembly
O2 Sensor 7.5A Oxygen Sensor
Audio/Video 15A Radio/Video System
Turn 10A Hazard Warning Flasher Switch
Audio Amp 20A Subwoofer Amplifier
Front Blower 20A Front Blower Motor, Front Blower
Motor/Speed Controller
Eng Cont 7.5A Powertrain Control Module,
Lighting Control Module
Relays 10A Speed Control, Instrument
Cluster, Rear Blower Motor, Data
Link Connector #2, Cooling Fans
A/C Cont 7.5A Electronic Automatic
Temperature Control (EATC)
Module, A/C Relay, Front Climate
Control Panel
Roadside Emergencies
178
Page 209 of 256

SERVICE RECOMMENDATIONS
To help you service your vehicle:
•We highlight do-it-yourself items in the engine compartment for easy
location.
•We provide a scheduled maintenance guide which makes tracking
routine service easy.
If your vehicle requires professional service, your dealership can provide
the necessary parts and service. Check yourWarranty Guideto find out
which parts and services are covered.
Use only recommended fuels, lubricants, fluids and service parts
conforming to specifications. Motorcraft parts are designed and built to
provide the best performance in your vehicle.
PRECAUTIONS WHEN SERVICING YOUR VEHICLE
Be especially careful when inspecting or servicing your vehicle.
•Do not work on a hot engine.
•When the engine is running, make sure that loose clothing, jewelry or
long hair does not get caught up in moving parts.
•Do not work on a vehicle with the engine running in an enclosed
space, unless you are sure you have enough ventilation.
•Keep all lit cigarettes, open flames and other lit material away from
the battery and all fuel related parts.
If you disconnect the battery, the engine must“relearn”its idle
conditions before your vehicle will drive properly, as explained in the
Batterysection of this chapter.
Working with the engine off
1. Set the parking brake and ensure the gearshift is securely latched in P
(Park).
2. Turn off the engine and remove the key.
3. Block the wheels to prevent the vehicle from moving unexpectedly.
Working with the engine on
1. Set the parking brake and ensure the gearshift is securely latched in P
(Park).
2. Block the wheels to prevent the vehicle from moving unexpectedly.
Note:Do not start your engine with the air cleaner removed and do not
remove it while the engine is running.
Maintenance and Specifications
209