2002 MERCEDES-BENZ SLK32AMG manual transmission
[x] Cancel search: manual transmissionPage 140 of 290

137 Tele Aid
Te ch n i c a l
data Instruments
and controlsOperationDrivingInstrument
cluster displayPractical hints Car care Index Important!
If the indicator lamps do not start flashing after
pressing one of the buttons or remain illuminated (in
red) at any time, the Tele Aid system has detected a fault
or the service is not currently active, and may not
initiate a call. Visit your Mercedes-Benz Center and
have the system checked or contact the Response Center
at 1-800-756-9018 (in the USA) or 1-888-923-8367 (in
Canada) as soon as possible.
Upgrade Signals
Tele Aid system processes calls using the following
priority.
•Automatic emergency – First priority
•Manual emergency – Second priority
•Roadside assistance – Third priority
•Information – Fourth priority
Should a higher priority call be initiated while you are
connected, an upgrade (alternating) tone will be heard,
and the appropriate indicator lamp will flash. If certain
information such as vehicle identification number or
client information is not available, the operator may
need to retransmit. During this time you will hear a chirp and voice contact will be interrupted. Voice
contact will resume once the retransmission is
completed. Once a call is concluded, a chirp will be
heard and the appropriate indicator lamp will stop
flashing. The audio system operation will resume.
Important!
If the indicator lamp continues to flash or the system
does not reset, contact the Response Center at
1-800-756-9018 (in the USA) or 1-888-923-8367 (in
Canada), or Mercedes-Benz Client Assistance at
1-800-FOR-MERCedes (1-800-367-6372) in the USA or
Customer Service at 1-800-387-0100 in Canada.
Notes:
The indicator lamp in the respective button flashes until
the call is concluded and this can only be completed by
a Response Center or Client Assistance Center
representative.
When a Tele Aid call has been initiated, the audio
system is muted and the selected mode (radio, tape or
CD) pauses. The optional cellular phone (if installed)
switches off. If you must use this phone, the vehicle
must be parked. Disconnect the coiled cord and place
the call.
Page 147 of 290

144 Starting and turning off the enging
Te ch n i c a l
data Instruments
and controlsOperationDrivingInstrument
cluster displayPractical hints Car care Index
Starting and turning off the engine
Before starting
Ensure that parking brake is engaged and that selector
lever is in position “P” or “N” (gearshift lever in
neutral). Turn key in steering lock to position 2.
Starting
Vehicles with automatic transmission:
Do not depress accelerator. Briefly turn key in steering
lock clockwise to the stop and release. The starter will
engage until the engine is running.
If engine will not run, and the starting procedure stops,
turn key completely to the left and repeat starting the
engine.
After several unsuccessful attempts, have the system
checked at the nearest authorized Mercedes-Benz
Center.Vehicles with manual transmission:
Do not depress accelerator. Fully depress clutch pedal,
otherwise the engine cannot be started due to the
integrated safety interlock.
Turn key in steering lock clockwise to the stop. Release
key only when the engine is firing regularly.
Important!
Due to the installed starter nonrepeat feature, the key
must be turned completely to the left before attempting
to start the engine again.
In areas where temperatures frequently drop below
-4°F(-20°C) we recommend that an engine block heater
be installed. Your authorized Mercedes-Benz Center will
advise you on this subject, see page 165.
Turning off
Turn the key in the steering lock to position 0 to stop the
engine.
Vehicles with automatic transmission:
The key can only be removed with your foot off the
brake pedal and the selector lever in position “P”.
Page 148 of 290
145 Manual transmission
Te ch n i c a l
data Instruments
and controlsOperationDrivingInstrument
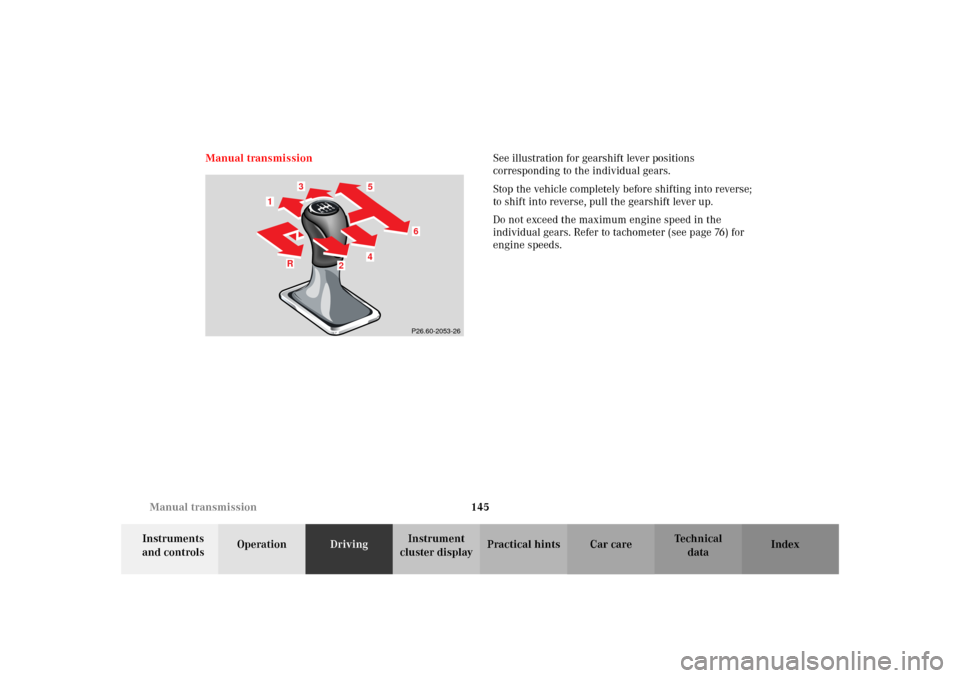
cluster displayPractical hints Car care Index Manual transmissionSee illustration for gearshift lever positions
corresponding to the individual gears.
Stop the vehicle completely before shifting into reverse;
to shift into reverse, pull the gearshift lever up.
Do not exceed the maximum engine speed in the
individual gears. Refer to tachometer (see page 76) for
engine speeds.
4 1
6
5
1
3
R
4
R4
6
13
5
2
2
P26.60-2053-26
Page 149 of 290
146 Manual transmission
Te ch n i c a l
data Instruments
and controlsOperationDrivingInstrument
cluster displayPractical hints Car care Index
Important!
Downshifting gears leading to overrevving the engine
can result in transmission damage that is not covered
by the Mercedes-Benz Limited Warranty.
Do not exceed engine speed limits, see page 76 .
Wa r n i n g !
For vehicles equipped with a manual transmission,
getting out of your vehicle with the gearshift lever
not engaged in 1st or reverse gear and parking
brake engaged is dangerous.
Also, when parked on an incline, an engaged 1st or
reverse gear alone may not prevent your vehicle
from moving, possibly hitting people or objects.Always set the parking brake in addition to
engaging 1st or reverse gear, see page 156 for
parking brake.When parked on an incline, also turn front wheel
towards the road curb.
Wa r n i n g !
When leaving the vehicle always remove the key
from the steering lock, and lock the vehicle. Do not
leave children unattended in the vehicle, or with
access to an unlocked vehicle. Children could move
the gearshift lever, which could result in an
accident or serious injury.Wa r n i n g !
On slippery road surfaces as well as high engine
speeds, never downshift in order to obtain braking
action. This could result in drive wheel slip and
reduced vehicle control. Your vehicle’s ABS will not
prevent this type of loss of control.
Page 153 of 290
150 Automatic transmission
Te ch n i c a l
data Instruments
and controlsOperationDrivingInstrument
cluster displayPractical hints Car care Index
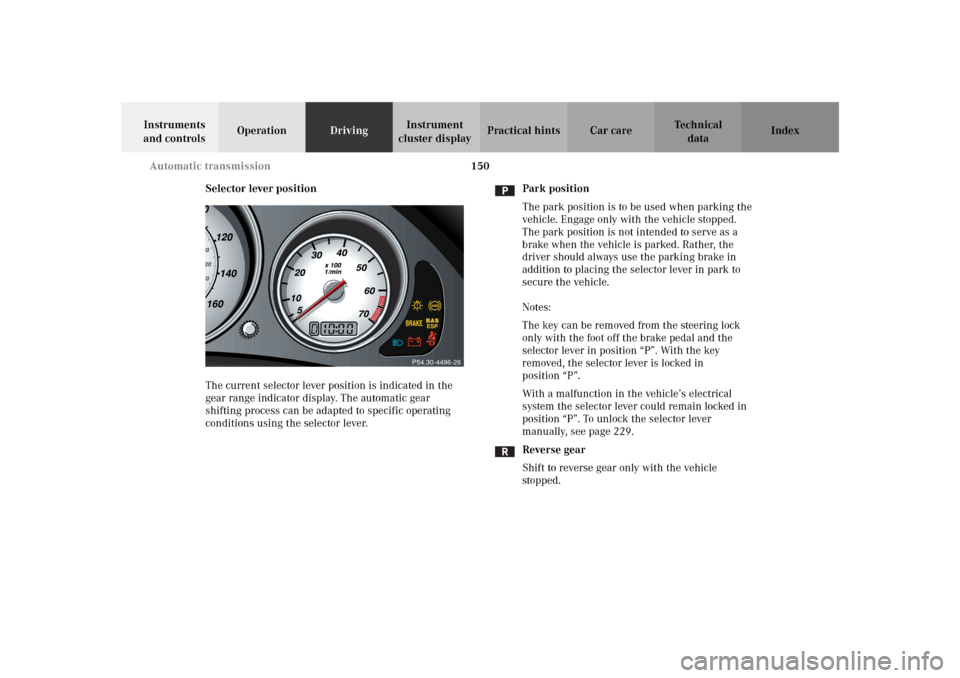
Selector lever position
The current selector lever position is indicated in the
gear range indicator display. The automatic gear
shifting process can be adapted to specific operating
conditions using the selector lever.Park position
The park position is to be used when parking the
vehicle. Engage only with the vehicle stopped.
The park position is not intended to serve as a
brake when the vehicle is parked. Rather, the
driver should always use the parking brake in
addition to placing the selector lever in park to
secure the vehicle.
Notes:
The key can be removed from the steering lock
only with the foot off the brake pedal and the
selector lever in position “P”. With the key
removed, the selector lever is locked in
position “P”.
With a malfunction in the vehicle’s electrical
system the selector lever could remain locked in
position “P”. To unlock the selector lever
manually, see page 229.
Reverse gear
Shift to reverse gear only with the vehicle
stopped.
P54.30-4496-26
Page 162 of 290
159 Driving instructions
Te ch n i c a l
data Instruments
and controlsOperationDrivingInstrument
cluster displayPractical hints Car care Index Caution!
When driving down long and steep grades, relieve the
load on the brakes by shifting into a lower gear to use
the engine’s braking power. This helps prevent
overheating of the brakes and reduces brake pad wear.
After hard braking, it is advisable to drive on for some
time, rather than immediately parking, so the air stream
will cool down the brakes faster.
Driving off
Apply the service brakes to test them briefly after
driving off. Perform this procedure only when the road
is clear of other traffic.
Warm up the engine smoothly. Do not place full load on
the engine until the operating temperature has been
reached.
When starting off on a slippery surface, do not allow one
drive wheel to spin for an extended period with the ESP
switched off. Doing so may cause serious damage to the
drive train which is not covered by the Mercedes-Benz
Limited Warranty.Parking
Wa r n i n g !
To reduce the risk of personal injury as a result of
vehicle movement, before
turning off the engine
and leaving the vehicle, always:
1. Keep right foot on the service brake pedal.
2. Firmly engage parking brake.
3. Move the selector lever to position “P”
(manual transmission: first or reverse gear).
4. Slowly release the service brake pedal.
5. Turn front wheels towards the road curb.
6. Turn the key to steering lock position 0 and
remove.
7. Take the key and lock vehicle when leaving.
Page 163 of 290
160 Driving instructions
Te ch n i c a l
data Instruments
and controlsOperationDrivingInstrument
cluster displayPractical hints Car care Index
Important!
It is advisable to set the parking brake whenever
parking or leaving the vehicle. In addition, move
selector lever to position “P” (manual transmission:
first or reverse gear).
When parking on hills, always set the parking brake.Tires
Tread wear indicators (TWI) are required by law. These
indicators are located in six places on the tread
circumference and become visible at a tread depth of
approximately
1/16 in (1.5 mm), at which point the tire is
considered worn and should be replaced.
The tread wear indicator appears as a solid band across
the tread.
Wa r n i n g !
If you feel a sudden significant vibration or ride
disturbance, or you suspect that possible damage to
your vehicle has occurred, you should turn on the
hazard warning flashers, carefully slow down, and
drive with caution to an area which is a safe
distance from the roadway.Inspect the tires and under the vehicle for possible
damage. If the vehicle or tires appear unsafe, have
it towed to the nearest Mercedes-Benz Center or
tire dealer for repairs.
Page 166 of 290

163 Driving instructions
Te ch n i c a l
data Instruments
and controlsOperationDrivingInstrument
cluster displayPractical hints Car care Index Snow chains
Use only snow chains that are tested and recommended
by Mercedes-Benz. Your authorized Mercedes-Benz
Center will be glad to advise you on this subject.
Chains should only be used on the rear wheels. Follow
the manufacturer’s mounting instructions.
Snow chains should only be driven on snow covered
roads at speeds not to exceed 30 mph (50 km / h).
Remove chains as soon as possible when driving on
roads without snow.
When driving with snow chains, press the ESP control
switch to OFF, see page 175.
Important!
Use of snow chains is not permissible with tire size
225 / 50 R 16, with the collapsible spare tire, or with tire
size 245 / 40 ZR 17 (Sport Package).Winter driving instructions
The most important rule for slippery or icy roads is to
drive sensibly and to avoid abrupt acceleration, braking
and steering maneuvers. Do not use the cruise control
system under such conditions.
When the vehicle is in danger of skidding, move
selector lever to position “N” or in case of manual
transmission declutch. Try to keep the vehicle under
control by corrective steering action.
Road salts and chemicals can adversely affect braking
efficiency. Increased pedal force may become necessary
to produce the normal brake effect. We therefore
recommend depressing the brake pedal periodically
when traveling at length on salt-strewn roads. This can
bring road salt impaired braking efficiency back to
normal. A prerequisite is, however, that this be done
without endangering other drivers on the road.
If the vehicle is parked after being driven on salt treated
roads, the braking efficiency should be tested as soon as
possible after driving is resumed while observing the
safety rules in the previous paragraph.