2002 MERCEDES-BENZ ML430 wheel
[x] Cancel search: wheelPage 210 of 342
207 Driving instructions
Te ch n i c a l
data Instruments
and controlsOperationDrivingInstrument
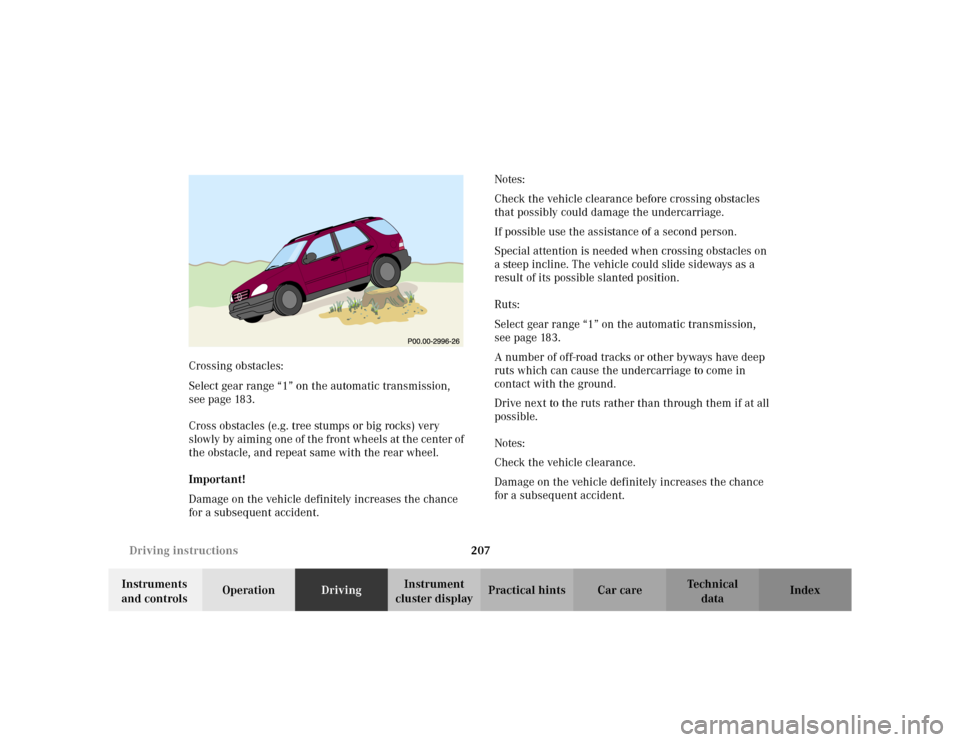
cluster displayPractical hints Car care Index Crossing obstacles:
Select gear range “1” on the automatic transmission,
see page 183.
Cross obstacles (e.g. tree stumps or big rocks) very
slowly by aiming one of the front wheels at the center of
the obstacle, and repeat same with the rear wheel.
Important!
Damage on the vehicle definitely increases the chance
for a subsequent accident.Notes:
Check the vehicle clearance before crossing obstacles
that possibly could damage the undercarriage.
If possible use the assistance of a second person.
Special attention is needed when crossing obstacles on
a steep incline. The vehicle could slide sideways as a
result of its possible slanted position.
Ruts:
Select gear range “1” on the automatic transmission,
see page 183.
A number of off-road tracks or other byways have deep
ruts which can cause the undercarriage to come in
contact with the ground.
Drive next to the ruts rather than through them if at all
possible.
Notes:
Check the vehicle clearance.
Damage on the vehicle definitely increases the chance
for a subsequent accident.
Page 211 of 342
208 Driving instructions
Te ch n i c a l
data Instruments
and controlsOperationDrivingInstrument
cluster displayPractical hints Car care Index
Returning from off-road driving
Off-road driving increases strain on the vehicle.
We recommend that you inspect the vehicle for possible
damage after each off-road trip. Recognizing any
damage and a subsequent timely repair reduces the
chance of a possible breakdown or accident later on.
Proceed as follows:
•Switch off the LOW RANGE mode, see page 227.
•Remove excessive dirt from tires, wheels, wheel
housings, and underbody. For instance, after driving
in mud, clean the radiator, chassis, engine, brakes,
and wheels from extreme dirt, using a strong jet of
water.
•Inspect frame, oil pan, brake hoses, etc., as well as
vehicle underbody for possible damage.
•Check tires for possible damage, clean all exterior
lamps, and conduct a brake test.•Check for brush or branches caught in the
undercarriage. They could increase the possibility of
a fire, as well as cut fuel and / or brake lines,
puncture rubber bellows of the axles or drive shafts.
•After continued operation in mud, sand, water or
other dirty conditions clean the brake discs, wheels,
brake pads and check and clean axle joints.
Wa r n i n g !
If you feel a sudden significant vibration or ride
disturbance, or you suspect that possible damage to
your vehicle has occurred, you should turn on the
hazard warning flashers, carefully slow down, and
drive with caution to an area which is a safe
distance from the roadway.Inspect the tires and under the vehicle for possible
damage. If the vehicle or tires appear unsafe, have
it towed to the nearest Mercedes-Benz Light Truck
Center or tire dealer for repairs.
Page 213 of 342
210 Driving instructions
Te ch n i c a l
data Instruments
and controlsOperationDrivingInstrument
cluster displayPractical hints Car care Index
Vehicle and trailer weights and ratings
Gross Vehicle Weight Rating (GVWR) is the maximum
permissible vehicle weight: 6614 lbs. (3000 kg)
Gross Vehicle Weight (GVW): comprises weight of
vehicle including fuel, tools, spare wheel, installed
accessories, passengers, cargo and trailer tongue. It
must never exceed the GVWR.
Gross Axle Weight Rating (GAWR) is the maximum
permissible axle weight:
Gross Trailer Weight (GTW) is the maximum
permissible trailer weight to be towed:
5000 lbs. (2260 kg)
Trailer Tongue Weight Rating (TWR) is the maximum
permissible weight of the trailer tongue:
[500 lbs. (225 kg) limit for MB approved hitch receiver]Loading a trailer
When loading a trailer, you should observe that neither
the permissible GTW, nor the GVWR are exceeded.
Maximum permissible values are listed on the safety
compliance certification labels for the vehicle and for
the trailer to be towed. The lowest value listed must be
selected when determining how the vehicle and trailer
are loaded.
We recommend loading the trailer in such a manner
that it has a tongue weight (TW) between 10% and 15%
of the GTW.
The tongue weight at the hitch ball must be added to the
GVW to prevent exceeding your Mercedes-Benz tow
vehicle’s rear GAWR. front
rear2976 lbs.
3858 lbs.(1350 kg)
(1750 kg)
Page 216 of 342
213 Driving instructions
Te ch n i c a l
data Instruments
and controlsOperationDrivingInstrument
cluster displayPractical hints Car care Index At very steep inclines, not manageable with selector
lever in position “1”, switch transfer case to LOW
RANGE, see page 227 for instructions on how to engage
LOW RANGE.
When going down a long hill, shift into a lower gear and
use the engine’s braking effect. Avoid riding the brakes,
thus overheating the vehicle and trailer brakes.
If the engine coolant rises to an extremely high
temperature (coolant temperature needle approaching
the red zone) when the air conditioner is on, turn off the
air conditioner. Engine coolant heat can be additionally
vented by opening the windows, switching the climate
control fan speed to high and setting the temperature
control to the maximum hot position.
Extreme care must be exercised since your vehicle with
a trailer will require additional passing distance ahead
than when driving without a trailer. Because your
vehicle and trailer is longer than your vehicle alone, you
will also need to go much farther ahead of the passed
vehicle before you can return to your lane.Parking
Wa r n i n g !
To reduce the risk of personal injury, or damage to
the vehicle powertrain, as a result of vehicle/trailer
movement, always:1. Keep right foot on brake pedal.2. Shift gear selector lever to position “N”.3. Have a second person place wheel chocks on
downhill side of left and right trailer wheels.4. Slowly release brake pedal and let vehicle and
trailer roll into chocks until stopped.5. Firmly depress parking brake pedal.6. Move gear selector lever to position “P”.7. On inclines turn front wheels towards the road
curb.
Page 218 of 342
215 Driving systems
Te ch n i c a l
data Instruments
and controlsOperationDrivingInstrument
cluster displayPractical hints Car care Index 3Canceling
To cancel the cruise control, briefly push lever to
position 3.
When you step on the brake pedal or the vehicle
speed drops below approximately 20 mph
(30 km / h), for example when driving upgrade, the
cruise control will be canceled.
If the cruise control cancels by itself and remains
inoperative until the engine is restarted, have the
system checked at your authorized Mercedes-Benz
Light Truck Center as soon as possible.
4Resume
If the lever is briefly pushed to position 4 when
driving at a speed exceeding approximately 20 mph
(30 km / h), the vehicle resumes the speed which
was set prior to the cancellation of the cruise
control. The last memorized speed is canceled when
the key in the steering lock is turned to position 1
or 0.Important!
Moving gear selector lever to position “N” switches the
cruise control off.
Wa r n i n g !
Only use the cruise control if the traffic and
weather conditions make it advisable to travel at a
steady speed.• The use of cruise control can be dangerous on
winding roads or in heavy traffic because
conditions do not allow safe driving at a steady
speed.
• The use of cruise control can be dangerous on
slippery roads. Rapid changes in tire adhesion
can result in wheel spin and loss of control.The “Resume” function should only be operated if
the driver is fully aware of the previously set speed
and wishes to resume this particular preset speed.
Page 222 of 342

219 Driving systems
Te ch n i c a l
data Instruments
and controlsOperationDrivingInstrument
cluster displayPractical hints Car care Index Antilock brake system (ABS)
Important!
The ABS improves steering control of the vehicle during
hard braking maneuvers.
The ABS prevents the wheels from locking up above a
vehicle speed of approximately 5 mph (8 km / h)
independent of road surface conditions.
At the instant one of the wheels is about to lock up, a
slight pulsation can be felt in the brake pedal,
indicating that the ABS is in the regulating mode. Keep
firm and steady pressure on the brake pedal while
experiencing the pulsation.
Continuous steady brake pedal pressure results in
applying the advantages of the ABS, namely braking
power and ability to steer the vehicle.In the case of an emergency brake maneuver keep
continuous full pressure on the brake pedal. In this
manner only can the ABS be most effective.
On slippery road surfaces, the ABS will respond even
with light brake pedal pressure because of the
increased likelihood of locking wheels. The pulsating
brake pedal can be an indication of hazardous road
conditions and functions as a reminder to take extra
care while driving.
ABS control
The ABS malfunction indicator lamp- in the
instrument cluster comes on with the key in steering
lock position 2 and should go out with the engine
running.
When the ABS malfunction indicator lamp- in the
instrument cluster comes on while the engine is
running, it indicates that the ABS has detected a
malfunction and has switched off. In this case, the brake
system functions in the usual manner, but without
antilock assistance.
With the ABS malfunctioning, the BAS, EBP, ESP and
4-ETS+ are also switched off. The malfunction indicator
lamps come on with the engine running.
Wa r n i n g !
Do not pump the brake pedal, rather use firm,
steady brake pedal pressure. Pumping the brake
pedal defeats the purpose for ABS and significantly
reduces braking effectiveness.
Page 223 of 342
220 Driving systems
Te ch n i c a l
data Instruments
and controlsOperationDrivingInstrument
cluster displayPractical hints Car care Index
If the charging voltage falls below 10 volts, the
malfunction indicator lamp comes on and the ABS is
switched off. When the voltage is above this value again,
the malfunction indicator lamp should go out and the
ABS is operational.
If the ABS malfunction indicator lamp stays illuminated,
have the system checked at your authorized
Mercedes-Benz Light Truck Center as soon as possible.Notes:
To alert following vehicles to slippery road conditions
you discover, operate your hazard warning flashers as
appropriate.
Operating the vehicle on a single axle dynamometer
should only be done for briefly testing the brakes. To do
so, move selector lever to position “N”. The engine must
be shut off (key in steering lock position 0 or 1).
LOW RANGE – ABS
During off-road driving a special low range system for
the antilock brake system (ABS) is operational with
transmission in LOW RANGE mode, see page 229.
When applying the service brakes at speeds below
approximately 18 mph (30 km / h), the front wheels are
locked cyclically to shorten the braking distance (dig in
effect). This affects steering the vehicle.
Wa r n i n g !
ABS cannot prevent the natural laws of physics
from acting on the vehicle, nor can it increase
braking or steering efficiency beyond that afforded
by the condition of the vehicle brakes and tires or
the traction afforded. The ABS cannot prevent
accidents, including those resulting from excessive
speed in turns, following another vehicle too
closely, or aquaplaning. Only a safe, attentive, and
skillful driver can prevent accidents. The
capabilities of an ABS equipped vehicle must never
be exploited in a reckless or dangerous manner
which could jeopardize the user’s safety or the
safety of others.
Page 224 of 342
221 Driving systems
Te ch n i c a l
data Instruments
and controlsOperationDrivingInstrument
cluster displayPractical hints Car care Index Four-wheel electronic traction system (4-ETS+)
With the key in steering lock position 2, the yellow
4-ETS+ malfunction indicator lamp{ and the 4-ETS+
warning lampv come on and should go out when
the engine is running.
The 4-ETS+ improves vehicle’s ability to utilize available
traction, especially under slippery road conditions. The
brakes are applied to the spinning wheel and power is
transferred to the wheel(s) with traction.
The traction control engages at vehicle speeds up to
approx. 24 mph (40 km / h), and switches off at
50 mph (80 km / h).
The 4-ETS+ warning lampv, located in the
speedometer dial, starts to flash at any vehicle speed, as
soon as the tires lose traction and the wheels begin to
spin.
Important!
If the 4-ETS+ warning lampv flashes:
•During take-off, apply as little throttle as possible.
•While driving, ease up on the accelerator.
•Adapt your speed and driving to the prevailing road
conditions.4-ETS+ Control
If the yellow 4-ETS+ malfunction indicator lamp{
comes on while the 4-ETS+ warning lampv flashes,
the electronic traction system is being switched off
temporarily to prevent overheating of the drive wheel
brakes.
If the 4-ETS+ malfunction indicator lamp{ comes on
with the engine running, a malfunction has been
detected.
Have the 4-ETS+ checked at your authorized
Mercedes-Benz Light Truck Center as soon as possible.
With the ABS malfunctioning, the 4-ETS+ is also
switched off.
Caution!
If the vehicle is towed with the front axle raised (see
towing the vehicle on page 277), or when testing the
parking brake on a brake test dynamometer, the engine
must be shut off (key in steering lock position 0 or 1).
Otherwise, the electronic traction system will
immediately be engaged and will apply the rear wheel
brakes.