2002 MERCEDES-BENZ G500 ECO mode
[x] Cancel search: ECO modePage 10 of 385

7 IntroductionProduct information
Kindly observe the following in your own best interest:
We recommend using Mercedes-Benz original parts as well as conversion parts and accessories
explicitly approved by us for your vehicle model.
We have tested these parts to determine their reliability, safety and their special
suitability for Mercedes-Benz vehicles.
We are unable to make an assessment for other products and therefore cannot be held responsible
for them, even if in individual cases an official approval or authorization by governmental or other
agencies should exist. Use of such parts and accessories could adversely affect the safety,
performance or reliability of your vehicle. Please do not use them.
Mercedes-Benz original parts as well as conversion parts and accessories approved by us are available
at your authorized Mercedes-Benz Light Truck Center where you will receive comprehensive information, also on
permissible technical modifications, and where proper installation will be performed.
J_G463.book Seite 7 Mittwoch, 19. September 2001 8:06 08
Page 34 of 385
31 Central locking system
Te ch n i c a l
data Instruments
and controlsOperationDrivingInstrument
cluster displayPractical hints Car care Index Locking and unlocking with remote control
Unlocking:
Press transmit button Œ. All turn signal lamps blink
once to indicate that the vehicle is unlocked.
The remote control can be programmed for two kinds of
unlocking modes (see below):
Selective unlocking mode –
Press transmit button Œ once to unlock driver’s door
and fuel filler flap.
Press transmit button Πtwice to unlock all doors,
fuel filler flap, and tailgate.
Global unlocking mode –
Press transmit button Πonce to unlock all doors,
fuel filler flap, and tailgate.
Notes:
If the tailgate was previously locked separately, it will
remain locked, see page 39.
The presently active unlocking mode (selective or
global) can only be determined by unlocking the vehicle
with the remote control (see below for changing mode).If within 40 seconds of unlocking with the remote
control, neither door or tailgate is opened, the electronic
key is not inserted in the starter switch, or the central
locking switch is not activated, the vehicle will
automatically lock.
Locking:
Press transmit button ‹ once. All turn signal lamps
blink three times to indicate that the vehicle is locked. If
they do not blink three times, a door or the tailgate is
not properly closed.
Note:
If the vehicle cannot be locked or unlocked by pressing
the transmit button, then it may be necessary to change
the batteries in the electronic key (if ok, battery check
lamp in electronic key will light briefly when pressing
transmit button) or to synchronize the remote control,
see pages 343 and 345.
Choosing global or selective mode on remote control
Press and hold transmit buttons‹ andŒ
simultaneously for 6 seconds to reprogram the remote
control. Battery check lamp will blink two times
indicating the completed mode change.
J_G463.book Seite 31 Mittwoch, 19. September 2001 8:06 08
Page 70 of 385
67 Restraint systems
Te ch n i c a l
data Instruments
and controlsOperationDrivingInstrument
cluster displayPractical hints Car care Index Important!
The operational readiness of the airbag system is
verified by the indicator lamp “SRS” in the instrument
cluster when turning the key in starter switch to
position 1 or 2. If no fault is detected, the lamp will go
out after approximately 5 seconds; after the lamp goes
out, the system continues to monitor the components
and circuitry of the airbag system and will indicate a
malfunction by coming on again. If the lamp does not
come on at all or if it fails to extinguish after
approximately 5 seconds or if it comes on thereafter,
a malfunction in the system has been detected.
The following system components are monitored or
undergo a self-check: crash-sensor(s), airbag ignition
circuits, front seat belt buckle, emergency tensioning
retractors, seat sensor.
Initially, when the key is turned from starter switch
position 0 to positions 1 or 2, malfunctions in the
crash-sensor are detected and indicated (the “SRS”
indicator lamp stays on longer than 5 seconds or does
not come on).
Have the system checked at your authorized
Mercedes-Benz Light Truck Center immediately.In the operational mode, after the indicator lamp has
gone out following the initial check, interruptions or
short circuits in the airbag ignition circuit and in the
driver and front passenger seat belt buckle harnesses,
and low voltage in the entire system are detected and
indicated.
Wa r n i n g !
In the event a malfunction of the “SRS” is indicated
as outlined above, the “SRS” may not be
operational. For your safety, we strongly
recommend that you visit an authorized
Mercedes-Benz Light Truck Center immediately to
have the system checked; otherwise the “SRS” may
n ot be a ct ivated when need ed in an ac c i den t, whi ch
could result in serious or fatal injury, or it might
deploy unexpectedly and unnecessarily which
could also result in injury.
J_G463.book Seite 67 Mittwoch, 19. September 2001 8:06 08
Page 112 of 385
109 Multifunction steering wheel, multifunction display
Te ch n i c a l
data Instruments
and controlsOperationDrivingInstrument
cluster displayPractical hints Car care Index Press the è or ÿ button repeatedly until the
individual setting preliminary display (1) appears.
Press the j or k button until the setting menu
“SETTINGS” (2) is displayed.
Pressing the æ or ç button controls the selection
marker in the setting menu.
“INSTRUMENT CLUSTER”, see page 110.
“LIGHTING”, see page 114.
“VEHICLE”, see page 118.
“CONVENIENCE”, see page 120
Pressing the è or ÿ button displays the next or
previous system.
Note:
These settings may only be performed with the
electronic key in starter switch position 1 or 2.To return menu “SETTINGS” (2) to its factory
setting:
•Call up the individual setting preliminary
display (1) or display (2).
•Press the reset knob on the instrument cluster
(see page 84) for approximately 3 seconds.
Display (3) will appear.
•Press the reset knob on the instrument cluster once
more. The menu “SETTINGS” is reset to factory
settings, acknowledged by display (4).
The individual setting preliminary display (1) will
appear if you do not press the reset knob on the
instrument cluster within about 5 seconds. The
setting menus will not be reset.
Note:
For safety reasons, the individual setting “LIGHT
CIRCUIT HEADLAMP MODE” in menu “LIGHTING”
cannot be reset while driving, see page 114. If an
attempt is made, the message “LIGHTING” – “CANNOT
BE COMPLETELY RESET TO FACTORY SETTINGS
WHILE DRIVING” will be displayed.
J_G463.book Seite 109 Mittwoch, 19. September 2001 8:06 08
Page 120 of 385
117 Multifunction steering wheel, multifunction display
Te ch n i c a l
data Instruments
and controlsOperationDrivingInstrument
cluster displayPractical hints Car care Index To return menu “LIGHTING” (3 to 6) to its factory
setting:
•Call up menu (3 to 6).
•Press the reset knob on the instrument cluster (see
page 84) in the instrument cluster for approximately
3 seconds. Display (7) will appear.
•Press the reset knob on the instrument cluster once
more. The individual setting menu “LIGHTING” is
reset to factory settings, acknowledged by
display (8).
The individual setting display “SETTINGS” (2) will
appear if you do not press the reset knob on the
instrument cluster within about 5 seconds. The
setting menus will not be reset.Note:
For safety reasons, the individual setting “LIGHT
CIRCUIT HEADLAMP MODE” in menu “LIGHTING”
cannot be reset while driving. If an attempt is made, the
message “LIGHTING” – “CANNOT BE COMPLETELY
RESET TO FACTORY SETTINGS WHILE DRIVING” will
be displayed.
J_G463.book Seite 117 Mittwoch, 19. September 2001 8:06 08
Page 122 of 385
119 Multifunction steering wheel, multifunction display
Te ch n i c a l
data Instruments
and controlsOperationDrivingInstrument
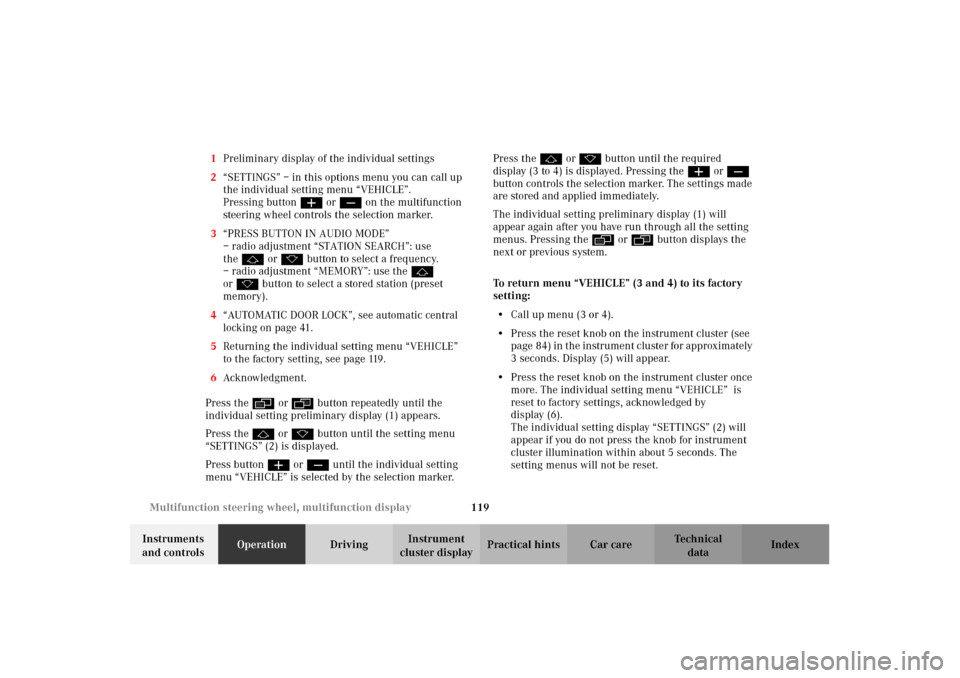
cluster displayPractical hints Car care Index 1Preliminary display of the individual settings
2“SETTINGS” – in this options menu you can call up
the individual setting menu “VEHICLE”.
Pressing buttonæ orç on the multifunction
steering wheel controls the selection marker.
3“PRESS BUTTON IN AUDIO MODE”
– radio adjustment “STATION SEARCH”: use
thej ork button to select a frequency.
– radio adjustment “MEMORY”: use the j
ork button to select a stored station (preset
memory).
4“AUTOMATIC DOOR LOCK”, see automatic central
locking on page 41.
5Returning the individual setting menu “VEHICLE”
to the factory setting, see page 119.
6Acknowledgment.
Press the è or ÿ button repeatedly until the
individual setting preliminary display (1) appears.
Press the j or k button until the setting menu
“SETTINGS” (2) is displayed.
Press buttonæ orç until the individual setting
menu “VEHICLE” is selected by the selection marker.Press the j or k button until the required
display (3 to 4) is displayed. Pressing the æ orç
button controls the selection marker. The settings made
are stored and applied immediately.
The individual setting preliminary display (1) will
appear again after you have run through all the setting
menus. Pressing the è or ÿ button displays the
next or previous system.
To return menu “VEHICLE” (3 and 4) to its factory
setting:
•Call up menu (3 or 4).
•Press the reset knob on the instrument cluster (see
page 84) in the instrument cluster for approximately
3 seconds. Display (5) will appear.
•Press the reset knob on the instrument cluster once
more. The individual setting menu “VEHICLE” is
reset to factory settings, acknowledged by
display (6).
The individual setting display “SETTINGS” (2) will
appear if you do not press the knob for instrument
cluster illumination within about 5 seconds. The
setting menus will not be reset.
J_G463.book Seite 119 Mittwoch, 19. September 2001 8:06 08
Page 132 of 385
129 Exterior lamp switch
Te ch n i c a l
data Instruments
and controlsOperationDrivingInstrument
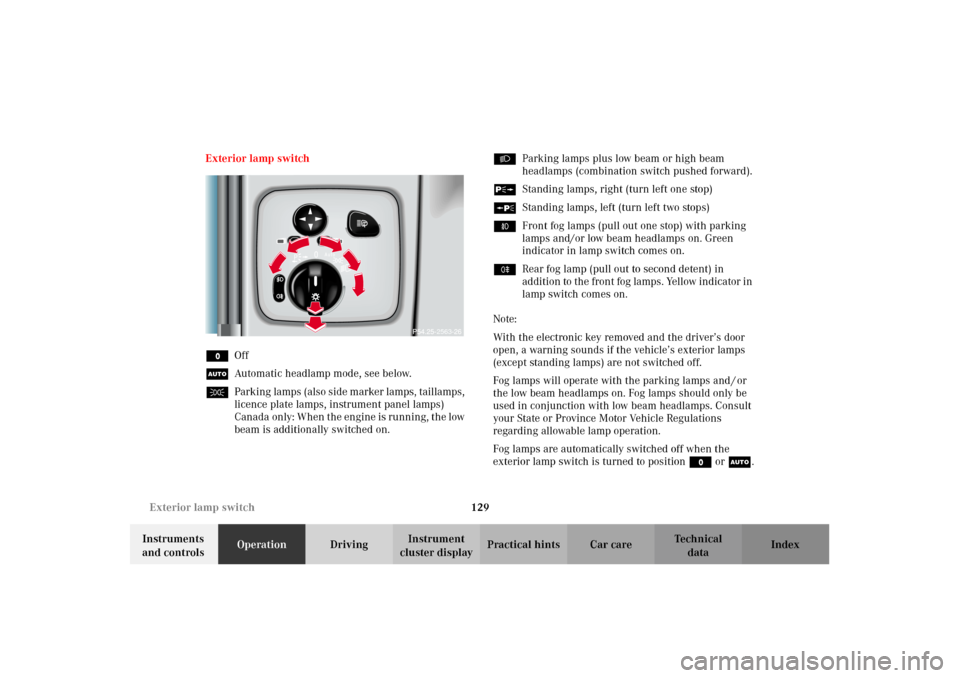
cluster displayPractical hints Car care Index Exterior lamp switch
MOff
UAutomatic headlamp mode, see below.
CPar k ing lamps (als o s id e m ar ker lamps , taillamps ,
licence plate lamps, instrument panel lamps)
Canada only: When the engine is running, the low
beam is additionally switched on.BParking lamps plus low beam or high beam
headlamps (combination switch pushed forward).
ˆStanding lamps, right (turn left one stop)
‚Standing lamps, left (turn left two stops)
‡Front fog lamps (pull out one stop) with parking
lamps and/or low beam headlamps on. Green
indicator in lamp switch comes on.
†Rear fog lamp (pull out to second detent) in
addition to the front fog lamps. Yellow indicator in
lamp switch comes on.
Note:
With the electronic key removed and the driver’s door
open, a warning sounds if the vehicle’s exterior lamps
(except standing lamps) are not switched off.
Fog lamps will operate with the parking lamps and / or
the low beam headlamps on. Fog lamps should only be
used in conjunction with low beam headlamps. Consult
your State or Province Motor Vehicle Regulations
regarding allowable lamp operation.
Fog lamps are automatically switched off when the
exterior lamp switch is turned to position M or U.
2563
J_G463.book Seite 129 Mittwoch, 19. September 2001 8:06 08
Page 135 of 385
132 Exterior lamp switch
Te ch n i c a l
data Instruments
and controlsOperationDrivingInstrument
cluster displayPractical hints Car care Index
Night security illumination
Turn exterior lamp switch to positionU.
At low ambient light conditions and with the engine
having been switched off, the exterior lamps (fog lamps
and parking lamps) switch on for added illumination,
(except in daytime running mode). After the last door
has been closed the lamp-on time period commences.
See the individual setting menu “LIGHTING” –
“HEADLAMPS DELAYED SWITCH–OFF” on page 114,
for instructions on how to activate the function.
The lamp-on time period for night security illumination
can be set at several different timed levels from 0 (off) to
60 seconds, see the individual setting menu
“LIGHTING” – “HEADLAMPS DELAYED SWITCH–OFF”
on page 114.Notes:
Within 10 minutes after closing the last door the night
security illumination can be reactivated by opening a
door.
If after switching the engine off, no doors are opened or
if after opening the doors or tailgate they are not closed,
the night security illumination will switch off
automatically after 60 seconds.
Deactivating night security illumination temporarily:
Turn the electronic key in starter switch to position 0
then to position 2 and back to position 0 again before
getting out of the vehicle. The night security
illumination will not be activated when the door is
opened.
J_G463.book Seite 132 Mittwoch, 19. September 2001 8:06 08