Page 242 of 341
239 Malfunction and warning messages
Te ch n i c a l
data Instruments
and controlsOperation DrivingInstrument
cluster displayPractical hints Car care Index LIGHT SENSOR
With the electronic key removed and the driver’s door
open, a warning sounds and the message “SWITCH OFF
LIGHTS!” appears in the multifunction indicator if the
vehicle’s exterior lamps (except standing lamps) are not
switched off.STEER. WHEEL ADJUST.
For locking the adjustable telescoping steering column,
see page 73.
Line 1 Line 2
STEER. WHEEL ADJUST.
ProCarManuals.com
Page 254 of 341
251 Engine compartment
Te ch n i c a l
data Instruments
and controlsOperation DrivingInstrument
cluster displayPractical hintsCar care Index To o pen :
To unlock the hood, pull release lever (1) under the
driver’s side of the instrument panel. At the same time a
handle will extend out of the radiator grill (it may be
necessary to lift the hood up slightly).
Caution!
To avoid damage to the windshield wiper or hood, open
the hood only with wiper in the parked position.Pull handle (2) to its stop out of radiator grill and open
hood (do not pull up on handle).
To c l o s e :
Lower hood and let it drop into lock from a height of
approx. 1ft. (30cm), assisting with hands placed flat on
edges of hood (3).
To avoid hood damage, please make sure that hood is
fully closed. If not, repeat closing procedure. Do not
push down on hood to attempt to fully close it.
P88.40-2025-26
1
P88.40-2017-26
3
2
3
ProCarManuals.com
Page 263 of 341

260 Tires, Wheels
Te ch n i c a l
data Instruments
and controlsOperation DrivingInstrument
cluster displayPractical hintsCar care Index
Spare wheel
Spare wheel bolts (CLK 320 only)
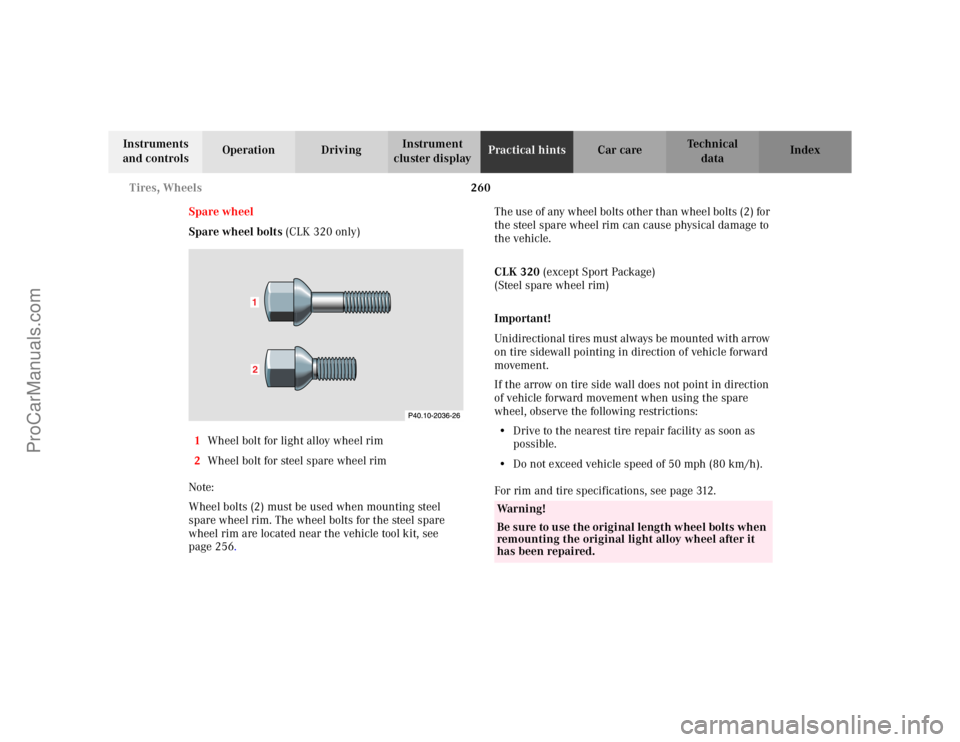
1Wheel bolt for light alloy wheel rim
2Wheel bolt for steel spare wheel rim
Note:
Wheel bolts (2) must be used when mounting steel
spare wheel rim. The wheel bolts for the steel spare
wheel rim are located near the vehicle tool kit, see
page 256.The use of any wheel bolts other than wheel bolts (2) for
the steel spare wheel rim can cause physical damage to
the vehicle.
CLK 320 (except Sport Package)
(Steel spare wheel rim)
Important!
Unidirectional tires must always be mounted with arrow
on tire sidewall pointing in direction of vehicle forward
movement.
If the arrow on tire side wall does not point in direction
of vehicle forward movement when using the spare
wheel, observe the following restrictions:
•Drive to the nearest tire repair facility as soon as
possible.
•Do not exceed vehicle speed of 50 mph (80 km/h).
For rim and tire specifications, see page 312.
12
Wa r n i n g !
Be sure to use the original length wheel bolts when
remounting the original light alloy wheel after it
has been repaired.
ProCarManuals.com
Page 269 of 341
266 Tires, Wheels
Te ch n i c a l
data Instruments
and controlsOperation DrivingInstrument
cluster displayPractical hintsCar care Index
10. Clean contact surfaces of wheel and wheel hub.
Install wheel on wheel hub. Insert wheel bolts and
tighten them slightly.Important!
CLK 320 only:
When installing steel spare wheel rim, make certain to
use the correct wheel bolts, supplied in the vehicle tool
kit, page 256 and see page 260.
To avoid paint damage, place wheel flat against hub and
hold it there while installing first wheel bolt.
Unscrew the alignment bolt (1) to install the last wheel
bolt.
P40.10-2483-26
ProCarManuals.com
Page 272 of 341

269 Tires, Wheels
Te ch n i c a l
data Instruments
and controlsOperation DrivingInstrument
cluster displayPractical hintsCar care Index The pressures listed for light loads are minimum values
offering high driving comfort.
Increased inflation pressures listed for heavier loads
may also be used for light loads. These higher pressures
produce favorable handling characteristics. The ride of
the vehicle, however, will be somewhat harder. Never
exceed the max. values or inflate tires below the min.
values listed in the fuel filler flap.
Tire temperature and pressure increase with the vehicle
speed. Tire pressure should therefore only be checked
and corrected on cold tires. Correct tire pressure in
warm tires only if pressure has dropped below the
pressure listed in the table and the respective operating
conditions are taken into consideration.
An underinflated tire due to a slow leak (e.g. due to a
nail in the tire) may cause damage such as tread
separation, bulging etc.. Regular tire pressure checks
(including the spare tire) at intervals of no more than
14 days are therefore essential.If a tire constantly loses air, it should be inspected for
damage.
The spare tire should be checked periodically for
condition and inflation. Spare tire will age and become
worn over time even if never used, and thus should be
inspected and replaced when necessary.
Wa r n i n g !Do not overload the tires by exceeding the specified
vehicle capacity weight (as indicated by the label
on the driver’s door latch post). Overloading the
tires can overheat them, possibly causing a
blowout.
Follow recommended inflation pressures.
Do not overinflate tires. Overinflated tires can
result in sudden deflation (blowout) because they
are more likely to become punctured or damaged
by road debris, potholes etc.
Do not underinflate tires. Underinflated tires wear
unevenly, adversely affect handling and fuel
economy, and are more likely to fail from being
overheated.
ProCarManuals.com
Page 275 of 341

272 Jump starting
Te ch n i c a l
data Instruments
and controlsOperation DrivingInstrument
cluster displayPractical hintsCar care Index
Important!
A discharged battery can freeze at approx. +14
°F
(–10
°C). In that case, it must be thawed out before
jumper cables are used. Attempting to jump start a
frozen battery can result in it exploding, causing
personal injury.
Jumper cable specifications:
•Minimum cable cross-section of 25 mm
2 or approx.
2AWG
•Maximum length of 11.5 ft. (3.5 m).
If the battery is discharged, the engine should be started
with jumper cables and the (12 V) battery of another
vehicle.
Only use 12 V battery to jump start your vehicle. Jump
starting with more powerful battery could damage the
vehicle’s electrical systems, which will not be covered
by the Mercedes-Benz Limited Warranty.
The battery is located in the trunk under the trunk floor.Proceed as follows:
1. Position the vehicle with the charged battery so that
the jumper cables will reach, but never let the
vehicles touch. Make sure the jumper cables do not
have loose or missing insulation.
2. On both vehicles:
•Turn off engine and all lights and accessories,
except hazard warning flashers or work lights.
•Apply parking brake and shift selector lever to
position “P”.
Important!
3. Clamp one end of the first jumper cable to the
positive (+) terminal of the discharged battery and
the other end to the positive (+) terminal of the
charged battery. Make sure the cable clamps do not
touch any other metal parts.
4. Clamp one end of the second jumper cable to the
grounded negative (–) terminal of the charged
battery and the final connection to the negative (–)
terminal (2) of the discharged battery.
ProCarManuals.com
Page 288 of 341
285 Electronic key
Te ch n i c a l
data Instruments
and controlsOperation DrivingInstrument
cluster displayPractical hintsCar care Index Changing batteries in the electronic key
1Transmit buttons
2Lamp for battery check and function control
Checking batteries
If one of the transmit buttons (1) is pressed, the battery
check lamp (2) lights up briefly – indicating that the
batteries are in order.
Change batteries if the battery check lamp (2) does not
light up briefly.Changing batteries
Move locking tab (3) in direction of right arrow and
remove mechanical key (4, left arrow).
P80.20-2201-26
1
2
P80.35-2029-26
4
3
ProCarManuals.com
Page 302 of 341

299
Te ch n i c a l
data Instruments
and controlsOperation DrivingInstrument
cluster displayPractical hintsCar careIndex
Vehicle careCleaning and care of the
vehicle ........................................300
Power washer .............................. 301
Paintwork, painted body
components ................................. 301
Engine cleaning ..........................302
Tar stains .....................................302
Vehicle washing .........................302
Ornamental moldings ................302
Headlamps, taillamps, turn signal
lenses ...........................................303
Window cleaning ........................303
Plastic and rubber parts ............303Wiper blade ................................ 303
Light alloy wheels ..................... 303
Instrument cluster ..................... 304
Steering wheel and gear selector
lever ............................................. 304
Cup holder .................................. 304
Seat belts ..................................... 304
Headliner .................................... 304
Upholstery .................................. 305
Hard plastic trim items ............. 305
Plastic and rubber parts ........... 305
Wind screen .............................. 305
Rubber weatherstrip ................ 305
Soft top ........................................ 306
ProCarManuals.com