Page 644 of 909

M–14
ELECTRONIC 4WD CONTROL SYSTEM
End Of Sie4WD SYSTEM CONTROLA6E632227100206Outline
Features
•Based on the inputted signals listed below, the 4WD CM calculates the optimal amount of torque distribution for
the rear wheels and outputs a corresponding electric control current to the electronic control coupling (4WD
solenoid).
•The module controls the current outputted to the 4WD solenoid by changing the rate of the ON/OFF timing.
Construction
Block diagram
.
Signal output part Signal name Note
PCMThrottle opening angle
Engine speed
Transmitted as a CAN signal TCMSelector lever position
Gear position
DSC HU/CMFour-wheel speed
DSC operating condition
Coupling torque request (DSC equipped vehicles)
Differential oil temperature
sensorRear differential oil temperature—
9
87
5
4
310
1413
11
12
61
2
A6E63222009
1PCM
2TCM
3 DSC HU/CM
4 Differential oil temperature sensor
5 Throttle opening angle
6 Engine speed
7 Selector lever position8 Gear position
9 Four-wheel speed
10 DSC operating condition
11 Coupling torque request (DSC equipped vehicles)
12 Rear differential oil temperature
13 4WD control modure (4WD CM)
14 Electronic control coupling (4WD solenoid)
Page 645 of 909

ELECTRONIC 4WD CONTROL SYSTEM
M–15
M
Operation
Normal control
•When starting off or accelerating during straight-ahead driving, torque transmitted to the rear wheels is
optimally controlled to ensure sufficient acceleration performance. Due to this, standing-start and acceleration
performance is improved.
•Also, in order to improve fuel economy when driving at a stable, consistent speed, torque transmitted to the
rear wheels is damped, and rear-wheel drive is controlled to maintain it close to that of the front wheels.
Tight cornering control
•When the 4WD CM determines, based on the four-wheel speed signal, that the vehicle is in tight cornering, it
reduces the torque transmitted to the rear wheels to avoid tight corner braking characteristics.
Integrated DSC control
•If a signal from the DSC HU/CM input to the 4WD CM indicates that ABS control is activated, the module
controls the torque transmitted to the rear wheels to prevent undue influence on ABS control.
•Also, when a coupling torque request signal is received from the DSC HU/CM, the module controls the torque
transmitted to the rear wheels to match the amount of requested torque.
Other control
•In case the rear differential oil temperature exceeds the specified amount, or when there is an unusually large
variation in the rotation speed of the front and rear wheels (ex. when trying to get unstuck), control is
temporarily suspended in order to protect the 4WD system. When this occurs the 4WD warning light flashes to
indicate the situation to the driver.
End Of Sie
CONTROLLER AREA NETWORK (CAN)A6E632227100207Outline
•The 4WD CM transmits/receives information using the CAN system. See Section T for detailed information
regarding the CAN system.
Operation
Transmitted information
•Coupling torque
•4WD system operating condition (warning light information)
Received information
•Four-wheel speed
•Throttle opening angle
•Engine speed
•ABS/DSC operating condition
•Gear position
•Selector lever position
•Coupling torque request
End Of Sie
Page 648 of 909

M–18
OUTLINE
SUPPLEMENTAL SERVICE INFORMATIONA6E630201018204•The following additions have been made since publication of the Mazda6 Workshop Manual (1730-1*-02C).
Rear wheel hub bolt
•Replacement procedure has been added.
Wheel hub, knuckle
•Removal/installation procedure has been added.
Joint shaft (MZR-CD (RF Turbo))
•Disassembly/assembly procedure has been added.
Joint shaft (4WD)
•Disassembly/assembly procedure has been added.
Front drive shaft (MZR-CD (RF Turbo))
•Disassembly/assembly procedure has been added.
Front drive shaft (4WD)
•Disassembly/assembly procedure has been added.
Rear drive shaft
•Inspection procedure has been added.
•Removal/installation procedure has been added.
•Disassembly/assembly procedure has been added.
Differential oil
•Inspection procedure has been added.
•Replacement procedure has been added.
Oil seal (side gear)
•Replacement procedure has been added.
Oil seal (companion flange)
•Replacement procedure has been added.
Rear differential
•Removal/installation procedure has been added.
•Disassembly procedure has been added.
•Assembly procedure has been added.
Differential oil temperature sensor
•Inspection procedure has been added.
•Removal/installation procedure has been added.
4WD solenoid
•Inspection procedure has been added.
Coupling component
•Removal/installation procedure has been added.
•Disassembly procedure has been added.
•Assembly procedure has been added.
On-board diagnostic
•Electronic 4WD control system have been added.
Troubleshooting
•Electronic 4WD control system have been added.
End Of Sie
OUTLINE
Page 649 of 909
LOCATION INDEX
M–19
M
AXLE/DRIVE SHAFT LOCATION INDEXA6E630025500201
.
End Of Sie
LOCATION INDEX
5
4
3
1
2
A6J63002001
1 Wheel hub bolt
(See M–22 WHEEL HUB BOLT REPLACEMENT)
2 Wheel hub, knuckle
(See M–22 WHEEL HUB, KNUCKLE REMOVAL/
INSTALLATION)
3 Joint shaft
(See M–29 JOINT SHAFT (MZR-CD (RF Turbo))
DISASSEMBLY/ASSEMBLY)
(See M–31 JOINT SHAFT (4WD) DISASSEMBLY/
ASSEMBLY)4 Front drive shaft
(See M–34 FRONT DRIVE SHAFT (MZR-CD (RF
Turbo)) DISASSEMBLY/ASSEMBLY)
(See M–39 FRONT DRIVE SHAFT (4WD)
DISASSEMBLY/ASSEMBLY)
5 Rear drive shaft
(See M–42 REAR DRIVE SHAFT
PRE-INSPECTION)
(See M–43 REAR DRIVE SHAFT REMOVAL/
INSTALLATION)
(See M–45 REAR DRIVE SHAFT DISASSEMBLY/
ASSEMBLY)
Page 651 of 909

GENERAL PROCEDURES
M–21
M
PRECAUTION (FRONT AND REAR AXLE)A6E631001018201Wheel and Tire Removal/Installation
1. The removal and installation procedures for the wheels and tires are not mentioned in this section. When a
wheel is removed, tighten it to 88—118 N·m {9.0—12.0 kgf·m, 65.0—87.0 ft·lbf}
Brake Line Disconnection/Connection
Caution
•Brake fluid will damage painted surfaces. If brake fluid gets on a painted surface, wipe it off
immediately.
1. Tighten the brake pipe flare nut using the SST (49 0259 770B). Be sure to modify the brake pipe flare nut
tightening torque to allow for use of a torque wrench-SST combination.
2. If any brake line has been disconnected any time during the procedure, add brake fluid, bleed the brakes, and
inspect for leakage after the procedure has been completed.
Suspension Arm Removal/Installation
1. Tighten any part of the suspension that uses rubber bushings only after vehicle has been lowered and
unloaded.
Note
•Unloaded: Fuel tank is full. Engine coolant and engine oil are at specified level. Spare tire, jack, and tools
are in designated position.
Connector Disconnection
1. Disconnect the negative (-) battery cable before disconnecting connectors.
Electronic Control 4WD System Parts
1. After servicing the electronic control 4WD system parts, verify that no DTC has been stored. Clear any DTCs
remaining in the memory.
End Of Sie
GENERAL PROCEDURES
Page 652 of 909

M–22
REAR AXLE
WHEEL HUB BOLT REPLACEMENTA6E6314050002011. Remove the brake caliper component and the disc plate.
2. Remove the wheel hub bolt using the SST as
shown in the figure.
Note
•If the dust cover interferes with the wheel
hub bolt and the wheel hub bolt cannot be
removed, tap the part shown in the figure
with a chisel lightly and bend the process
back to the knuckle side.
3. Install a new wheel hub bolt into the wheel hub
and install a washer and hub nut on the hub bolt.
4. Tighten the hub nut while holding the wheel hub
using a brass bar.
End Of Sie
WHEEL HUB, KNUCKLE REMOVAL/INSTALLATIONA6E631405000202
Caution
•Performing the following procedures without first removing the ABS wheel-speed sensor may
possibly cause an open circuit in the harness if it is pulled by mistake. Before performing the
following procedures, remove the ABS wheel-speed sensor (wheel side) and fix it to an
appropriate place where the sensor will not be pulled by mistake while the vehicle is being
serviced.
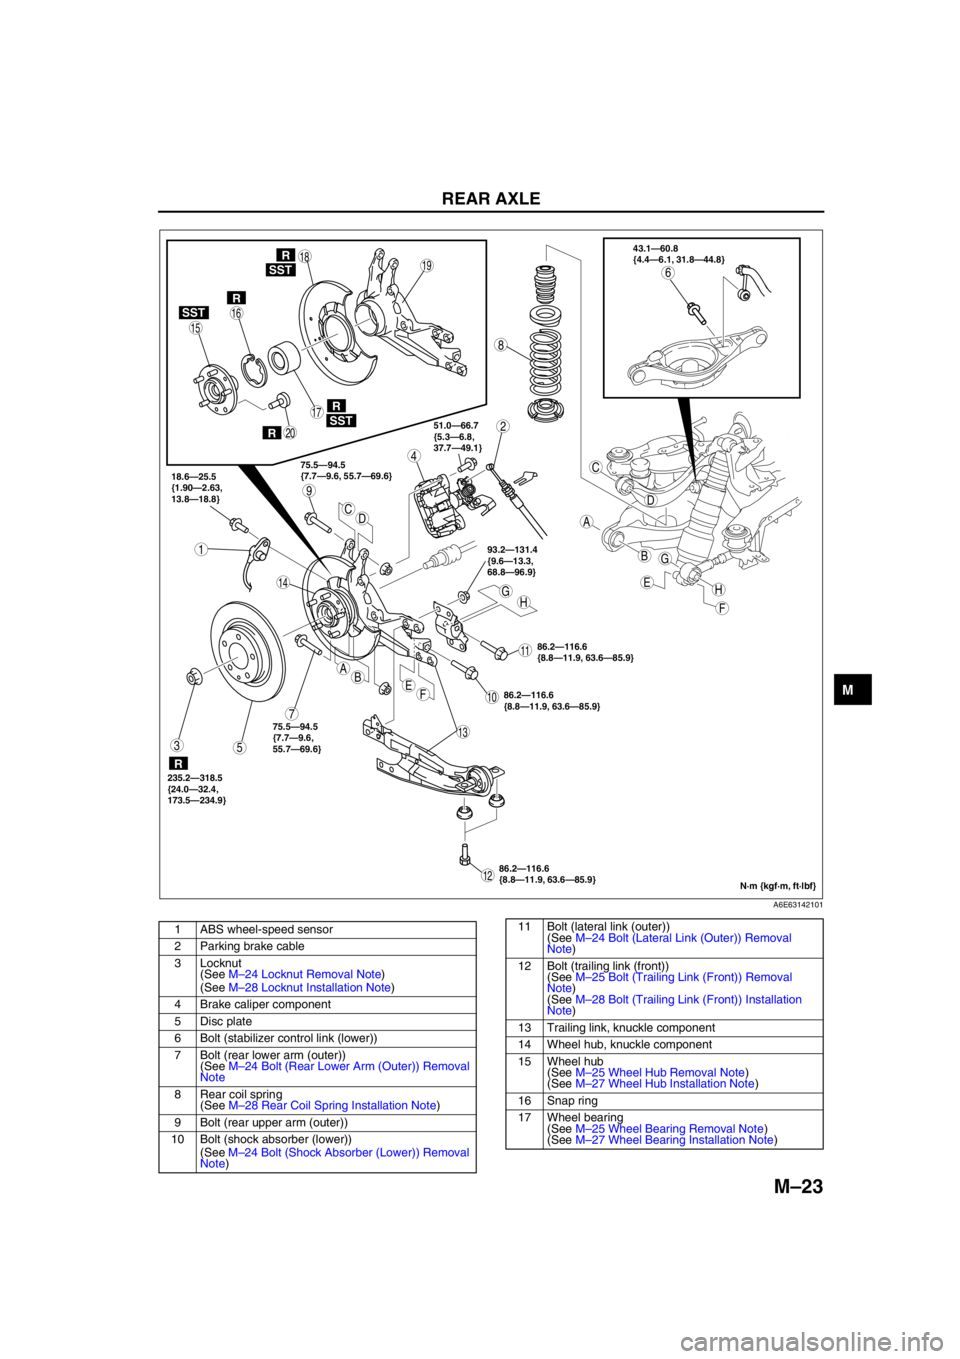
1. Remove in the order indicated in the table.
2. Install in the reverse order of removal.
REAR AXLE
49 T028 3A0
BEND THIS PART
A6E0311W011
HUB BOLT
WHEEL
NUT WHEEL
NUT
WASHER
BRASS
BAR
A6E0311W012
Page 653 of 909

REAR AXLE
M–23
M
.
93.2—131.4
{9.6—13.3,
68.8—96.9}
HHG
G
E
E
F
F
AB
A
B
C
C
D
D
86.2—116.6
{8.8—11.9, 63.6—85.9} 18.6—25.5
{1.90—2.63,
13.8—18.8}75.5—94.5
{7.7—9.6, 55.7—69.6}51.0—66.7
{5.3—6.8,
37.7—49.1}43.1—60.8
{4.4—6.1, 31.8—44.8}
235.2—318.5
{24.0—32.4,
173.5—234.9}
9
8
7
5
4
3
1
2
10
1918
17
15
16
14
13
11
12
20
6SST
SST
R
SST
R
R
R
R
75.5—94.5
{7.7—9.6,
55.7—69.6}
86.2—116.6
{8.8—11.9, 63.6—85.9}
86.2—116.6
{8.8—11.9, 63.6—85.9}
N·m {kgf·m, ft·lbf}
A6E63142101
1 ABS wheel-speed sensor
2 Parking brake cable
3 Locknut
(See M–24 Locknut Removal Note)
(See M–28 Locknut Installation Note)
4 Brake caliper component
5 Disc plate
6 Bolt (stabilizer control link (lower))
7 Bolt (rear lower arm (outer))
(See M–24 Bolt (Rear Lower Arm (Outer)) Removal
Note
8 Rear coil spring
(See M–28 Rear Coil Spring Installation Note)
9 Bolt (rear upper arm (outer))
10 Bolt (shock absorber (lower))
(See M–24 Bolt (Shock Absorber (Lower)) Removal
Note)11 Bolt (lateral link (outer))
(See M–24 Bolt (Lateral Link (Outer)) Removal
Note)
12 Bolt (trailing link (front))
(See M–25 Bolt (Trailing Link (Front)) Removal
Note)
(See M–28 Bolt (Trailing Link (Front)) Installation
Note)
13 Trailing link, knuckle component
14 Wheel hub, knuckle component
15 Wheel hub
(See M–25 Wheel Hub Removal Note)
(See M–27 Wheel Hub Installation Note)
16 Snap ring
17 Wheel bearing
(See M–25 Wheel Bearing Removal Note)
(See M–27 Wheel Bearing Installation Note)
Page 654 of 909

M–24
REAR AXLE
Locknut Removal Note
1. Knock the crimped portion of the locknut outward
using a small chisel and a hammer.
2. Lock the hub by applying the brakes.
3. Remove the locknut.
Bolt (Rear Lower Arm (Outer)) Removal Note
1. Support the lower arm with a jack.
2. Loosen the lower arm bolts (inner).
3. Remove the lower arm bolts (outer).
4. Gradually lower the jack and separate the lower
arm (outer) from the knuckle.
Bolt (Shock Absorber (Lower)) Removal Note
1. Support the trailing link and the knuckle
component with a jack.
2. Remove the lower shock absorber bolts.
Bolt (Lateral Link (Outer)) Removal Note
1. Loosen the lateral link bolts (inner).
2. Remove the lateral link bolts (outer), and remove the lateral link (outer) from the knuckle.
18 Dust cover
(See M–26 Dust Cover Removal Note)
(See M–27 Dust Cover Installation Note)
19 Knuckle20 Wheel hub bolt
(See M–26 Wheel Hub Bolt Removal Note)
(See M–26 Wheel Hub Bolt Installation Note)
A6E0312W021
JACK
A6E63142102
JACK
A6E63142103