Page 1444 of 1672

WIPERS AND WASHERS
REPAIRS 84-23
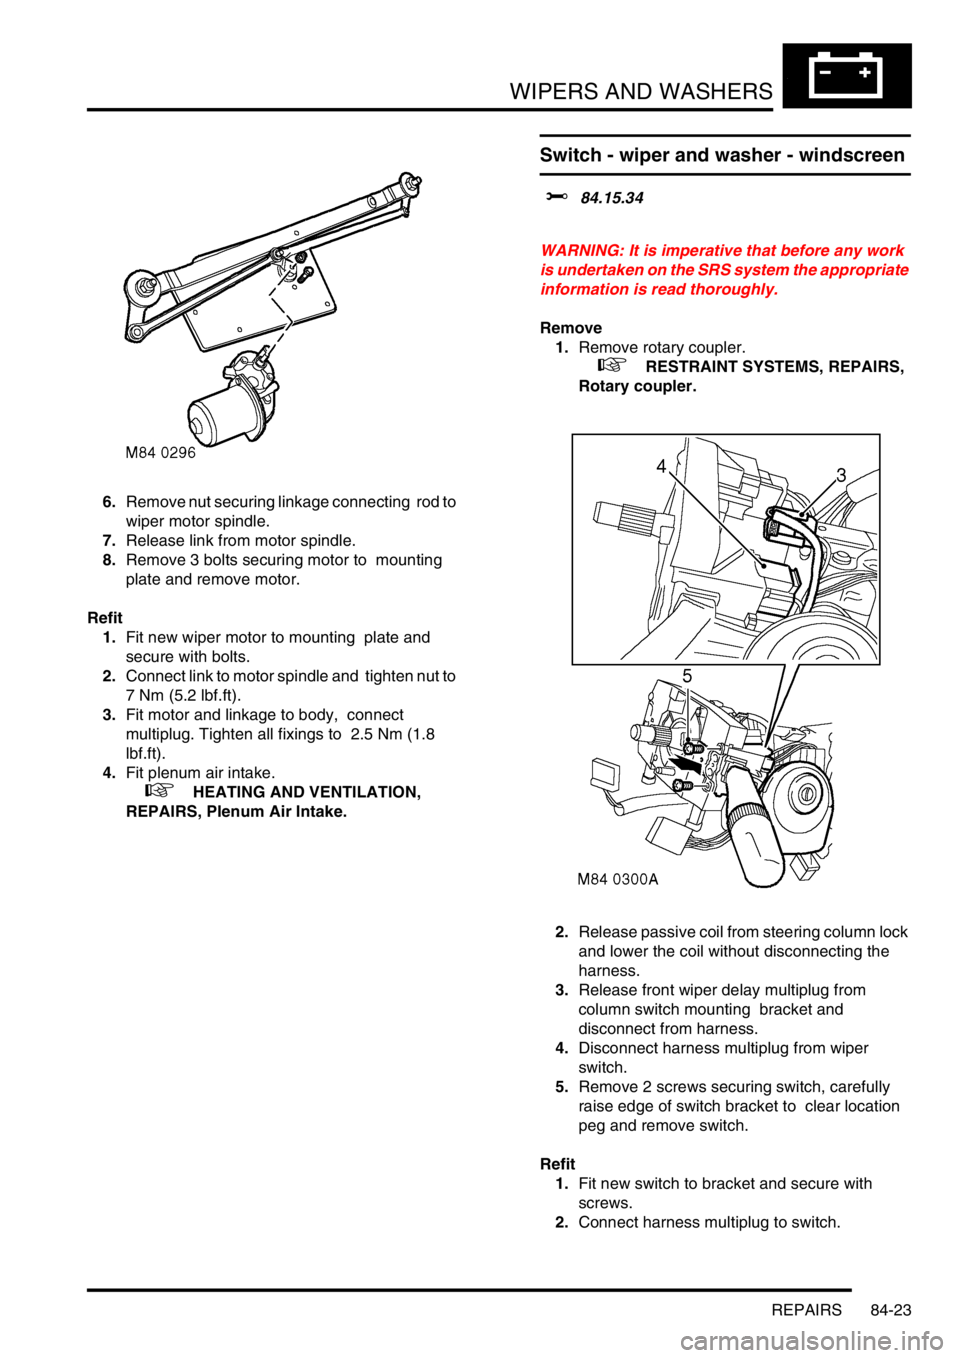
6.Remove nut securing linkage connecting rod to
wiper motor spindle.
7.Release link from motor spindle.
8.Remove 3 bolts securing motor to mounting
plate and remove motor.
Refit
1.Fit new wiper motor to mounting plate and
secure with bolts.
2.Connect link to motor spindle and tighten nut to
7 Nm (5.2 lbf.ft).
3.Fit motor and linkage to body, connect
multiplug. Tighten all fixings to 2.5 Nm (1.8
lbf.ft).
4.Fit plenum air intake.
+ HEATING AND VENTILATION,
REPAIRS, Plenum Air Intake.
Switch - wiper and washer - windscreen
$% 84.15.34
WARNING: It is imperative that before any work
is undertaken on the SRS system the appropriate
information is read thoroughly.
Remove
1.Remove rotary coupler.
+ RESTRAINT SYSTEMS, REPAIRS,
Rotary coupler.
2.Release passive coil from steering column lock
and lower the coil without disconnecting the
harness.
3.Release front wiper delay multiplug from
column switch mounting bracket and
disconnect from harness.
4.Disconnect harness multiplug from wiper
switch.
5.Remove 2 screws securing switch, carefully
raise edge of switch bracket to clear location
peg and remove switch.
Refit
1.Fit new switch to bracket and secure with
screws.
2.Connect harness multiplug to switch.
Page 1445 of 1672
WIPERS AND WASHERS
84-24 REPAIRS
3.Connect front wiper delay multiplug and fit
multiplug to switch bracket.
4.Fit passive coil to column lock.
5.Fit rotary coupler.
+ RESTRAINT SYSTEMS, REPAIRS,
Rotary coupler.
Jet - washer - headlamp
$% 84.20.08
The procedure to remove the headlamp washer jet
on 03MY vehicles is detailed in the front bumper
finisher job.
+ EXTERIOR FITTINGS, REPAIRS, Trim
finisher - bumper - front - from 03MY.
Remove
1.Remove retaining screw cover from jet
housing.
2.Remove screw securing jet to bumper.
3.Release jet and withdraw sufficiently to gain
access to washer tube. Disconnect tube from
jet and remove jet.
Refit
1.Connect jet to washer tube, ensuring it is
pushed fully home.
2.Locate jet in bumper, retain with screw and fit
screw cover.
Page 1447 of 1672
WIPERS AND WASHERS
84-26 REPAIRS
Motor - wiper - rear screen
$% 84.35.12
Remove
1.Remove spare wheel from taildoor.
2.Remove tail door trim casing.
+ DOORS, REPAIRS, Trim casing - tail
door.
3.Remove tail door water shedder.
4.Disconnect washer tube
5.Raise nut cover, remove nut and release wiper
arm.
6.Remove spindle nut and flat washer and
discard rubber seal.
7.Disconnect taildoor harness multiplug from
wiper motor.
8.Remove 2 bolts securing wiper motor to tail
door.
9.Remove wiper motor. Refit
1.Position wiper motor to door and secure with
bolts.
2.Connect tail door harness multiplug to wiper
motor.
3.Fit rubber seal, flat washer and spindle nut.
Tighten spindle nut to 3 Nm (2.2 lbf.ft).
4.Position wiper arm to tail door and connect
washer tube.
5.Tighten wiper arm nut to 20 Nm (15 lbf.ft) and
fit nut cover.
6.Fit tail door water shedder.
7.Fit tail door trim casing.
+ DOORS, REPAIRS, Trim casing - tail
door.
8.Fit spare wheel to tail door.
Page 1448 of 1672
WIPERS AND WASHERS
REPAIRS 84-27
Switch - wiper - rear - up to 03MY
$% 84.35.33
Remove
1.Carefully remove switch from instrument cowl.
2.Disconnect multiplug and remove switch.
Refit
1.Position new switch and connect multiplug.
2.Carefully push switch into instrument cowl.
Switch - wiper - rear - from 03MY
$% 843533
Remove
1.Remove 2 screws securing instrument cowl to
fascia and release the cowl from the retaining
clips.
2.Disconnect multiplug from the rear wiper
switch.
3.Remove the rear wiper switch from the
instrument cowl.
Refit
1.Fit and secure the rear wiper switch to the
instrument cowl and connect the multiplug.
2.Fit the instrument cowl to the fascia and secure
with screws.
Page 1450 of 1672
CHARGING AND STARTING
REPAIRS 86-1-1
CHARGING AND STARTING REPAIRS
Alternator - diesel
$% 86.10.02
Remove
1.Remove auxiliary drive belt.
+ CHARGING AND STARTING,
REPAIRS, Belt - auxiliary drive.
2.Release cover and remove nut securing lead
to alternator.
3.Disconnect alternator multiplug.
4.Remove bolt (LH thread) and remove auxiliary
drive belt tensioner. 5.Remove bolt securing support stay to
alternator.
6.Release clip and disconnect oil drain hose from
vacuum pump.
7.Disconnect vacuum pump oil supply pipe from
cylinder head and discard 'O' ring.
8.Remove bolt securing alternator and release
from mounting bracket.
9.Disconnect vacuum hose from vacuum pump.
10.Remove alternator. Take care not to damage
radiator cooling fins.
11.Remove 4 bolts, and remove vacuum pump
from alternator.
CAUTION: Always fit plugs to open
connections to prevent contamination.
Page 1451 of 1672

CHARGING AND STARTING
86-1-2 REPAIRS
Refit
1.Clean mating faces of alternator and vacuum
pump.
2.Fit vacuum pump to alternator and tighten
bolts to 8 Nm (6 lbf.ft).
3.Position alternator to engine and connect
multiplug.
4.Connect vacuum hose and oil drain hose to
vacuum pump and secure clips.
5.With assistance align alternator to mounting
bracket and fit but do not tighten bolt.
6.Fit bolt securing support stay to alternator and
tighten to 25 Nm (18 lbf.ft) .
7.Tighten bolt securing alternator to mounting
bracket to 45 Nm (33 lbf.ft).
8.Using new 'O' ring, connect oil supply pipe to
cylinder head and tighten to 10 Nm (7 lbf.ft).
9.Connect lead to alternator and tighten nut to 6
Nm (4.4 lbf.ft).
10.Fit auxiliary drive belt tensioner and tighten bolt
to 50 Nm (37 lbf.ft).
11.Fit auxiliary drive belt.
+ CHARGING AND STARTING,
REPAIRS, Belt - auxiliary drive.
Alternator - V8
$% 86.10.02
Remove
1.Remove auxiliary drive belt.
+ CHARGING AND STARTING,
REPAIRS, Belt - auxiliary drive.
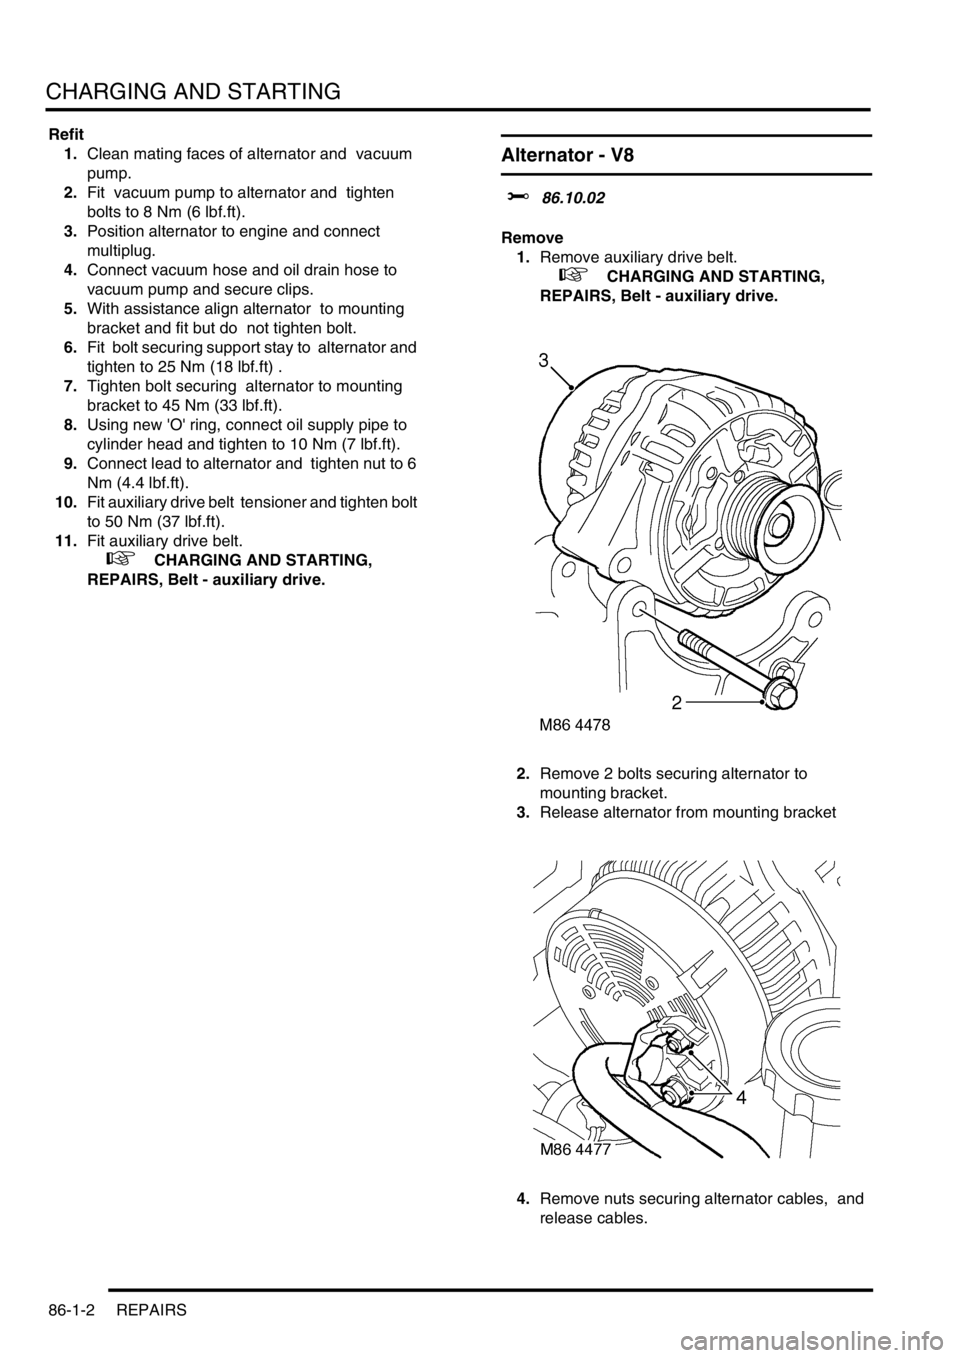
2.Remove 2 bolts securing alternator to
mounting bracket.
3.Release alternator from mounting bracket
4.Remove nuts securing alternator cables, and
release cables.
Page 1453 of 1672
CHARGING AND STARTING
86-1-4 REPAIRS
Battery
$% 86.15.01
Remove
1.Release fixings and remove battery cover.
2.Disconnect both battery leads, negative lead
first.
3.Remove lock nuts and retaining nuts securing
battery clamp.
4.Remove battery clamp.
5.Remove battery.
Refit
1.Clean battery terminals and coat with
petroleum jelly.
2.Fit battery.
3.Fit battery clamp and tighten retaining nuts and
lock nuts.
4.Fit both battery leads, negative lead last.
5.Fit battery cover and secure fixings.
Battery carrier
$% 86.15.11
Remove
1.Remove battery.
+ CHARGING AND STARTING,
REPAIRS, Battery.
2.Release strap and remove jack.
3.Release coolant hose from clip.
4. Diesel models: Remove screw securing ECM,
release ECM and position aside.
5.Remove 7 bolts securing battery carrier.
6.Remove battery carrier.
NOTE: Do not carry out further dismantling if
component is removed for access only.
7.Remove jack retaining strap, speed nut and
clip.
Page 1454 of 1672

CHARGING AND STARTING
REPAIRS 86-1-5
Refit
1.Fit jack retaining strap, speed nut and clip.
2.Fit battery carrier, fit bolts and tighten to 28 Nm
(21 lbf.ft).
3. Diesel models: Fit ECM and secure with
screw.
4.Secure coolant hose.
5.Fit and secure jack.
6.Fit battery.
+ CHARGING AND STARTING,
REPAIRS, Battery.
Starter motor - diesel
$% 86.60.01
Remove
1.Release fixings and remove battery cover.
2.Disconnect battery earth lead.
3.Raise front of vehicle.
WARNING: Do not work on or under a
vehicle supported only by a jack. Always
support the vehicle on safety stands.
4.Remove underbelly panel.
+ EXTERIOR FITTINGS, REPAIRS,
Panel - underbelly.
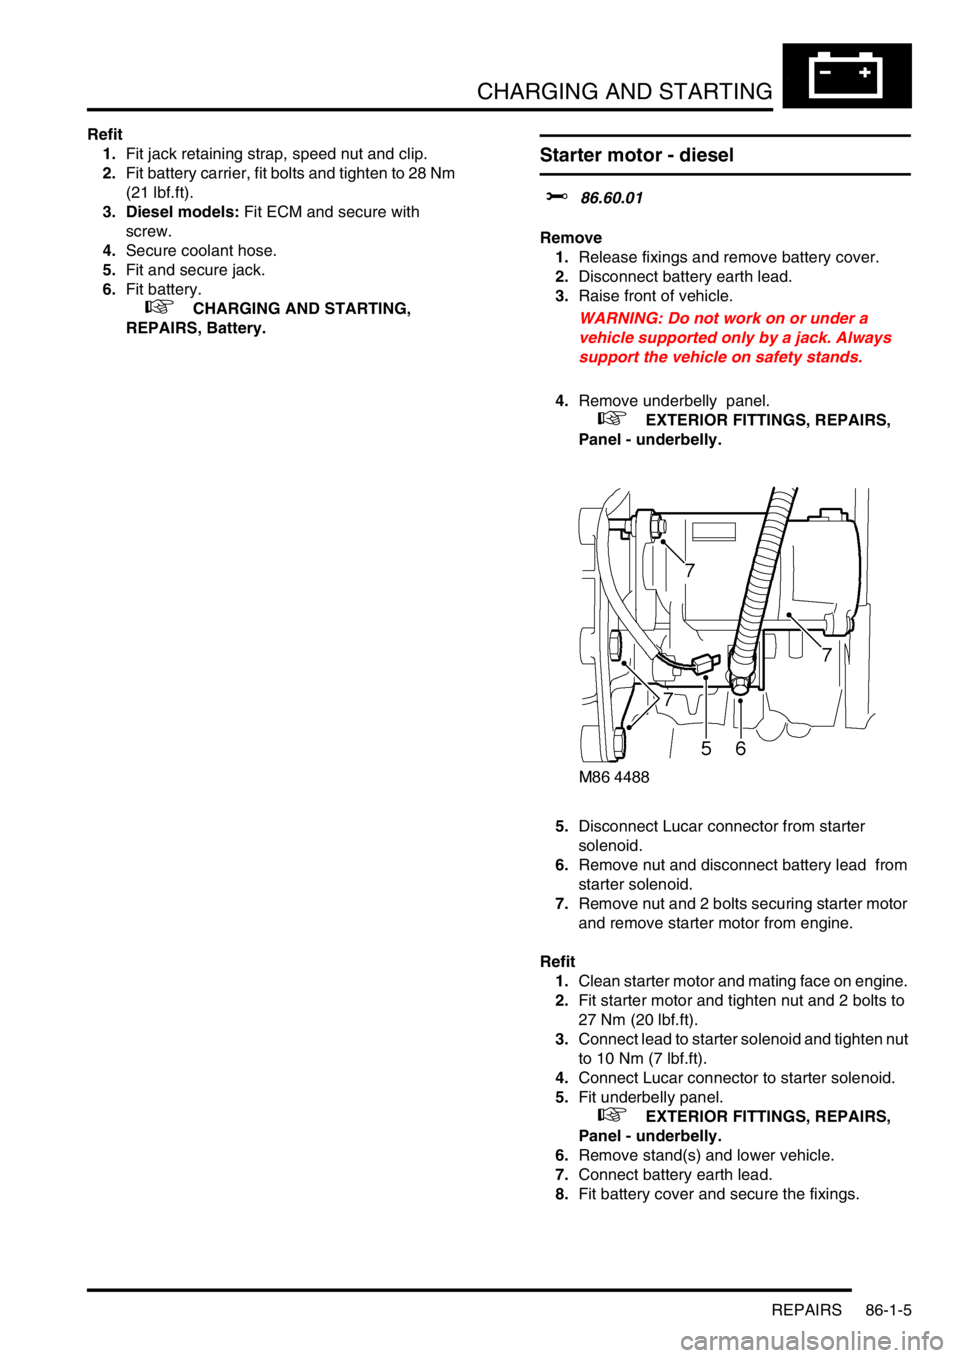
5.Disconnect Lucar connector from starter
solenoid.
6.Remove nut and disconnect battery lead from
starter solenoid.
7.Remove nut and 2 bolts securing starter motor
and remove starter motor from engine.
Refit
1.Clean starter motor and mating face on engine.
2.Fit starter motor and tighten nut and 2 bolts to
27 Nm (20 lbf.ft).
3.Connect lead to starter solenoid and tighten nut
to 10 Nm (7 lbf.ft).
4.Connect Lucar connector to starter solenoid.
5.Fit underbelly panel.
+ EXTERIOR FITTINGS, REPAIRS,
Panel - underbelly.
6.Remove stand(s) and lower vehicle.
7.Connect battery earth lead.
8.Fit battery cover and secure the fixings.