Page 1064 of 1672
BRAKES
DESCRIPTION AND OPERATION 70-19
HDC switch
The HDC switch is a latching push switch installed on the fascia, in the switchpack inboard of the steering wheel.
When pushed in, the switch connects an ignition supply to the SLABS ECU to initiate HDC.
Warning indications
The SLABS ECU operates audible and visual warnings to convey brake system status.
Audible warning
A repetitive chime, at a frequency of 2 Hz, draws attention to warning lamp indications. The chime is produced on the
speaker in the instrument pack.
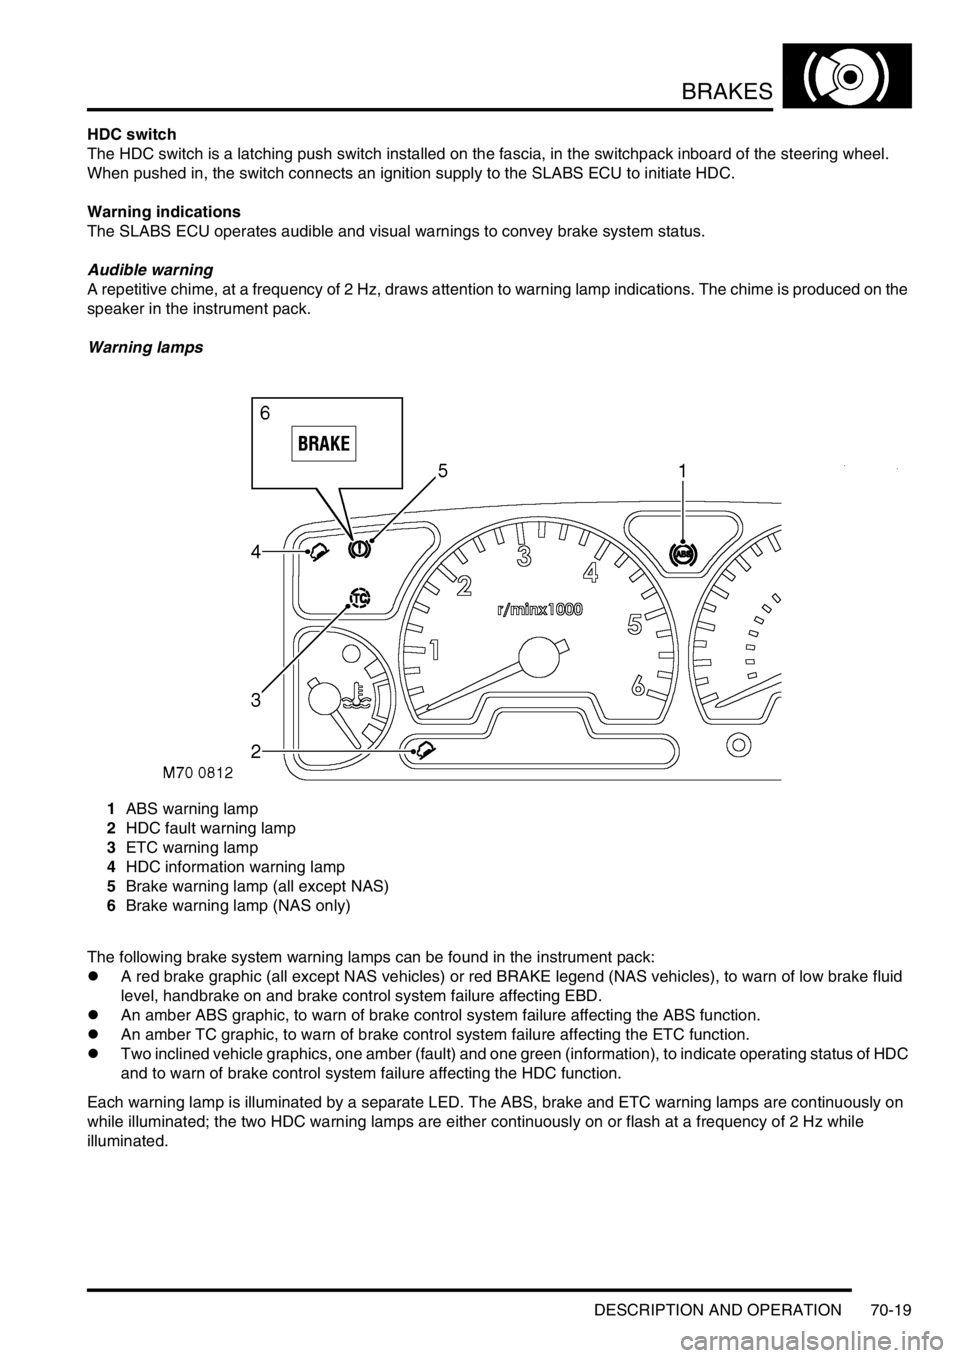
Warning lamps
1ABS warning lamp
2HDC fault warning lamp
3ETC warning lamp
4HDC information warning lamp
5Brake warning lamp (all except NAS)
6Brake warning lamp (NAS only)
The following brake system warning lamps can be found in the instrument pack:
lA red brake graphic (all except NAS vehicles) or red BRAKE legend (NAS vehicles), to warn of low brake fluid
level, handbrake on and brake control system failure affecting EBD.
lAn amber ABS graphic, to warn of brake control system failure affecting the ABS function.
lAn amber TC graphic, to warn of brake control system failure affecting the ETC function.
lTwo inclined vehicle graphics, one amber (fault) and one green (information), to indicate operating status of HDC
and to warn of brake control system failure affecting the HDC function.
Each warning lamp is illuminated by a separate LED. The ABS, brake and ETC warning lamps are continuously on
while illuminated; the two HDC warning lamps are either continuously on or flash at a frequency of 2 Hz while
illuminated.
Page 1075 of 1672
BRAKES
70-30 ADJUSTMENTS
Brake system bleeding
$% 70.25.02
Bleeding of the brake system can be carried out
using the procedures given on TestBook, or by
following the manual procedure given below.
WARNING: If any components upstream of brake
modulator, including the modulator itself are
replaced, the brake system must be bled using
the procedure on TestBook/T4, to ensure that all
air is expelled from the new component(s).
WARNING: Do not allow brake fluid to come into
contact with eyes or skin.
Bleed
NOTE: This procedure covers bleeding the
complete system, but where only the primary or
secondary circuit have been disturbed in
isolation, it should only be necessary to bleed
that circuit. Partial bleeding of the hydraulic
system is only permissible if a brake pipe or
hose has been disconnected with only minor
loss of fluid.
1.Do not allow fluid level in master cylinder to fall
below 'MIN' mark during bleeding.
2.Do not fill reservoir above 'MAX' level.
3.Raise front and rear of vehicle.
WARNING: Do not work on or under a
vehicle supported only by a jack. Always
support the vehicle on safety stands.
4.Check all pipe and hose connections are tight
and there are no signs of leakage.
5.Top-up fluid level in brake reservoir to 'MAX'
mark.
WARNING: Do not allow dirt or foreign
liquids to enter the reservoir. Use only new
DOT 4 brake fluid from airtight containers.
Do not mix brands of brake fluid as they
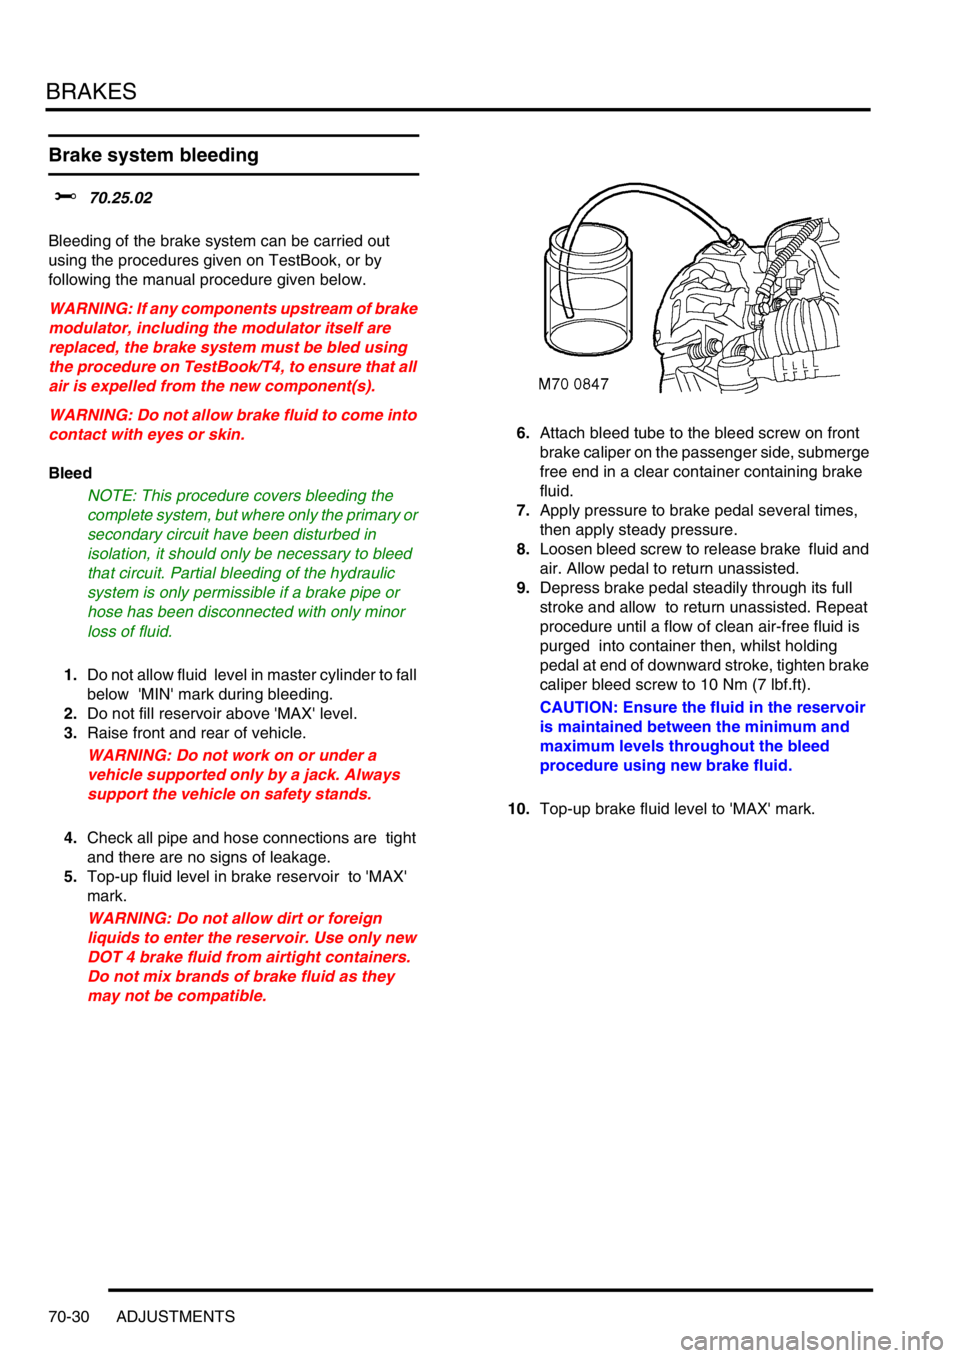
may not be compatible.6.Attach bleed tube to the bleed screw on front
brake caliper on the passenger side, submerge
free end in a clear container containing brake
fluid.
7.Apply pressure to brake pedal several times,
then apply steady pressure.
8.Loosen bleed screw to release brake fluid and
air. Allow pedal to return unassisted.
9.Depress brake pedal steadily through its full
stroke and allow to return unassisted. Repeat
procedure until a flow of clean air-free fluid is
purged into container then, whilst holding
pedal at end of downward stroke, tighten brake
caliper bleed screw to 10 Nm (7 lbf.ft).
CAUTION: Ensure the fluid in the reservoir
is maintained between the minimum and
maximum levels throughout the bleed
procedure using new brake fluid.
10.Top-up brake fluid level to 'MAX' mark.
Page 1080 of 1672
BRAKES
REPAIRS 70-35
Master cylinder - brake
$% 70.30.08
Remove
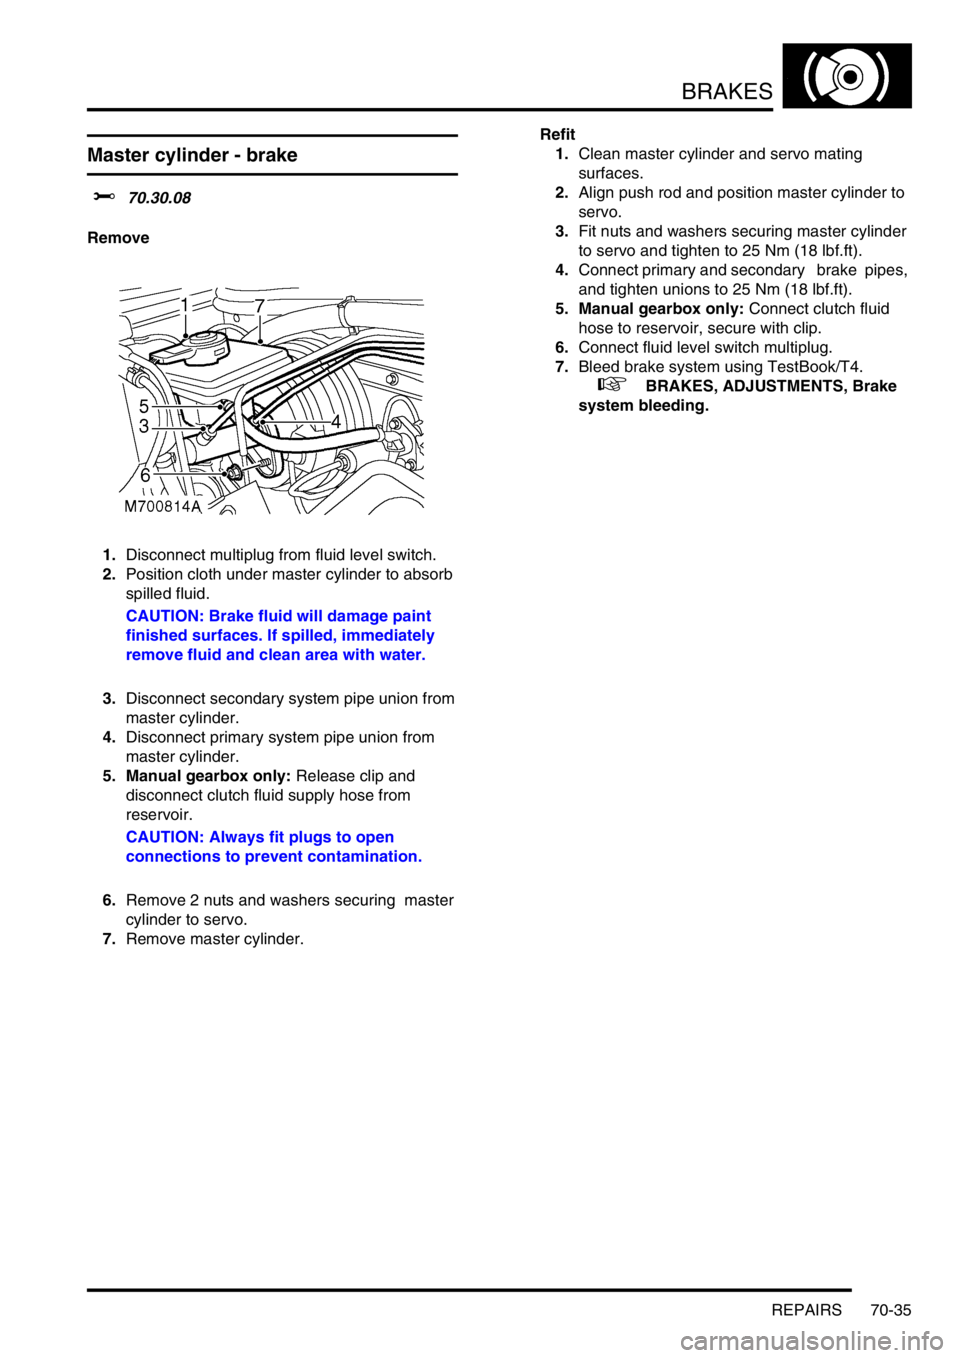
1.Disconnect multiplug from fluid level switch.
2.Position cloth under master cylinder to absorb
spilled fluid.
CAUTION: Brake fluid will damage paint
finished surfaces. If spilled, immediately
remove fluid and clean area with water.
3.Disconnect secondary system pipe union from
master cylinder.
4.Disconnect primary system pipe union from
master cylinder.
5. Manual gearbox only: Release clip and
disconnect clutch fluid supply hose from
reservoir.
CAUTION: Always fit plugs to open
connections to prevent contamination.
6.Remove 2 nuts and washers securing master
cylinder to servo.
7.Remove master cylinder. Refit
1.Clean master cylinder and servo mating
surfaces.
2.Align push rod and position master cylinder to
servo.
3.Fit nuts and washers securing master cylinder
to servo and tighten to 25 Nm (18 lbf.ft).
4.Connect primary and secondary brake pipes,
and tighten unions to 25 Nm (18 lbf.ft).
5. Manual gearbox only: Connect clutch fluid
hose to reservoir, secure with clip.
6.Connect fluid level switch multiplug.
7.Bleed brake system using TestBook/T4.
+ BRAKES, ADJUSTMENTS, Brake
system bleeding.
Page 1082 of 1672
BRAKES
REPAIRS 70-37
Switch - brake light
$% 70.35.42
The brake switch is set automatically during fitment.
If the setting is disturbed, the switch can be reset by
depressing the brake pedal and pulling the plunger
out of the switch body, until it contacts the pedal.
Remove
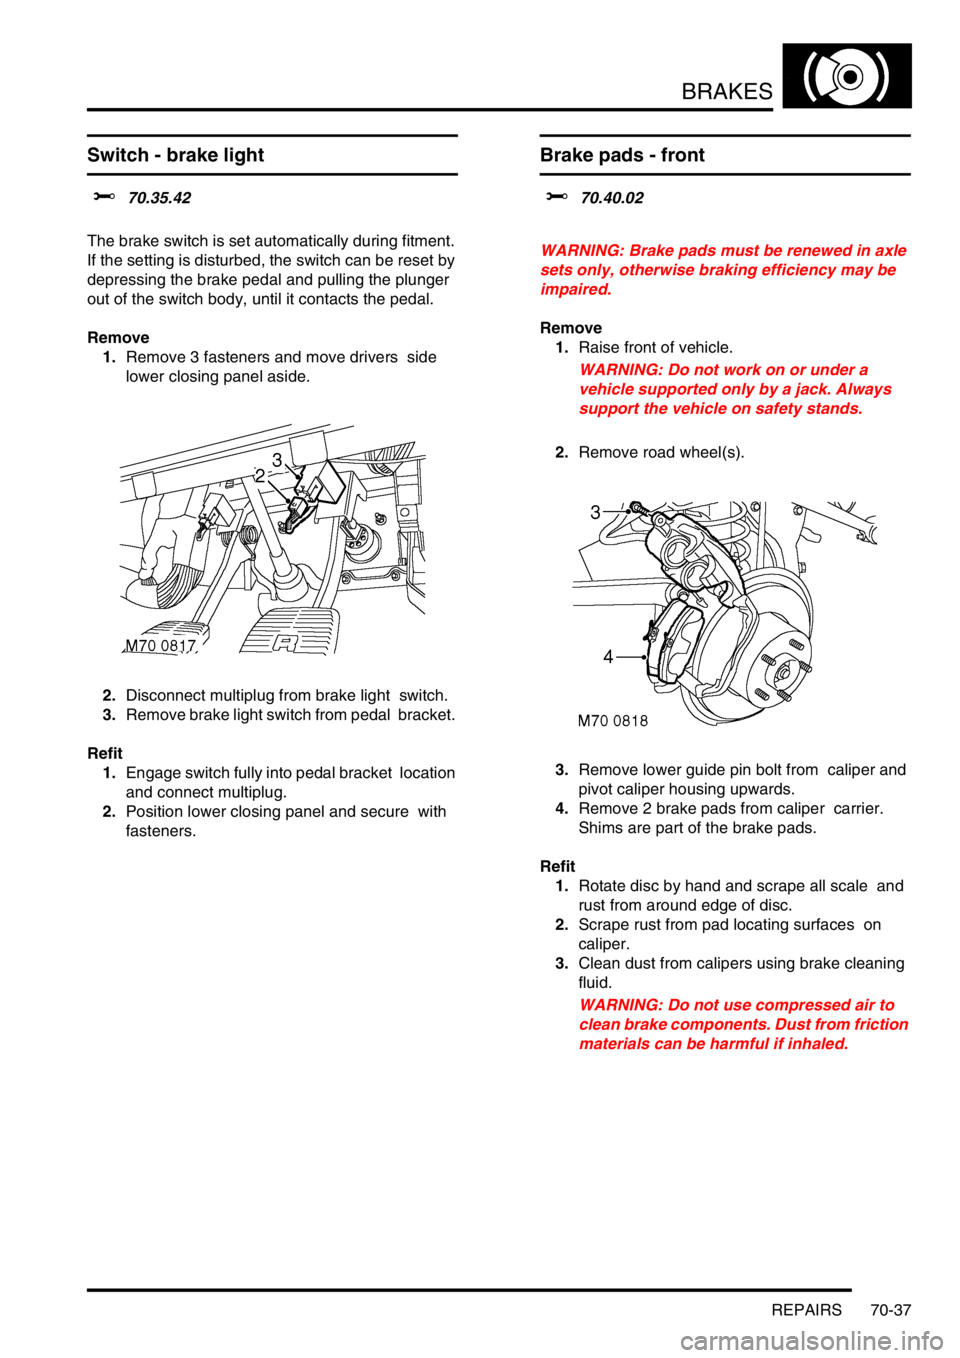
1.Remove 3 fasteners and move drivers side
lower closing panel aside.
2.Disconnect multiplug from brake light switch.
3.Remove brake light switch from pedal bracket.
Refit
1.Engage switch fully into pedal bracket location
and connect multiplug.
2.Position lower closing panel and secure with
fasteners.
Brake pads - front
$% 70.40.02
WARNING: Brake pads must be renewed in axle
sets only, otherwise braking efficiency may be
impaired.
Remove
1.Raise front of vehicle.
WARNING: Do not work on or under a
vehicle supported only by a jack. Always
support the vehicle on safety stands.
2.Remove road wheel(s).
3.Remove lower guide pin bolt from caliper and
pivot caliper housing upwards.
4.Remove 2 brake pads from caliper carrier.
Shims are part of the brake pads.
Refit
1.Rotate disc by hand and scrape all scale and
rust from around edge of disc.
2.Scrape rust from pad locating surfaces on
caliper.
3.Clean dust from calipers using brake cleaning
fluid.
WARNING: Do not use compressed air to
clean brake components. Dust from friction
materials can be harmful if inhaled.
Page 1083 of 1672
BRAKES
70-38 REPAIRS
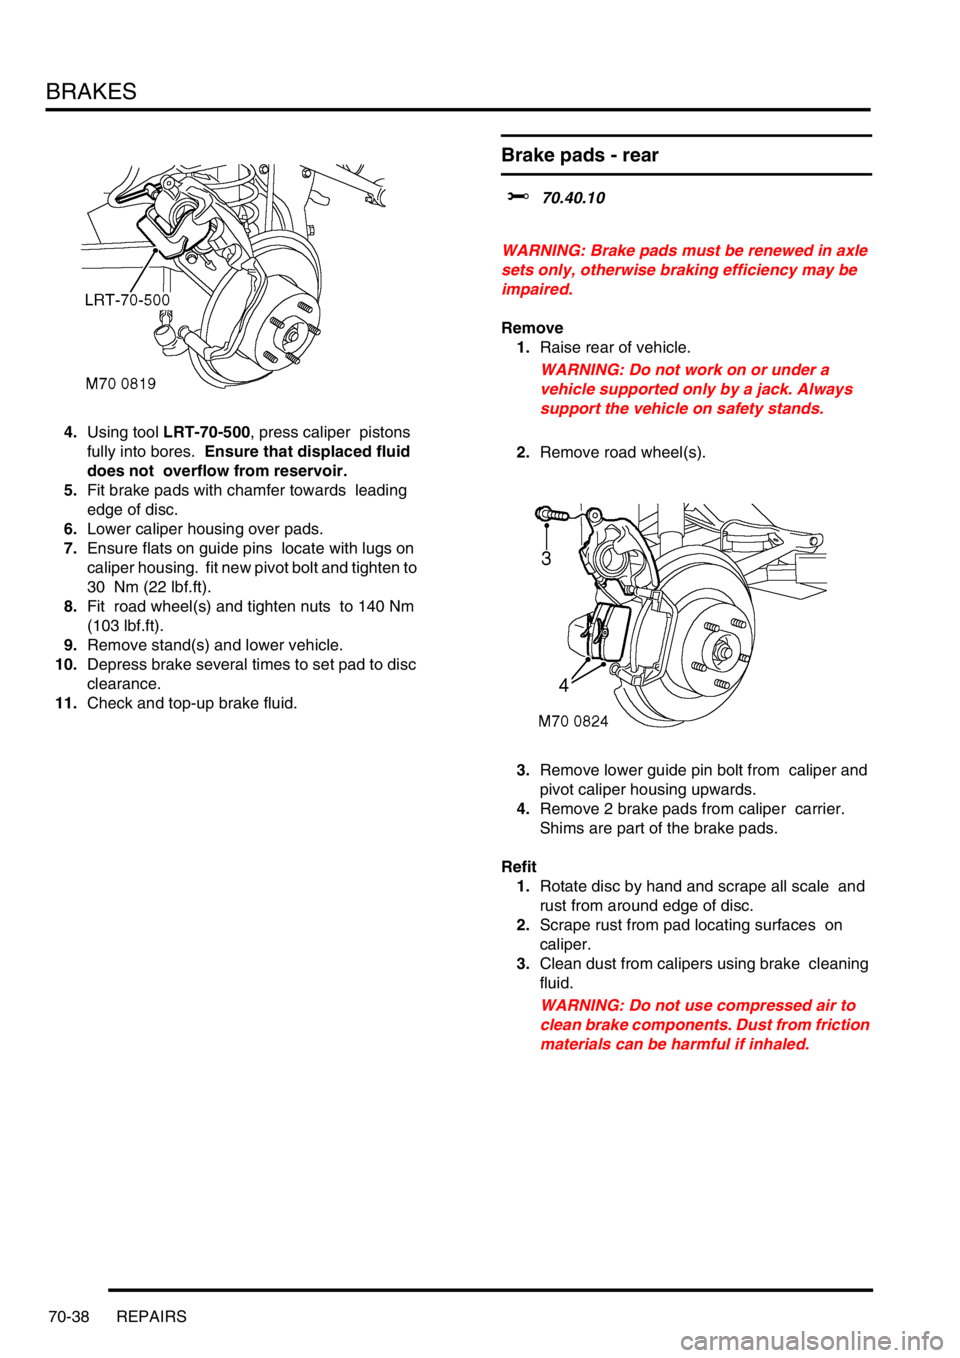
4.Using tool LRT-70-500, press caliper pistons
fully into bores. Ensure that displaced fluid
does not overflow from reservoir.
5.Fit brake pads with chamfer towards leading
edge of disc.
6.Lower caliper housing over pads.
7.Ensure flats on guide pins locate with lugs on
caliper housing. fit new pivot bolt and tighten to
30 Nm (22 lbf.ft).
8.Fit road wheel(s) and tighten nuts to 140 Nm
(103 lbf.ft).
9.Remove stand(s) and lower vehicle.
10.Depress brake several times to set pad to disc
clearance.
11.Check and top-up brake fluid.
Brake pads - rear
$% 70.40.10
WARNING: Brake pads must be renewed in axle
sets only, otherwise braking efficiency may be
impaired.
Remove
1.Raise rear of vehicle.
WARNING: Do not work on or under a
vehicle supported only by a jack. Always
support the vehicle on safety stands.
2.Remove road wheel(s).
3.Remove lower guide pin bolt from caliper and
pivot caliper housing upwards.
4.Remove 2 brake pads from caliper carrier.
Shims are part of the brake pads.
Refit
1.Rotate disc by hand and scrape all scale and
rust from around edge of disc.
2.Scrape rust from pad locating surfaces on
caliper.
3.Clean dust from calipers using brake cleaning
fluid.
WARNING: Do not use compressed air to
clean brake components. Dust from friction
materials can be harmful if inhaled.
Page 1084 of 1672
BRAKES
REPAIRS 70-39
4.Using tool LRT-70-500, press caliper pistons
fully into bores. Ensure that displaced fluid
does not overflow from reservoir.
5.Fit pads to caliper carrier.
6.Lower caliper housing over pads.
7.Ensure flats on guide pins locate with lugs on
caliper housing. fit new pivot bolt and tighten to
30 Nm (22 lbf.ft).
8.Fit road wheel(s) and tighten nuts to 140 Nm
(103 lbf.ft).
9.Remove stand(s) and lower vehicle.
10.Depress brake several times to set pad to disc
clearance.
11.Check and top-up brake fluid.
Brake shoes - handbrake
$% 70.45.18
Remove
1.Remove rear propeller shaft.
+ PROPELLER SHAFTS, REPAIRS,
Propeller shaft - rear.
2.Remove screw and remove brake drum.
Page 1085 of 1672
BRAKES
70-40 REPAIRS
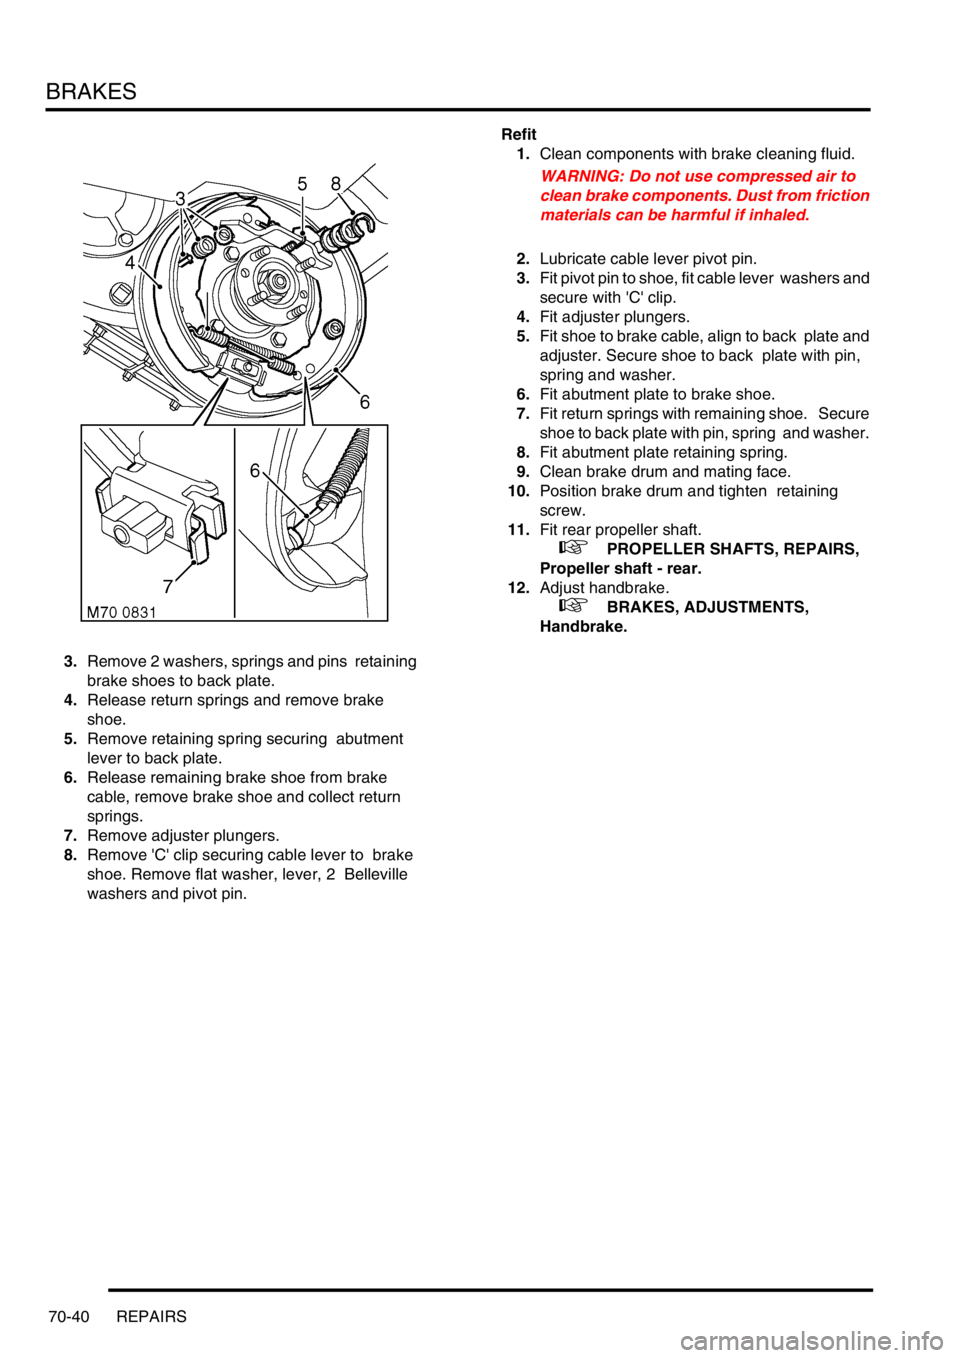
3.Remove 2 washers, springs and pins retaining
brake shoes to back plate.
4.Release return springs and remove brake
shoe.
5.Remove retaining spring securing abutment
lever to back plate.
6.Release remaining brake shoe from brake
cable, remove brake shoe and collect return
springs.
7.Remove adjuster plungers.
8.Remove 'C' clip securing cable lever to brake
shoe. Remove flat washer, lever, 2 Belleville
washers and pivot pin. Refit
1.Clean components with brake cleaning fluid.
WARNING: Do not use compressed air to
clean brake components. Dust from friction
materials can be harmful if inhaled.
2.Lubricate cable lever pivot pin.
3.Fit pivot pin to shoe, fit cable lever washers and
secure with 'C' clip.
4.Fit adjuster plungers.
5.Fit shoe to brake cable, align to back plate and
adjuster. Secure shoe to back plate with pin,
spring and washer.
6.Fit abutment plate to brake shoe.
7.Fit return springs with remaining shoe. Secure
shoe to back plate with pin, spring and washer.
8.Fit abutment plate retaining spring.
9.Clean brake drum and mating face.
10.Position brake drum and tighten retaining
screw.
11.Fit rear propeller shaft.
+ PROPELLER SHAFTS, REPAIRS,
Propeller shaft - rear.
12.Adjust handbrake.
+ BRAKES, ADJUSTMENTS,
Handbrake.
Page 1088 of 1672
BRAKES
REPAIRS 70-43
Refit
1.Clean mating faces of alternator and vacuum
pump.
2.Fit vacuum pump to alternator and tighten
bolts to 8 Nm (6 lbf.ft).
3.Position alternator to engine and connect
multiplug.
4.Connect vacuum hose and oil drain hose to
vacuum pump and secure clips.
5.With assistance align alternator to mounting
bracket and fit but do not tighten bolt.
6.Fit bolt securing support stay to alternator and
tighten to 25 Nm (18 lbf.ft) .
7.Tighten bolt securing alternator to mounting
bracket to 45 Nm (33 lbf.ft).
8.Using new 'O' ring, connect oil supply pipe to
cylinder head and tighten to 10 Nm (7 lbf.ft).
9.Connect lead to alternator and tighten nut to 6
Nm (4.4 lbf.ft).
10.Fit auxiliary drive belt tensioner and tighten bolt
to 50 Nm (37 lbf.ft).
11.Fit auxiliary drive belt.
+ CHARGING AND STARTING,
REPAIRS, Belt - auxiliary drive.
Housing - caliper - front
$% 70.55.24
Remove
1.Raise front of vehicle, one side.
WARNING: Do not work on or under a
vehicle supported only by a jack. Always
support the vehicle on safety stands.
2.Remove road wheel(s).
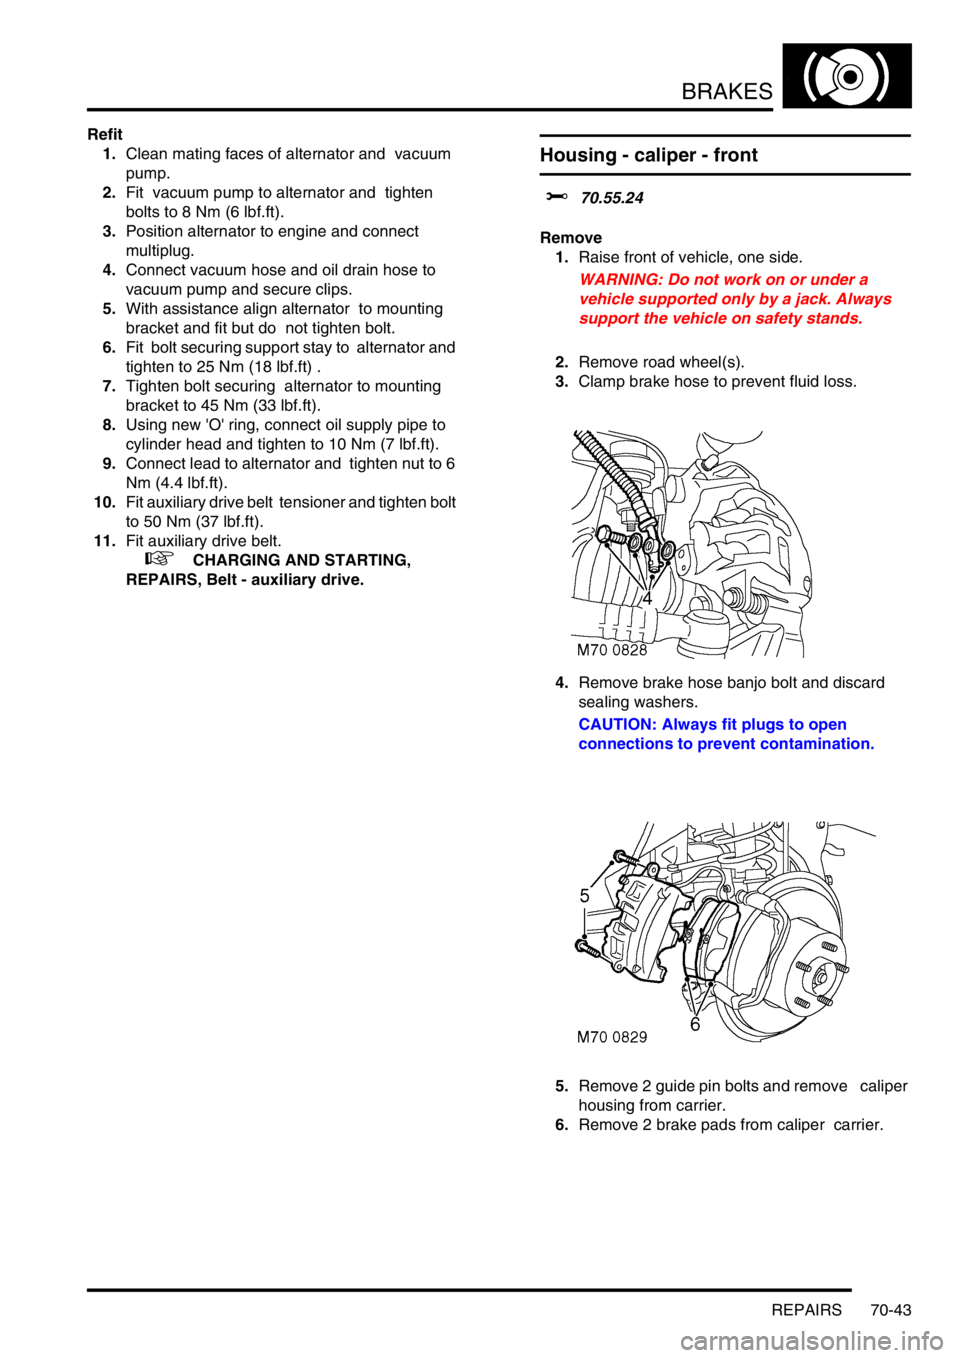
3.Clamp brake hose to prevent fluid loss.
4.Remove brake hose banjo bolt and discard
sealing washers.
CAUTION: Always fit plugs to open
connections to prevent contamination.
5.Remove 2 guide pin bolts and remove caliper
housing from carrier.
6.Remove 2 brake pads from caliper carrier.