Page 1024 of 1672

REAR SUSPENSION
DESCRIPTION AND OPERATION 64-19
Failure modes
Failures are indicated by the SLS warning lamp in the bottom left corner of the instrument pack illuminating
continuously in an amber colour. The following tables show the type of system failures and their effects on the system
operation.
Height sensors
Door Switch Inputs
SLS off-road mode switch
Air supply unit air control valves
Air supply unit compressor
5 Right height sensor earth Input
6 Right height sensor signal Input
C0655
1 Driver's door switch Input
2 Passenger and tail door switches Input
3 Left air valve Output
4 Right air valve Output
5 Exhaust valve Output
6 Air compressor (SLS relay) Output
7 Audible warning Output
8 SLS warning lamp Output
11 ORM switch/ORM warning lamp Input/Output
12 Remote handset raise/lower signal Input
Connectors and pins not listed are either not used or used by the brakes system.
+ BRAKES, DESCRIPTION AND OPERATION, Description.
Failure Effect
Sensor output stuck at 5 V Vehicle will not level
Sensor output stuck at 0 V Vehicle will not level
Mechanical link between radius arm and sensor broken Vehicle will not level
Failure Effect
Harness leads for open doors are are broken or shorted to
V Batt.Air suspension levels when one or more doors are open
Harness leads to door(s) shorted to earth Air suspension will not level
Failure Effect
Fault in wiring harness Off-road mode cannot be selected
Failure of off-road mode switch Off-road mode is activated when switch has not been
selected
Failure Effect
Valves open or short circuit Vehicle does not level or levels unevenly
Failure Effect
Faulty relay, harness fault or compressor fault Vehicle does not level upwards
Page 1030 of 1672
REAR SUSPENSION
REPAIRS 64-25
REPAIRS
Wheel hub
$% 64.15.01
Models with SLS:
WARNING: Ensure the air suspension system is
made safe before commencing work. Otherwise
the chassis may lower onto the bump stops
during repair.
Remove
1.Raise rear of vehicle.
WARNING: Do not work on or under a
vehicle supported only by a jack. Always
support the vehicle on safety stands.
2.Remove road wheel.
3.Release stake in drive shaft nut.
4.With an assistant depressing the brake pedal,
remove and discard drive shaft nut.
5.Remove rear brake disc.
+ BRAKES, REPAIRS, Brake disc -
rear.6.Disconnect ABS sensor multiplug.
7.Release harness from brake hose and hose
bracket.
8.Remove 4 bolts securing wheel hub to axle.
9.Release and remove wheel hub and drive shaft
assembly from axle. Remove and discard 'O'
ring from wheel hub.
Page 1031 of 1672

REAR SUSPENSION
64-26 REPAIRS
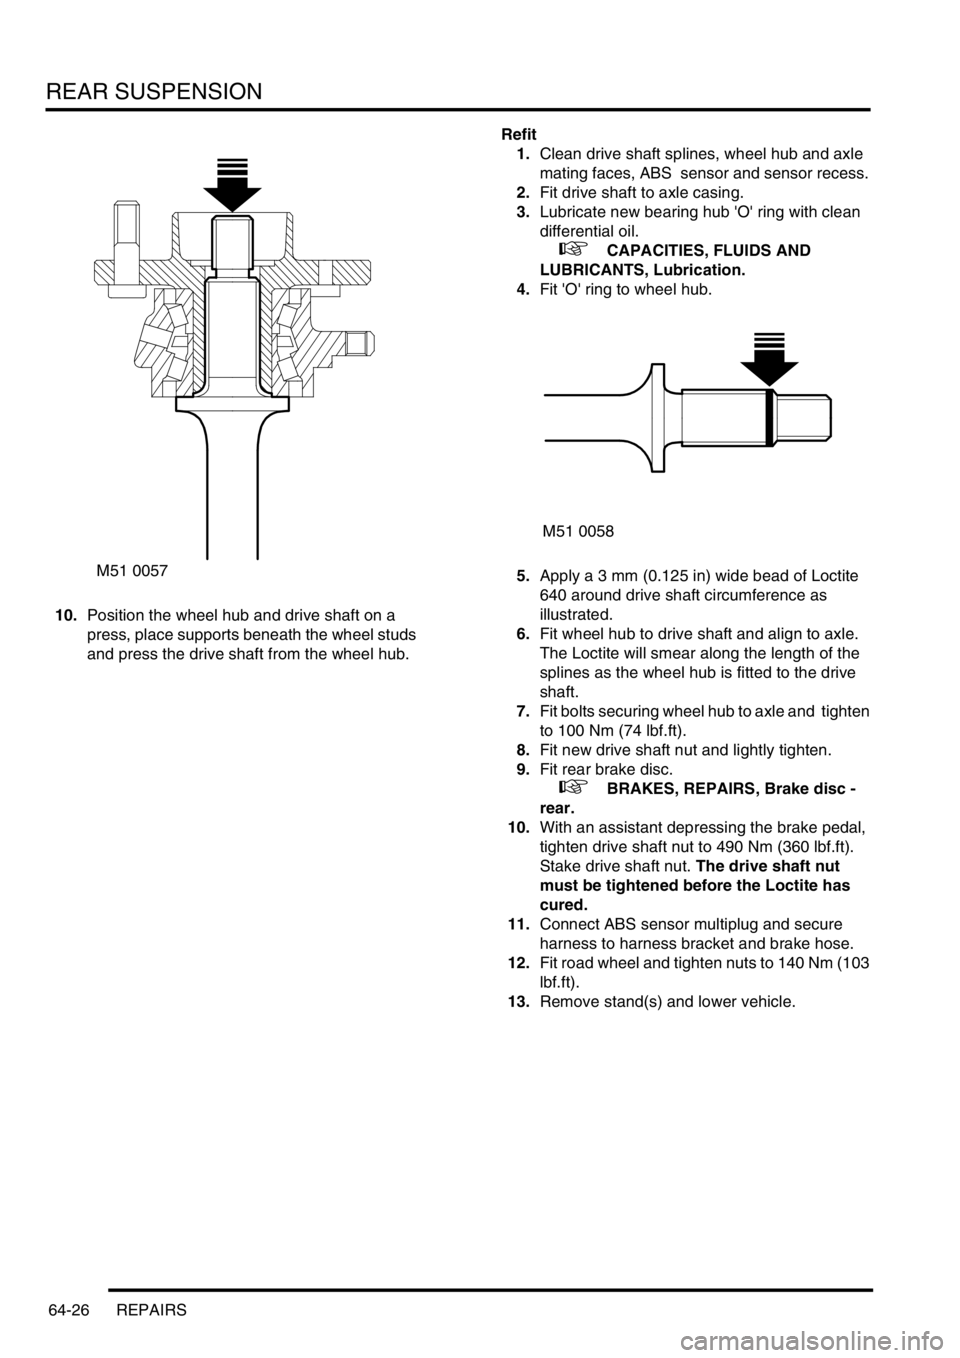
10.Position the wheel hub and drive shaft on a
press, place supports beneath the wheel studs
and press the drive shaft from the wheel hub.Refit
1.Clean drive shaft splines, wheel hub and axle
mating faces, ABS sensor and sensor recess.
2.Fit drive shaft to axle casing.
3.Lubricate new bearing hub 'O' ring with clean
differential oil.
+ CAPACITIES, FLUIDS AND
LUBRICANTS, Lubrication.
4.Fit 'O' ring to wheel hub.
5.Apply a 3 mm (0.125 in) wide bead of Loctite
640 around drive shaft circumference as
illustrated.
6.Fit wheel hub to drive shaft and align to axle.
The Loctite will smear along the length of the
splines as the wheel hub is fitted to the drive
shaft.
7.Fit bolts securing wheel hub to axle and tighten
to 100 Nm (74 lbf.ft).
8.Fit new drive shaft nut and lightly tighten.
9.Fit rear brake disc.
+ BRAKES, REPAIRS, Brake disc -
rear.
10.With an assistant depressing the brake pedal,
tighten drive shaft nut to 490 Nm (360 lbf.ft).
Stake drive shaft nut. The drive shaft nut
must be tightened before the Loctite has
cured.
11.Connect ABS sensor multiplug and secure
harness to harness bracket and brake hose.
12.Fit road wheel and tighten nuts to 140 Nm (103
lbf.ft).
13.Remove stand(s) and lower vehicle.
M51 0057
M51 0058
Page 1046 of 1672
BRAKES
DESCRIPTION AND OPERATION 70-1
BRAKES DESCRIPTION AND OPERAT ION
Brake system control component layout
RH drive shown, LH drive similar
1Hill descent switch
2ABS sensor
3SLABS ECU
Page 1047 of 1672
BRAKES
70-2 DESCRIPTION AND OPERATION
Brake system control diagram
Page 1048 of 1672
BRAKES
DESCRIPTION AND OPERATION 70-3
1ABS sensor
2ABS modulator
3Return pump relay
4SLABS ECU
5Brake lamp relay
6Centre high mounted stop lamp
7LH brake lamp
8RH brake lamp
9Instrument pack
10Body control unit
11Reverse lamp switch (manual gearbox)
12Diagnostic socket
13HDC switch
14Transmission high/low switch
15Centre differential lock switch
16Engine control module
17Battery power supply
18Ignition power supply
Page 1049 of 1672
BRAKES
70-4 DESCRIPTION AND OPERATION
Brake system hydraulic component
layout
RH drive shown, LH drive similar
1Rear brake
2ABS modulator
3Front brake
4Inlet manifold plenum (V8 models)
5Non return valve6Master cylinder assembly
7Brake fluid reservoir
8Brake servo assembly
9Vacuum pump (diesel models)
Page 1050 of 1672

BRAKES
DESCRIPTION AND OPERATION 70-5
Description
General
The brakes consist of front and rear disc brakes operated by a diagonally split, dual circuit hydraulic system with
vacuum servo power assistance. The system incorporates the following control functions as standard on all models:
lAnti-lock Brakes (ABS), to prevent road wheels locking during brake application.
lElectronic Brake Distribution (EBD), to control distribution of hydraulic pressure between front and rear axles.
Replaces mechanical pressure limiting valve of previous systems.
lElectronic Traction Control (ETC), to maintain even torque distribution to the road wheels.
lHill Descent Control (HDC), to provide controlled descent ability in off road conditions.
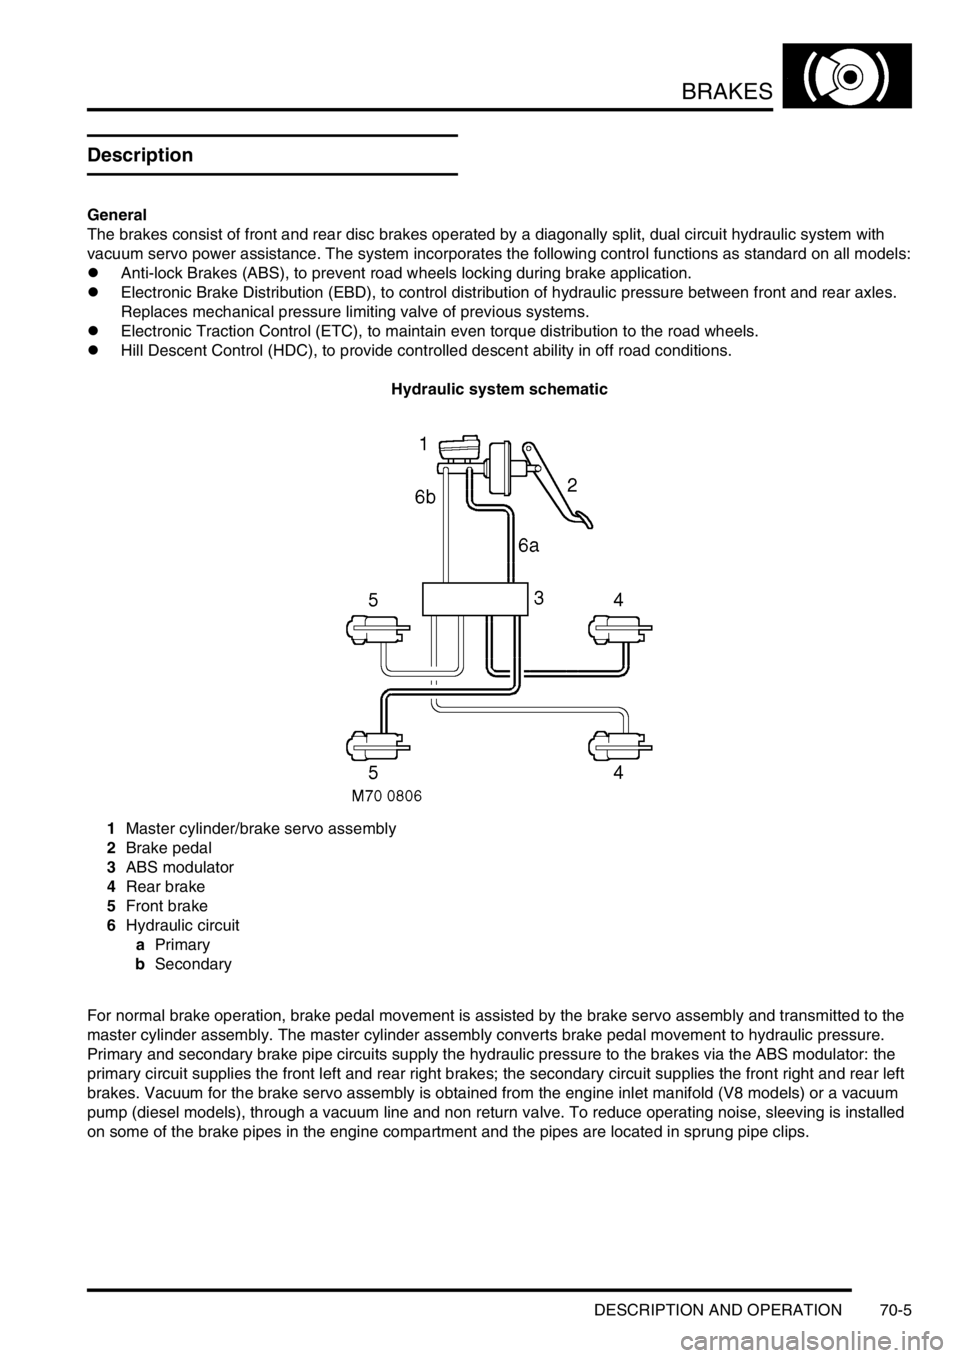
Hydraulic system schematic
1Master cylinder/brake servo assembly
2Brake pedal
3ABS modulator
4Rear brake
5Front brake
6Hydraulic circuit
aPrimary
bSecondary
For normal brake operation, brake pedal movement is assisted by the brake servo assembly and transmitted to the
master cylinder assembly. The master cylinder assembly converts brake pedal movement to hydraulic pressure.
Primary and secondary brake pipe circuits supply the hydraulic pressure to the brakes via the ABS modulator: the
primary circuit supplies the front left and rear right brakes; the secondary circuit supplies the front right and rear left
brakes. Vacuum for the brake servo assembly is obtained from the engine inlet manifold (V8 models) or a vacuum
pump (diesel models), through a vacuum line and non return valve. To reduce operating noise, sleeving is installed
on some of the brake pipes in the engine compartment and the pipes are located in sprung pipe clips.