Page 1567 of 1672

IN CAR ENTERTAINMENT
86-6-14 REPAIRS
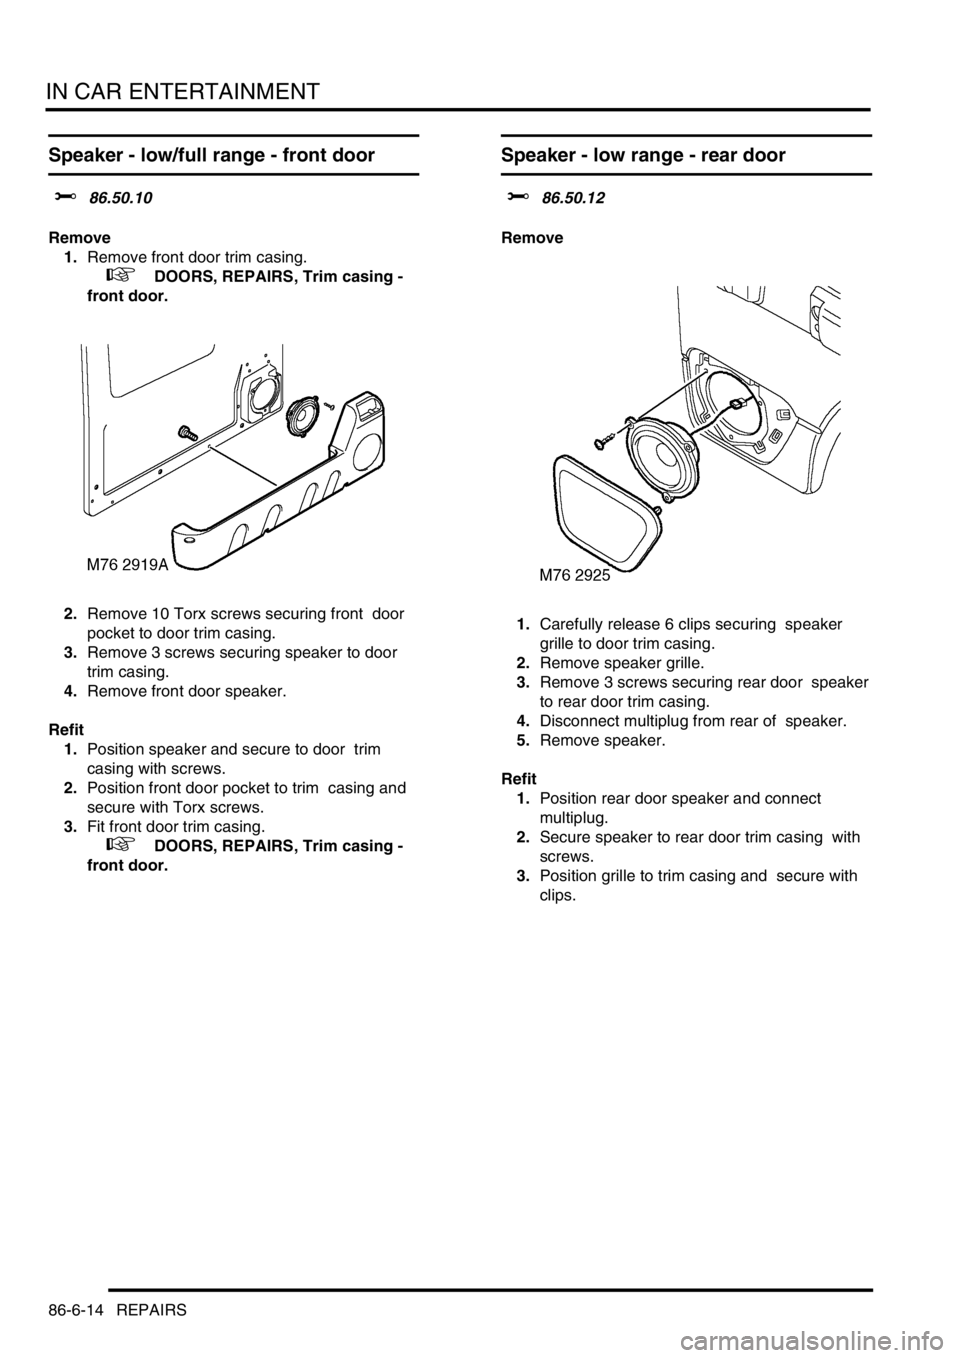
Speaker - low/full range - front door
$% 86.50.10
Remove
1.Remove front door trim casing.
+ DOORS, REPAIRS, Trim casing -
front door.
2.Remove 10 Torx screws securing front door
pocket to door trim casing.
3.Remove 3 screws securing speaker to door
trim casing.
4.Remove front door speaker.
Refit
1.Position speaker and secure to door trim
casing with screws.
2.Position front door pocket to trim casing and
secure with Torx screws.
3.Fit front door trim casing.
+ DOORS, REPAIRS, Trim casing -
front door.
Speaker - low range - rear door
$% 86.50.12
Remove
1.Carefully release 6 clips securing speaker
grille to door trim casing.
2.Remove speaker grille.
3.Remove 3 screws securing rear door speaker
to rear door trim casing.
4.Disconnect multiplug from rear of speaker.
5.Remove speaker.
Refit
1.Position rear door speaker and connect
multiplug.
2.Secure speaker to rear door trim casing with
screws.
3.Position grille to trim casing and secure with
clips.
Page 1568 of 1672

IN CAR ENTERTAINMENT
REPAIRS 86-6-15
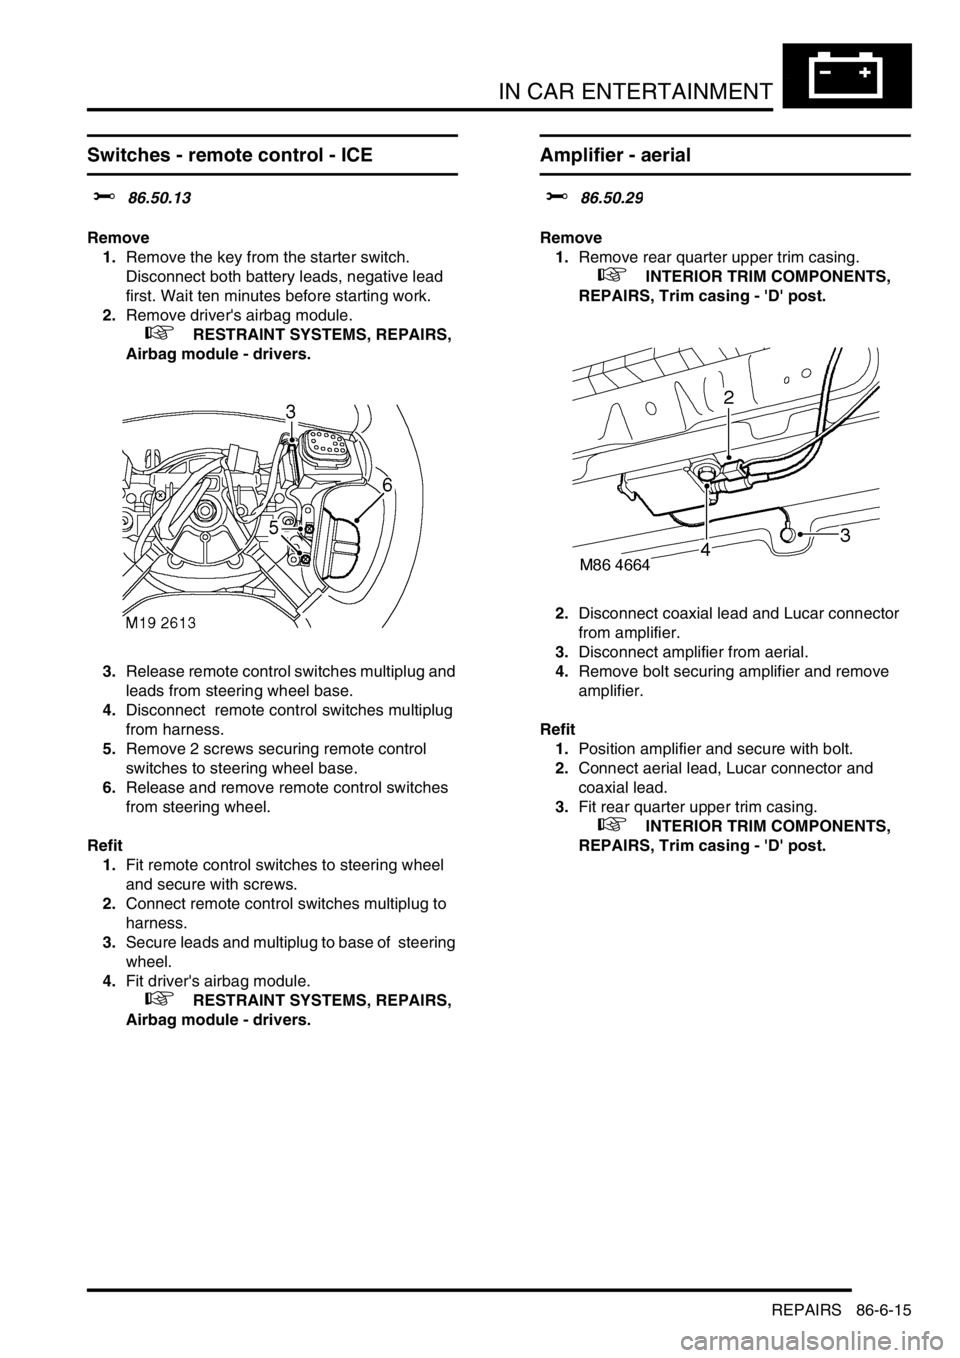
Switches - remote control - ICE
$% 86.50.13
Remove
1.Remove the key from the starter switch.
Disconnect both battery leads, negative lead
first. Wait ten minutes before starting work.
2.Remove driver's airbag module.
+ RESTRAINT SYSTEMS, REPAIRS,
Airbag module - drivers.
3.Release remote control switches multiplug and
leads from steering wheel base.
4.Disconnect remote control switches multiplug
from harness.
5.Remove 2 screws securing remote control
switches to steering wheel base.
6.Release and remove remote control switches
from steering wheel.
Refit
1.Fit remote control switches to steering wheel
and secure with screws.
2.Connect remote control switches multiplug to
harness.
3.Secure leads and multiplug to base of steering
wheel.
4.Fit driver's airbag module.
+ RESTRAINT SYSTEMS, REPAIRS,
Airbag module - drivers.
Amplifier - aerial
$% 86.50.29
Remove
1.Remove rear quarter upper trim casing.
+ INTERIOR TRIM COMPONENTS,
REPAIRS, Trim casing - 'D' post.
2.Disconnect coaxial lead and Lucar connector
from amplifier.
3.Disconnect amplifier from aerial.
4.Remove bolt securing amplifier and remove
amplifier.
Refit
1.Position amplifier and secure with bolt.
2.Connect aerial lead, Lucar connector and
coaxial lead.
3.Fit rear quarter upper trim casing.
+ INTERIOR TRIM COMPONENTS,
REPAIRS, Trim casing - 'D' post.
Page 1569 of 1672
IN CAR ENTERTAINMENT
86-6-16 REPAIRS
Speaker - mid range - front door
$% 86.50.34
Remove
1.Remove front door trim casing.
+ DOORS, REPAIRS, Trim casing -
front door.
2.Remove locknut securing speaker to front door
trim casing.
3.Remove speaker.
Refit
1.Position speaker and secure to door trim
casing using locknut.
2.Fit front door trim casing.
+ DOORS, REPAIRS, Trim casing -
front door.
Speaker - high range - rear door
$% 86.50.35
Remove
1.Remove rear door trim casing.
+ DOORS, REPAIRS, Trim casing -
rear door.
2.Remove speaker locknut.
3.Remove speaker from door trim casing.
Refit
1.Position speaker and secure withlocknut to
rear door trim casing.
2.Fit rear door trim casing.
+ DOORS, REPAIRS, Trim casing -
rear door.
Page 1570 of 1672

IN CAR ENTERTAINMENT
REPAIRS 86-6-17
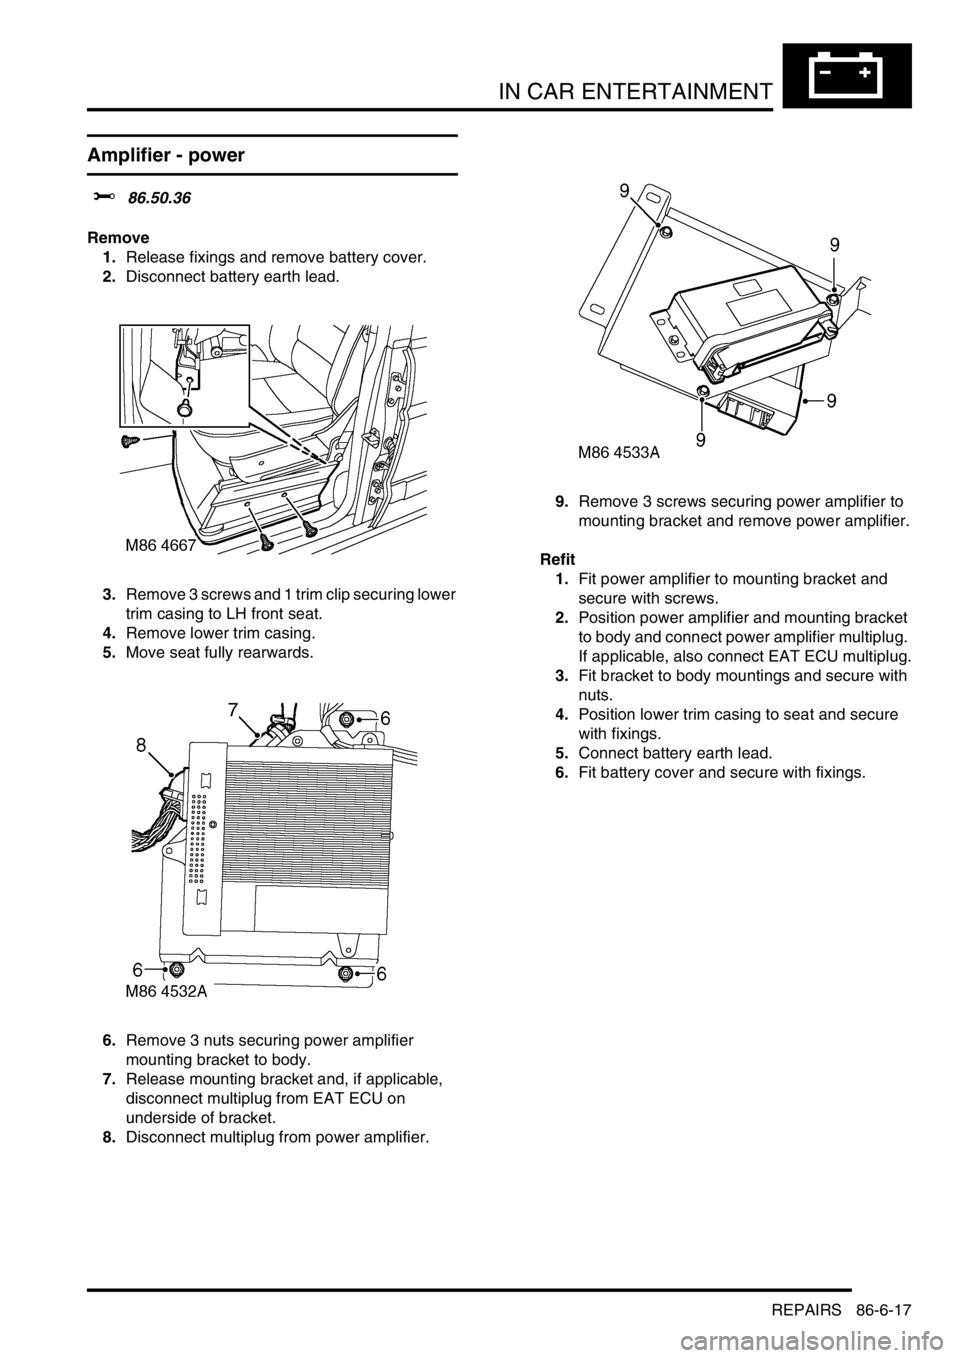
Amplifier - power
$% 86.50.36
Remove
1.Release fixings and remove battery cover.
2.Disconnect battery earth lead.
3.Remove 3 screws and 1 trim clip securing lower
trim casing to LH front seat.
4.Remove lower trim casing.
5.Move seat fully rearwards.
6.Remove 3 nuts securing power amplifier
mounting bracket to body.
7.Release mounting bracket and, if applicable,
disconnect multiplug from EAT ECU on
underside of bracket.
8.Disconnect multiplug from power amplifier. 9.Remove 3 screws securing power amplifier to
mounting bracket and remove power amplifier.
Refit
1.Fit power amplifier to mounting bracket and
secure with screws.
2.Position power amplifier and mounting bracket
to body and connect power amplifier multiplug.
If applicable, also connect EAT ECU multiplug.
3.Fit bracket to body mountings and secure with
nuts.
4.Position lower trim casing to seat and secure
with fixings.
5.Connect battery earth lead.
6.Fit battery cover and secure with fixings.
Page 1571 of 1672

IN CAR ENTERTAINMENT
86-6-18 REPAIRS
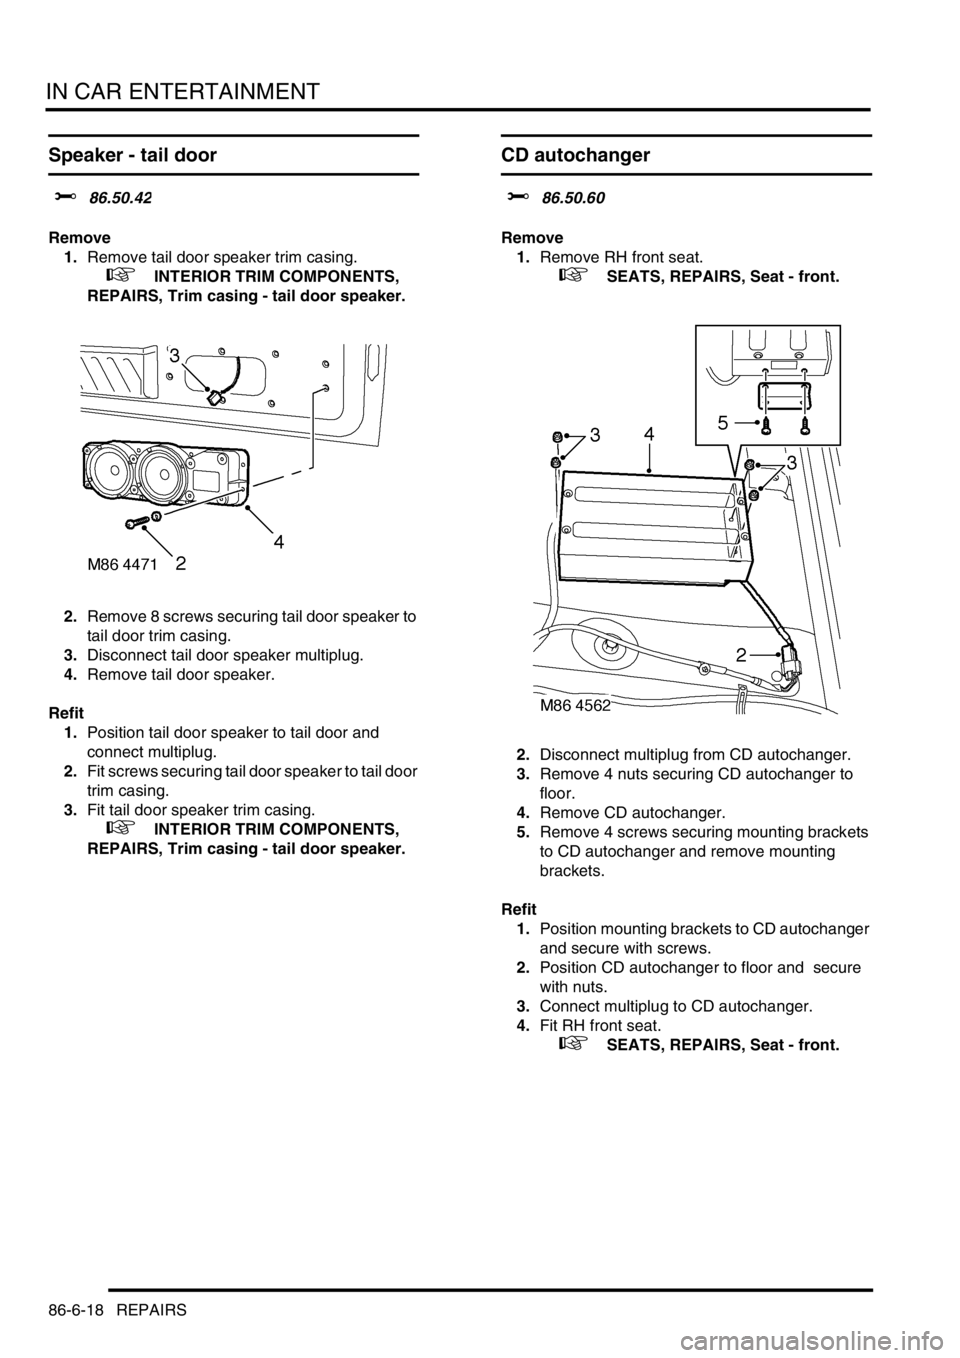
Speaker - tail door
$% 86.50.42
Remove
1.Remove tail door speaker trim casing.
+ INTERIOR TRIM COMPONENTS,
REPAIRS, Trim casing - tail door speaker.
2.Remove 8 screws securing tail door speaker to
tail door trim casing.
3.Disconnect tail door speaker multiplug.
4.Remove tail door speaker.
Refit
1.Position tail door speaker to tail door and
connect multiplug.
2.Fit screws securing tail door speaker to tail door
trim casing.
3.Fit tail door speaker trim casing.
+ INTERIOR TRIM COMPONENTS,
REPAIRS, Trim casing - tail door speaker.
CD autochanger
$% 86.50.60
Remove
1.Remove RH front seat.
+ SEATS, REPAIRS, Seat - front.
2.Disconnect multiplug from CD autochanger.
3.Remove 4 nuts securing CD autochanger to
floor.
4.Remove CD autochanger.
5.Remove 4 screws securing mounting brackets
to CD autochanger and remove mounting
brackets.
Refit
1.Position mounting brackets to CD autochanger
and secure with screws.
2.Position CD autochanger to floor and secure
with nuts.
3.Connect multiplug to CD autochanger.
4.Fit RH front seat.
+ SEATS, REPAIRS, Seat - front.
Page 1572 of 1672
HARNESSES
REPAIRS 86-7-1
HARNESSES REPAIRS
Harness - injectors - diesel
$% 86.70.22
Remove
1.Remove camshaft cover gasket.
+ ENGINE - Td5, REPAIRS, Gasket -
cover - camshaft.
2.Disconnect engine harness from injector
harness.
3.Disconnect multiplugs from injectors. release
injector harness from camshaft carrier and
remove harness.
Refit
1.Fit new 'O' rings to injector harness connector.
2.Position harness and locate connector to
camshaft carrier.
3.Connect injector and engine harness
multiplugs.
4.Fit camshaft cover gasket.
+ ENGINE - Td5, REPAIRS, Gasket -
cover - camshaft.
Harness - body
$% 86.70.11
Remove
1.Remove fascia panel.
+ INTERIOR TRIM COMPONENTS,
REPAIRS, Fascia.
2.Remove headlining.
+ INTERIOR TRIM COMPONENTS,
REPAIRS, Headlining.
3.Remove 5 studs securing sound deadening
and remove 3 sound deadening panels.
4.Remove 2 studs securing LH lower 'A' post trim
panel and remove trim panel.
Page 1573 of 1672
HARNESSES
86-7-2 REPAIRS
5.Release and disconnect 4 multiplugs from LH
lower 'A' post.
6.Release clip and disconnect rear washer pipe
from LH lower 'A' post.
7.Release harness from behind bonnet release
cable.
8.Release harness from 4 retainers in LH upper
'A' post and collect protective sleeves. 9.Release 4 clips securing harness to centre of
roof.
10.Disconnect multiplug from ACE accelerometer.
11.Disconnect multiplug from interior mirror.
12.Feed harness through roof to upper 'A' post.
13.Release 3 retainers securing harness to RH
roof panel.
Page 1574 of 1672
HARNESSES
REPAIRS 86-7-3
14.Release 2 cable clips securing body harness to
sunroof harness.
15.Drill out 4 rivets securing air conditioning
ducting to body, release ducting.
16.Release 2 cable ties securing harness to LH
side of body.
17.Release retainer securing harness to LH side
of body. 18.Disconnect Lucar from radio aerial LH
amplifier.
19.Remove both luggage compartment trim
casings.
+ INTERIOR TRIM COMPONENTS,
REPAIRS, Trim casing - side - loadspace.
20.Disconnect 2 multiplugs from rear air
conditioning unit.