2002 JEEP LIBERTY belt
[x] Cancel search: beltPage 1625 of 1803
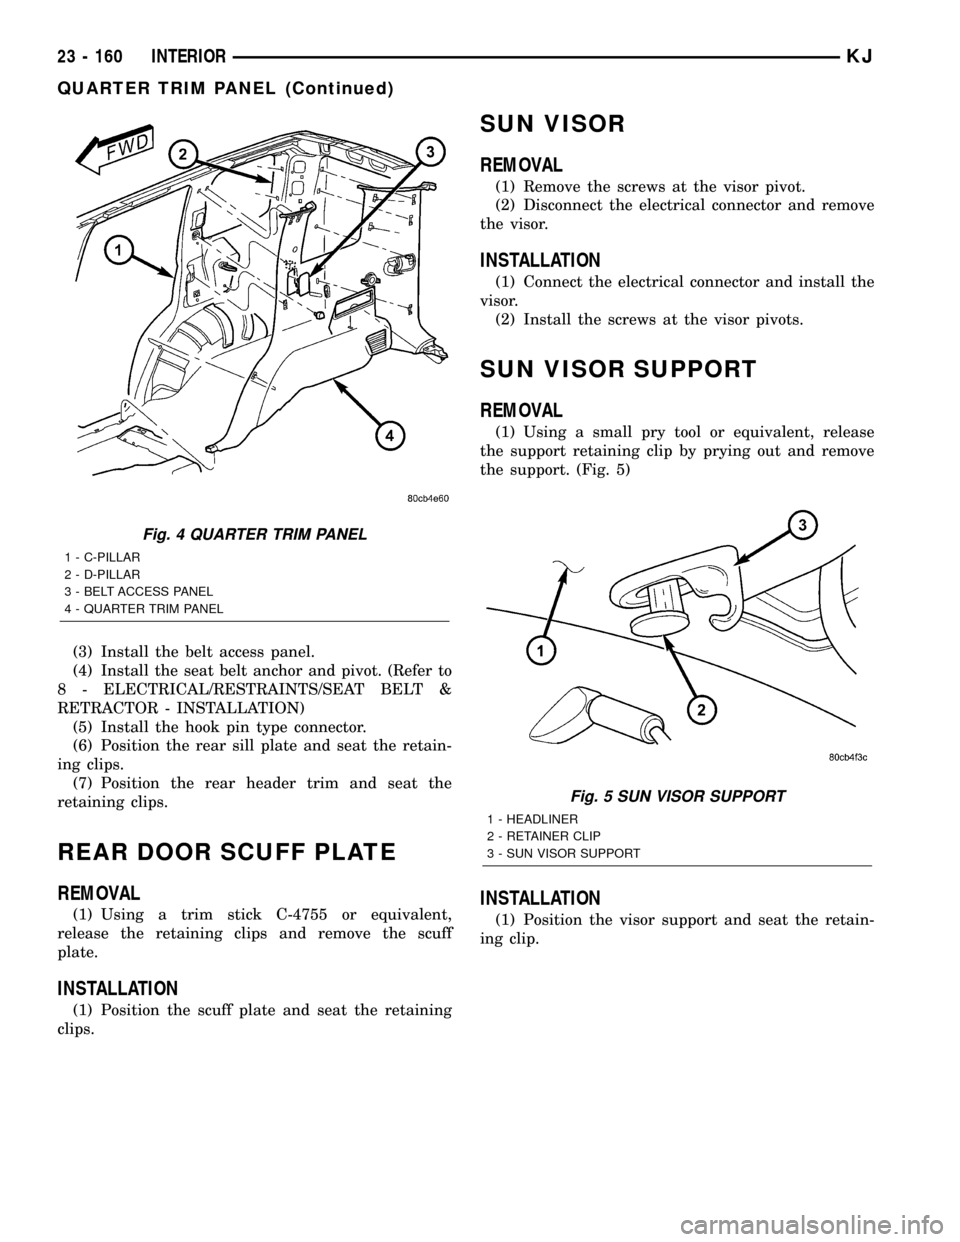
(3) Install the belt access panel.
(4) Install the seat belt anchor and pivot. (Refer to
8 - ELECTRICAL/RESTRAINTS/SEAT BELT &
RETRACTOR - INSTALLATION)
(5) Install the hook pin type connector.
(6) Position the rear sill plate and seat the retain-
ing clips.
(7) Position the rear header trim and seat the
retaining clips.
REAR DOOR SCUFF PLATE
REMOVAL
(1) Using a trim stick C-4755 or equivalent,
release the retaining clips and remove the scuff
plate.
INSTALLATION
(1) Position the scuff plate and seat the retaining
clips.
SUN VISOR
REMOVAL
(1) Remove the screws at the visor pivot.
(2) Disconnect the electrical connector and remove
the visor.
INSTALLATION
(1) Connect the electrical connector and install the
visor.
(2) Install the screws at the visor pivots.
SUN VISOR SUPPORT
REMOVAL
(1) Using a small pry tool or equivalent, release
the support retaining clip by prying out and remove
the support. (Fig. 5)
INSTALLATION
(1) Position the visor support and seat the retain-
ing clip.
Fig. 4 QUARTER TRIM PANEL
1 - C-PILLAR
2 - D-PILLAR
3 - BELT ACCESS PANEL
4 - QUARTER TRIM PANEL
Fig. 5 SUN VISOR SUPPORT
1 - HEADLINER
2 - RETAINER CLIP
3 - SUN VISOR SUPPORT
23 - 160 INTERIORKJ
QUARTER TRIM PANEL (Continued)
Page 1630 of 1803
SEAT - FRONT
REMOVAL
WARNING: DISABLE THE SUPPLEMENTAL
RESTRAINTS SYSTEM BEFORE ATTEMPTING ANY
STEERING WHEEL, STEERING COLUMN, DRIVER
AIRBAG, PASSENGER AIRBAG, SEAT BELT TEN-
SIONER, SIDE CURTAIN AIRBAG, OR INSTRUMENT
PANEL COMPONENT DIAGNOSIS OR SERVICE.
DISCONNECT AND ISOLATE THE BATTERY NEGA-
TIVE (GROUND) CABLE, THEN WAIT TWO MINUTES
FOR THE SYSTEM CAPACITOR TO DISCHARGE
BEFORE PERFORMING FURTHER DIAGNOSIS OR
SERVICE. THIS IS THE ONLY SURE WAY TO DIS-
ABLE THE SUPPLEMENTAL RESTRAINTS SYSTEM.
FAILURE TO TAKE THE PROPER PRECAUTIONS
COULD RESULT IN ACCIDENTAL AIRBAG DEPLOY-
MENT AND POSSIBLE PERSONAL INJURY.
WARNING: DURING AND FOLLOWING ANY SEAT
BELT SERVICE, CAREFULLY INSPECT ALL SEAT
BELTS, BUCKLES, MOUNTING HARDWARE, AND
RETRACTORS FOR PROPER INSTALLATION,
OPERATION, OR DAMAGE. REPLACE ANY BELT
THAT IS CUT, FRAYED, OR TORN. STRAIGHTEN
ANY BELT THAT IS TWISTED. TIGHTEN ANY
LOOSE FASTENERS. REPLACE ANY BELT THAT
HAS A DAMAGED OR INOPERATIVE BUCKLE OR
RETRACTOR. REPLACE ANY BELT THAT HAS A
BENT OR DAMAGED LATCH PLATE OR ANCHOR
PLATE. NEVER ATTEMPT TO REPAIR A SEAT BELT
COMPONENT. ALWAYS REPLACE DAMAGED OR
FAULTY SEAT BELT COMPONENTS WITH THE COR-
RECT, NEW AND UNUSED REPLACEMENT PARTS
LISTED IN THE MOPAR PARTS CATALOG.
(1) Remove the seat belt anchor bolt. (Refer to 8 -
ELECTRICAL/RESTRAINTS/SEAT BELT &
RETRACTOR - REMOVAL)
(2) Slide seat back and remove the front bolts.
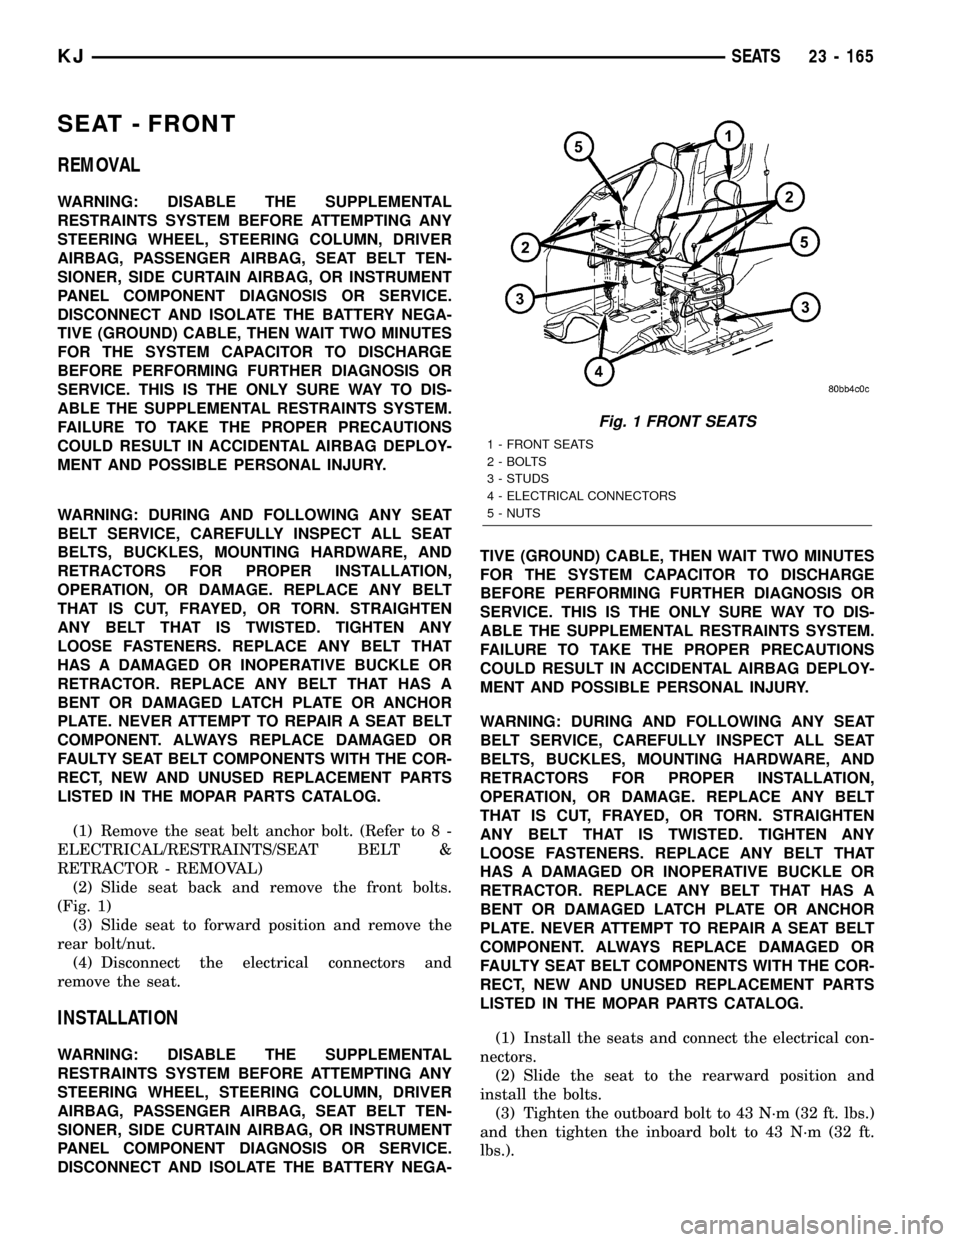
(Fig. 1)
(3) Slide seat to forward position and remove the
rear bolt/nut.
(4) Disconnect the electrical connectors and
remove the seat.
INSTALLATION
WARNING: DISABLE THE SUPPLEMENTAL
RESTRAINTS SYSTEM BEFORE ATTEMPTING ANY
STEERING WHEEL, STEERING COLUMN, DRIVER
AIRBAG, PASSENGER AIRBAG, SEAT BELT TEN-
SIONER, SIDE CURTAIN AIRBAG, OR INSTRUMENT
PANEL COMPONENT DIAGNOSIS OR SERVICE.
DISCONNECT AND ISOLATE THE BATTERY NEGA-TIVE (GROUND) CABLE, THEN WAIT TWO MINUTES
FOR THE SYSTEM CAPACITOR TO DISCHARGE
BEFORE PERFORMING FURTHER DIAGNOSIS OR
SERVICE. THIS IS THE ONLY SURE WAY TO DIS-
ABLE THE SUPPLEMENTAL RESTRAINTS SYSTEM.
FAILURE TO TAKE THE PROPER PRECAUTIONS
COULD RESULT IN ACCIDENTAL AIRBAG DEPLOY-
MENT AND POSSIBLE PERSONAL INJURY.
WARNING: DURING AND FOLLOWING ANY SEAT
BELT SERVICE, CAREFULLY INSPECT ALL SEAT
BELTS, BUCKLES, MOUNTING HARDWARE, AND
RETRACTORS FOR PROPER INSTALLATION,
OPERATION, OR DAMAGE. REPLACE ANY BELT
THAT IS CUT, FRAYED, OR TORN. STRAIGHTEN
ANY BELT THAT IS TWISTED. TIGHTEN ANY
LOOSE FASTENERS. REPLACE ANY BELT THAT
HAS A DAMAGED OR INOPERATIVE BUCKLE OR
RETRACTOR. REPLACE ANY BELT THAT HAS A
BENT OR DAMAGED LATCH PLATE OR ANCHOR
PLATE. NEVER ATTEMPT TO REPAIR A SEAT BELT
COMPONENT. ALWAYS REPLACE DAMAGED OR
FAULTY SEAT BELT COMPONENTS WITH THE COR-
RECT, NEW AND UNUSED REPLACEMENT PARTS
LISTED IN THE MOPAR PARTS CATALOG.
(1) Install the seats and connect the electrical con-
nectors.
(2) Slide the seat to the rearward position and
install the bolts.
(3) Tighten the outboard bolt to 43 N´m (32 ft. lbs.)
and then tighten the inboard bolt to 43 N´m (32 ft.
lbs.).
Fig. 1 FRONT SEATS
1 - FRONT SEATS
2 - BOLTS
3 - STUDS
4 - ELECTRICAL CONNECTORS
5 - NUTS
KJSEATS 23 - 165
Page 1631 of 1803
(4) Slide the seat to the forward position and
install the rear bolt and nut.
(5) Tighten the fasteners to 43 N´m (32 ft. lbs.).
(6) Install the seat belt anchor and bolt. (Refer to
8 - ELECTRICAL/RESTRAINTS/SEAT BELT &
RETRACTOR - INSTALLATION)
SEAT BACK - FRONT
REMOVAL
(1) Remove the seat. (Refer to 23 - BODY/SEATS/
SEAT - FRONT - REMOVAL)
(2) Remove the seat cushion side shields. (Refer to
23 - BODY/SEATS/SEAT CUSHION SIDE SHIELDS
- REMOVAL)
(3) Disconnect the lock out cable from both reclin-
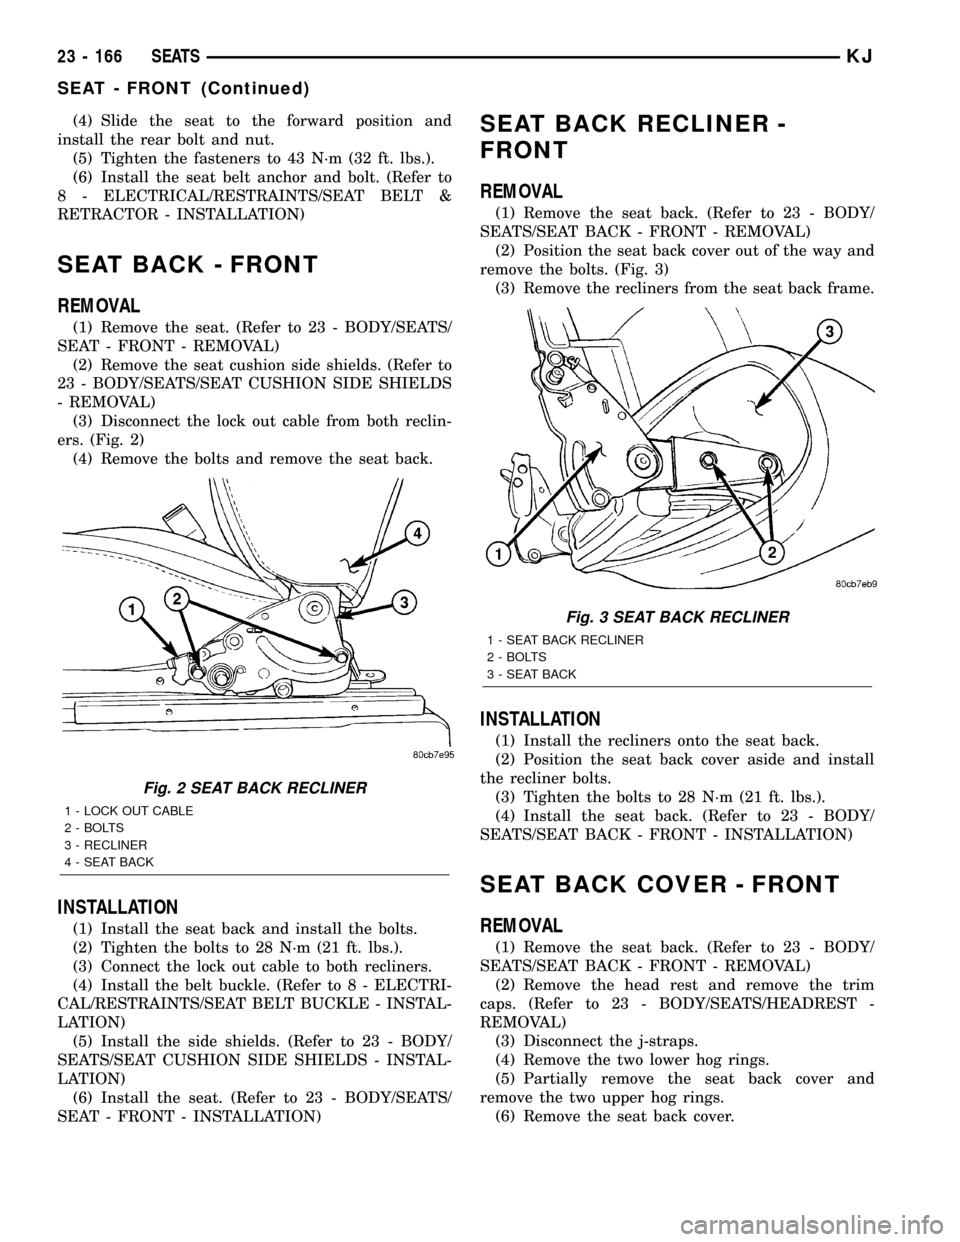
ers. (Fig. 2)
(4) Remove the bolts and remove the seat back.
INSTALLATION
(1) Install the seat back and install the bolts.
(2) Tighten the bolts to 28 N´m (21 ft. lbs.).
(3) Connect the lock out cable to both recliners.
(4) Install the belt buckle. (Refer to 8 - ELECTRI-
CAL/RESTRAINTS/SEAT BELT BUCKLE - INSTAL-
LATION)
(5) Install the side shields. (Refer to 23 - BODY/
SEATS/SEAT CUSHION SIDE SHIELDS - INSTAL-
LATION)
(6) Install the seat. (Refer to 23 - BODY/SEATS/
SEAT - FRONT - INSTALLATION)
SEAT BACK RECLINER -
FRONT
REMOVAL
(1) Remove the seat back. (Refer to 23 - BODY/
SEATS/SEAT BACK - FRONT - REMOVAL)
(2) Position the seat back cover out of the way and
remove the bolts. (Fig. 3)
(3) Remove the recliners from the seat back frame.
INSTALLATION
(1) Install the recliners onto the seat back.
(2) Position the seat back cover aside and install
the recliner bolts.
(3) Tighten the bolts to 28 N´m (21 ft. lbs.).
(4) Install the seat back. (Refer to 23 - BODY/
SEATS/SEAT BACK - FRONT - INSTALLATION)
SEAT BACK COVER - FRONT
REMOVAL
(1) Remove the seat back. (Refer to 23 - BODY/
SEATS/SEAT BACK - FRONT - REMOVAL)
(2) Remove the head rest and remove the trim
caps. (Refer to 23 - BODY/SEATS/HEADREST -
REMOVAL)
(3) Disconnect the j-straps.
(4) Remove the two lower hog rings.
(5) Partially remove the seat back cover and
remove the two upper hog rings.
(6) Remove the seat back cover.
Fig. 2 SEAT BACK RECLINER
1 - LOCK OUT CABLE
2 - BOLTS
3 - RECLINER
4 - SEAT BACK
Fig. 3 SEAT BACK RECLINER
1 - SEAT BACK RECLINER
2 - BOLTS
3 - SEAT BACK
23 - 166 SEATSKJ
SEAT - FRONT (Continued)
Page 1633 of 1803
INSTALLATION
(1) Install the seat riser and install the bolts.
(2) Tighten the bolts to 28 N´m (21 ft. lbs.).
(3) Install a new release handle rivet.
(4) Install the seat. (Refer to 23 - BODY/SEATS/
SEAT - FRONT - INSTALLATION)
SEAT TRACK
REMOVAL
(1) Remove the seat back. (Refer to 23 - BODY/
SEATS/SEAT BACK - FRONT - REMOVAL)
(2) Remove the outer riser. (Refer to 23 - BODY/
SEATS/SEAT RISER - REMOVAL)
(3) Remove the front outer bolts and remove the
tracks.
INSTALLATION
(1) Install the seat track onto the seat cushion and
install the front outer bolts.
(2) Tighten the bolts to 28 N´m (21 ft. lbs.).
(3) Install the seat riser. (Refer to 23 - BODY/
SEATS/SEAT RISER - INSTALLATION)
(4) Install the seat back. (Refer to 23 - BODY/
SEATS/SEAT BACK - FRONT - INSTALLATION)
SEAT - REAR
REMOVAL
(1) Remove the outer seat belt anchors. (Refer to 8
- ELECTRICAL/RESTRAINTS/SEAT BELT &
RETRACTOR - REMOVAL)
(2) Remove the inner seat belt buckles. (Refer to 8
- ELECTRICAL/RESTRAINTS/SEAT BELT BUCKLE
- REMOVAL)
(3) Remove the center seat belt anchor. (Refer to 8
- ELECTRICAL/RESTRAINTS/SEAT BELT &
RETRACTOR - REMOVAL)
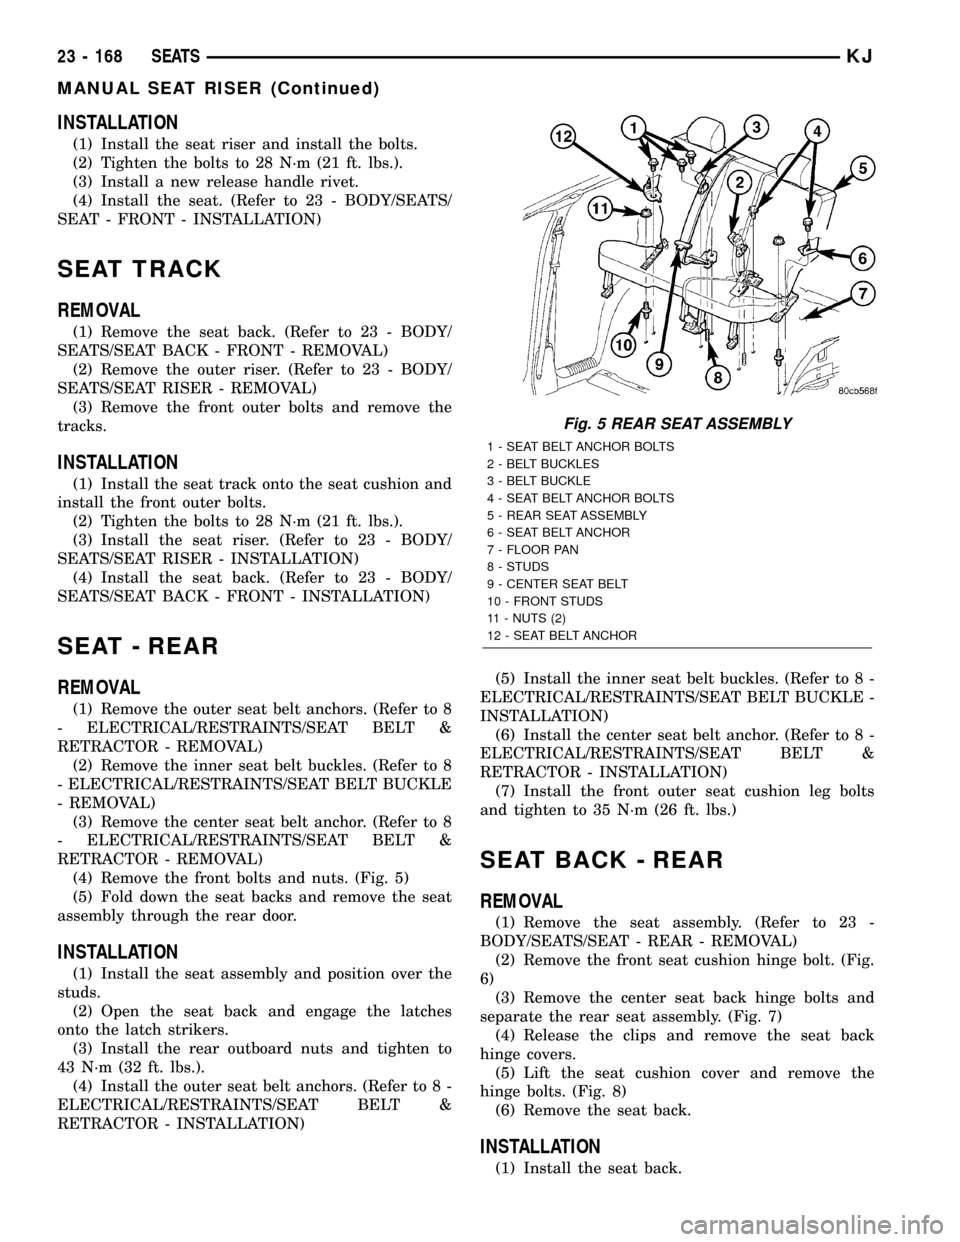
(4) Remove the front bolts and nuts. (Fig. 5)
(5) Fold down the seat backs and remove the seat
assembly through the rear door.
INSTALLATION
(1) Install the seat assembly and position over the
studs.
(2) Open the seat back and engage the latches
onto the latch strikers.
(3) Install the rear outboard nuts and tighten to
43 N´m (32 ft. lbs.).
(4) Install the outer seat belt anchors. (Refer to 8 -
ELECTRICAL/RESTRAINTS/SEAT BELT &
RETRACTOR - INSTALLATION)(5) Install the inner seat belt buckles. (Refer to 8 -
ELECTRICAL/RESTRAINTS/SEAT BELT BUCKLE -
INSTALLATION)
(6) Install the center seat belt anchor. (Refer to 8 -
ELECTRICAL/RESTRAINTS/SEAT BELT &
RETRACTOR - INSTALLATION)
(7) Install the front outer seat cushion leg bolts
and tighten to 35 N´m (26 ft. lbs.)
SEAT BACK - REAR
REMOVAL
(1) Remove the seat assembly. (Refer to 23 -
BODY/SEATS/SEAT - REAR - REMOVAL)
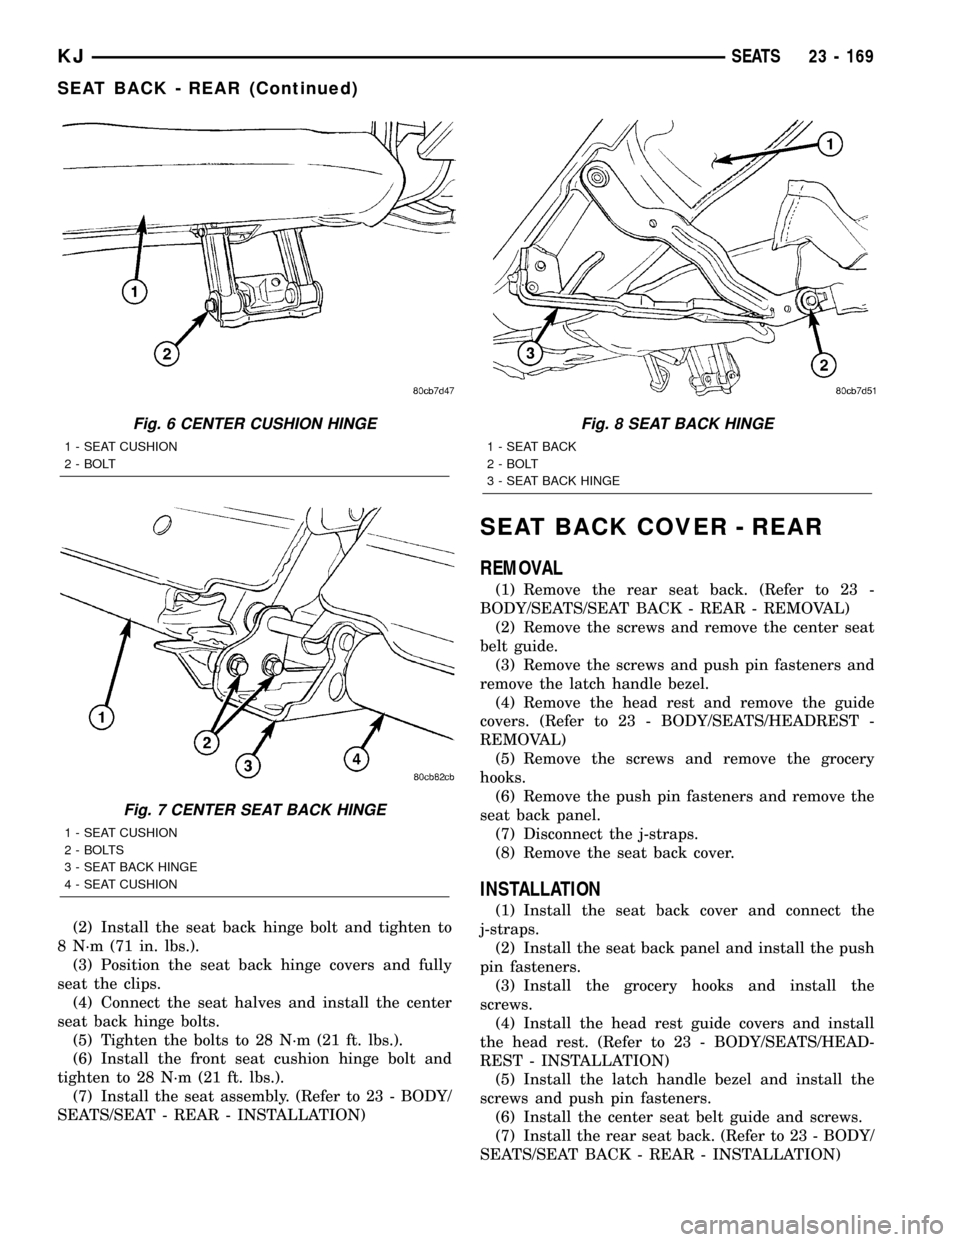
(2) Remove the front seat cushion hinge bolt. (Fig.
6)
(3) Remove the center seat back hinge bolts and
separate the rear seat assembly. (Fig. 7)
(4) Release the clips and remove the seat back
hinge covers.
(5) Lift the seat cushion cover and remove the
hinge bolts. (Fig. 8)
(6) Remove the seat back.
INSTALLATION
(1) Install the seat back.
Fig. 5 REAR SEAT ASSEMBLY
1 - SEAT BELT ANCHOR BOLTS
2 - BELT BUCKLES
3 - BELT BUCKLE
4 - SEAT BELT ANCHOR BOLTS
5 - REAR SEAT ASSEMBLY
6 - SEAT BELT ANCHOR
7 - FLOOR PAN
8 - STUDS
9 - CENTER SEAT BELT
10 - FRONT STUDS
11 - NUTS (2)
12 - SEAT BELT ANCHOR
23 - 168 SEATSKJ
MANUAL SEAT RISER (Continued)
Page 1634 of 1803
(2) Install the seat back hinge bolt and tighten to
8 N´m (71 in. lbs.).
(3) Position the seat back hinge covers and fully
seat the clips.
(4) Connect the seat halves and install the center
seat back hinge bolts.
(5) Tighten the bolts to 28 N´m (21 ft. lbs.).
(6) Install the front seat cushion hinge bolt and
tighten to 28 N´m (21 ft. lbs.).
(7) Install the seat assembly. (Refer to 23 - BODY/
SEATS/SEAT - REAR - INSTALLATION)
SEAT BACK COVER - REAR
REMOVAL
(1) Remove the rear seat back. (Refer to 23 -
BODY/SEATS/SEAT BACK - REAR - REMOVAL)
(2) Remove the screws and remove the center seat
belt guide.
(3) Remove the screws and push pin fasteners and
remove the latch handle bezel.
(4) Remove the head rest and remove the guide
covers. (Refer to 23 - BODY/SEATS/HEADREST -
REMOVAL)
(5) Remove the screws and remove the grocery
hooks.
(6) Remove the push pin fasteners and remove the
seat back panel.
(7) Disconnect the j-straps.
(8) Remove the seat back cover.
INSTALLATION
(1) Install the seat back cover and connect the
j-straps.
(2) Install the seat back panel and install the push
pin fasteners.
(3) Install the grocery hooks and install the
screws.
(4) Install the head rest guide covers and install
the head rest. (Refer to 23 - BODY/SEATS/HEAD-
REST - INSTALLATION)
(5) Install the latch handle bezel and install the
screws and push pin fasteners.
(6) Install the center seat belt guide and screws.
(7) Install the rear seat back. (Refer to 23 - BODY/
SEATS/SEAT BACK - REAR - INSTALLATION)
Fig. 6 CENTER CUSHION HINGE
1 - SEAT CUSHION
2 - BOLT
Fig. 7 CENTER SEAT BACK HINGE
1 - SEAT CUSHION
2 - BOLTS
3 - SEAT BACK HINGE
4 - SEAT CUSHION
Fig. 8 SEAT BACK HINGE
1 - SEAT BACK
2 - BOLT
3 - SEAT BACK HINGE
KJSEATS 23 - 169
SEAT BACK - REAR (Continued)
Page 1635 of 1803
SEAT BACK CUSHION - REAR
REMOVAL
(1) Remove the seat back cover. (Refer to 23 -
BODY/SEATS/SEAT BACK COVER - REAR -
REMOVAL)
(2) Separate the cushion from the seat back frame.
INSTALLATION
(1) Position the seat back cushion onto the seat
back frame.
(2) Install the seat back cover. (Refer to 23 -
BODY/SEATS/SEAT BACK COVER - REAR -
INSTALLATION)
FOLDING REAR SEAT BACK
LATCH / LOCK
REMOVAL
(1) Remove the rear seat back cushion. (Refer to
23 - BODY/SEATS/SEAT BACK CUSHION / COVER
- REAR - REMOVAL)
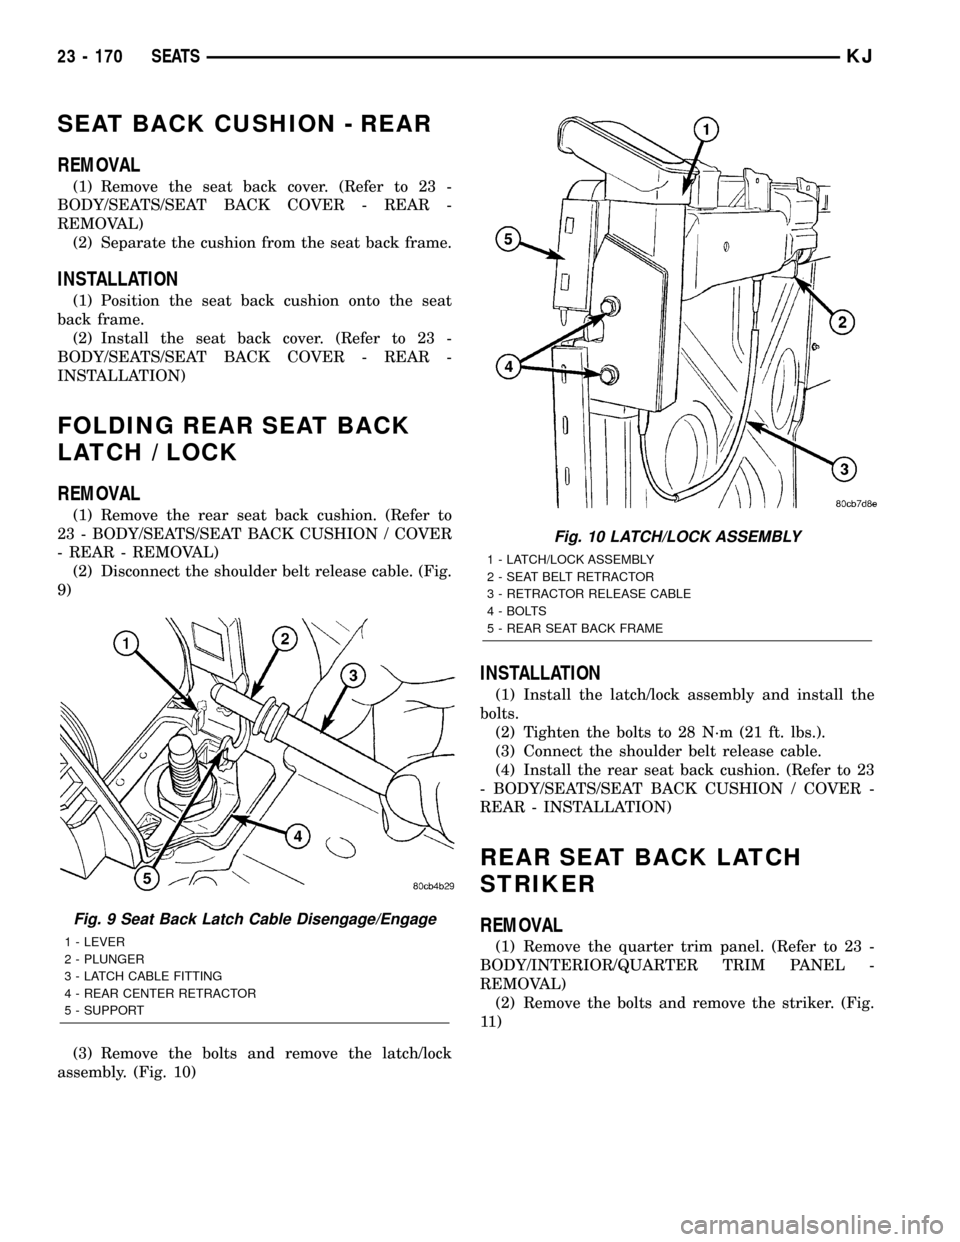
(2) Disconnect the shoulder belt release cable. (Fig.
9)
(3) Remove the bolts and remove the latch/lock
assembly. (Fig. 10)
INSTALLATION
(1) Install the latch/lock assembly and install the
bolts.
(2) Tighten the bolts to 28 N´m (21 ft. lbs.).
(3) Connect the shoulder belt release cable.
(4) Install the rear seat back cushion. (Refer to 23
- BODY/SEATS/SEAT BACK CUSHION / COVER -
REAR - INSTALLATION)
REAR SEAT BACK LATCH
STRIKER
REMOVAL
(1) Remove the quarter trim panel. (Refer to 23 -
BODY/INTERIOR/QUARTER TRIM PANEL -
REMOVAL)
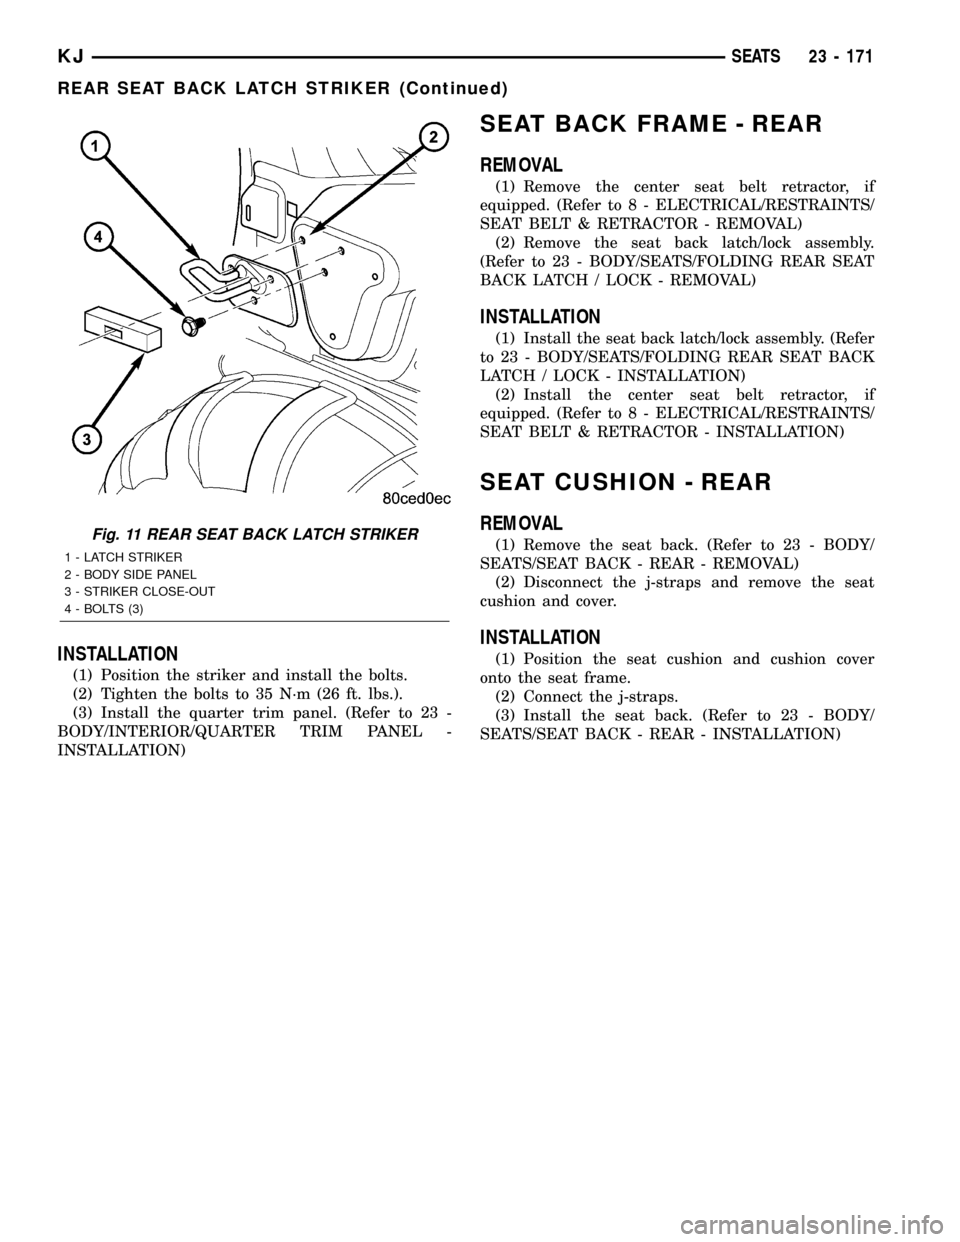
(2) Remove the bolts and remove the striker. (Fig.
11 )
Fig. 9 Seat Back Latch Cable Disengage/Engage
1 - LEVER
2 - PLUNGER
3 - LATCH CABLE FITTING
4 - REAR CENTER RETRACTOR
5 - SUPPORT
Fig. 10 LATCH/LOCK ASSEMBLY
1 - LATCH/LOCK ASSEMBLY
2 - SEAT BELT RETRACTOR
3 - RETRACTOR RELEASE CABLE
4 - BOLTS
5 - REAR SEAT BACK FRAME
23 - 170 SEATSKJ
Page 1636 of 1803
INSTALLATION
(1) Position the striker and install the bolts.
(2) Tighten the bolts to 35 N´m (26 ft. lbs.).
(3) Install the quarter trim panel. (Refer to 23 -
BODY/INTERIOR/QUARTER TRIM PANEL -
INSTALLATION)
SEAT BACK FRAME - REAR
REMOVAL
(1) Remove the center seat belt retractor, if
equipped. (Refer to 8 - ELECTRICAL/RESTRAINTS/
SEAT BELT & RETRACTOR - REMOVAL)
(2) Remove the seat back latch/lock assembly.
(Refer to 23 - BODY/SEATS/FOLDING REAR SEAT
BACK LATCH / LOCK - REMOVAL)
INSTALLATION
(1) Install the seat back latch/lock assembly. (Refer
to 23 - BODY/SEATS/FOLDING REAR SEAT BACK
LATCH / LOCK - INSTALLATION)
(2) Install the center seat belt retractor, if
equipped. (Refer to 8 - ELECTRICAL/RESTRAINTS/
SEAT BELT & RETRACTOR - INSTALLATION)
SEAT CUSHION - REAR
REMOVAL
(1) Remove the seat back. (Refer to 23 - BODY/
SEATS/SEAT BACK - REAR - REMOVAL)
(2) Disconnect the j-straps and remove the seat
cushion and cover.
INSTALLATION
(1) Position the seat cushion and cushion cover
onto the seat frame.
(2) Connect the j-straps.
(3) Install the seat back. (Refer to 23 - BODY/
SEATS/SEAT BACK - REAR - INSTALLATION)
Fig. 11 REAR SEAT BACK LATCH STRIKER
1 - LATCH STRIKER
2 - BODY SIDE PANEL
3 - STRIKER CLOSE-OUT
4 - BOLTS (3)
KJSEATS 23 - 171
REAR SEAT BACK LATCH STRIKER (Continued)
Page 1650 of 1803
WEATHERSTRIP/SEALS
TABLE OF CONTENTS
page page
A-PILLAR SEAL
REMOVAL............................185
INSTALLATION........................185
COWL WEATHERSTRIP
REMOVAL............................185
INSTALLATION........................185
DOOR PRIMARY WEATHERSTRIP
REMOVAL............................185
INSTALLATION........................185
DOOR LOWER WEATHERSTRIP
REMOVAL............................186
INSTALLATION........................186
FRONT DOOR OUTER BELT MOLDING
REMOVAL............................186
INSTALLATION........................186
SWING GATE BELTLINE WEATHERSTRIP
REMOVAL............................186
INSTALLATION........................186
SWING GATE OPENING WEATHERSTRIP
REMOVAL............................186INSTALLATION........................186
REAR DOOR OUTER BELT MOLDING
REMOVAL............................186
INSTALLATION........................186
SIDE RAIL WEATHERSTRIP/RETAINER
REMOVAL............................186
INSTALLATION........................186
WINDSHIELD A-PILLAR WEATHERSTRIP/
RETAINER
REMOVAL............................186
INSTALLATION........................187
COWL/PLENUM SEAL
REMOVAL............................187
INSTALLATION........................187
COWL/PLENUM WINDOW BAFFLE SEAL
REMOVAL............................187
INSTALLATION........................187
A-PILLAR SEAL
REMOVAL
(1) Open the doors and peal the seal away from
the a-pillar/windshield and the side rail weather
strip flanges.
INSTALLATION
(1) Position the a-pillar seal over the windshield/a-
pillar and the side rail weatherstrip flanges and seat
fully.
COWL WEATHERSTRIP
REMOVAL
(1) Open the hood and peal the cowl seal from the
cowl panel and cowl flange.
INSTALLATION
(1) Position the weatherstrip over the cowl flange
and the cowl grille and seat fully.
DOOR PRIMARY
WEATHERSTRIP
REMOVAL
(1) Remove the lower b-pillar trim. (Refer to 23 -
BODY/INTERIOR/B-PILLAR LOWER TRIM -
REMOVAL)
(2) Peal seal off of the door opening flange.
INSTALLATION
(1) Position the seal to the bottom of the door
opening, with bulb facing outboard, starting the
installation at the center of the lower flange. Press
the seal onto the sill flange and work around the
perimeter of the door opening until fully seated.
Work in one direction, smoothing the seal to avoid
puckers or wrinkles.
(2) Install the lower b-pillar trim. (Refer to 23 -
BODY/INTERIOR/B-PILLAR LOWER TRIM -
INSTALLATION)
(3) When installing a new weatherstrip on the
front door opening, remove the tear strip starting at
the splice and moving around the front of the door to
the back of the opening.
KJWEATHERSTRIP/SEALS 23 - 185