2002 JEEP GRAND CHEROKEE lock
[x] Cancel search: lockPage 1971 of 2199

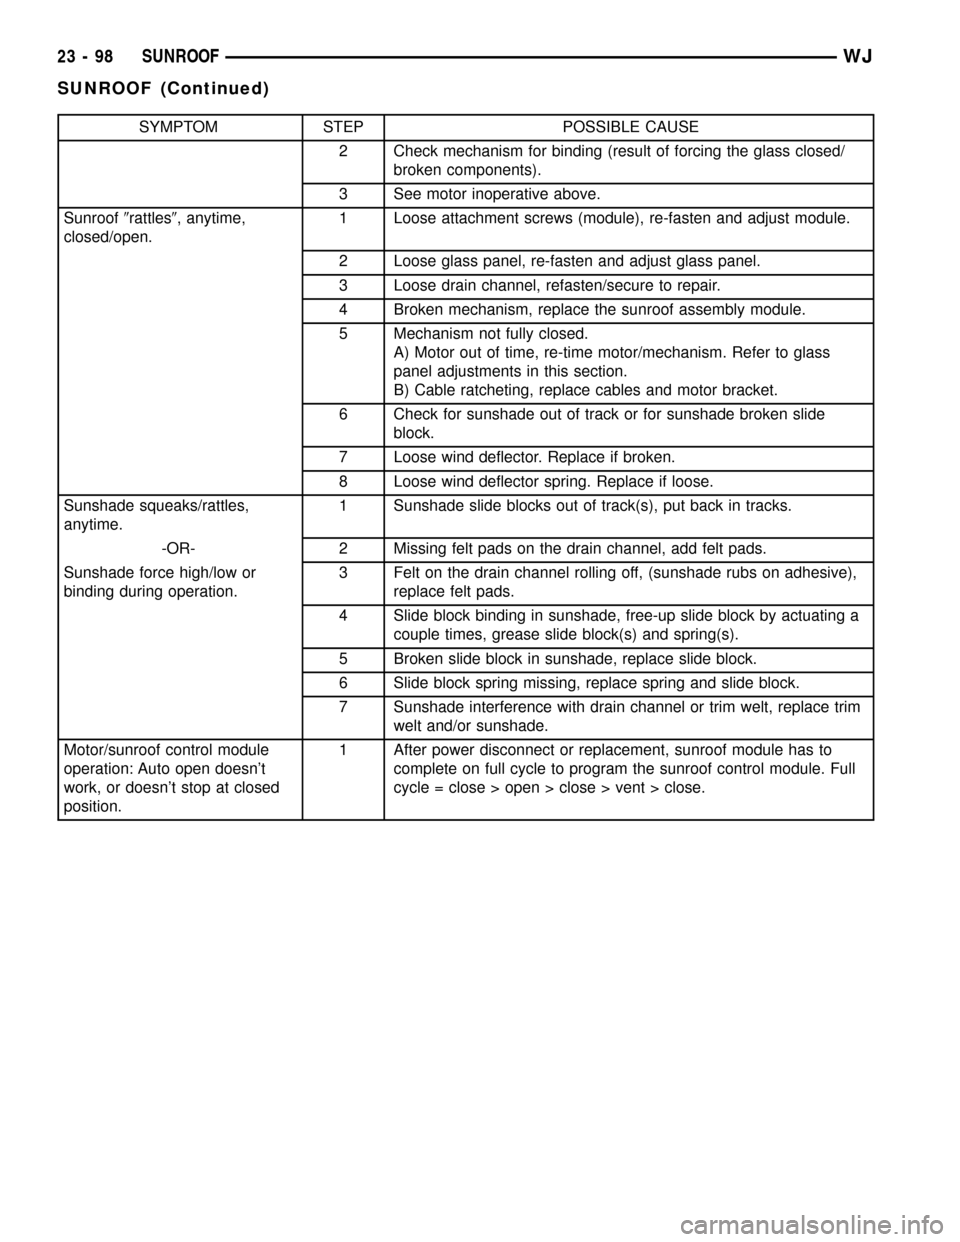
SYMPTOM STEP POSSIBLE CAUSE
2 Check mechanism for binding (result of forcing the glass closed/
broken components).
3 See motor inoperative above.
Sunroof9rattles9, anytime,
closed/open.1 Loose attachment screws (module), re-fasten and adjust module.
2 Loose glass panel, re-fasten and adjust glass panel.
3 Loose drain channel, refasten/secure to repair.
4 Broken mechanism, replace the sunroof assembly module.
5 Mechanism not fully closed.
A) Motor out of time, re-time motor/mechanism. Refer to glass
panel adjustments in this section.
B) Cable ratcheting, replace cables and motor bracket.
6 Check for sunshade out of track or for sunshade broken slide
block.
7 Loose wind deflector. Replace if broken.
8 Loose wind deflector spring. Replace if loose.
Sunshade squeaks/rattles,
anytime.1 Sunshade slide blocks out of track(s), put back in tracks.
-OR- 2 Missing felt pads on the drain channel, add felt pads.
Sunshade force high/low or
binding during operation.3 Felt on the drain channel rolling off, (sunshade rubs on adhesive),
replace felt pads.
4 Slide block binding in sunshade, free-up slide block by actuating a
couple times, grease slide block(s) and spring(s).
5 Broken slide block in sunshade, replace slide block.
6 Slide block spring missing, replace spring and slide block.
7 Sunshade interference with drain channel or trim welt, replace trim
welt and/or sunshade.
Motor/sunroof control module
operation: Auto open doesn't
work, or doesn't stop at closed
position.1 After power disconnect or replacement, sunroof module has to
complete on full cycle to program the sunroof control module. Full
cycle = close > open > close > vent > close.
23 - 98 SUNROOFWJ
SUNROOF (Continued)
Page 1974 of 2199

CONTROL MODULE
REMOVAL
(1) Move the glass panel to the fully closed posi-
tion.
(2) Remove the A-pillar trim. (Refer to 23 - BODY/
INTERIOR/A-PILLAR TRIM - REMOVAL)
(3) Remove the sun visors. (Refer to 23 - BODY/
INTERIOR/SUN VISOR - REMOVAL)
(4) Remove the overhead console. (Refer to 8 -
ELECTRICAL/OVERHEAD CONSOLE - REMOVAL)
(5) Lower headliner as necessary to gain access to
the sunroof express module.
(6) Disconnect the express module wire harness
connectors.
(7) Remove express module screw.
(8) Remove express module from the keyway by
sliding module towards the center of the vehicle.
INSTALLATION
(1) Insert sunroof express module in the keyway
located in the sunroof module and slide the module
outward to lock it into position.
(2) Install the sunroof express module screw.
(3) Connect the wire connectors to the sunroof
express module.
(4) Install the headliner into position.
(5) Install the overhead console. (Refer to 8 -
ELECTRICAL/OVERHEAD CONSOLE - INSTALLA-
TION)
(6) Install the sun visors. (Refer to 23 - BODY/IN-
TERIOR/SUN VISOR - INSTALLATION)
(7) Install the A-pillar trim. (Refer to 23 - BODY/
INTERIOR/A-PILLAR TRIM - INSTALLATION)
(8) Test sunroof operation, adjust if necessary.
(Refer to 23 - BODY/SUNROOF/GLASS PANEL -
ADJUSTMENTS)
DRIVE MOTOR
REMOVAL
CAUTION: The sunroof system is timed from the
factory so that the motor shuts off automatically
when the sunroof window reaches a certain posi-
tion. Extreme care must be taken when removing
the motor, timing may be thrown off causing possi-
ble damage to the sunroof system. Anytime the
motor is removed from the sunroof assembly the
sunroof glass panel must be in the FULLY CLOSED
POSITION or the unit will be out of timing. The drive
motor cannot be reset to the park position after
being removed.CAUTION: The sunroof motor should only be pow-
ered through the vehicle battery and sunroof wire
harness. Applying power to the sunroof motor leads
will cause failure of the control module.
(1) Move glass panel to the fully closed position.
(2) Remove the A-pillar trim. (Refer to 23 - BODY/
INTERIOR/A-PILLAR TRIM - REMOVAL)
(3) Remove the B-pillar upper trim. (Refer to 23 -
BODY/INTERIOR/B-PILLAR UPPER TRIM -
REMOVAL)
(4) Remove the C-pillar trim. (Refer to 23 - BODY/
INTERIOR/C-PILLAR TRIM - REMOVAL)
(5) Remove the D-pillar trim. (Refer to 23 - BODY/
INTERIOR/D-PILLAR TRIM - REMOVAL)
(6) Remove the sunvisors. (Refer to 23 - BODY/IN-
TERIOR/SUN VISOR - REMOVAL)
(7) Remove the overhead console. (Refer to 8 -
ELECTRICAL/OVERHEAD CONSOLE - REMOVAL)
(8) Disconnect the control switch wire connector.
(9) Remove headliner as necessary to gain access
to sunroof drive motor. Refer to Headliner Removal
and Installation for proper procedures.
(10) Disconnect the drive motor wire harness con-
nectors (Fig. 3).
(11) Remove drive motor fasteners and remove
motor from the sunroof housing.
INSTALLATION
(1) Ensure that the window is in the fully closed
position before mounting the motor. If motor fails
with the window in the open position the sunroof
glass panel timing will have to be timed. The new
motor comes in the fully closed position and with a
gage for setting cable timing. (Refer to 23 - BODY/
SUNROOF/GLASS PANEL - ADJUSTMENTS - TIM-
ING)
(2) Place drive motor into position on the sunroof
housing and install fasteners.
Fig. 3 Sunroof Drive Motor and Express Module
1 - EXPRESS MODULE
2 - SCREW
WJSUNROOF 23 - 101
Page 1976 of 2199

INSTALLATION
NOTE: Sunroof glass must be set in place and
attached as close as possible to flush with the roof
surface. For wind noise reasons, care must be
taken to ensure that the glass is not remounted
either a) Overflush to the roof surface at the front
edge of the glass, or b) Underflush to the roof sur-
face at the rear edge of the glass.
(1) Position glass panel in to opening.
(2) Start the four attaching screws.
(3) Tighten screws.
(4) Verify sunroof operation and alignment. Check
fit and adjust as necessary. (Refer to 23 - BODY/
SUNROOF/GLASS PANEL - ADJUSTMENTS - FIT)
ADJUSTMENTS
ADJUSTMENTS - FIT
(1) Move the sunshade rearward to the open posi-
tion.
(2) Move the sunroof glass panel to the fully closed
position.
(3) Loosen the forward screws on each side enough
to make the front adjustment.
(4) Adjust the front of the sunroof glass panel 1
mm (1/32 inch) below the top surface of the roof
panel.
(5) Tighten the front two screws.
(6) Loosen the rear screws on each side enough to
make the rear adjustment.
(7) Adjust the rear of the sunroof glass panel 1
mm (1/32 inch) above the top surface of the roof
panel.
(8) Tighten the rear two screws.
(9) Check for proper fit. If not OK, repeat glass
panel adjustment.
ADJUSTMENT - TIMING
NOTE: A gage comes with the new motor.
(1) If the glass panel was not in the fully closed
position, when the motor was removed, the sunroof
glass panel needs to be timed, before the new motor
is installed.
(2) Remove sunroof glass panel.
(3) Set gage into the track near the rear of the
opening between the driver slide and the bracket
(Fig. 6).
(4) Move the driver slide forward or aft to get
proper setting.
(5) Repeat the operation on the other side.
(6) Install drive motor.
SUNSHADE
REMOVAL
(1) Open sunroof approximately 50% of the way.
(2) Push sunshade down until tabs clear glass.
(3) Move sunshade forward of glass panel.
(4) Compress the spring loaded plungers holding
the guide blocks in the track.
(5) Slide the sunshade forward while lifting the
front through the opening until the rear guide blocks
are accessible.
CAUTION: Use care not to crease the sunshade
when removing or installing.
(6) Disengage rear guide blocks from track.
INSTALLATION
(1) Install the sunshade from outside of the vehicle
with the sunroof fully open.
(2) Put rear guide blocks into sunshade guide
track.
(3) Push sunshade back and down through the
sunroof opening.
(4) Using a flat blade tool, put front guide blocks
into the sunshade track. By pushing the block
towards the center of the vehicle.
(5) Move the glass panel to approximately halfway
to the fully closed position.
Fig. 6 Sunroof Drive Cable Timing
1 - MOVE DRIVER SLIDE FORWARD/AFT
2 - GAGE
WJSUNROOF 23 - 103
GLASS PANEL (Continued)
Page 1982 of 2199

LIFTGATE OPENING
WEATHERSTRIP
REMOVAL
(1) Pull seal away from flange around edge of lift-
gate opening.
(2) Separate weatherstrip from opening (Fig. 9).
(3) Clean weatherstrip flange as necessary.
INSTALLATION
(1) Position weatherstrip in opening with left end
of seal at opening centerline.
(2) Press weatherstrip onto flange in a clockwise
direction.
(3) Center and butt weatherstrip ends together at
centerline.
(4) If necessary, cut surplus from weatherstrip
(non-plug end only).
RDR INNER BELT
WEATHERSTRIP
REMOVAL
(1) Remove door trim panel (Refer to 23 - BODY/
DOORS - REAR/TRIM PANEL - REMOVAL).
(2) Using a trim stick, carefully pry rear inner
edge of inner belt weatherstrip upward.
(3) Grasp weatherstrip and pull upward to sepa-
rate from door flange (Fig. 10).
INSTALLATION
(1) Position weatherstrip on door flange.
(2) Firmly press downward to seat weatherstrip on
flange.
(3) Install trim panel (Refer to 23 - BODY/DOORS
- REAR/TRIM PANEL - INSTALLATION).
RDR OUTER BELT
WEATHERSTRIP
REMOVAL
(1) Remove trim panel (Refer to 23 - BODY/
DOORS - REAR/TRIM PANEL - REMOVAL).
(2) Using a small flat blade, disengage tangs
attaching outer belt weatherstrip to inner door panel.
(3) Lift weatherstrip upward and separate from
door (Fig. 10).
INSTALLATION
(1) Position the weatherstrip onto the door flange.
(2) Force the weatherstrip onto door flange and
engage tangs. Continue rearward until it is seated on
flange.
(3) Instal trim panel (Refer to 23 - BODY/DOORS
- REAR/TRIM PANEL - INSTALLATION).
Fig. 9 Liftgate Opening Weatherstrip
1 - LIFTGATE
2 - WEATHERSTRIP
Fig. 10 Rear Door Inner/Outer Belt Weatherstrip
1 - INNER BELT WEATHERSTRIP
2 - OUTER BELT WEATHERSTRIP
WJWEATHERSTRIP/SEALS 23 - 109
Page 1983 of 2199

RDR SECONDARY
WEATHERSTRIP
REMOVAL
The rear door secondary weatherstrip is attached
to the door shutface with push-in fasteners.
(1) Open door.
(2) Using a trim panel removal tool, remove
push-in fasteners attaching secondary weatherstrip
to door shutface.
(3) Separate secondary weatherstrip from door
(Fig. 11).
INSTALLATION
(1) Clean contact area as necessary.
(2)
Position secondary weatherstrip on door shutface.
(3) Install push-in fasteners attaching secondary
weatherstrip to door shutface.
REAR DOOR WEATHERSTRIP
REMOVAL
(1) Remove C-pillar trim (Refer to 23 - BODY/IN-
TERIOR/C-PILLAR TRIM - REMOVAL).
(2) Remove B-pillar upper trim (Refer to 23 -
BODY/INTERIOR/B-PILLAR UPPER TRIM -
REMOVAL).
(3) Remove B-pillar lower trim(Refer to 23 -
BODY/INTERIOR/B-PILLAR LOWER TRIM -
REMOVAL).
(4) Remove screws at front of quarter trim panel.
(5) Pull weatherstrip from door opening flange.
INSTALLATION
(1) Position weatherstrip at corners.
(2) Move upward and around edge of door opening
seating weatherstrip onto flange (Fig. 7).(3) Engage connector plug with each end of weath-
erstrip at bottom of door opening.
(4) Install screws at front of quarter trim panel.
(5)
Install B-pillar lower trim (Refer to 23 - BODY/IN-
TERIOR/B-PILLAR LOWER TRIM - INSTALLATION).
(6) Install B-pillar upper trim (Refer to 23 -
BODY/INTERIOR/B-PILLAR UPPER TRIM -
INSTALLATION).
(7) Install C-pillar trim (Refer to 23 - BODY/INTE-
RIOR/C-PILLAR TRIM - INSTALLATION).
ROOF RAIL WEATHERSTRIP /
RETAINR
REMOVAL
(1) Open front and rear doors.
(2) Remove secondary seal from retainer to access
the screws holding the retainer to the A pillar and
roof panel.
(3) Remove the screws holding the retainer in
place (Fig. 12).
(4) Remove the retainer.
INSTALLATION
(1) Position the retainer on the A pillar and roof
panel.
(2) Align the screw holes and install the screws.
(3) Install secondary seal.
Fig. 11 Rear Door Secondary Weatherstrip
1 - SECONDARY WEATHERSTRIP
Fig. 12 Upper Body Seal With Retainer
1 - ROOF RAIL WEATHERSTRIP
2 - RETAINER
3 - SCREW
4 - BLOCKER
23 - 110 WEATHERSTRIP/SEALSWJ
Page 2081 of 2199

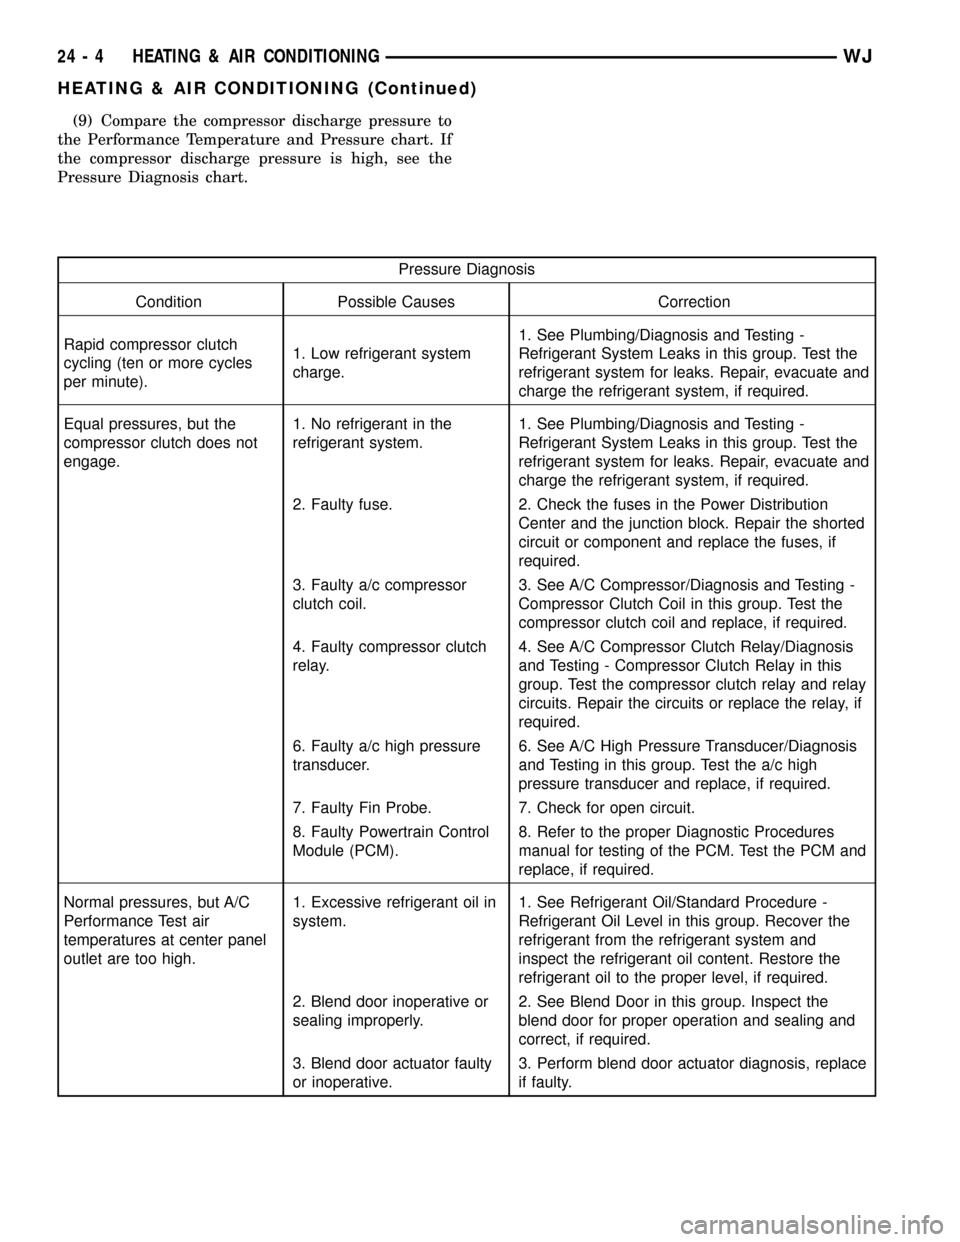
(9) Compare the compressor discharge pressure to
the Performance Temperature and Pressure chart. If
the compressor discharge pressure is high, see the
Pressure Diagnosis chart.
Pressure Diagnosis
Condition Possible Causes Correction
Rapid compressor clutch
cycling (ten or more cycles
per minute).1. Low refrigerant system
charge.1. See Plumbing/Diagnosis and Testing -
Refrigerant System Leaks in this group. Test the
refrigerant system for leaks. Repair, evacuate and
charge the refrigerant system, if required.
Equal pressures, but the
compressor clutch does not
engage.1. No refrigerant in the
refrigerant system.1. See Plumbing/Diagnosis and Testing -
Refrigerant System Leaks in this group. Test the
refrigerant system for leaks. Repair, evacuate and
charge the refrigerant system, if required.
2. Faulty fuse. 2. Check the fuses in the Power Distribution
Center and the junction block. Repair the shorted
circuit or component and replace the fuses, if
required.
3. Faulty a/c compressor
clutch coil.3. See A/C Compressor/Diagnosis and Testing -
Compressor Clutch Coil in this group. Test the
compressor clutch coil and replace, if required.
4. Faulty compressor clutch
relay.4. See A/C Compressor Clutch Relay/Diagnosis
and Testing - Compressor Clutch Relay in this
group. Test the compressor clutch relay and relay
circuits. Repair the circuits or replace the relay, if
required.
6. Faulty a/c high pressure
transducer.6. See A/C High Pressure Transducer/Diagnosis
and Testing in this group. Test the a/c high
pressure transducer and replace, if required.
7. Faulty Fin Probe. 7. Check for open circuit.
8. Faulty Powertrain Control
Module (PCM).8. Refer to the proper Diagnostic Procedures
manual for testing of the PCM. Test the PCM and
replace, if required.
Normal pressures, but A/C
Performance Test air
temperatures at center panel
outlet are too high.1. Excessive refrigerant oil in
system.1. See Refrigerant Oil/Standard Procedure -
Refrigerant Oil Level in this group. Recover the
refrigerant from the refrigerant system and
inspect the refrigerant oil content. Restore the
refrigerant oil to the proper level, if required.
2. Blend door inoperative or
sealing improperly.2. See Blend Door in this group. Inspect the
blend door for proper operation and sealing and
correct, if required.
3. Blend door actuator faulty
or inoperative.3. Perform blend door actuator diagnosis, replace
if faulty.
24 - 4 HEATING & AIR CONDITIONINGWJ
HEATING & AIR CONDITIONING (Continued)
Page 2084 of 2199

(5) Install the new diode in the harness, making
sure current flow is correct. If necessary refer to the
appropriate wiring diagram for current flow.
(6) Solder the connection together using rosin core
type solder only.Do not use acid core solder.
(7) Tape the diode to the harness using electrical
tape making, sure the diode is completely sealed
from the elements.
(8) Re-connect the battery, and test affected sys-
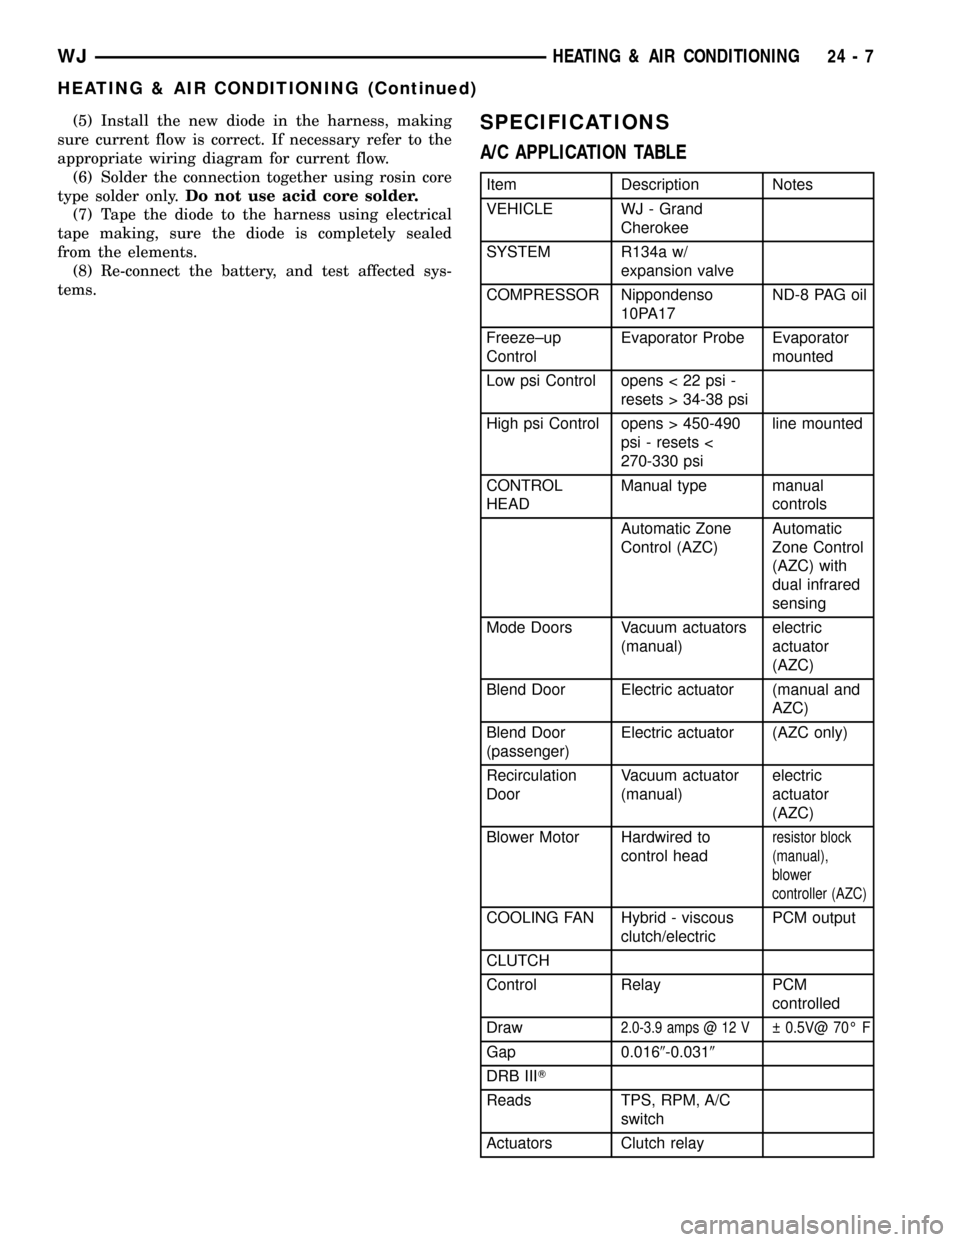
tems.SPECIFICATIONS
A/C APPLICATION TABLE
Item Description Notes
VEHICLE WJ - Grand
Cherokee
SYSTEM R134a w/
expansion valve
COMPRESSOR Nippondenso
10PA17ND-8 PAG oil
Freeze±up
ControlEvaporator Probe Evaporator
mounted
Low psi Control opens < 22 psi -
resets > 34-38 psi
High psi Control opens > 450-490
psi - resets <
270-330 psiline mounted
CONTROL
HEADManual type manual
controls
Automatic Zone
Control (AZC)Automatic
Zone Control
(AZC) with
dual infrared
sensing
Mode Doors Vacuum actuators
(manual)electric
actuator
(AZC)
Blend Door Electric actuator (manual and
AZC)
Blend Door
(passenger)Electric actuator (AZC only)
Recirculation
DoorVacuum actuator
(manual)electric
actuator
(AZC)
Blower Motor Hardwired to
control head
resistor block
(manual),
blower
controller (AZC)
COOLING FAN Hybrid - viscous
clutch/electricPCM output
CLUTCH
Control Relay PCM
controlled
Draw
2.0-3.9 amps @ 12 V 0.5V@ 70É F
Gap 0.0169-0.0319
DRB IIIT
Reads TPS, RPM, A/C
switch
Actuators Clutch relay
WJHEATING & AIR CONDITIONING 24 - 7
HEATING & AIR CONDITIONING (Continued)
Page 2085 of 2199

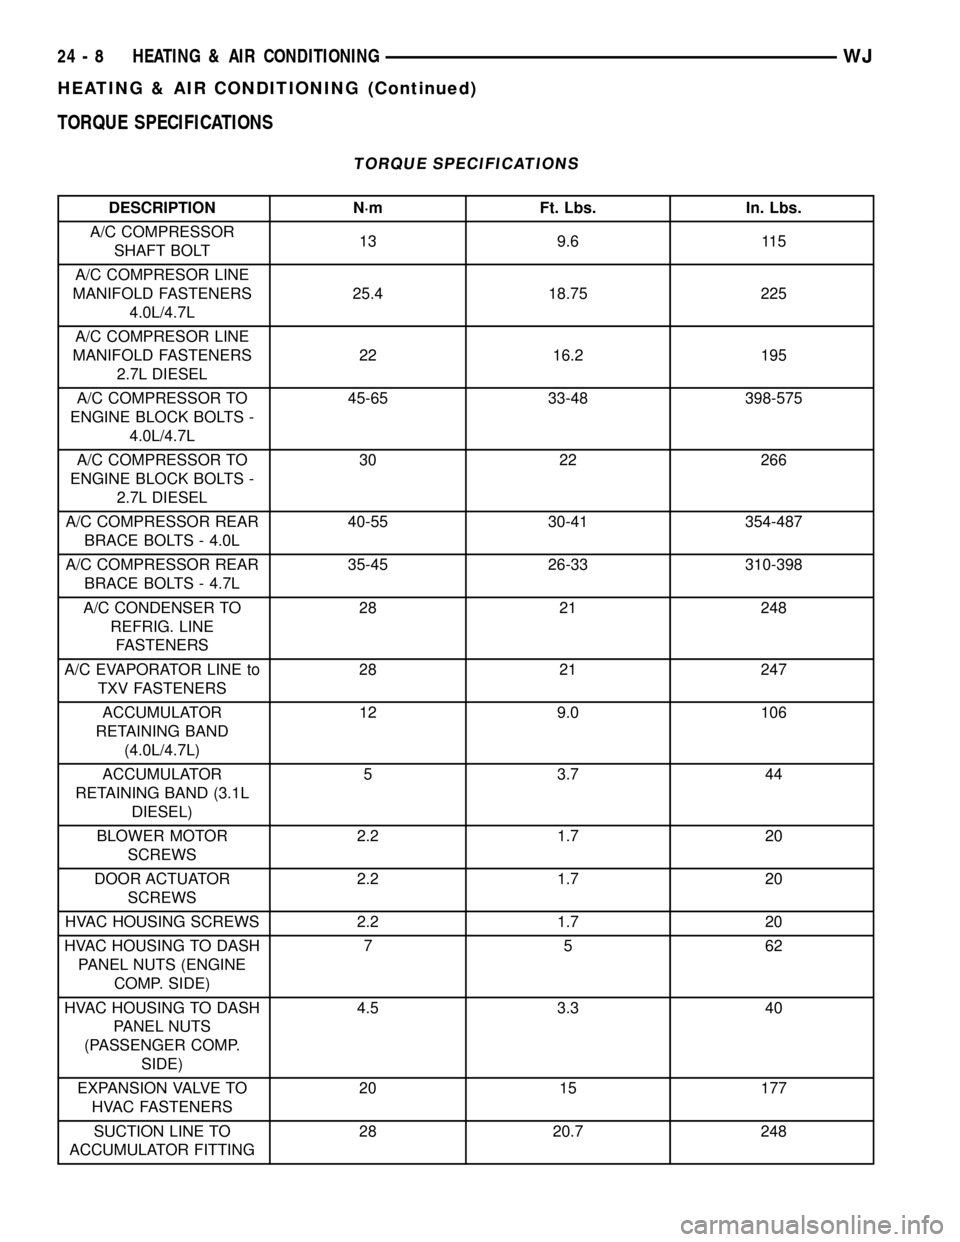
TORQUE SPECIFICATIONS
TORQUE SPECIFICATIONS
DESCRIPTION N´m Ft. Lbs. In. Lbs.
A/C COMPRESSOR
SHAFT BOLT13 9.6 115
A/C COMPRESOR LINE
MANIFOLD FASTENERS
4.0L/4.7L25.4 18.75 225
A/C COMPRESOR LINE
MANIFOLD FASTENERS
2.7L DIESEL22 16.2 195
A/C COMPRESSOR TO
ENGINE BLOCK BOLTS -
4.0L/4.7L45-65 33-48 398-575
A/C COMPRESSOR TO
ENGINE BLOCK BOLTS -
2.7L DIESEL30 22 266
A/C COMPRESSOR REAR
BRACE BOLTS - 4.0L40-55 30-41 354-487
A/C COMPRESSOR REAR
BRACE BOLTS - 4.7L35-45 26-33 310-398
A/C CONDENSER TO
REFRIG. LINE
FASTENERS28 21 248
A/C EVAPORATOR LINE to
TXV FASTENERS28 21 247
ACCUMULATOR
RETAINING BAND
(4.0L/4.7L)12 9.0 106
ACCUMULATOR
RETAINING BAND (3.1L
DIESEL)5 3.7 44
BLOWER MOTOR
SCREWS2.2 1.7 20
DOOR ACTUATOR
SCREWS2.2 1.7 20
HVAC HOUSING SCREWS 2.2 1.7 20
HVAC HOUSING TO DASH
PANEL NUTS (ENGINE
COMP. SIDE)75 62
HVAC HOUSING TO DASH
PANEL NUTS
(PASSENGER COMP.
SIDE)4.5 3.3 40
EXPANSION VALVE TO
HVAC FASTENERS20 15 177
SUCTION LINE TO
ACCUMULATOR FITTING28 20.7 248
24 - 8 HEATING & AIR CONDITIONINGWJ
HEATING & AIR CONDITIONING (Continued)