2002 JEEP GRAND CHEROKEE Bearings
[x] Cancel search: BearingsPage 106 of 2199

(8) Thread Pilot Stud C-3288-B into rear cover bolt
hole below ring gear (Fig. 17).
(9) Attach a Dial Indicator C-3339 to pilot stud.
Position the dial indicator plunger on a flat surface
between the ring gear bolt heads (Fig. 17).
(10) Push and hold differential case to pinion gear
side of the housing and zero dial indicator (Fig. 18).
(11) Push and hold differential case to ring gear
side of the housing and record dial indicator reading
(Fig. 19).
(12) Add 0.152 mm (0.006 in.) to the zero end play
total. This new total represents the thickness of
shims to compress, or preload the new bearings when
the differential is installed.
(13) Rotate dial indicator out of the way on the
pilot stud.
(14) Remove differential case and dummy bearings
from the housing.
(15) Install the pinion gear in axle housing. Install
the pinion yoke and establish the correct pinion
rotating torque.
(16) Install differential case and Dummy Bearings
D-348 in the housing.
(17) Install a single dummy shim in the ring gear
side. Install bearing caps and tighten bolts snug.
(18) Seat ring gear side dummy bearing (Fig. 16).
(19) Position the dial indicator plunger on a flat
surface between the ring gear bolt heads. (Fig. 17).(20) Push and hold differential case toward pinion
gear and zero dial indicator (Fig. 20).
(21) Push and hold differential case to ring gear
side of the housing and record dial indicator reading
(Fig. 21). Add dummy shim thickness to this reading.
This will be the total shim thickness to achieve zero
backlash.
(22) Subtract 0.076 mm (0.003 in.) from the dial
indicator reading to compensate for backlash between
ring and pinion gears. This total is the thickness
shim required to achieve proper backlash.
(23) Subtract the backlash shim thickness from
the total preload shim thickness. The remainder is
Fig. 17 DIFFERENTIAL SIDE PLAY
1 - DIFFERENTIAL CASE
2 - DIFFERENTIAL HOUSING
3 - PILOT STUD
4 - DIAL INDICATOR
Fig. 18 ZERO DIAL INDICATOR
1 - FORCE DIFFERENTIAL CASE TO PINION GEAR SIDE
2 - PILOT STUD
3 - DIAL INDICATOR
4 - ZERO DIAL INDICATOR FACE
Fig. 19 DIFFERENTIAL TO RING GEAR SIDE
1 - DIAL INDICATOR
2 - FORCE DIFFERENTIAL CASE TO RING GEAR SIDE
3 - DIFFERENTIAL HOUSING
WJREAR AXLE - 198RBI 3 - 61
REAR AXLE - 198RBI (Continued)
Page 107 of 2199

the shim thickness required on the pinion side of the
housing.
(24) Rotate dial indicator out of the way on pilot
stud.
(25) Remove differential case and dummy bearings
from the housing.
(26) Install side bearings and cups on differential
case.(27) Install spreader W-129-B utilizing some items
from Adapter Set 6987, on the housing and spread
axle opening enough to receive differential case.
CAUTION: Never spread over 0.38 mm (0.015 in.). If
housing is over-spread, it could be distorted or
damaged.
(28) Place the bearing preload shims in the hous-
ing, against the axle tubes.
(29) Install differential case into the housing.
(30) Remove spreader from the housing.
(31) Install differential bearing caps in their origi-
nal locations.
(32) Install bearing cap bolts and tighten to 77
N´m (57 ft. lbs.).
(33) Rotate the differential case several times to
seat the side bearings.
(34) Position the indicator plunger against a ring
gear tooth (Fig. 22).
(35) Push and hold ring gear upward while not
allowing the pinion gear to rotate.
(36) Zero dial indicator face to pointer.
(37) Push and hold ring gear downward while not
allowing the pinion gear to rotate. Dial indicator
reading should be between 0.12-0.20 mm (0.005-0.008
in.). If backlash is not within specifications transfer
the necessary amount of shim thickness from one
side of the axle housing to the other (Fig. 23).
(38) Verify differential case and ring gear runout
by measuring ring to pinion gear backlash at eight
locations around the ring gear. Readings should not
vary more than 0.05 mm (0.002 in.). If readings vary
more than specified, the ring gear or the differential
case is defective.
After the proper backlash is achieved, perform
Gear Contact Pattern Analysis procedure.
Fig. 20 ZERO DIAL INDICATOR
1 - DIAL INDICATOR FACE
2 - FORCE DIFFERENTIAL CASE TO PINION GEAR SIDE
3 - PINION GEAR
4 - DIFFERENTIAL HOUSING
5 - DIFFERENTIAL CASE
Fig. 21 DIFFERENTIAL TO RING GEAR SIDE
1 - DIAL INDICATOR
2 - FORCE DIFFERENTIAL CASE TO RING GEAR SIDE
3 - PINION GEAR
4 - DIFFERENTIAL HOUSING
5 - DIFFERENTIAL CASE
Fig. 22 RING GEAR BACKLASH MEASUREMENT
1 - DIAL INDICATOR
3 - 62 REAR AXLE - 198RBIWJ
REAR AXLE - 198RBI (Continued)
Page 110 of 2199

DIFFERENTIAL BEARING PRELOAD CHECK
The final check on the differential assembly before
installing the axles is torque to rotate pinion and dif-
ferential combined. This will verify the correct differ-
ential bearing preload.Torque to rotate the differential and pinion should
be the torque to rotate the pinion plus 0.79-1.24 N´m
(7-11 in. lbs.).
SPECIFICATIONS
AXLE SPECIFICATIONS
DESCRIPTION SPECIFICATION
Axle Ratio 3.07, 3.31, 3.55, 3.73, 4.11
Differential Bearing Preload 0.1 mm (0.004 in.)
Ring Gear Diameter 198 mm (7.795 in.)
Ring Gear Backlash 0.12-0.20 mm (0.005-0.008 in.)
Pinion Gear Std. Depth 96.85 mm (3.813 in.)
Pinion Bearing Preload - Original Bearings 1-2 N´m (10-20 in. lbs.)
Pinion Bearing Preload - New Bearings 1.7-3.9 N´m (15-35 in. lbs.)
TORQUE SPECIFICATIONS
DESCRIPTION N´m Ft. Lbs. In. Lbs.
Differential Cover Bolts 41 30 -
Bearing Cap Bolts 77 57 -
Ring Gear Bolts 129-142 95-105 -
Pinion Nut Minimum 272 200 -
Pinion Mate Shaft Screw 16.25 12 -
Axle Bearing Retainer Plate
Nuts61 45 -
WJREAR AXLE - 198RBI 3 - 65
REAR AXLE - 198RBI (Continued)
Page 114 of 2199

AXLE SHAFTS
REMOVAL
(1) Place transmission in neutral.
(2) Raise and support vehicle.
(3) Remove wheel and tire assembly.
(4) Remove brake caliper and rotor.
(5) Remove nuts holding axle retainer plate to axle
tube from the rear of the axle flange.
(6) Pull axle shaft from the axle with Slide Ham-
mer 7420 and Adapter 6790. Mount the adapter to
the axle with lug nuts.
NOTE: The axle bearing race is normally loose in
the axle tube.
INSTALLATION
(1) Insall axle into the axle tube with the flat area
of the retainer plate upward.
(2) Insert retaining plate studs into the brake
backing plate and axle tube flange.
(3) Install retainer nuts and tighten nuts to 61
N´m (45 ft. lbs.).
(4) Install the brake rotor and caliper.
(5) Install wheel and tire.
(6) Check and fill the differential with gear lubri-
cant.
(7) Lower vehicle.
AXLE BEARINGS/SEALS
REMOVAL
(1) Remove axle shaft from vehicle.
NOTE: The axle bearing race is normally loose in
the axle tube.
(2) Drill a shallow hole into soft steel axle bearing
retaining ring with a 3/8 in. drill bit (Fig. 25). Use a
drill depth stop to avoid marking the axle.
(3) With a cold chisel cut the retaining ring across
drilled hole. (Fig. 26)
(4) Slide retaining ring from axle shaft.
Fig. 25 DRILL RETAINING RING
1 - DRILL BIT
2 - AXLE
3 - RETAINING PLATE
4 - RETAINING RING
Fig. 26 RETAINING RING
1 - AXLE
2 - COLD CHISEL
3 - VISE
4 - RETAINING RING
WJREAR AXLE - 198RBI 3 - 69
Page 115 of 2199

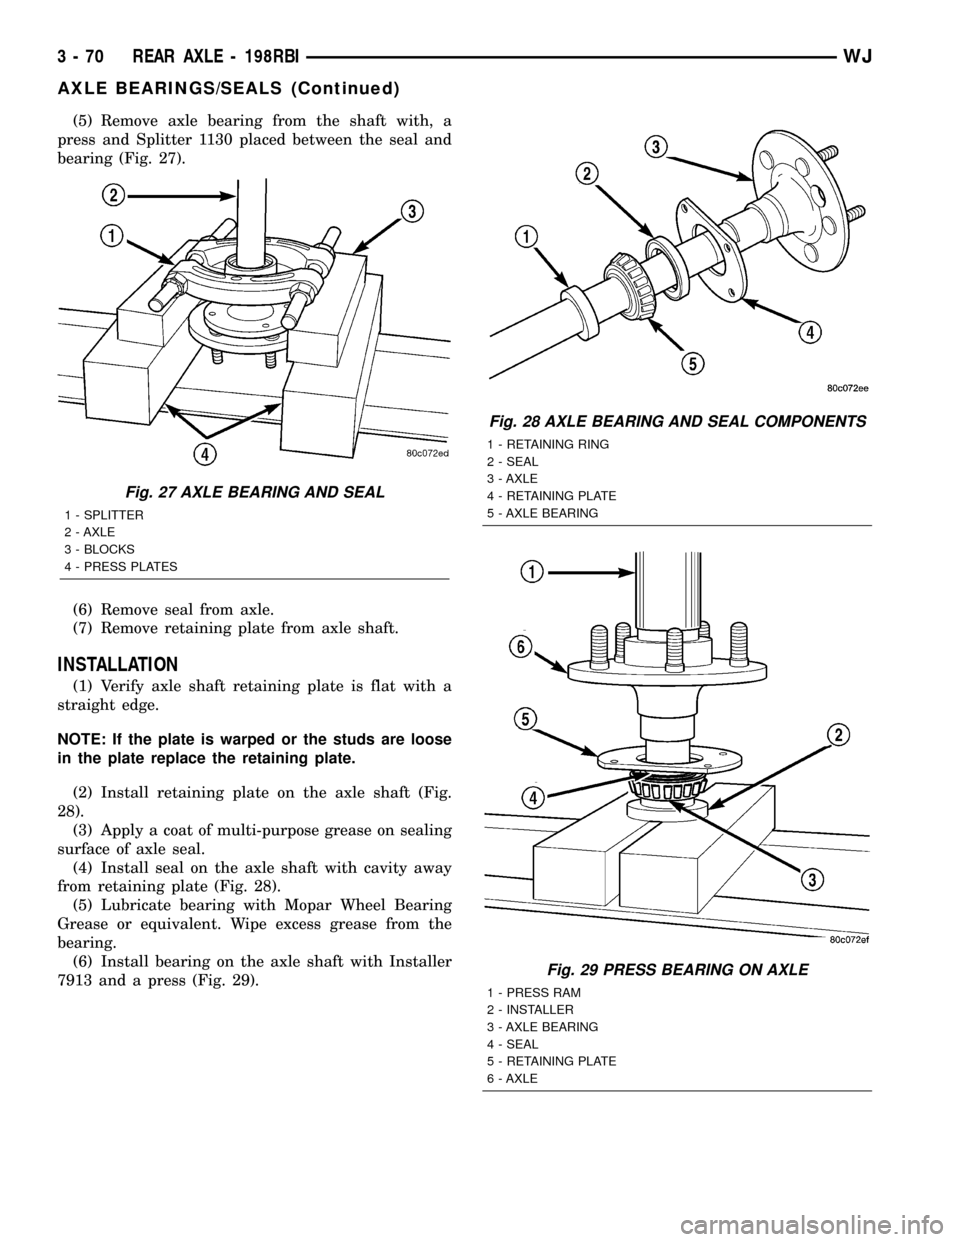
(5) Remove axle bearing from the shaft with, a
press and Splitter 1130 placed between the seal and
bearing (Fig. 27).
(6) Remove seal from axle.
(7) Remove retaining plate from axle shaft.
INSTALLATION
(1) Verify axle shaft retaining plate is flat with a
straight edge.
NOTE: If the plate is warped or the studs are loose
in the plate replace the retaining plate.
(2) Install retaining plate on the axle shaft (Fig.
28).
(3) Apply a coat of multi-purpose grease on sealing
surface of axle seal.
(4) Install seal on the axle shaft with cavity away
from retaining plate (Fig. 28).
(5) Lubricate bearing with Mopar Wheel Bearing
Grease or equivalent. Wipe excess grease from the
bearing.
(6) Install bearing on the axle shaft with Installer
7913 and a press (Fig. 29).
Fig. 27 AXLE BEARING AND SEAL
1 - SPLITTER
2 - AXLE
3 - BLOCKS
4 - PRESS PLATES
Fig. 28 AXLE BEARING AND SEAL COMPONENTS
1 - RETAINING RING
2 - SEAL
3 - AXLE
4 - RETAINING PLATE
5 - AXLE BEARING
Fig. 29 PRESS BEARING ON AXLE
1 - PRESS RAM
2 - INSTALLER
3 - AXLE BEARING
4 - SEAL
5 - RETAINING PLATE
6 - AXLE
3 - 70 REAR AXLE - 198RBIWJ
AXLE BEARINGS/SEALS (Continued)
Page 116 of 2199

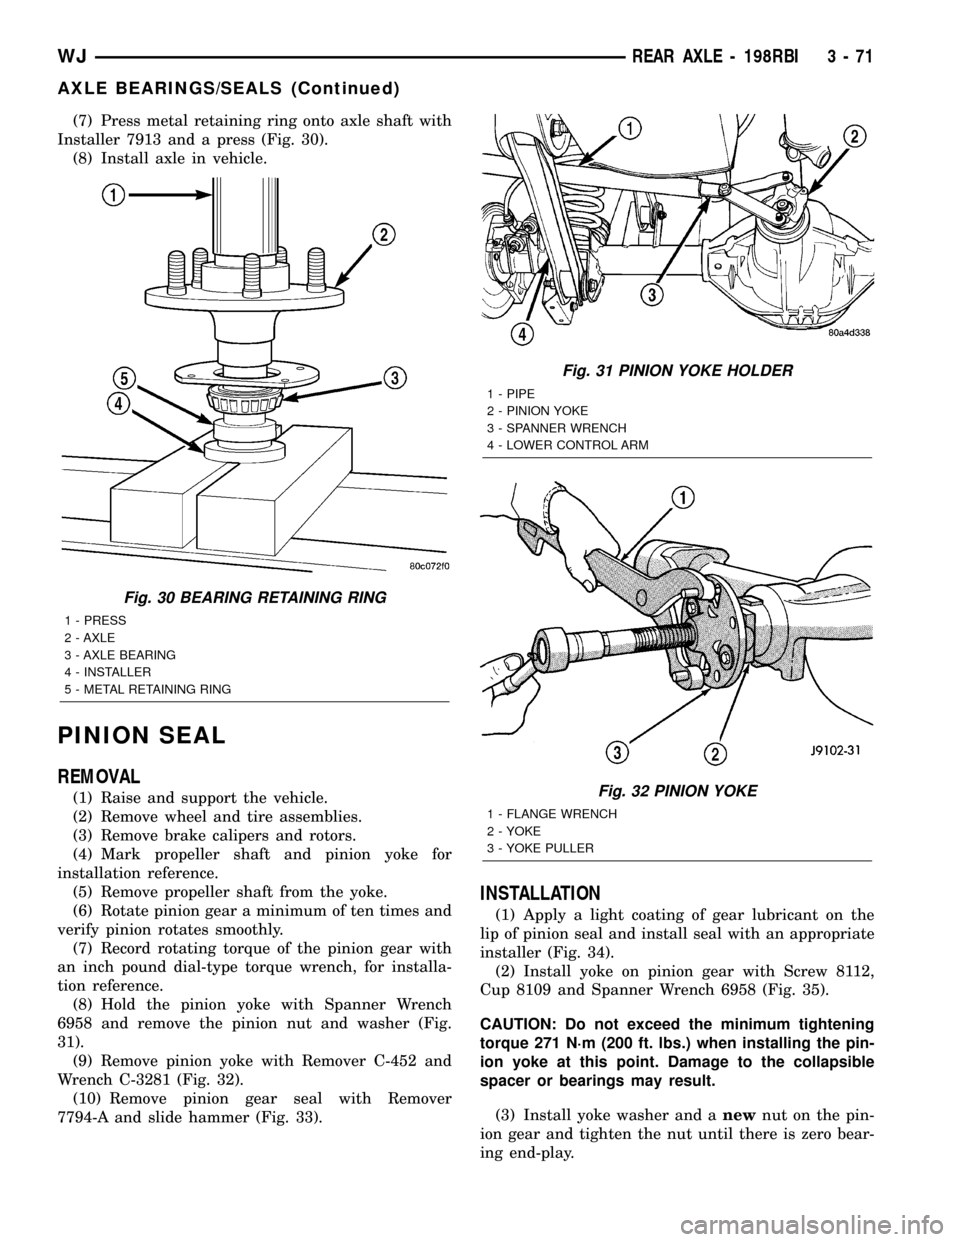
(7) Press metal retaining ring onto axle shaft with
Installer 7913 and a press (Fig. 30).
(8) Install axle in vehicle.
PINION SEAL
REMOVAL
(1) Raise and support the vehicle.
(2) Remove wheel and tire assemblies.
(3) Remove brake calipers and rotors.
(4) Mark propeller shaft and pinion yoke for
installation reference.
(5) Remove propeller shaft from the yoke.
(6) Rotate pinion gear a minimum of ten times and
verify pinion rotates smoothly.
(7) Record rotating torque of the pinion gear with
an inch pound dial-type torque wrench, for installa-
tion reference.
(8) Hold the pinion yoke with Spanner Wrench
6958 and remove the pinion nut and washer (Fig.
31).
(9) Remove pinion yoke with Remover C-452 and
Wrench C-3281 (Fig. 32).
(10) Remove pinion gear seal with Remover
7794-A and slide hammer (Fig. 33).
INSTALLATION
(1) Apply a light coating of gear lubricant on the
lip of pinion seal and install seal with an appropriate
installer (Fig. 34).
(2) Install yoke on pinion gear with Screw 8112,
Cup 8109 and Spanner Wrench 6958 (Fig. 35).
CAUTION: Do not exceed the minimum tightening
torque 271 N´m (200 ft. lbs.) when installing the pin-
ion yoke at this point. Damage to the collapsible
spacer or bearings may result.
(3) Install yoke washer and anewnut on the pin-
ion gear and tighten the nut until there is zero bear-
ing end-play.
Fig. 30 BEARING RETAINING RING
1 - PRESS
2 - AXLE
3 - AXLE BEARING
4 - INSTALLER
5 - METAL RETAINING RING
Fig. 31 PINION YOKE HOLDER
1 - PIPE
2 - PINION YOKE
3 - SPANNER WRENCH
4 - LOWER CONTROL ARM
Fig. 32 PINION YOKE
1 - FLANGE WRENCH
2 - YOKE
3 - YOKE PULLER
WJREAR AXLE - 198RBI 3 - 71
AXLE BEARINGS/SEALS (Continued)
Page 122 of 2199

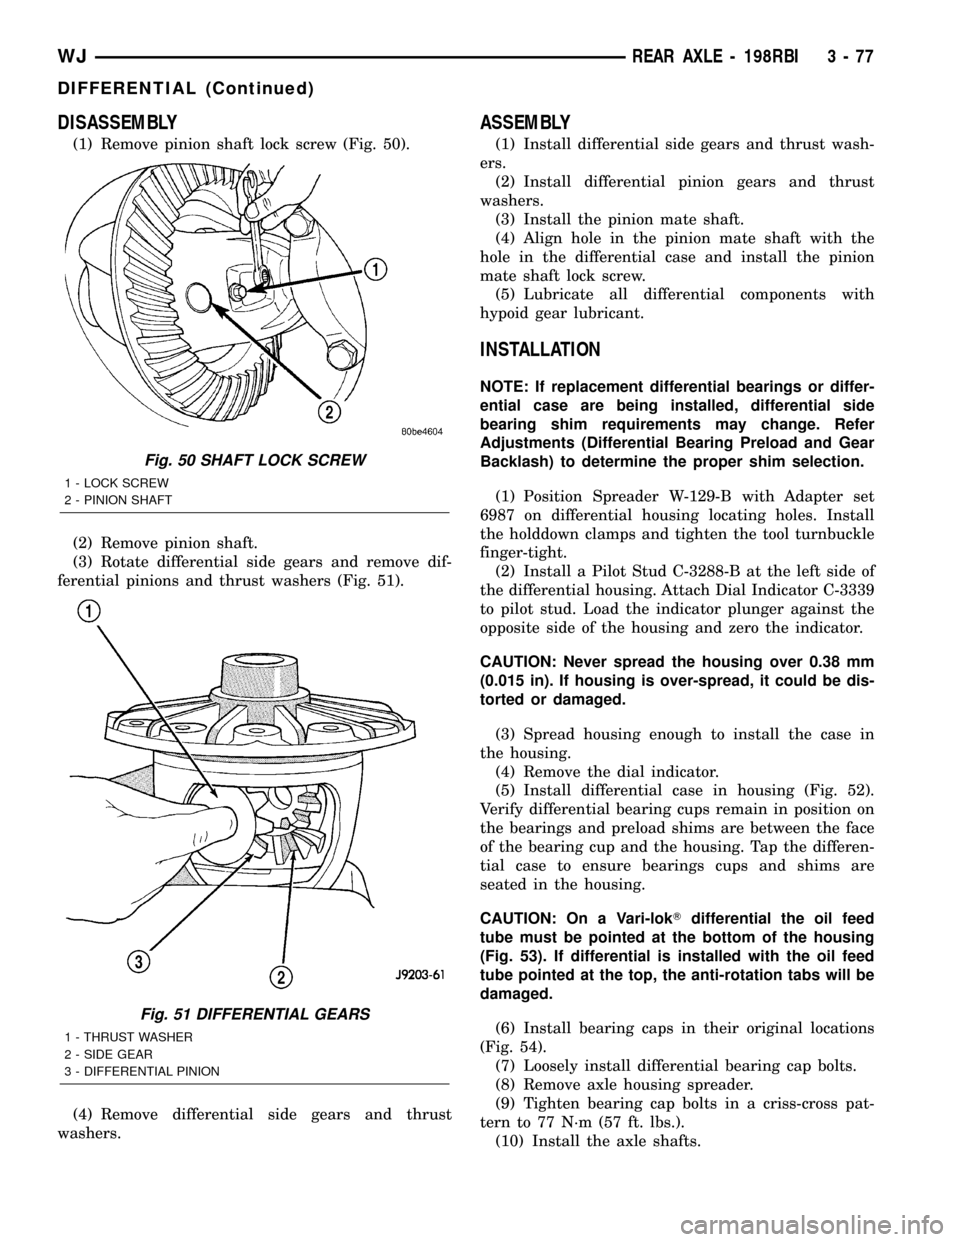
DISASSEMBLY
(1) Remove pinion shaft lock screw (Fig. 50).
(2) Remove pinion shaft.
(3) Rotate differential side gears and remove dif-
ferential pinions and thrust washers (Fig. 51).
(4) Remove differential side gears and thrust
washers.
ASSEMBLY
(1) Install differential side gears and thrust wash-
ers.
(2) Install differential pinion gears and thrust
washers.
(3) Install the pinion mate shaft.
(4) Align hole in the pinion mate shaft with the
hole in the differential case and install the pinion
mate shaft lock screw.
(5) Lubricate all differential components with
hypoid gear lubricant.
INSTALLATION
NOTE: If replacement differential bearings or differ-
ential case are being installed, differential side
bearing shim requirements may change. Refer
Adjustments (Differential Bearing Preload and Gear
Backlash) to determine the proper shim selection.
(1) Position Spreader W-129-B with Adapter set
6987 on differential housing locating holes. Install
the holddown clamps and tighten the tool turnbuckle
finger-tight.
(2) Install a Pilot Stud C-3288-B at the left side of
the differential housing. Attach Dial Indicator C-3339
to pilot stud. Load the indicator plunger against the
opposite side of the housing and zero the indicator.
CAUTION: Never spread the housing over 0.38 mm
(0.015 in). If housing is over-spread, it could be dis-
torted or damaged.
(3) Spread housing enough to install the case in
the housing.
(4) Remove the dial indicator.
(5) Install differential case in housing (Fig. 52).
Verify differential bearing cups remain in position on
the bearings and preload shims are between the face
of the bearing cup and the housing. Tap the differen-
tial case to ensure bearings cups and shims are
seated in the housing.
CAUTION: On a Vari-lokTdifferential the oil feed
tube must be pointed at the bottom of the housing
(Fig. 53). If differential is installed with the oil feed
tube pointed at the top, the anti-rotation tabs will be
damaged.
(6) Install bearing caps in their original locations
(Fig. 54).
(7) Loosely install differential bearing cap bolts.
(8) Remove axle housing spreader.
(9) Tighten bearing cap bolts in a criss-cross pat-
tern to 77 N´m (57 ft. lbs.).
(10) Install the axle shafts.
Fig. 50 SHAFT LOCK SCREW
1 - LOCK SCREW
2 - PINION SHAFT
Fig. 51 DIFFERENTIAL GEARS
1 - THRUST WASHER
2 - SIDE GEAR
3 - DIFFERENTIAL PINION
WJREAR AXLE - 198RBI 3 - 77
DIFFERENTIAL (Continued)
Page 128 of 2199

(5) Position the differential case on the Holding
Fixture 6965.
(6) Install lubricated Step Plate C-6960-3 in lower
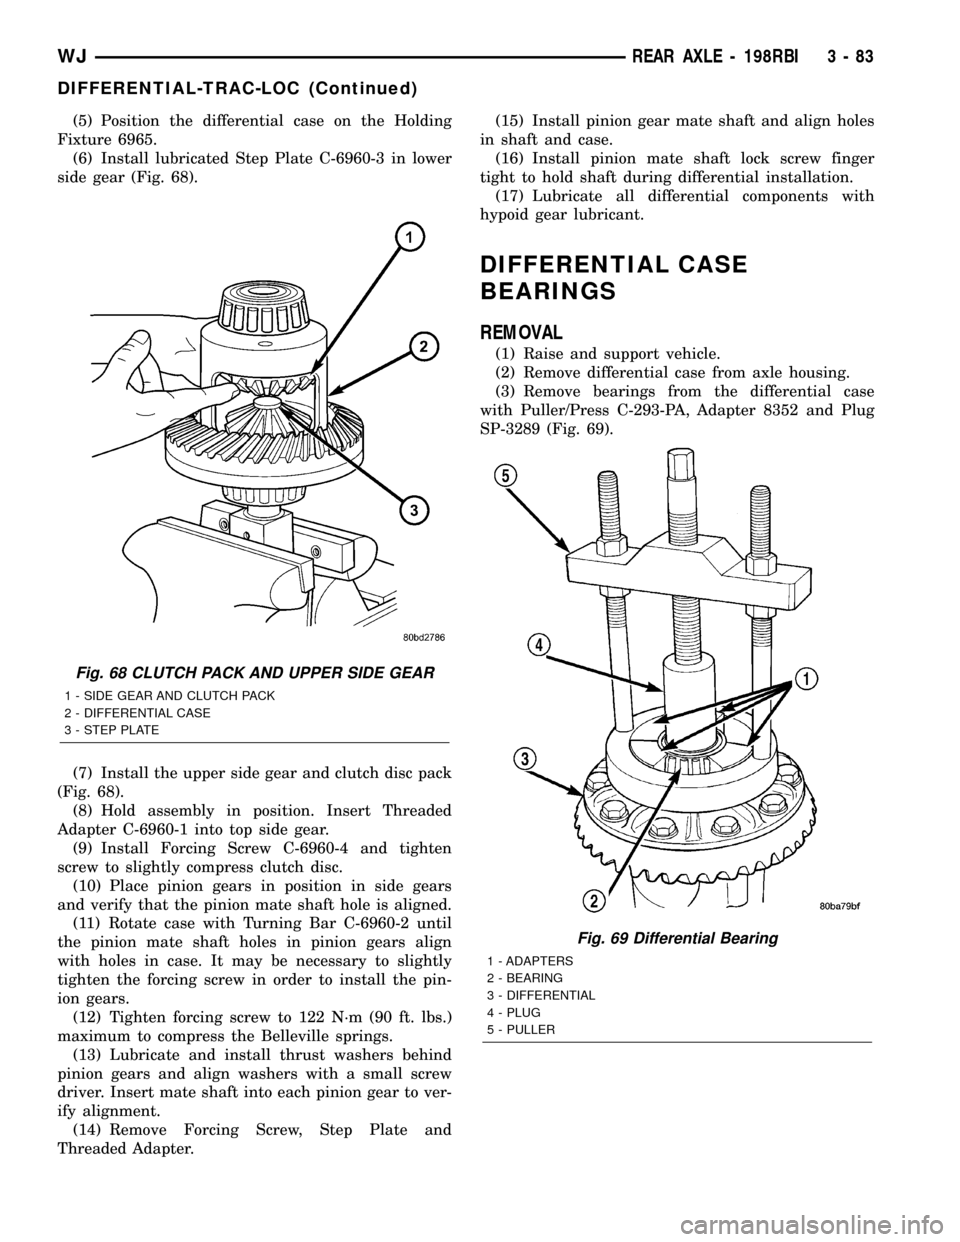
side gear (Fig. 68).
(7) Install the upper side gear and clutch disc pack
(Fig. 68).
(8) Hold assembly in position. Insert Threaded
Adapter C-6960-1 into top side gear.
(9) Install Forcing Screw C-6960-4 and tighten
screw to slightly compress clutch disc.
(10) Place pinion gears in position in side gears
and verify that the pinion mate shaft hole is aligned.
(11) Rotate case with Turning Bar C-6960-2 until
the pinion mate shaft holes in pinion gears align
with holes in case. It may be necessary to slightly
tighten the forcing screw in order to install the pin-
ion gears.
(12) Tighten forcing screw to 122 N´m (90 ft. lbs.)
maximum to compress the Belleville springs.
(13) Lubricate and install thrust washers behind
pinion gears and align washers with a small screw
driver. Insert mate shaft into each pinion gear to ver-
ify alignment.
(14) Remove Forcing Screw, Step Plate and
Threaded Adapter.(15) Install pinion gear mate shaft and align holes
in shaft and case.
(16) Install pinion mate shaft lock screw finger
tight to hold shaft during differential installation.
(17) Lubricate all differential components with
hypoid gear lubricant.
DIFFERENTIAL CASE
BEARINGS
REMOVAL
(1) Raise and support vehicle.
(2) Remove differential case from axle housing.
(3) Remove bearings from the differential case
with Puller/Press C-293-PA, Adapter 8352 and Plug
SP-3289 (Fig. 69).
Fig. 68 CLUTCH PACK AND UPPER SIDE GEAR
1 - SIDE GEAR AND CLUTCH PACK
2 - DIFFERENTIAL CASE
3 - STEP PLATE
Fig. 69 Differential Bearing
1 - ADAPTERS
2 - BEARING
3 - DIFFERENTIAL
4 - PLUG
5 - PULLER
WJREAR AXLE - 198RBI 3 - 83
DIFFERENTIAL-TRAC-LOC (Continued)