2002 ISUZU AXIOM stop start
[x] Cancel search: stop startPage 1597 of 2100
7A±13 AUTOMATIC TRANSMISSION (4L30±E)
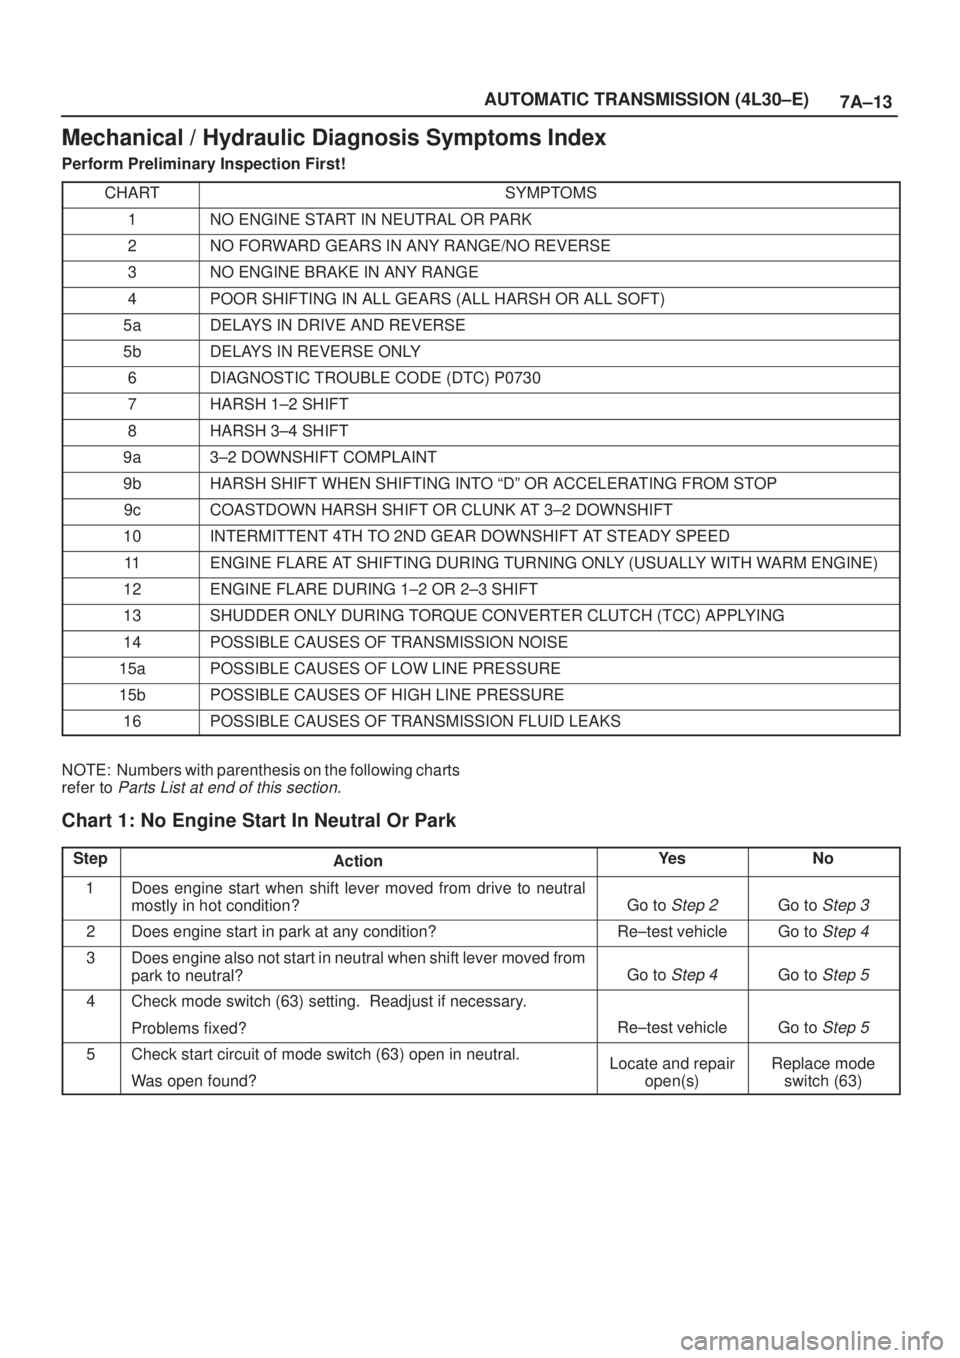
Mechanical / Hydraulic Diagnosis Symptoms Index
Perform Preliminary Inspection First!
CHART
SYMPTOMS
1NO ENGINE START IN NEUTRAL OR PARK
2NO FORWARD GEARS IN ANY RANGE/NO REVERSE
3NO ENGINE BRAKE IN ANY RANGE
4POOR SHIFTING IN ALL GEARS (ALL HARSH OR ALL SOFT)
5aDELAYS IN DRIVE AND REVERSE
5bDELAYS IN REVERSE ONLY
6DIAGNOSTIC TROUBLE CODE (DTC) P0730
7HARSH 1±2 SHIFT
8HARSH 3±4 SHIFT
9a3±2 DOWNSHIFT COMPLAINT
9bHARSH SHIFT WHEN SHIFTING INTO ªDº OR ACCELERATING FROM STOP
9cCOASTDOWN HARSH SHIFT OR CLUNK AT 3±2 DOWNSHIFT
10INTERMITTENT 4TH TO 2ND GEAR DOWNSHIFT AT STEADY SPEED
11ENGINE FLARE AT SHIFTING DURING TURNING ONLY (USUALLY WITH WARM ENGINE)
12ENGINE FLARE DURING 1±2 OR 2±3 SHIFT
13SHUDDER ONLY DURING TORQUE CONVERTER CLUTCH (TCC) APPLYING
14POSSIBLE CAUSES OF TRANSMISSION NOISE
15aPOSSIBLE CAUSES OF LOW LINE PRESSURE
15bPOSSIBLE CAUSES OF HIGH LINE PRESSURE
16POSSIBLE CAUSES OF TRANSMISSION FLUID LEAKS
NOTE: Numbers with parenthesis on the following charts
refer to
Parts List at end of this section.
Chart 1: No Engine Start In Neutral Or Park
StepActionYe sNo
1Does engine start when shift lever moved from drive to neutral
mostly in hot condition?
Go to Step 2Go to Step 3
2Does engine start in park at any condition?Re±test vehicleGo to Step 4
3Does engine also not start in neutral when shift lever moved from
park to neutral?
Go to Step 4Go to Step 5
4Check mode switch (63) setting. Readjust if necessary.
Problems fixed?
Re±test vehicleGo to Step 5
5Check start circuit of mode switch (63) open in neutral.
Was open found?Locate and repair
open(s)Replace mode
switch (63)
Page 1777 of 2100
LIGHTING SYSTEM8A±1
AXIOM
BODY AND ACCESSORIES
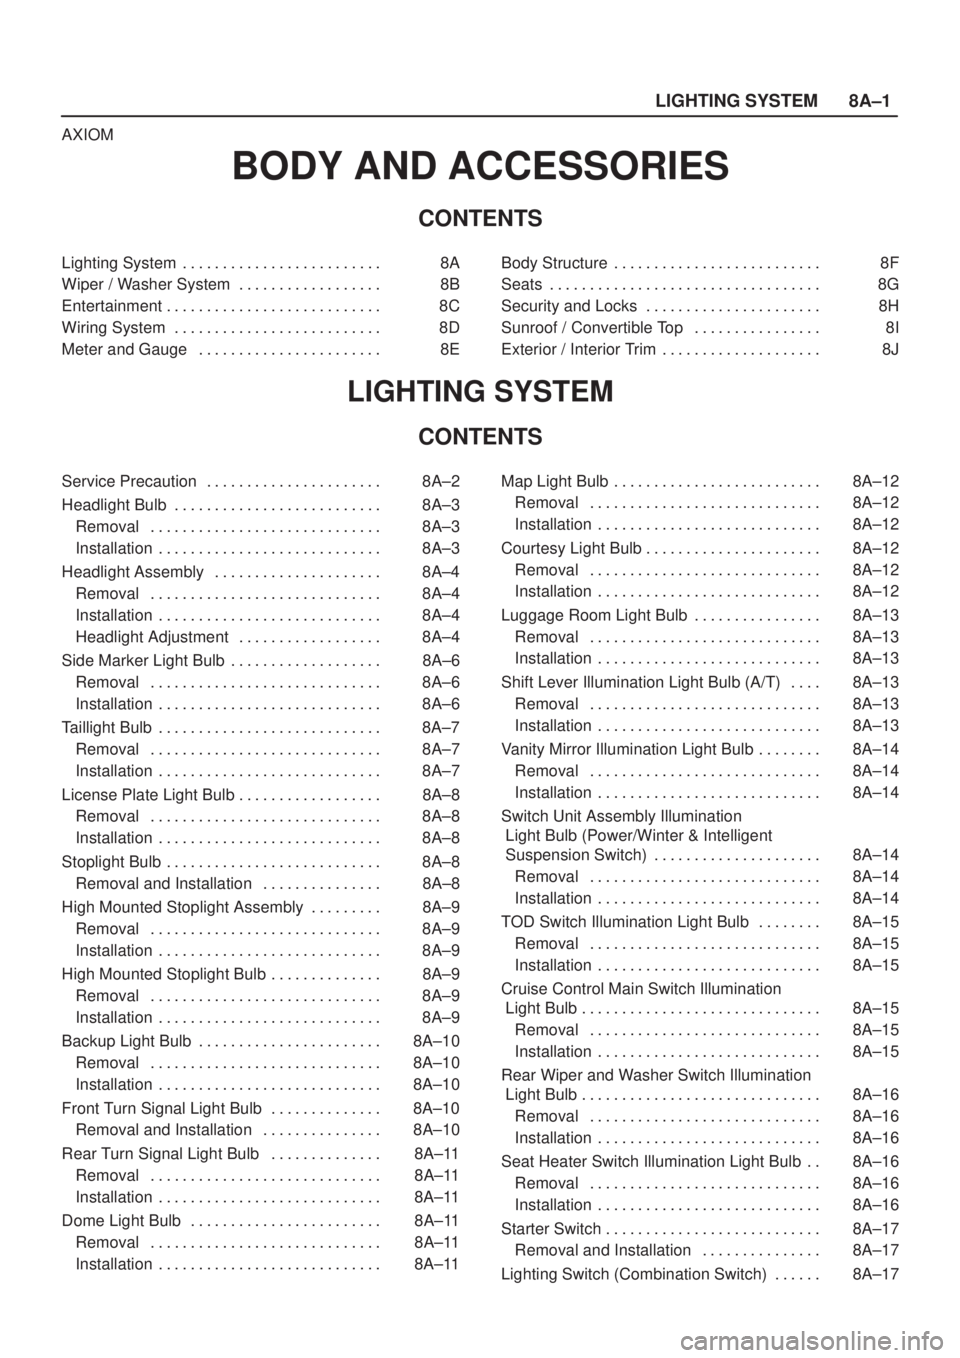
CONTENTS
Lighting System 8A. . . . . . . . . . . . . . . . . . . . . . . . .
Wiper / Washer System 8B. . . . . . . . . . . . . . . . . .
Entertainment 8C. . . . . . . . . . . . . . . . . . . . . . . . . . .
Wiring System 8D. . . . . . . . . . . . . . . . . . . . . . . . . .
Meter and Gauge 8E. . . . . . . . . . . . . . . . . . . . . . . Body Structure 8F. . . . . . . . . . . . . . . . . . . . . . . . . .
Seats 8G. . . . . . . . . . . . . . . . . . . . . . . . . . . . . . . . . .
Security and Locks 8H. . . . . . . . . . . . . . . . . . . . . .
Sunroof / Convertible Top 8I. . . . . . . . . . . . . . . .
Exterior / Interior Trim 8J. . . . . . . . . . . . . . . . . . . .
LIGHTING SYSTEM
CONTENTS
Service Precaution 8A±2. . . . . . . . . . . . . . . . . . . . . .
Headlight Bulb 8A±3. . . . . . . . . . . . . . . . . . . . . . . . . .
Removal 8A±3. . . . . . . . . . . . . . . . . . . . . . . . . . . . .
Installation 8A±3. . . . . . . . . . . . . . . . . . . . . . . . . . . .
Headlight Assembly 8A±4. . . . . . . . . . . . . . . . . . . . .
Removal 8A±4. . . . . . . . . . . . . . . . . . . . . . . . . . . . .
Installation 8A±4. . . . . . . . . . . . . . . . . . . . . . . . . . . .
Headlight Adjustment 8A±4. . . . . . . . . . . . . . . . . .
Side Marker Light Bulb 8A±6. . . . . . . . . . . . . . . . . . .
Removal 8A±6. . . . . . . . . . . . . . . . . . . . . . . . . . . . .
Installation 8A±6. . . . . . . . . . . . . . . . . . . . . . . . . . . .
Taillight Bulb 8A±7. . . . . . . . . . . . . . . . . . . . . . . . . . . .
Removal 8A±7. . . . . . . . . . . . . . . . . . . . . . . . . . . . .
Installation 8A±7. . . . . . . . . . . . . . . . . . . . . . . . . . . .
License Plate Light Bulb 8A±8. . . . . . . . . . . . . . . . . .
Removal 8A±8. . . . . . . . . . . . . . . . . . . . . . . . . . . . .
Installation 8A±8. . . . . . . . . . . . . . . . . . . . . . . . . . . .
Stoplight Bulb 8A±8. . . . . . . . . . . . . . . . . . . . . . . . . . .
Removal and Installation 8A±8. . . . . . . . . . . . . . .
High Mounted Stoplight Assembly 8A±9. . . . . . . . .
Removal 8A±9. . . . . . . . . . . . . . . . . . . . . . . . . . . . .
Installation 8A±9. . . . . . . . . . . . . . . . . . . . . . . . . . . .
High Mounted Stoplight Bulb 8A±9. . . . . . . . . . . . . .
Removal 8A±9. . . . . . . . . . . . . . . . . . . . . . . . . . . . .
Installation 8A±9. . . . . . . . . . . . . . . . . . . . . . . . . . . .
Backup Light Bulb 8A±10. . . . . . . . . . . . . . . . . . . . . . .
Removal 8A±10. . . . . . . . . . . . . . . . . . . . . . . . . . . . .
Installation 8A±10. . . . . . . . . . . . . . . . . . . . . . . . . . . .
Front Turn Signal Light Bulb 8A±10. . . . . . . . . . . . . .
Removal and Installation 8A±10. . . . . . . . . . . . . . .
Rear Turn Signal Light Bulb 8A±11. . . . . . . . . . . . . .
Removal 8A±11. . . . . . . . . . . . . . . . . . . . . . . . . . . . .
Installation 8A±11. . . . . . . . . . . . . . . . . . . . . . . . . . . .
Dome Light Bulb 8A±11. . . . . . . . . . . . . . . . . . . . . . . .
Removal 8A±11. . . . . . . . . . . . . . . . . . . . . . . . . . . . .
Installation 8A±11. . . . . . . . . . . . . . . . . . . . . . . . . . . . Map Light Bulb 8A±12. . . . . . . . . . . . . . . . . . . . . . . . . .
Removal 8A±12. . . . . . . . . . . . . . . . . . . . . . . . . . . . .
Installation 8A±12. . . . . . . . . . . . . . . . . . . . . . . . . . . .
Courtesy Light Bulb 8A±12. . . . . . . . . . . . . . . . . . . . . .
Removal 8A±12. . . . . . . . . . . . . . . . . . . . . . . . . . . . .
Installation 8A±12. . . . . . . . . . . . . . . . . . . . . . . . . . . .
Luggage Room Light Bulb 8A±13. . . . . . . . . . . . . . . .
Removal 8A±13. . . . . . . . . . . . . . . . . . . . . . . . . . . . .
Installation 8A±13. . . . . . . . . . . . . . . . . . . . . . . . . . . .
Shift Lever Illumination Light Bulb (A/T) 8A±13. . . .
Removal 8A±13. . . . . . . . . . . . . . . . . . . . . . . . . . . . .
Installation 8A±13. . . . . . . . . . . . . . . . . . . . . . . . . . . .
Vanity Mirror Illumination Light Bulb 8A±14. . . . . . . .
Removal 8A±14. . . . . . . . . . . . . . . . . . . . . . . . . . . . .
Installation 8A±14. . . . . . . . . . . . . . . . . . . . . . . . . . . .
Switch Unit Assembly Illumination
Light Bulb (Power/Winter & Intelligent
Suspension Switch) 8A±14. . . . . . . . . . . . . . . . . . . . .
Removal 8A±14. . . . . . . . . . . . . . . . . . . . . . . . . . . . .
Installation 8A±14. . . . . . . . . . . . . . . . . . . . . . . . . . . .
TOD Switch Illumination Light Bulb 8A±15. . . . . . . .
Removal 8A±15. . . . . . . . . . . . . . . . . . . . . . . . . . . . .
Installation 8A±15. . . . . . . . . . . . . . . . . . . . . . . . . . . .
Cruise Control Main Switch Illumination
Light Bulb 8A±15. . . . . . . . . . . . . . . . . . . . . . . . . . . . . .
Removal 8A±15. . . . . . . . . . . . . . . . . . . . . . . . . . . . .
Installation 8A±15. . . . . . . . . . . . . . . . . . . . . . . . . . . .
Rear Wiper and Washer Switch Illumination
Light Bulb 8A±16. . . . . . . . . . . . . . . . . . . . . . . . . . . . . .
Removal 8A±16. . . . . . . . . . . . . . . . . . . . . . . . . . . . .
Installation 8A±16. . . . . . . . . . . . . . . . . . . . . . . . . . . .
Seat Heater Switch Illumination Light Bulb 8A±16. .
Removal 8A±16. . . . . . . . . . . . . . . . . . . . . . . . . . . . .
Installation 8A±16. . . . . . . . . . . . . . . . . . . . . . . . . . . .
Starter Switch 8A±17. . . . . . . . . . . . . . . . . . . . . . . . . . .
Removal and Installation 8A±17. . . . . . . . . . . . . . .
Lighting Switch (Combination Switch) 8A±17. . . . . .
Page 1778 of 2100
8A±2LIGHTING SYSTEM
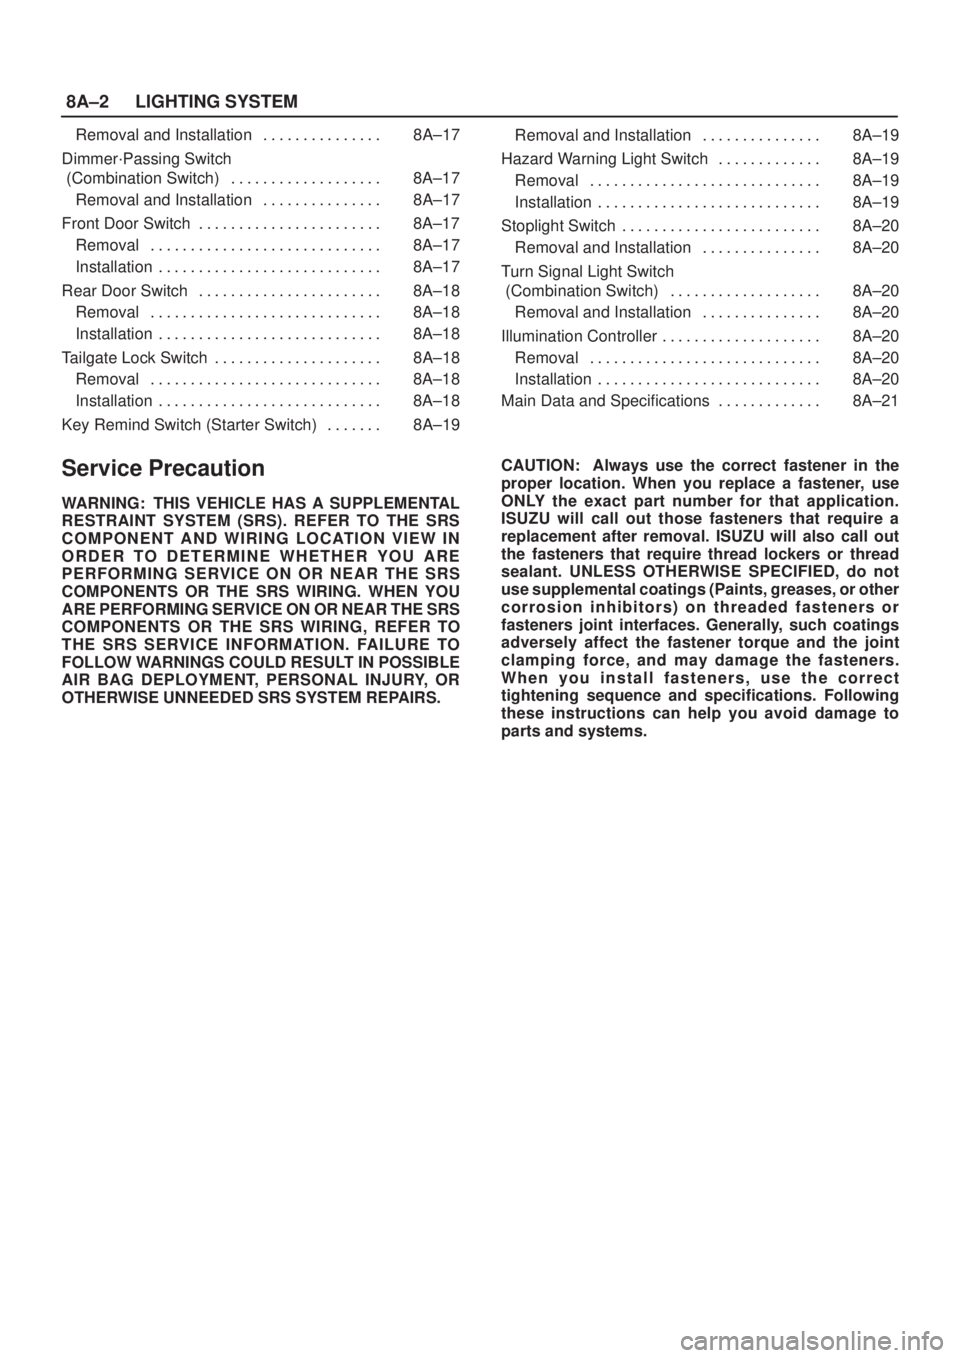
Removal and Installation 8A±17. . . . . . . . . . . . . . .
Dimmer´Passing Switch
(Combination Switch) 8A±17. . . . . . . . . . . . . . . . . . .
Removal and Installation 8A±17. . . . . . . . . . . . . . .
Front Door Switch 8A±17. . . . . . . . . . . . . . . . . . . . . . .
Removal 8A±17. . . . . . . . . . . . . . . . . . . . . . . . . . . . .
Installation 8A±17. . . . . . . . . . . . . . . . . . . . . . . . . . . .
Rear Door Switch 8A±18. . . . . . . . . . . . . . . . . . . . . . .
Removal 8A±18. . . . . . . . . . . . . . . . . . . . . . . . . . . . .
Installation 8A±18. . . . . . . . . . . . . . . . . . . . . . . . . . . .
Tailgate Lock Switch 8A±18. . . . . . . . . . . . . . . . . . . . .
Removal 8A±18. . . . . . . . . . . . . . . . . . . . . . . . . . . . .
Installation 8A±18. . . . . . . . . . . . . . . . . . . . . . . . . . . .
Key Remind Switch (Starter Switch) 8A±19. . . . . . . Removal and Installation 8A±19. . . . . . . . . . . . . . .
Hazard Warning Light Switch 8A±19. . . . . . . . . . . . .
Removal 8A±19. . . . . . . . . . . . . . . . . . . . . . . . . . . . .
Installation 8A±19. . . . . . . . . . . . . . . . . . . . . . . . . . . .
Stoplight Switch 8A±20. . . . . . . . . . . . . . . . . . . . . . . . .
Removal and Installation 8A±20. . . . . . . . . . . . . . .
Turn Signal Light Switch
(Combination Switch) 8A±20. . . . . . . . . . . . . . . . . . .
Removal and Installation 8A±20. . . . . . . . . . . . . . .
Illumination Controller 8A±20. . . . . . . . . . . . . . . . . . . .
Removal 8A±20. . . . . . . . . . . . . . . . . . . . . . . . . . . . .
Installation 8A±20. . . . . . . . . . . . . . . . . . . . . . . . . . . .
Main Data and Specifications 8A±21. . . . . . . . . . . . .
Service Precaution
WARNING: THIS VEHICLE HAS A SUPPLEMENTAL
RESTRAINT SYSTEM (SRS). REFER TO THE SRS
COMPONENT AND WIRING LOCATION VIEW IN
ORDER TO DETERMINE WHETHER YOU ARE
PERFORMING SERVICE ON OR NEAR THE SRS
COMPONENTS OR THE SRS WIRING. WHEN YOU
ARE PERFORMING SERVICE ON OR NEAR THE SRS
COMPONENTS OR THE SRS WIRING, REFER TO
THE SRS SERVICE INFORMATION. FAILURE TO
FOLLOW WARNINGS COULD RESULT IN POSSIBLE
AIR BAG DEPLOYMENT, PERSONAL INJURY, OR
OTHERWISE UNNEEDED SRS SYSTEM REPAIRS.CAUTION: Always use the correct fastener in the
proper location. When you replace a fastener, use
ONLY the exact part number for that application.
ISUZU will call out those fasteners that require a
replacement after removal. ISUZU will also call out
the fasteners that require thread lockers or thread
sealant. UNLESS OTHERWISE SPECIFIED, do not
use supplemental coatings (Paints, greases, or other
corrosion inhibitors) on threaded fasteners or
fasteners joint interfaces. Generally, such coatings
adversely affect the fastener torque and the joint
clamping force, and may damage the fasteners.
When you install fasteners, use the correct
tightening sequence and specifications. Following
these instructions can help you avoid damage to
parts and systems.
Page 1800 of 2100
8B±2WIPER/WASHER SYSTEM
Windshield Wiper/Washer System
General Description
The circuit consists of the starter switch, windshield wiper
& washer switch, windshield wiper motor, windshield
washer motor and alarm & relay control unit.
When the windshield wiper & washer switch is turned on
with the starter switch on, the battery voltage is applied to
the wiper motor to activate the wiper.
The washer motor squirts glass cleaning fluid while the
washer switch is being pushed. The alarm & relay control
unit relay is used to control motion of the wiper.
Windshield Wiper And Washer Switch
Removal and Installation
Refer to Combination Switch in Steering section.
Windshield Wiper Motor
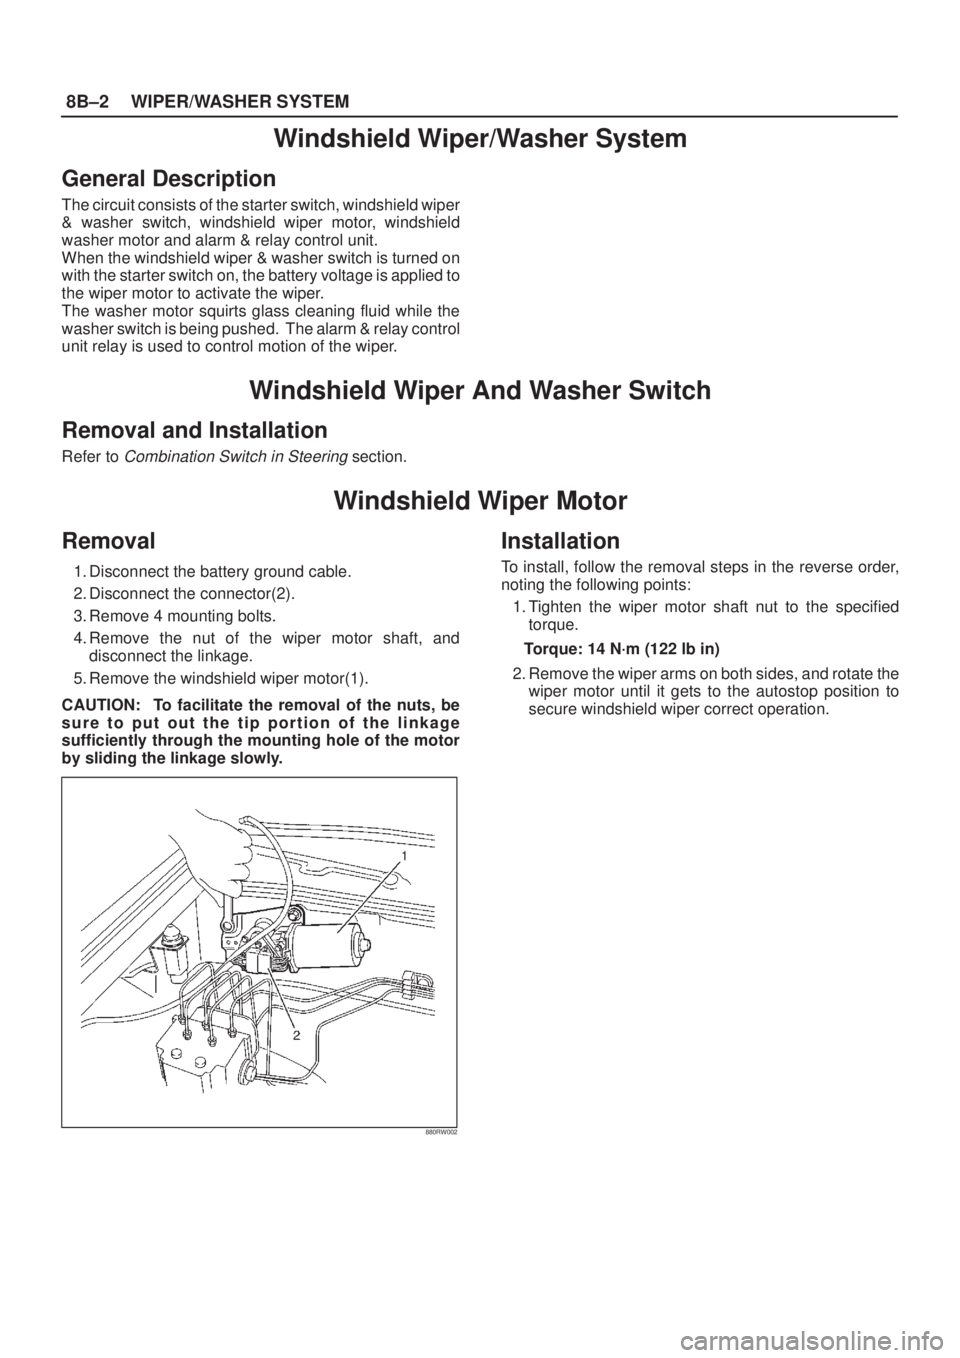
Removal
1. Disconnect the battery ground cable.
2. Disconnect the connector(2).
3. Remove 4 mounting bolts.
4. Remove the nut of the wiper motor shaft, and
disconnect the linkage.
5. Remove the windshield wiper motor(1).
CAUTION: To facilitate the removal of the nuts, be
sure to put out the tip portion of the linkage
sufficiently through the mounting hole of the motor
by sliding the linkage slowly.
880RW002
Installation
To install, follow the removal steps in the reverse order,
noting the following points:
1. Tighten the wiper motor shaft nut to the specified
torque.
Torque: 14 N´m (122 lb in)
2. Remove the wiper arms on both sides, and rotate the
wiper motor until it gets to the autostop position to
secure windshield wiper correct operation.
Page 1836 of 2100
8D±1
WIRING SYSTEM
AXIOM
BODY AND ACCESSORIES
WIRING SYSTEM
CONTENTS
Fuse, Relay and Diode 8D±2. . . . . . . . . . . . . . . . . . .
Relay / Fuse Box Location 8D±2. . . . . . . . . . . . . .
Relay / Fuse Box (Instrument Panel) 8D±3. . . . .
Relay / Fuse Box (Engine Room) 8D±4. . . . . . . .
Circuit Diagram 8D±5. . . . . . . . . . . . . . . . . . . . . . . . .
Fuse Block Circuit 8D±5. . . . . . . . . . . . . . . . . . . . .
Ground Location (Engine Room) 8D±6. . . . . . . .
Ground Location (Cabin) 8D±7. . . . . . . . . . . . . . .
Starter and Generator 8D±8. . . . . . . . . . . . . . . . . .
PCM±1 8D±9. . . . . . . . . . . . . . . . . . . . . . . . . . . . . . .
PCM±2 8D±10. . . . . . . . . . . . . . . . . . . . . . . . . . . . . . .
Headlight and Fog Light 8D±11. . . . . . . . . . . . . . . .
Turn, Hazard, Stop, Back Up, Horn and
A/T Shift Lock 8D±12. . . . . . . . . . . . . . . . . . . . . . . .
Dome Light, Luggage Room Light, Courtesy
Light, Spot Light, and Warning Buzzer 8D±13. . .
Power Window and Door Lock 8D±14. . . . . . . . . .
Alarm and Relay Control Unit 8D±15. . . . . . . . . . . Rear Wiper/Washer and Rear Defogger 8D±16. .
Audio, Clock, Cigarette Lighter and
ACC Socket 8D±17. . . . . . . . . . . . . . . . . . . . . . . . . .
MID 8D±18. . . . . . . . . . . . . . . . . . . . . . . . . . . . . . . . . .
Door Mirror 8D±19. . . . . . . . . . . . . . . . . . . . . . . . . . .
Meter 8D±20. . . . . . . . . . . . . . . . . . . . . . . . . . . . . . . .
Anti-theft with Keyless Entry 8D±21. . . . . . . . . . . .
Air Conditioning 8D±22. . . . . . . . . . . . . . . . . . . . . . .
ABS 8D±23. . . . . . . . . . . . . . . . . . . . . . . . . . . . . . . . .
SRS±Air Bag 8D±24. . . . . . . . . . . . . . . . . . . . . . . . . .
Intelligent Suspension 8D±25. . . . . . . . . . . . . . . . . .
T.O.D 8D±26. . . . . . . . . . . . . . . . . . . . . . . . . . . . . . . .
Sunroof 8D±27. . . . . . . . . . . . . . . . . . . . . . . . . . . . . .
Illumination Light 8D±28. . . . . . . . . . . . . . . . . . . . . .
Windshield Wiper and Washer 8D±29. . . . . . . . . .
Power Seat 8D±30. . . . . . . . . . . . . . . . . . . . . . . . . . .
Seat Heater 8D±31. . . . . . . . . . . . . . . . . . . . . . . . . . .
Page 1838 of 2100
8D±3
WIRING SYSTEM
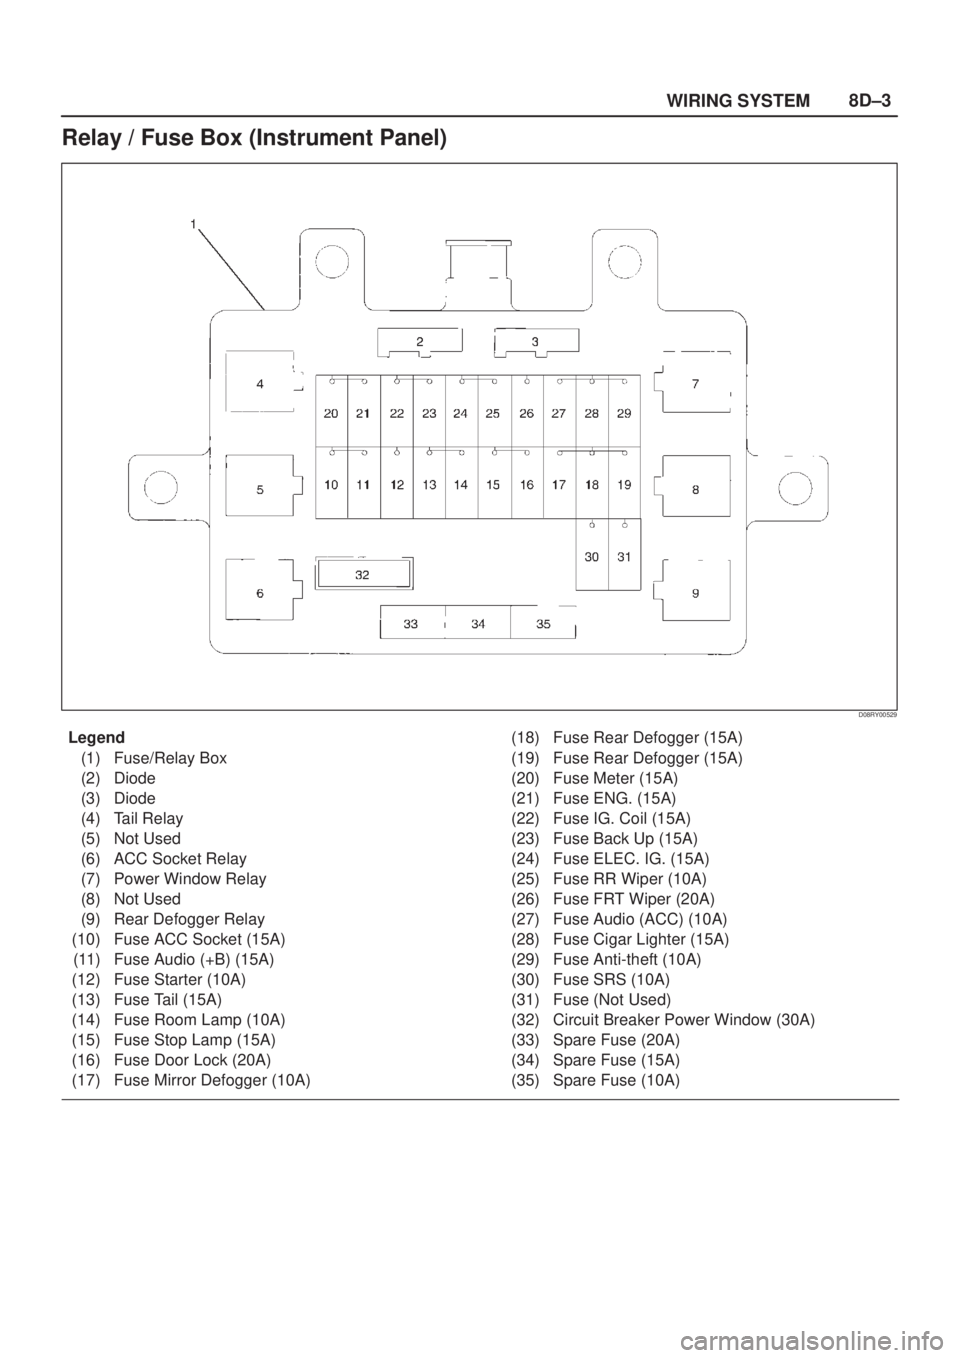
Relay / Fuse Box (Instrument Panel)
D08RY00529
Legend
(1) Fuse/Relay Box
(2) Diode
(3) Diode
(4) Tail Relay
(5) Not Used
(6) ACC Socket Relay
(7) Power Window Relay
(8) Not Used
(9) Rear Defogger Relay
(10) Fuse ACC Socket (15A)
(11) Fuse Audio (+B) (15A)
(12) Fuse Starter (10A)
(13) Fuse Tail (15A)
(14) Fuse Room Lamp (10A)
(15) Fuse Stop Lamp (15A)
(16) Fuse Door Lock (20A)
(17) Fuse Mirror Defogger (10A)(18) Fuse Rear Defogger (15A)
(19) Fuse Rear Defogger (15A)
(20) Fuse Meter (15A)
(21) Fuse ENG. (15A)
(22) Fuse IG. Coil (15A)
(23) Fuse Back Up (15A)
(24) Fuse ELEC. IG. (15A)
(25) Fuse RR Wiper (10A)
(26) Fuse FRT Wiper (20A)
(27) Fuse Audio (ACC) (10A)
(28) Fuse Cigar Lighter (15A)
(29) Fuse Anti-theft (10A)
(30) Fuse SRS (10A)
(31) Fuse (Not Used)
(32) Circuit Breaker Power Window (30A)
(33) Spare Fuse (20A)
(34) Spare Fuse (15A)
(35) Spare Fuse (10A)
Page 2046 of 2100
SUPPLEMENTAL RESTRAINT SYSTEM 9J±32
SRS Coil Assembly
Service Precaution
WARNING: S A F E T Y P R ECAUTIONS MUST BE
FOLLOWED WHEN HANDLING A DEPLOYED AIR
BAG ASSEMBLY. AFTER DEPLOYMENT, THE AIR
BAG ASSEMBLY SURFACE MAY CONTAIN A SMALL
AMOUNT OF SODIUM HYDROXIDE, A BY±PRODUCT
OF THE DEPLOYMENT REACTION, THAT IS
IRRITATING TO THE SKIN AND EYES. MOST OF THE
POWDER ON THE AIR BAG ASSEMBLY IS
HARMLESS. AS A PRECAUTION, WEAR GLOVES
AND SAFETY GLASSES WHEN HANDLING A
DEPLOYED AIR BAG ASSEMBLY, AND WASH YOUR
HANDS WITH MILD SOAP AND WATER
AFTERWARDS.
WARNING: W H E N C A R RY I N G A L I V E A I R B A G
ASSEMBLY, MAKE SURE THE BAG AND TRIM
COVER ARE POINTED AWAY FROM YOU. NEVER
CARRY AIR BAG ASSEMBLY BY THE WIRES OR
CONNECTOR ON THE UNDERSIDE OF MODULE. IN
THE CASE OF AN ACCIDENTAL DEPLOYMENT, THE
BAG WILL THEN DEPLOY WITH MINIMAL CHANCE
OF INJURY. WHEN PLACING A LIVE AIR BAG
ASSEMBLY ON A BENCH OR OTHER SURFACE,
ALWAYS FACE BAG AND TRIM COVER UP, AWAY
FROM THE SURFACE. NEVER REST A STEERING
COLUMN ASSEMBLY ON THE STEERING WHEEL
WITH THE AIR BAG ASSEMBLY FACE DOWN AND
COLUMN VERTICAL. THIS IS NECESSARY SO THAT
A FREE SPACE IS PROVIDED TO ALLOW THE AIR
BAG ASSEMBLY TO EXPAND IN THE UNLIKELY
EVENT OF ACCIDENTAL DEPLOYMENT.
OTHERWISE, PERSONAL INJURY COULD RESULT.
NOTE: In the event deployment has occurred, inspect
coil assembly wire for any signs of scorching, melting or
any other damage due to excessive heat. If the coil has
been damaged, replace it.
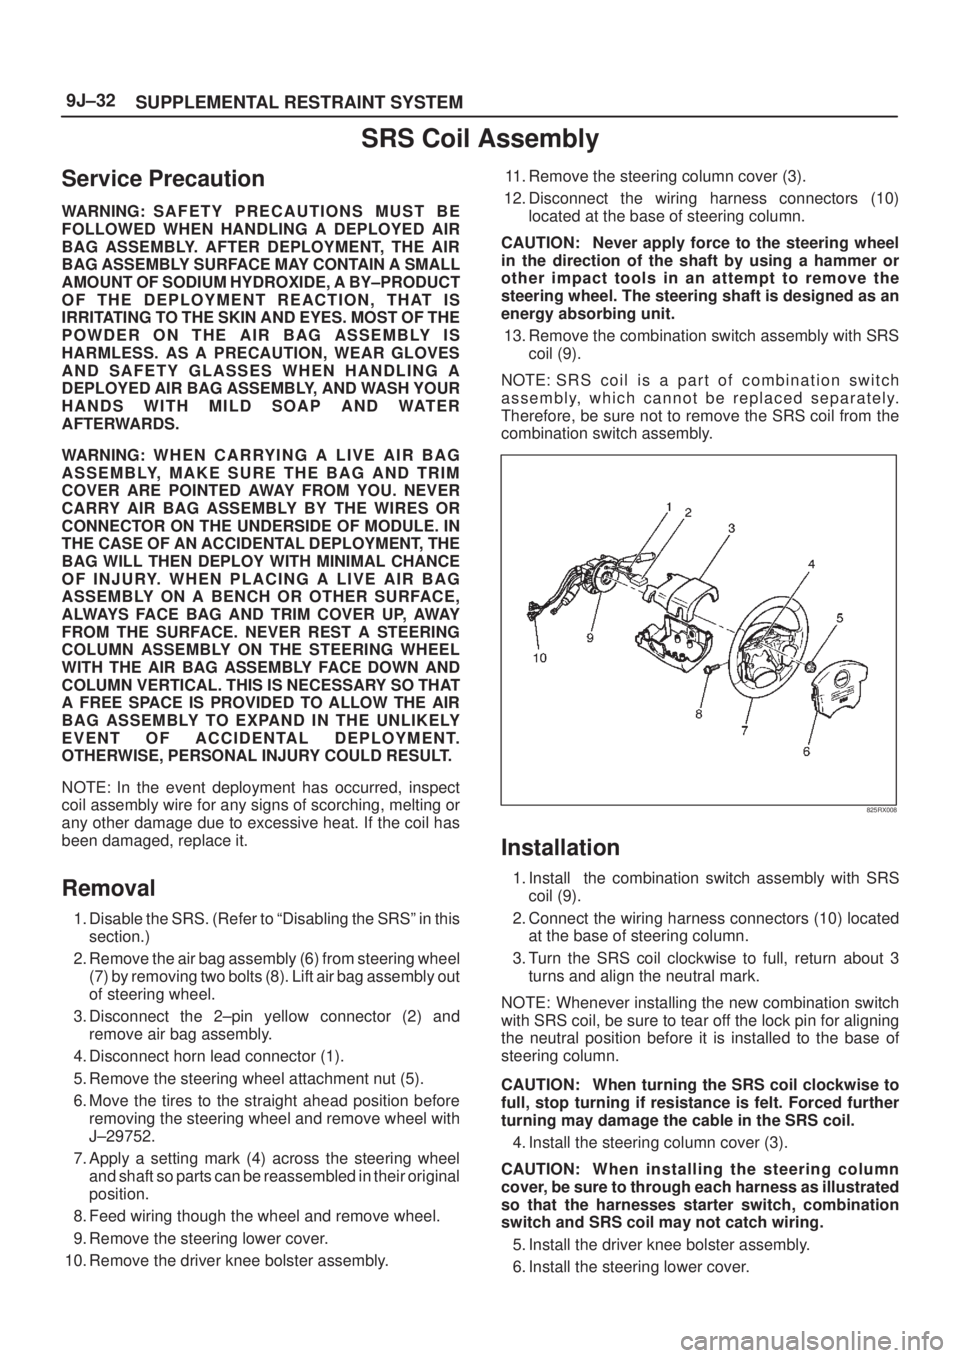
Removal
1. Disable the SRS. (Refer to ªDisabling the SRSº in this
section.)
2. Remove the air bag assembly (6) from steering wheel
(7) by removing two bolts (8). Lift air bag assembly out
of steering wheel.
3. Disconnect the 2±pin yellow connector (2) and
remove air bag assembly.
4. Disconnect horn lead connector (1).
5. Remove the steering wheel attachment nut (5).
6. Move the tires to the straight ahead position before
removing the steering wheel and remove wheel with
J±29752.
7. Apply a setting mark (4) across the steering wheel
and shaft so parts can be reassembled in their original
position.
8. Feed wiring though the wheel and remove wheel.
9. Remove the steering lower cover.
10. Remove the driver knee bolster assembly.11. Remove the steering column cover (3).
12. Disconnect the wiring harness connectors (10)
located at the base of steering column.
CAUTION: Never apply force to the steering wheel
in the direction of the shaft by using a hammer or
other impact tools in an attempt to remove the
steering wheel. The steering shaft is designed as an
energy absorbing unit.
13. Remove the combination switch assembly with SRS
coil (9).
NOTE: S R S c o i l i s a p a r t o f combination switch
assembly, which cannot be replaced separately.
Therefore, be sure not to remove the SRS coil from the
combination switch assembly.
825RX008
Installation
1. Install the combination switch assembly with SRS
coil (9).
2. Connect the wiring harness connectors (10) located
at the base of steering column.
3. Turn the SRS coil clockwise to full, return about 3
turns and align the neutral mark.
NOTE: Whenever installing the new combination switch
with SRS coil, be sure to tear off the lock pin for aligning
the neutral position before it is installed to the base of
steering column.
CAUTION: When turning the SRS coil clockwise to
full, stop turning if resistance is felt. Forced further
turning may damage the cable in the SRS coil.
4. Install the steering column cover (3).
CAUTION: When installing the steering column
cover, be sure to through each harness as illustrated
so that the harnesses starter switch, combination
switch and SRS coil may not catch wiring.
5. Install the driver knee bolster assembly.
6. Install the steering lower cover.
Page 2049 of 2100
SUPPLEMENTAL RESTRAINT SYSTEM9J±35
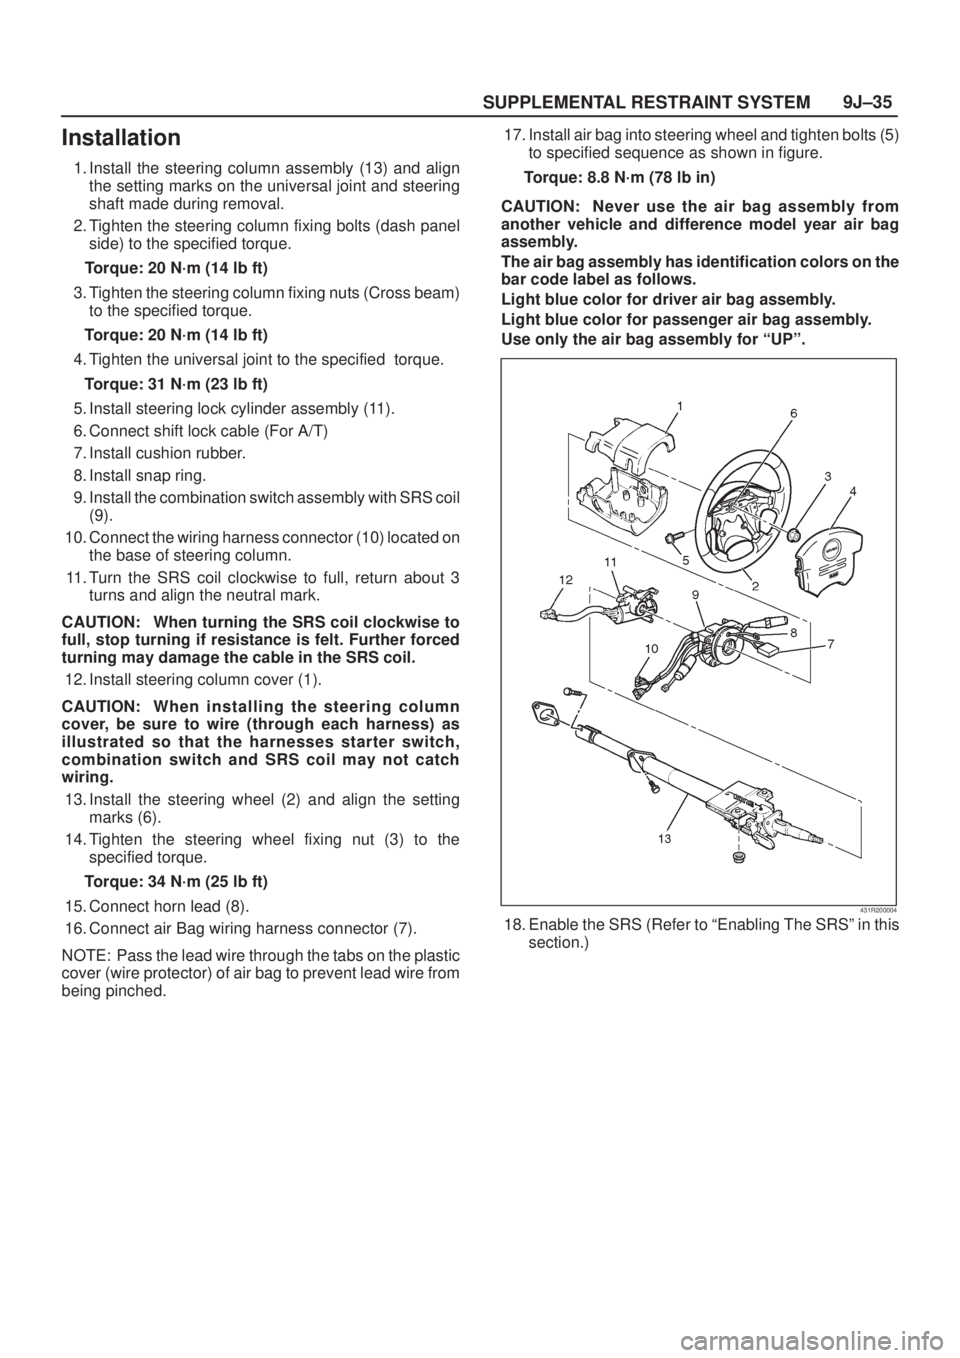
Installation
1. Install the steering column assembly (13) and align
the setting marks on the universal joint and steering
shaft made during removal.
2. Tighten the steering column fixing bolts (dash panel
side) to the specified torque.
Torque: 20 N´m (14 lb ft)
3. Tighten the steering column fixing nuts (Cross beam)
to the specified torque.
Torque: 20 N´m (14 lb ft)
4. Tighten the universal joint to the specified torque.
Torque: 31 N´m (23 lb ft)
5. Install steering lock cylinder assembly (11).
6. Connect shift lock cable (For A/T)
7. Install cushion rubber.
8. Install snap ring.
9. Install the combination switch assembly with SRS coil
(9).
10. Connect the wiring harness connector (10) located on
the base of steering column.
11. Turn the SRS coil clockwise to full, return about 3
turns and align the neutral mark.
CAUTION: When turning the SRS coil clockwise to
full, stop turning if resistance is felt. Further forced
turning may damage the cable in the SRS coil.
12. Install steering column cover (1).
CAUTION: When installing the steering column
cover, be sure to wire (through each harness) as
illustrated so that the harnesses starter switch,
combination switch and SRS coil may not catch
wiring.
13. Install the steering wheel (2) and align the setting
marks (6).
14. Tighten the steering wheel fixing nut (3) to the
specified torque.
Torque: 34 N´m (25 lb ft)
15. Connect horn lead (8).
16. Connect air Bag wiring harness connector (7).
NOTE: Pass the lead wire through the tabs on the plastic
cover (wire protector) of air bag to prevent lead wire from
being pinched.17. Install air bag into steering wheel and tighten bolts (5)
to specified sequence as shown in figure.
Torque: 8.8 N´m (78 lb in)
CAUTION: Never use the air bag assembly from
another vehicle and difference model year air bag
assembly.
The air bag assembly has identification colors on the
bar code label as follows.
Light blue color for driver air bag assembly.
Light blue color for passenger air bag assembly.
Use only the air bag assembly for ªUPº.
431R200004
18. Enable the SRS (Refer to ªEnabling The SRSº in this
section.)