Page 484 of 2100

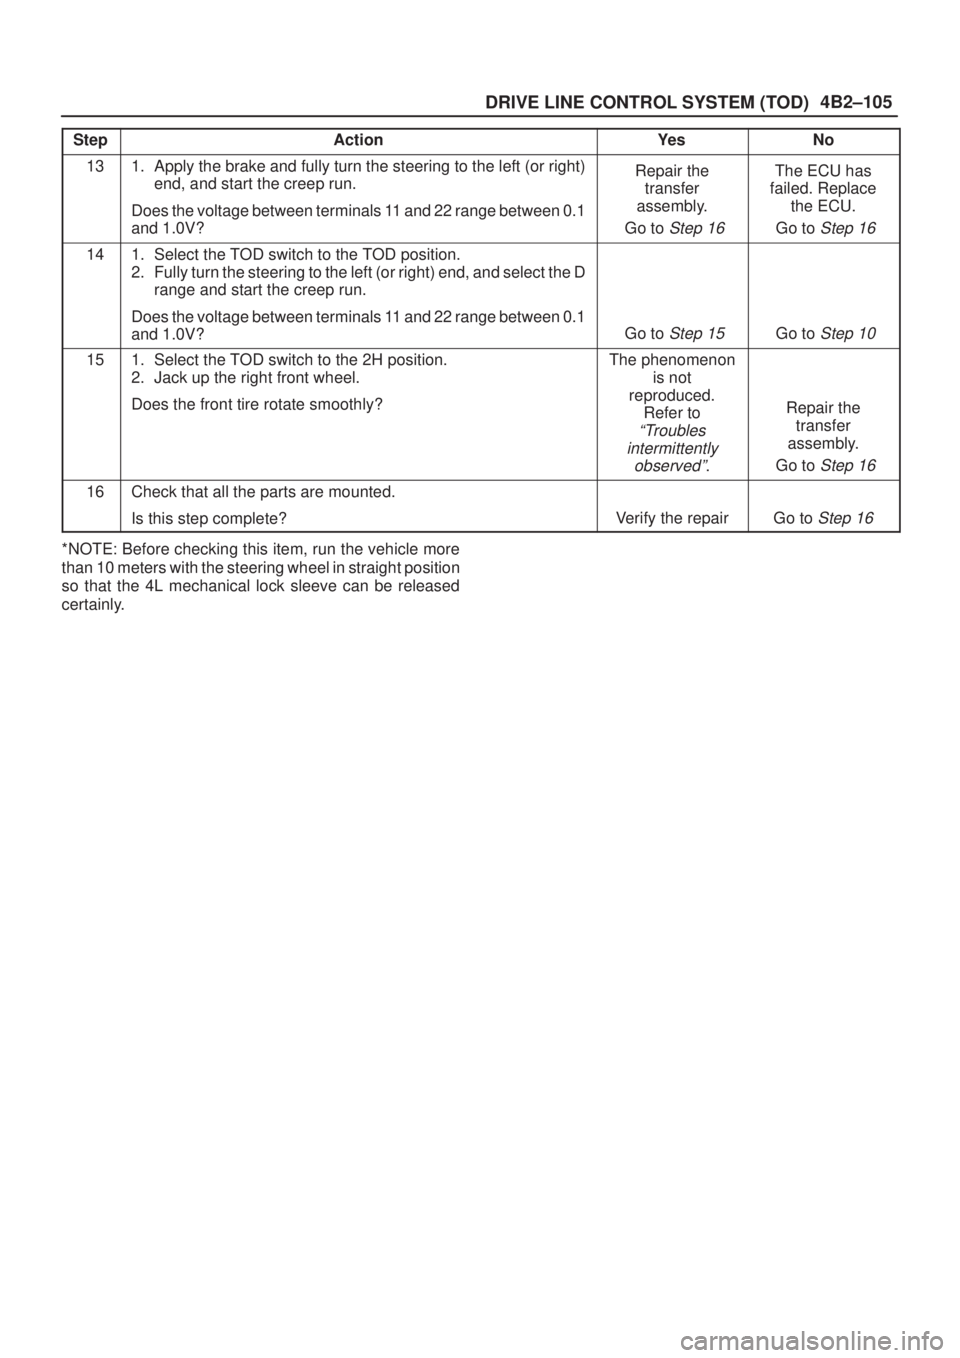
4B2±105
DRIVE LINE CONTROL SYSTEM (TOD)
StepNo Ye s Action
131. Apply the brake and fully turn the steering to the left (or right)
end, and start the creep run.
Does the voltage between terminals 11 and 22 range between 0.1
and 1.0V?Repair the
transfer
assembly.
Go to
Step 16
The ECU has
failed. Replace
the ECU.
Go to
Step 16
141. Select the TOD switch to the TOD position.
2. Fully turn the steering to the left (or right) end, and select the D
range and start the creep run.
Does the voltage between terminals 11 and 22 range between 0.1
and 1.0V?
Go to Step 15 Go to Step 10
151. Select the TOD switch to the 2H position.
2. Jack up the right front wheel.
Does the front tire rotate smoothly?The phenomenon
is not
reproduced.
Refer to
ªTroubles
intermittently
observedº
.
Repair the
transfer
assembly.
Go to
Step 16
16Check that all the parts are mounted.
Is this step complete?
Verify the repairGo to Step 16
*NOTE: Before checking this item, run the vehicle more
than 10 meters with the steering wheel in straight position
so that the 4L mechanical lock sleeve can be released
certainly.
Page 486 of 2100

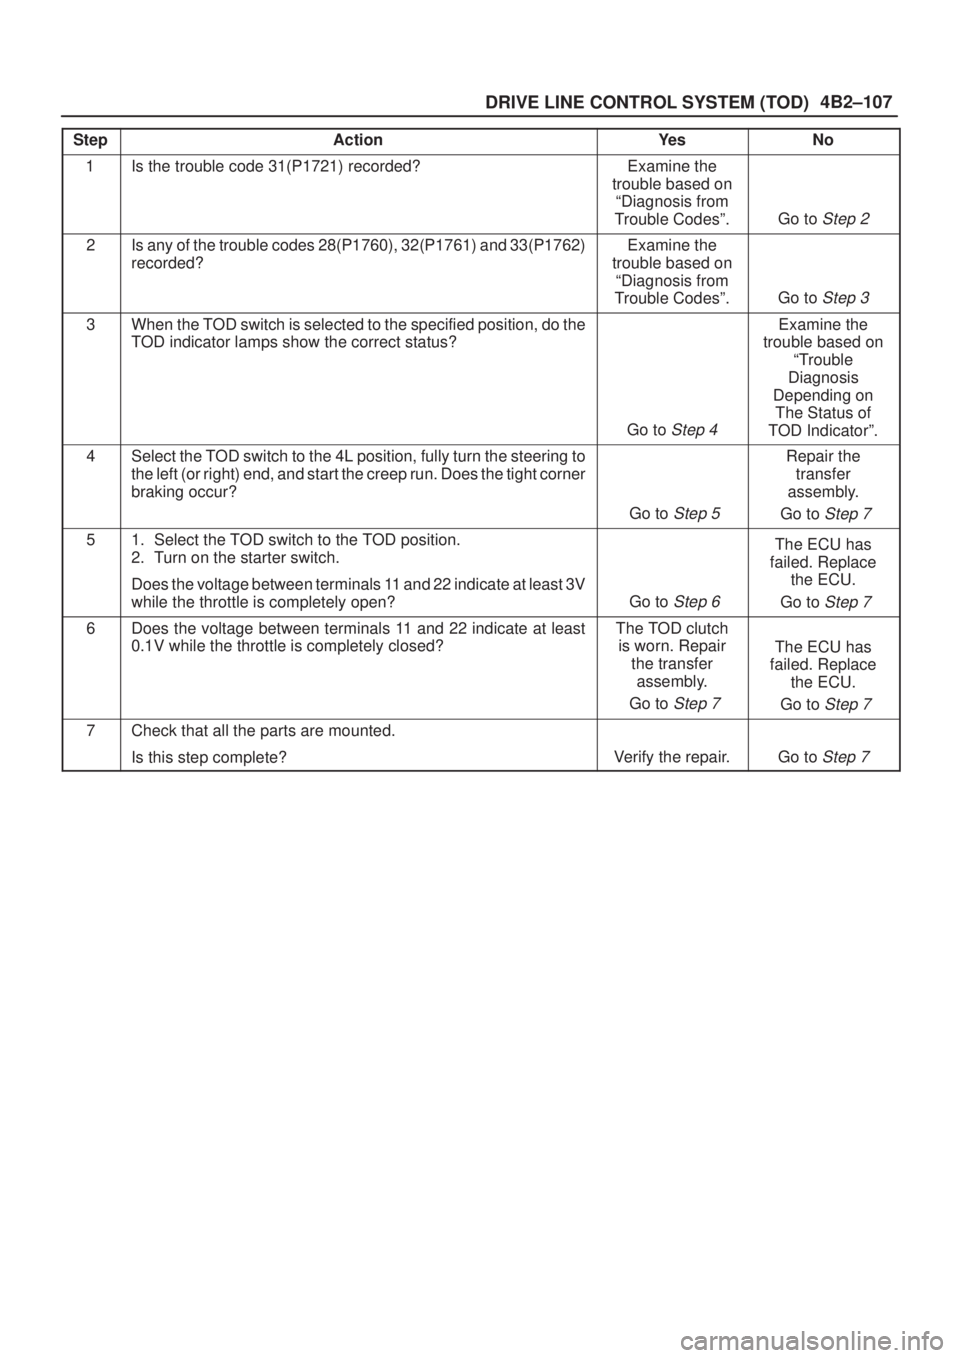
4B2±107
DRIVE LINE CONTROL SYSTEM (TOD)
StepActionYe sNo
1Is the trouble code 31(P1721) recorded?Examine the
trouble based on
ªDiagnosis from
Trouble Codesº.
Go to Step 2
2Is any of the trouble codes 28(P1760), 32(P1761) and 33(P1762)
recorded?Examine the
trouble based on
ªDiagnosis from
Trouble Codesº.
Go to Step 3
3When the TOD switch is selected to the specified position, do the
TOD indicator lamps show the correct status?
Go to Step 4
Examine the
trouble based on
ªTrouble
Diagnosis
Depending on
The Status of
TOD Indicatorº.
4Select the TOD switch to the 4L position, fully turn the steering to
the left (or right) end, and start the creep run. Does the tight corner
braking occur?
Go to Step 5
Repair the
transfer
assembly.
Go to
Step 7
51. Select the TOD switch to the TOD position.
2. Turn on the starter switch.
Does the voltage between terminals 11 and 22 indicate at least 3V
while the throttle is completely open?
Go to Step 6
The ECU has
failed. Replace
the ECU.
Go to
Step 7
6Does the voltage between terminals 11 and 22 indicate at least
0.1V while the throttle is completely closed?The TOD clutch
is worn. Repair
the transfer
assembly.
Go to
Step 7
The ECU has
failed. Replace
the ECU.
Go to
Step 7
7Check that all the parts are mounted.
Is this step complete?
Verify the repair.Go to Step 7
Page 490 of 2100
DRIVE LINE CONTROL SYSTEM (TOD) 4B2–111
Step Action Yes No
1 Are the brake and ABS systems healthy?
Go to
Step 2
Repair the brake
and ABS. (Refer to
section 5A and 5B)
2 Turn on the star ter switch.
Is the battery voltage observed between terminals 14 and 47?
Go to
Step 3
Repair the
battery system.
Go to
Step 5
3 1. Select the TOD switch to the 2H position.
Does the voltage between terminals 36 and 47 range between
7.5 and 16V (0.12 seconds make a cycle)? Go to
Step 4
The ECU has
failed. Replace
the ECU.
Go to
Step 5
4 1. Turn off the starter switch.
2. Disconnect the connector (C–37).
Is there the continuity between the connector terminal (C–37) 14
and (C–6) 8?The
phenomenon is
not reproduced.
Refer to
“Trouble
intermittently
observed".
Repair the
harness.
Go to Step 5
5 Check that all the par ts are mounted.
Is this step complete? Verify the repair. Go to
Step 5
Page 492 of 2100

4B2±113
DRIVE LINE CONTROL SYSTEM (TOD)
StepActionYe sNo
11. Turn on the starter switch.
Is any of the trouble codes 41 (P1741), 42 (P1773), 43 (P1743)
and 55 (P1755) recorded?Examine the
trouble based on
ªDiagnosis from
Trouble Codesº.
Go to Step 2
2Is any of the trouble codes 13 (P1735), 14 (P1731), 15 (P1736),
16 (P1737), 24 (P1733), and 27 (P1738) recorded?Examine the
trouble based on
ªDiagnosis from
Trouble Codesº.
Go to Step 3
3Is the trouble code 17 (P1774) recorded?Examine the
trouble based on
ªDiagnosis from
Trouble Codesº.
Go to Step 4
41. Turn on the starter switch.
2. The car stops, engine speed is less than 1500 rpm, the AT
selector is N position, and select the TOD switch to the 4L
position.
Do the front lamp and rear lamp in the indicator blink?
Go to Step 5
Examine the
trouble based on
ªTrouble
Diagnosis
Depending on the
Status of TOD
Indicatorº.
51. Step on the brake pedal.
Is the transfer changed to the 4L mode?The phenomenon
is not
reproduced.
Refer to
ªTrouble
intermittently
observedº.
Go to Step 6
6When the vehicle is moved forth and back, is the transfer changed
to the 4L mode?The phenomenon
is not
reproduced.
Refer to
ªTrouble
intermittently
observedº.
Go to Step 7
7Does the continuity corresponding to the encoder position
between the terminals comply with the 4L position in the following
table (continuity)?Examine the
trouble based on
ªTrouble
diagnosis
Depending on
The Status of
TOD Indicatorº.
Go to Step 8
81. Step on the brake pedal.
Is the battery voltage observed between the terminal 37 and 47?
Go to Step 10Go to Step 9
91. Turn off the starter switch.
2. Disconnect the ECU connector (C±37) and the brake switch
connector (I±31).
Is there the continuity between the connector terminal (C±37) 15
and (I±31) 4?The brake switch
is abnormal.
Repair or replace
the brake switch.
Go to
Step 13
Repair the
harness.
Go to
Step 13
101. Select the AT selector to the N position.
Is the voltage between the terminals ranged within the following
table (voltage)?
Go to Step 12Go to Step 11
111. Turn off the starter switch.
2. Disconnect the ECU connector (C±37).
3. Disconnect the AT mode switch connector (E±41).
Is there the continuity between the following connector terminals?
(C±37)6 and (E±41)8 (C±37)19 and (E±41)7 (C±37)5 and
(E±41)6
Repair or replace
the AT mode
switch.
Go to
Step 13
Repair the circuit
which has no
continuity.
Go to
Step 13
Page 493 of 2100
DRIVE LINE CONTROL SYSTEM (TOD) 4B2±114
StepNo Ye s Action
121. Start the engine.
Is the engine pulse signal between terminal 2 and 47 at engine
speed under 1500 rpm within the standard? Standard: less than
4500 Hz
Replace the
ECU.
Go to
Step 13
The engine pulse
signal is
abnormal. Repair
or replace the
PCM.
Go to
Step 13
13Check that all the parts are mounted.
Is this step complete?
Verify the repair.Go to Step 13
Continuity between terminal in 4L position
(Table: continuity)
Terminals
No.
26 and
2439 and
2425 and
2438 and
24
Continuity
of 4L
positionYESNOYESYES or
NO
Standard (Table: voltage)
Unit: V
Terminals28 and 4741 and 4727 and 47
Voltage0120
Page 495 of 2100

DRIVE LINE CONTROL SYSTEM (TOD) 4B2±116
StepActionYe sNo
11. Turn on the starter switch.
Is any of the trouble codes 41 (P1741), 42 (P1773), 43 (P1743)
and 55 (P1755) recorded?Examine the
trouble based on
ªDiagnosis from
Trouble Codesº.
Go to Step 2
2Is any of the trouble codes 13 (P1735), 14 (P1731), 15 (P1736),
16 (P1737), 24 (P1733), and 27 (P1738) recorded?Examine the
trouble based on
ªDiagnosis from
Trouble Codesº.
Go to Step 3
3Is the trouble code 17 (P1774) recorded?Examine the
trouble based on
ªDiagnosis from
Trouble Codesº.
Go to Step 4
41. Turn on the starter switch.
2. The car stops, engine speed is less than 1500 rpm, the AT
selector is N position, and select the TOD switch to the TOD
position.
Do the front, rear, and AUTO lamps in the indicator blink?
Go to Step 5
Examine the
trouble based on
ªTrouble
Diagnosis
Depending on the
Status of TOD
Indicatorº.
51. Step on the brake pedal.
Is the transfer changed to the TOD mode?The phenomenon
is not
reproduced.
Refer to
ªTrouble
intermittently
observedº.
Go to Step 6
6When the vehicle is moved forth and back, is the transfer changed
to the TOD mode?The phenomenon
is not
reproduced.
Refer to
ªTrouble
intermittently
observedº.
Go to Step 7
7Is the continuity corresponding to the encoder position between
the terminals ranged within the any case (case 1, 2 and 3) of TOD
position in the following table (continuity)?Examine the
trouble based on
ªTrouble
diagnosis
Depending on
The Status of
TOD Indicatorº.
Go to Step 8
81. Step on the brake pedal.
Is the battery voltage observed between the terminal 37 and 47?
Go to Step 10Go to Step 9
91. Turn off the starter switch.
2. Disconnect the ECU connector (C±37) and the brake switch
connector (I±31).
Is there the continuity between the connector terminal (C±37) 15
and (I±31) 4?The brake switch
is abnormal.
Repair or replace
the brake switch.
Go to
Step 13
Repair the
harness.
Go to
Step 13
101. Select the AT selector to the N position.
Is the voltage between the terminals ranged within the following
table (voltage)?
Go to Step 12Go to Step 11
111. Turn off the starter switch.
2. Disconnect the ECU connector (C±37) and brake switch
connector (I±31).
3. Disconnect the AT mode switch connector (E±41).
Is there the continuity between the following connector terminals?
(C±37)6 and (E±41)8 (C±37)19 and (E±41)7 (C±37)5 and
(E±41)6
Repair or replace
the AT mode
switch.
Go to
Step 13
Repair the circuit
which has no
continuity.
Go to
Step 13
Page 496 of 2100
4B2±117
DRIVE LINE CONTROL SYSTEM (TOD)
StepNo Ye s Action
121. Start the engine.
Is the engine pulse signal between terminal 2 and 47 at engine
speed under 1500 rpm within the standard? Standard: less than
4500 Hz
Replace the
ECU.
Go to
Step 13
The engine pulse
signal is
abnormal. Repair
or replace the
PCM.
Go to
Step 13
13Check that all the parts are mounted.
Is this step complete?
Verify the repair.Go to Step 13
Continuity in TOD position (Table: continuity)
Case
Continuity between terminals
26 and
2439 and
2425 and
2438 and
24
1NONONOYES
2NOYESNOYES
3YESYESNOYES
Standard (Table: voltage)
Unit: V
Terminals28 and 4741 and 4727 and 47
Voltage0120
Page 514 of 2100

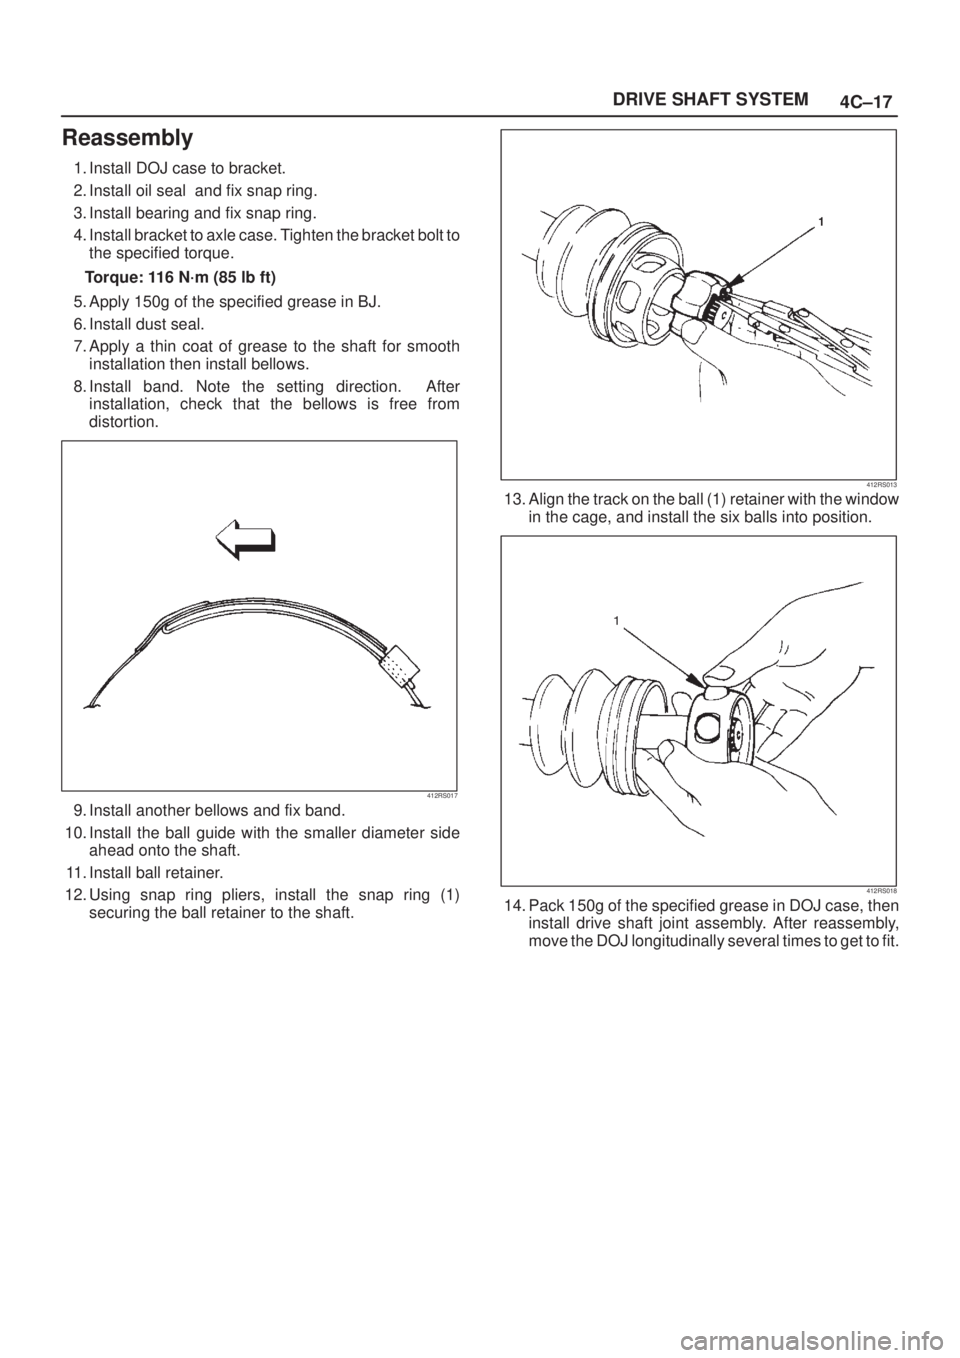
4C±17 DRIVE SHAFT SYSTEM
Reassembly
1. Install DOJ case to bracket.
2. Install oil seal and fix snap ring.
3. Install bearing and fix snap ring.
4. Install bracket to axle case. Tighten the bracket bolt to
the specified torque.
Torque: 116 N´m (85 lb ft)
5. Apply 150g of the specified grease in BJ.
6. Install dust seal.
7. Apply a thin coat of grease to the shaft for smooth
installation then install bellows.
8. Install band. Note the setting direction. After
installation, check that the bellows is free from
distortion.
412RS017
9. Install another bellows and fix band.
10. Install the ball guide with the smaller diameter side
ahead onto the shaft.
11. Install ball retainer.
12. Using snap ring pliers, install the snap ring (1)
securing the ball retainer to the shaft.
412RS013
13. Align the track on the ball (1) retainer with the window
in the cage, and install the six balls into position.
412RS018
14. Pack 150g of the specified grease in DOJ case, then
install drive shaft joint assembly. After reassembly,
move the DOJ longitudinally several times to get to fit.