Page 1817 of 2100
ENTERTAINMENT8C±5
Audio
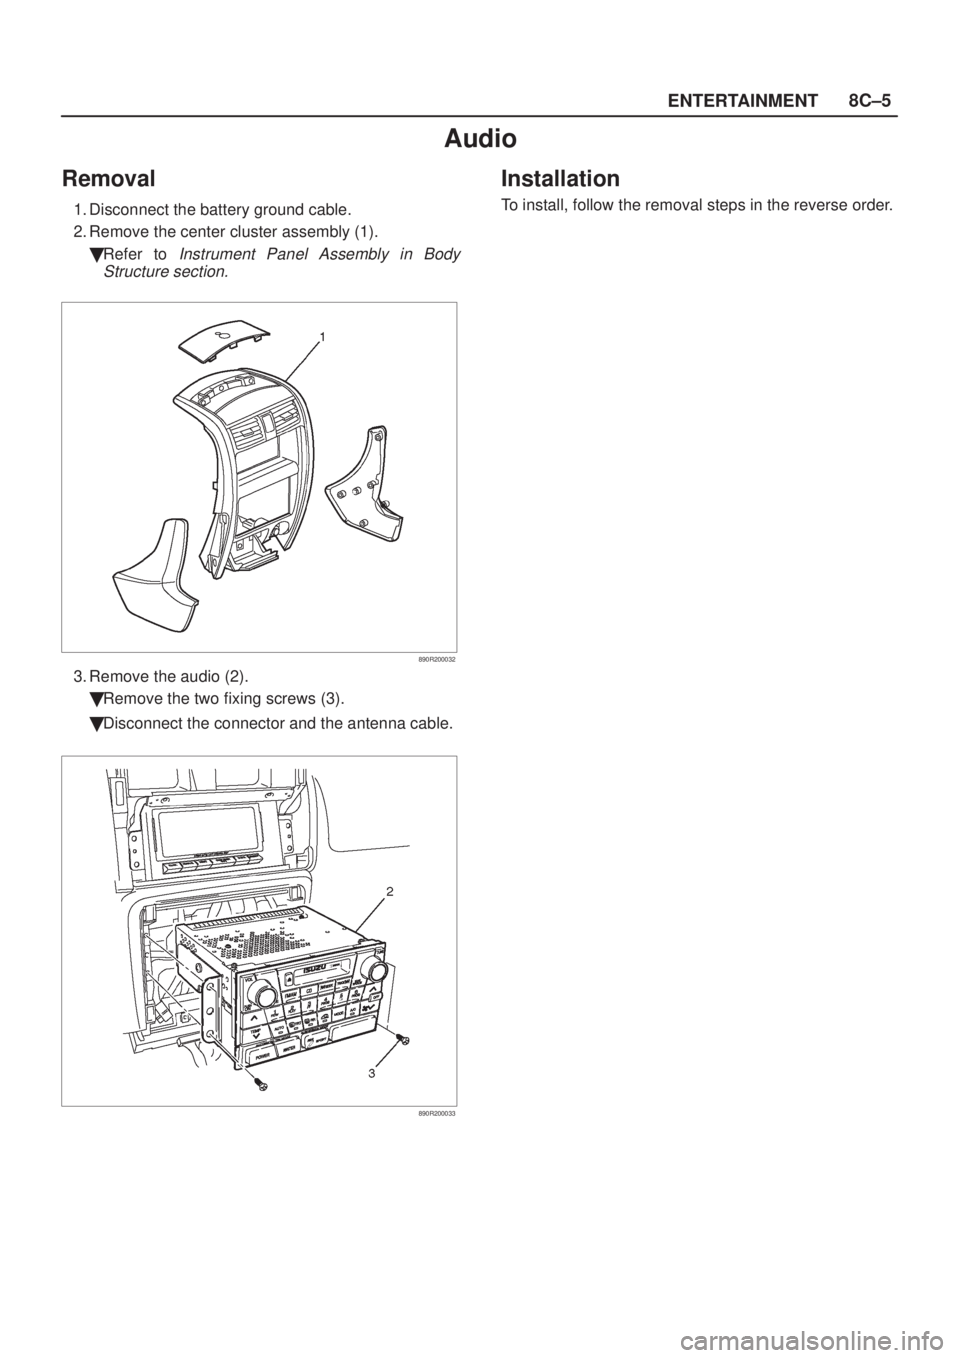
Removal
1. Disconnect the battery ground cable.
2. Remove the center cluster assembly (1).
�Refer to
Instrument Panel Assembly in Body
Structure section.
890R200032
3. Remove the audio (2).
�Remove the two fixing screws (3).
�Disconnect the connector and the antenna cable.
890R200033
Installation
To install, follow the removal steps in the reverse order.
Page 1824 of 2100
8C±12ENTERTAINMENT
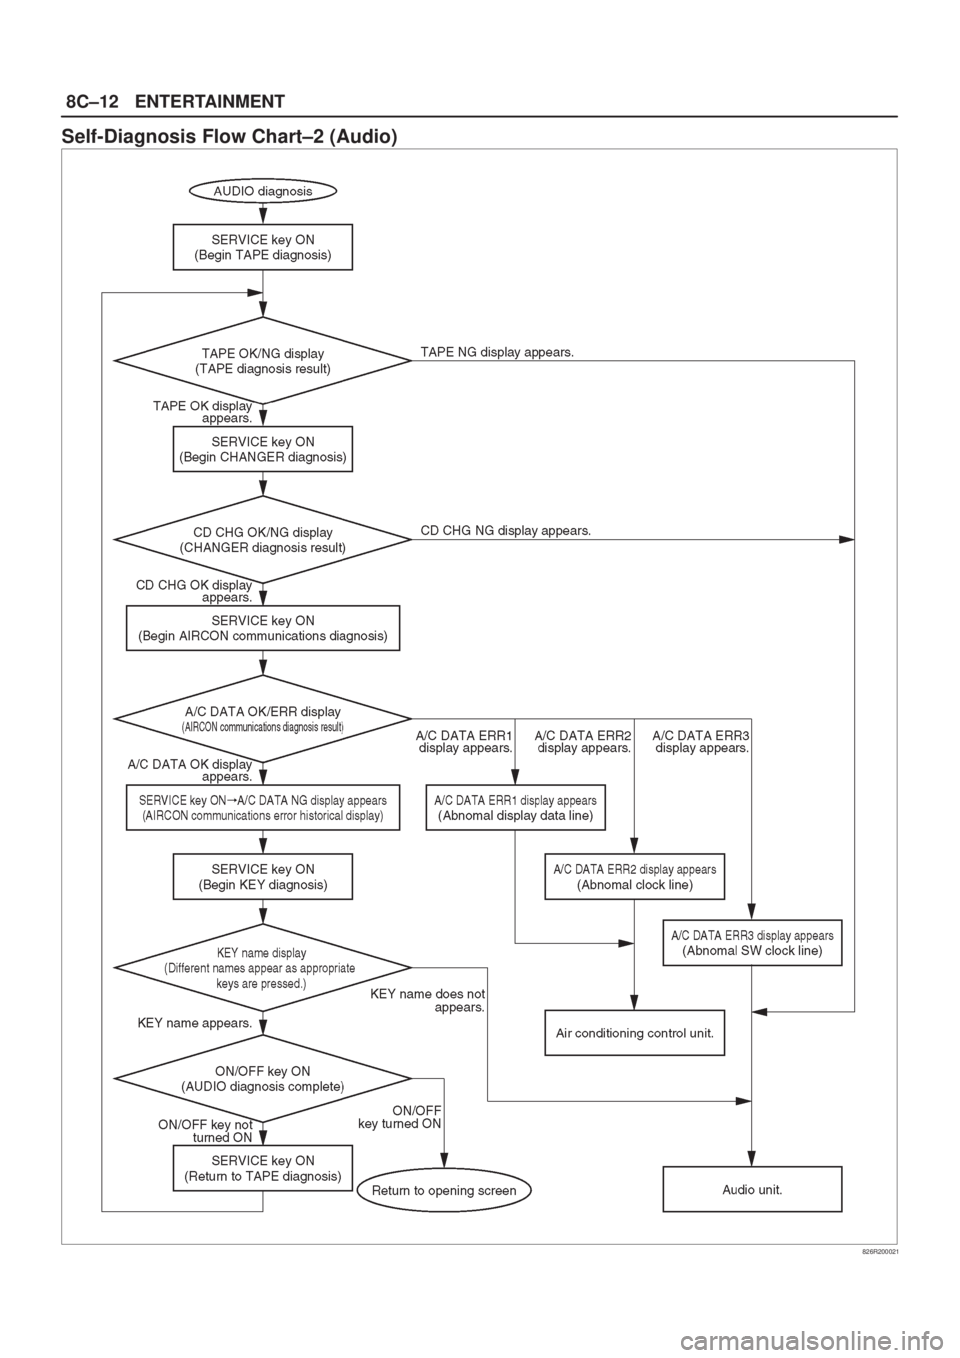
Self-Diagnosis Flow Chart±2 (Audio)
826R200021
Page 1827 of 2100
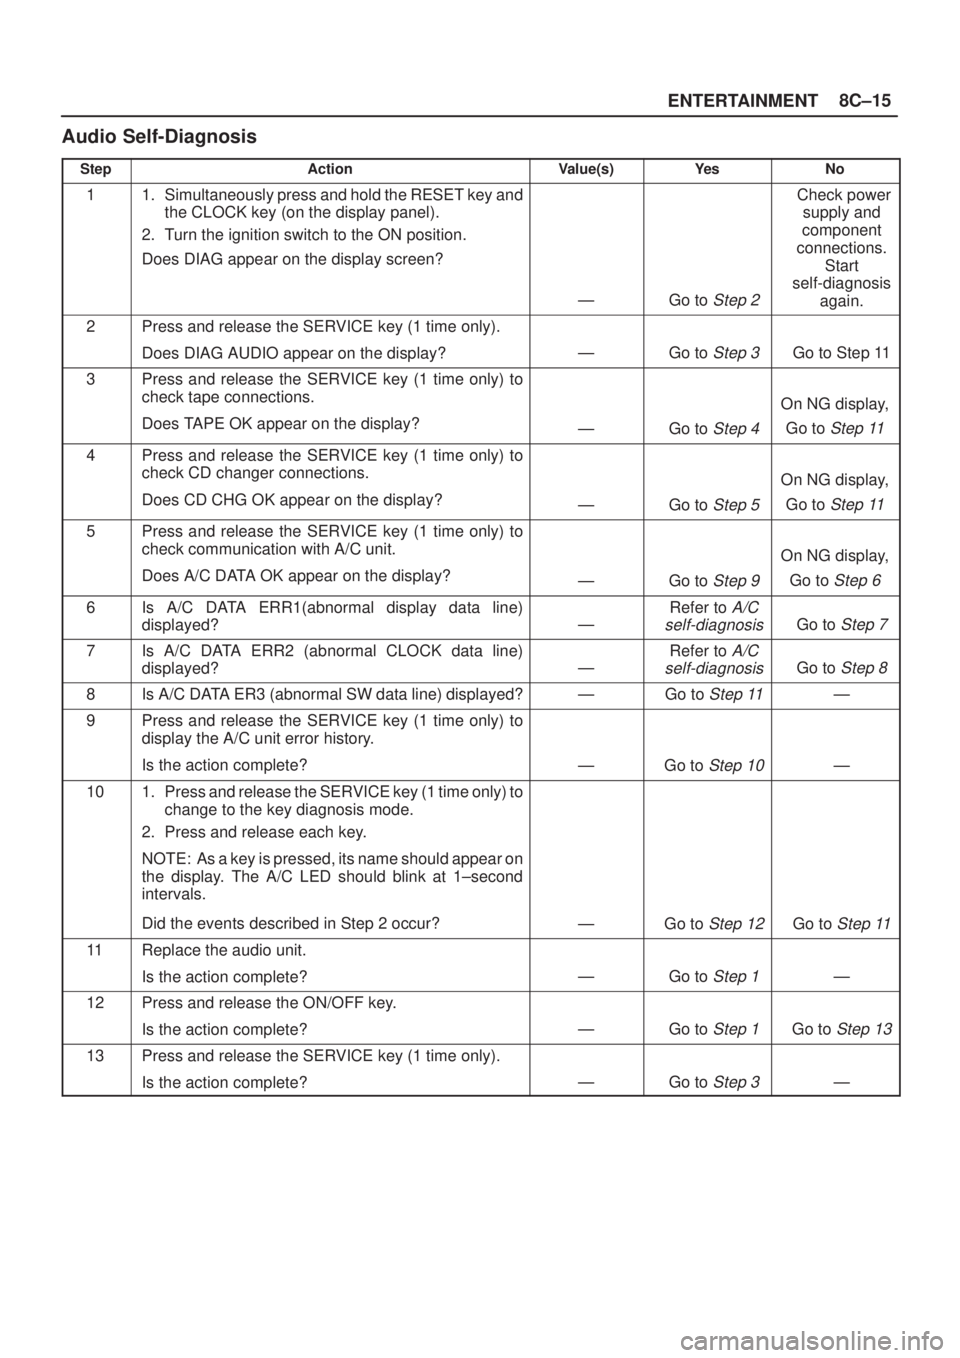
ENTERTAINMENT8C±15
Audio Self-Diagnosis
StepActionValue(s)Ye sNo
11. Simultaneously press and hold the RESET key and
the CLOCK key (on the display panel).
2. Turn the ignition switch to the ON position.
Does DIAG appear on the display screen?
ÐGo to Step 2
Check power
supply and
component
connections.
Start
self-diagnosis
again.
2Press and release the SERVICE key (1 time only).
Does DIAG AUDIO appear on the display?
ÐGo to Step 3Go to Step 11
3Press and release the SERVICE key (1 time only) to
check tape connections.
Does TAPE OK appear on the display?
ÐGo to Step 4
On NG display,
Go to
Step 11
4Press and release the SERVICE key (1 time only) to
check CD changer connections.
Does CD CHG OK appear on the display?
ÐGo to Step 5
On NG display,
Go to
Step 11
5Press and release the SERVICE key (1 time only) to
check communication with A/C unit.
Does A/C DATA OK appear on the display?
ÐGo to Step 9
On NG display,
Go to
Step 6
6Is A/C DATA ERR1(abnormal display data line)
displayed?
Ð
Refer to A/C
self-diagnosis
Go to Step 7
7Is A/C DATA ERR2 (abnormal CLOCK data line)
displayed?
Ð
Refer to A/C
self-diagnosis
Go to Step 8
8Is A/C DATA ER3 (abnormal SW data line) displayed?ÐGo to Step 11Ð
9Press and release the SERVICE key (1 time only) to
display the A/C unit error history.
Is the action complete?
ÐGo to Step 10Ð
101. Press and release the SERVICE key (1 time only) to
change to the key diagnosis mode.
2. Press and release each key.
NOTE: As a key is pressed, its name should appear on
the display. The A/C LED should blink at 1±second
intervals.
Did the events described in Step 2 occur?
ÐGo to Step 12Go to Step 11
11Replace the audio unit.
Is the action complete?
ÐGo to Step 1Ð
12Press and release the ON/OFF key.
Is the action complete?
ÐGo to Step 1Go to Step 13
13Press and release the SERVICE key (1 time only).
Is the action complete?
ÐGo to Step 3Ð
Page 1828 of 2100
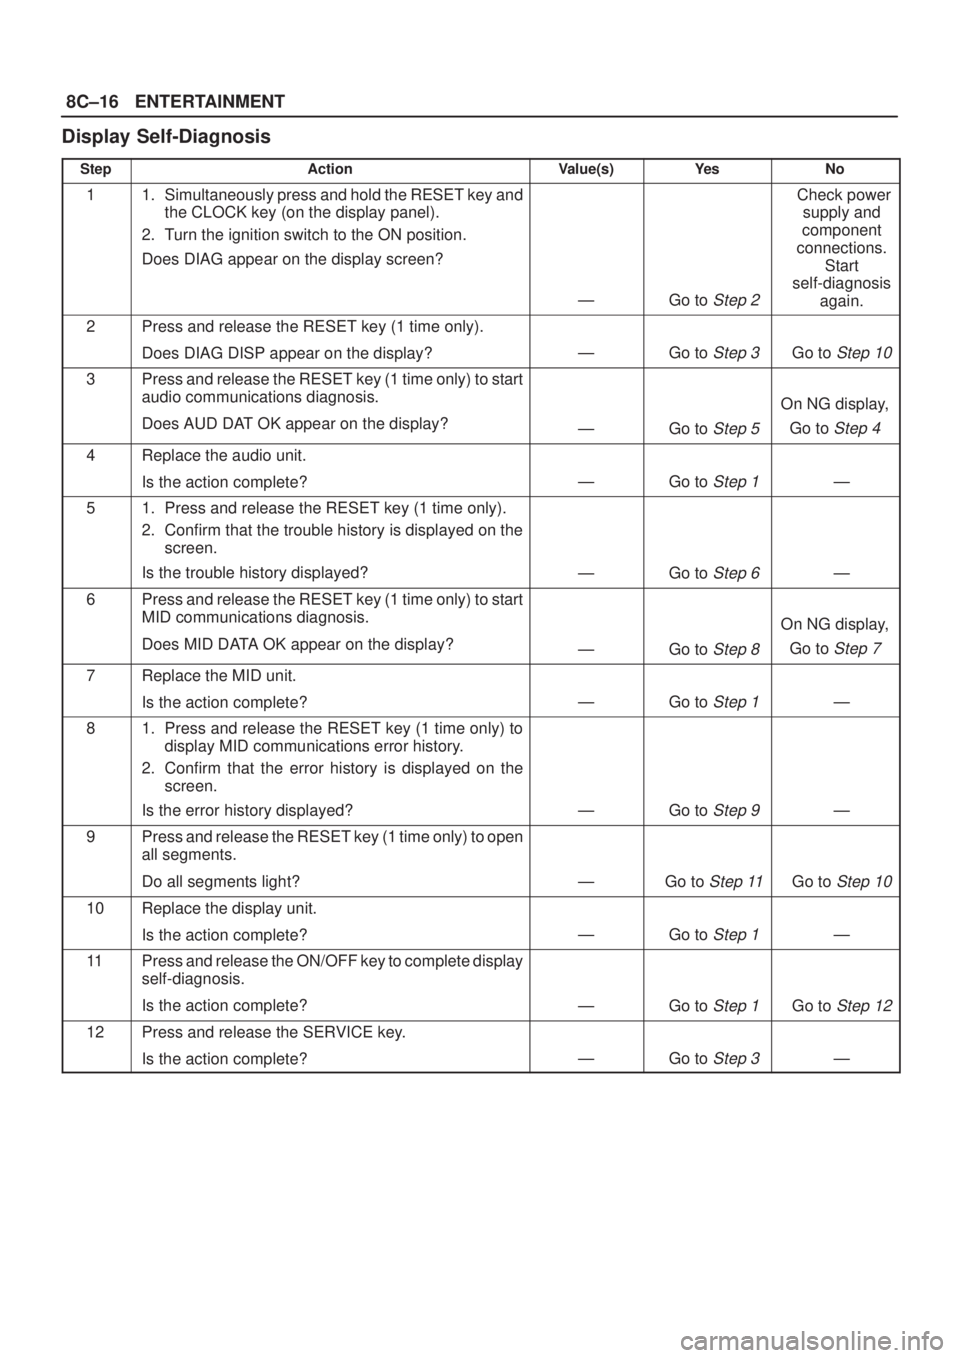
8C±16ENTERTAINMENT
Display Self-Diagnosis
StepActionValue(s)Ye sNo
11. Simultaneously press and hold the RESET key and
the CLOCK key (on the display panel).
2. Turn the ignition switch to the ON position.
Does DIAG appear on the display screen?
ÐGo to Step 2
Check power
supply and
component
connections.
Start
self-diagnosis
again.
2Press and release the RESET key (1 time only).
Does DIAG DISP appear on the display?
ÐGo to Step 3Go to Step 10
3Press and release the RESET key (1 time only) to start
audio communications diagnosis.
Does AUD DAT OK appear on the display?
ÐGo to Step 5
On NG display,
Go to
Step 4
4Replace the audio unit.
Is the action complete?
ÐGo to Step 1Ð
51. Press and release the RESET key (1 time only).
2. Confirm that the trouble history is displayed on the
screen.
Is the trouble history displayed?
ÐGo to Step 6Ð
6Press and release the RESET key (1 time only) to start
MID communications diagnosis.
Does MID DATA OK appear on the display?
ÐGo to Step 8
On NG display,
Go to
Step 7
7Replace the MID unit.
Is the action complete?
ÐGo to Step 1Ð
81. Press and release the RESET key (1 time only) to
display MID communications error history.
2. Confirm that the error history is displayed on the
screen.
Is the error history displayed?
ÐGo to Step 9Ð
9Press and release the RESET key (1 time only) to open
all segments.
Do all segments light?
ÐGo to Step 11Go to Step 10
10Replace the display unit.
Is the action complete?
ÐGo to Step 1Ð
11Press and release the ON/OFF key to complete display
self-diagnosis.
Is the action complete?
ÐGo to Step 1Go to Step 12
12Press and release the SERVICE key.
Is the action complete?
ÐGo to Step 3Ð
Page 1830 of 2100
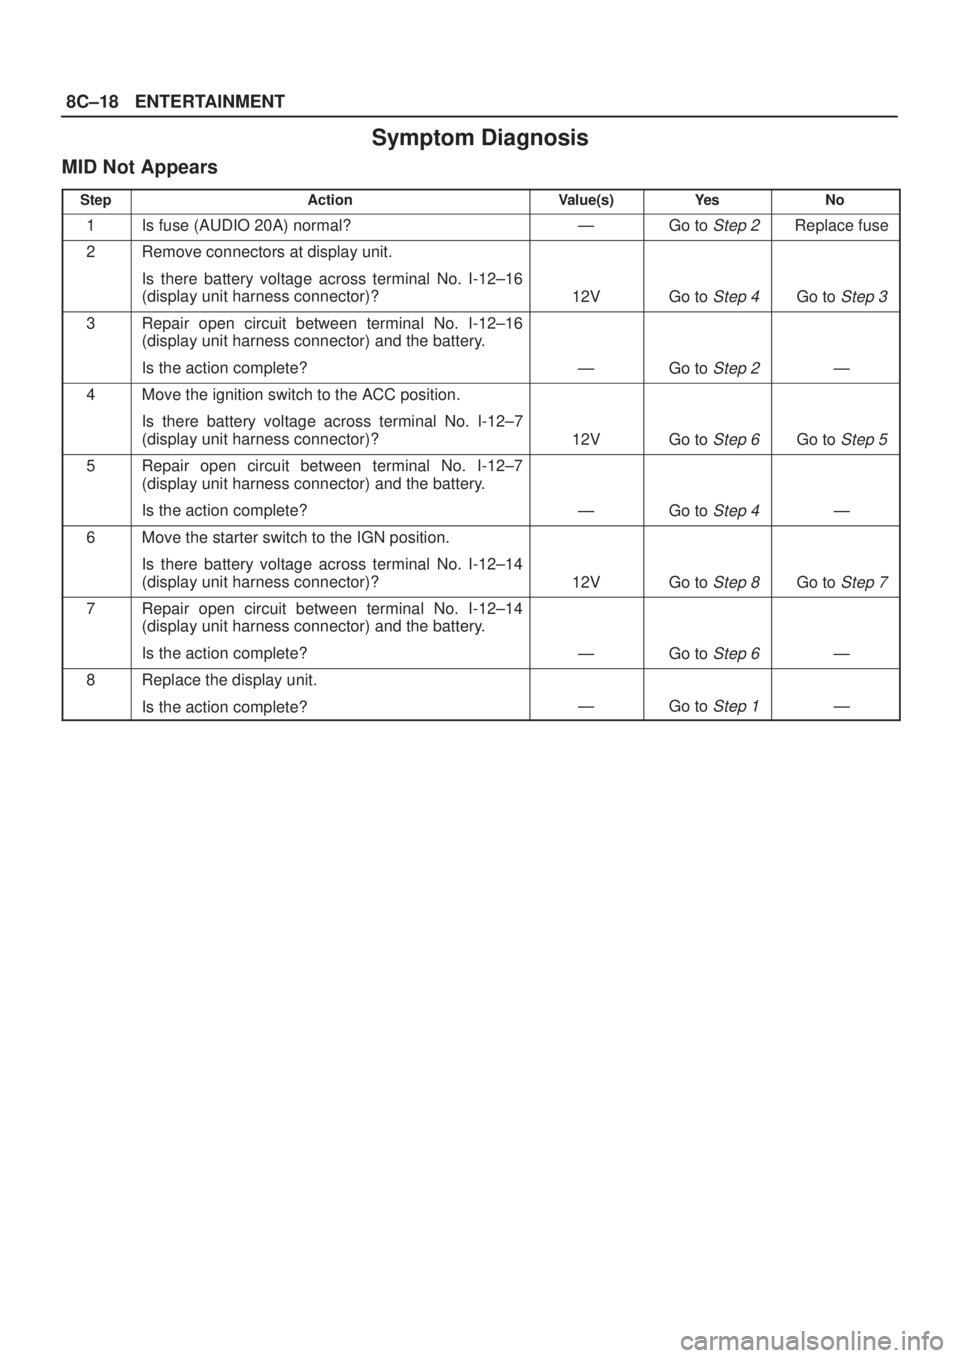
8C±18ENTERTAINMENT
Symptom Diagnosis
MID Not Appears
StepActionValue(s)Ye sNo
1Is fuse (AUDIO 20A) normal?ÐGo to Step 2Replace fuse
2Remove connectors at display unit.
Is there battery voltage across terminal No. I-12±16
(display unit harness connector)?
12VGo to Step 4Go to Step 3
3Repair open circuit between terminal No. I-12±16
(display unit harness connector) and the battery.
Is the action complete?
ÐGo to Step 2Ð
4Move the ignition switch to the ACC position.
Is there battery voltage across terminal No. I-12±7
(display unit harness connector)?
12VGo to Step 6Go to Step 5
5Repair open circuit between terminal No. I-12±7
(display unit harness connector) and the battery.
Is the action complete?
ÐGo to Step 4Ð
6Move the starter switch to the IGN position.
Is there battery voltage across terminal No. I-12±14
(display unit harness connector)?
12VGo to Step 8Go to Step 7
7Repair open circuit between terminal No. I-12±14
(display unit harness connector) and the battery.
Is the action complete?
ÐGo to Step 6Ð
8Replace the display unit.
Is the action complete?
ÐGo to Step 1Ð
Page 1836 of 2100
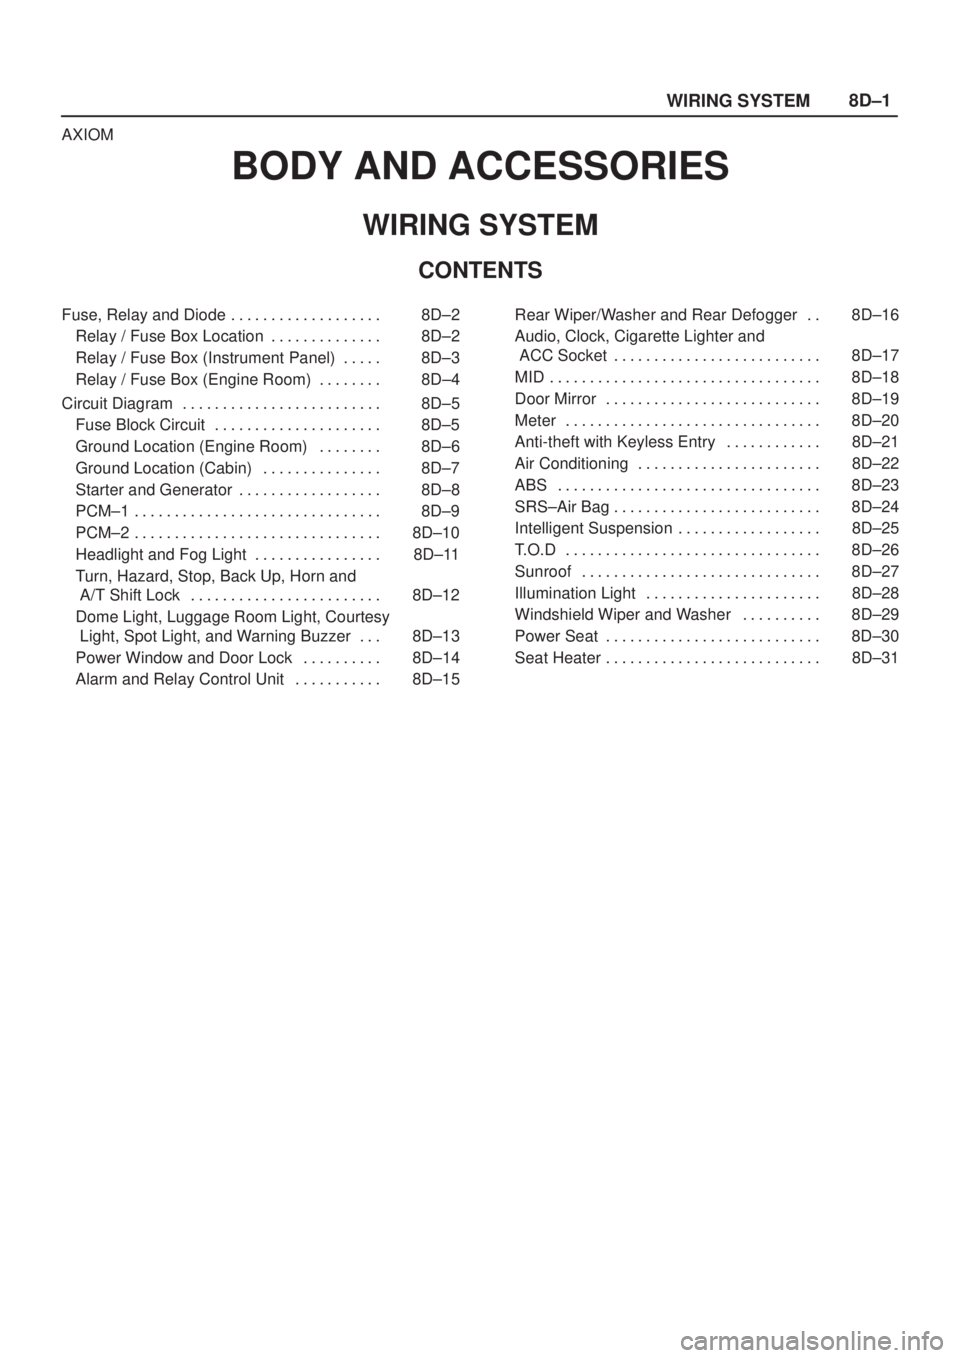
8D±1
WIRING SYSTEM
AXIOM
BODY AND ACCESSORIES
WIRING SYSTEM
CONTENTS
Fuse, Relay and Diode 8D±2. . . . . . . . . . . . . . . . . . .
Relay / Fuse Box Location 8D±2. . . . . . . . . . . . . .
Relay / Fuse Box (Instrument Panel) 8D±3. . . . .
Relay / Fuse Box (Engine Room) 8D±4. . . . . . . .
Circuit Diagram 8D±5. . . . . . . . . . . . . . . . . . . . . . . . .
Fuse Block Circuit 8D±5. . . . . . . . . . . . . . . . . . . . .
Ground Location (Engine Room) 8D±6. . . . . . . .
Ground Location (Cabin) 8D±7. . . . . . . . . . . . . . .
Starter and Generator 8D±8. . . . . . . . . . . . . . . . . .
PCM±1 8D±9. . . . . . . . . . . . . . . . . . . . . . . . . . . . . . .
PCM±2 8D±10. . . . . . . . . . . . . . . . . . . . . . . . . . . . . . .
Headlight and Fog Light 8D±11. . . . . . . . . . . . . . . .
Turn, Hazard, Stop, Back Up, Horn and
A/T Shift Lock 8D±12. . . . . . . . . . . . . . . . . . . . . . . .
Dome Light, Luggage Room Light, Courtesy
Light, Spot Light, and Warning Buzzer 8D±13. . .
Power Window and Door Lock 8D±14. . . . . . . . . .
Alarm and Relay Control Unit 8D±15. . . . . . . . . . . Rear Wiper/Washer and Rear Defogger 8D±16. .
Audio, Clock, Cigarette Lighter and
ACC Socket 8D±17. . . . . . . . . . . . . . . . . . . . . . . . . .
MID 8D±18. . . . . . . . . . . . . . . . . . . . . . . . . . . . . . . . . .
Door Mirror 8D±19. . . . . . . . . . . . . . . . . . . . . . . . . . .
Meter 8D±20. . . . . . . . . . . . . . . . . . . . . . . . . . . . . . . .
Anti-theft with Keyless Entry 8D±21. . . . . . . . . . . .
Air Conditioning 8D±22. . . . . . . . . . . . . . . . . . . . . . .
ABS 8D±23. . . . . . . . . . . . . . . . . . . . . . . . . . . . . . . . .
SRS±Air Bag 8D±24. . . . . . . . . . . . . . . . . . . . . . . . . .
Intelligent Suspension 8D±25. . . . . . . . . . . . . . . . . .
T.O.D 8D±26. . . . . . . . . . . . . . . . . . . . . . . . . . . . . . . .
Sunroof 8D±27. . . . . . . . . . . . . . . . . . . . . . . . . . . . . .
Illumination Light 8D±28. . . . . . . . . . . . . . . . . . . . . .
Windshield Wiper and Washer 8D±29. . . . . . . . . .
Power Seat 8D±30. . . . . . . . . . . . . . . . . . . . . . . . . . .
Seat Heater 8D±31. . . . . . . . . . . . . . . . . . . . . . . . . . .
Page 1838 of 2100
8D±3
WIRING SYSTEM
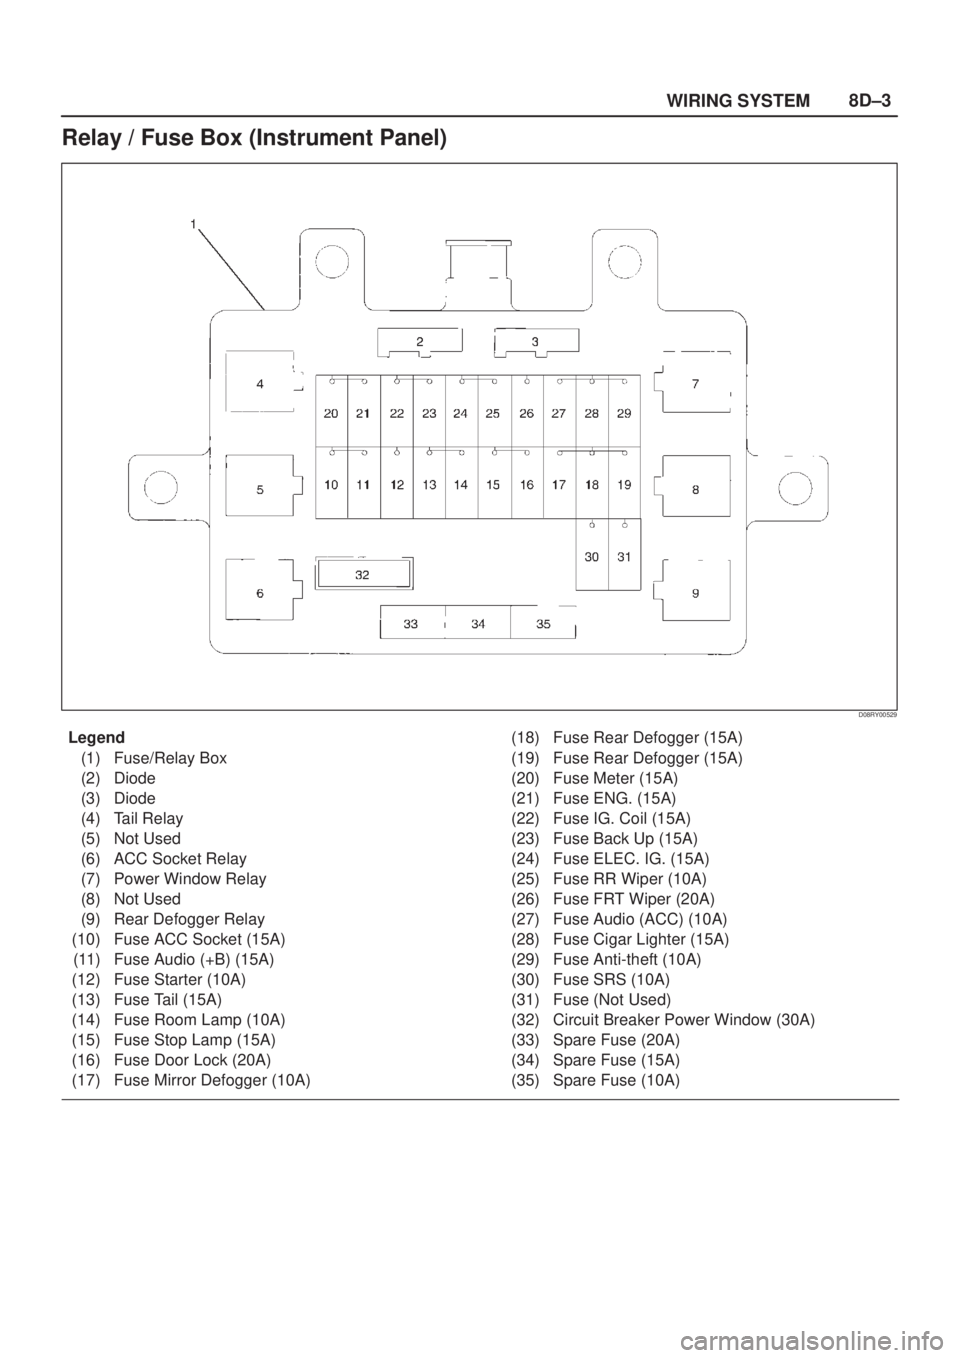
Relay / Fuse Box (Instrument Panel)
D08RY00529
Legend
(1) Fuse/Relay Box
(2) Diode
(3) Diode
(4) Tail Relay
(5) Not Used
(6) ACC Socket Relay
(7) Power Window Relay
(8) Not Used
(9) Rear Defogger Relay
(10) Fuse ACC Socket (15A)
(11) Fuse Audio (+B) (15A)
(12) Fuse Starter (10A)
(13) Fuse Tail (15A)
(14) Fuse Room Lamp (10A)
(15) Fuse Stop Lamp (15A)
(16) Fuse Door Lock (20A)
(17) Fuse Mirror Defogger (10A)(18) Fuse Rear Defogger (15A)
(19) Fuse Rear Defogger (15A)
(20) Fuse Meter (15A)
(21) Fuse ENG. (15A)
(22) Fuse IG. Coil (15A)
(23) Fuse Back Up (15A)
(24) Fuse ELEC. IG. (15A)
(25) Fuse RR Wiper (10A)
(26) Fuse FRT Wiper (20A)
(27) Fuse Audio (ACC) (10A)
(28) Fuse Cigar Lighter (15A)
(29) Fuse Anti-theft (10A)
(30) Fuse SRS (10A)
(31) Fuse (Not Used)
(32) Circuit Breaker Power Window (30A)
(33) Spare Fuse (20A)
(34) Spare Fuse (15A)
(35) Spare Fuse (10A)
Page 1852 of 2100
8D±17
WIRING SYSTEM
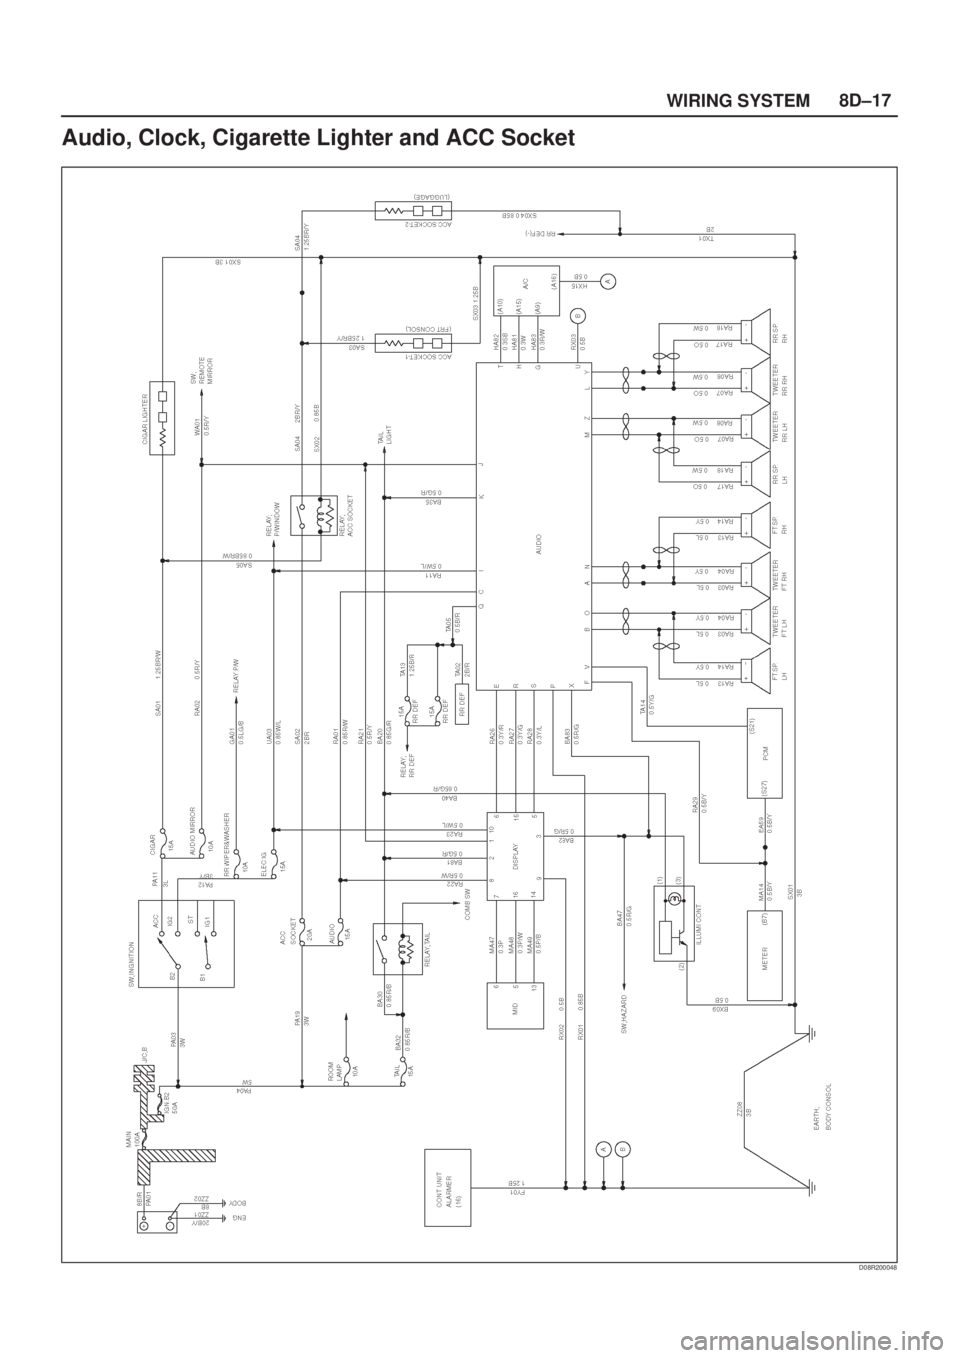
Audio, Clock, Cigarette Lighter and ACC Socket
D08R200048