2002 Hyundai Atos coolant level
[x] Cancel search: coolant levelPage 204 of 249
3-3
WHAT TO DO IN AN EMERGENCY
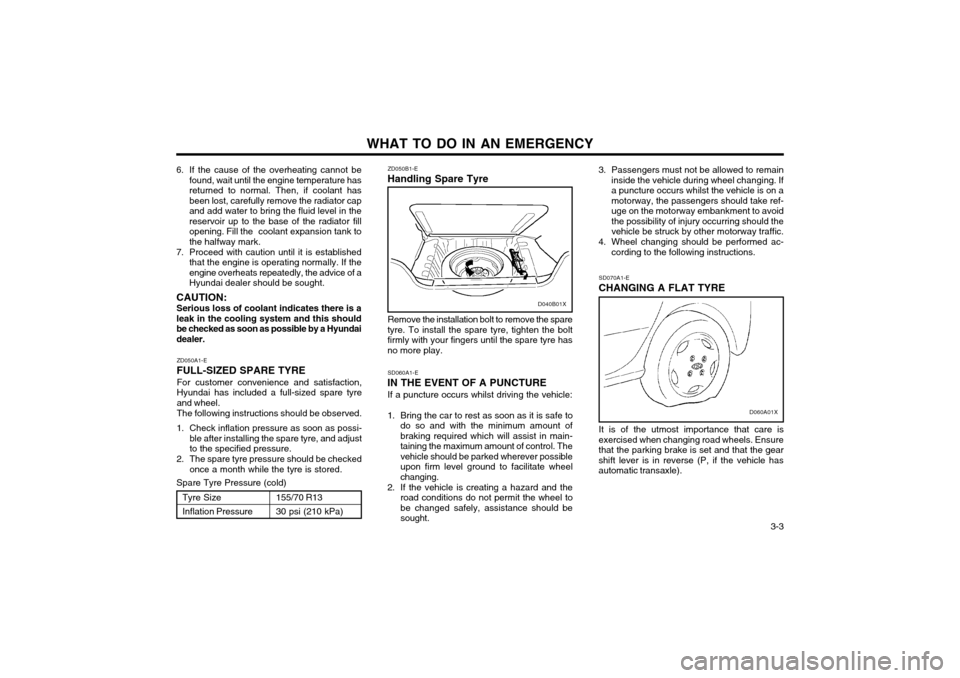
ZD050B1-E
Handling Spare Tyre
6. If the cause of the overheating cannot be
found, wait until the engine temperature has returned to normal. Then, if coolant hasbeen lost, carefully remove the radiator capand add water to bring the fluid level in thereservoir up to the base of the radiator fill
opening. Fill the coolant expansion tank tothe halfway mark.
7. Proceed with caution until it is established that the engine is operating normally. If theengine overheats repeatedly, the advice of aHyundai dealer should be sought.
CAUTION: Serious loss of coolant indicates there is aleak in the cooling system and this shouldbe checked as soon as possible by a Hyundaidealer. 3. Passengers must not be allowed to remain
inside the vehicle during wheel changing. Ifa puncture occurs whilst the vehicle is on amotorway, the passengers should take ref-uge on the motorway embankment to avoidthe possibility of injury occurring should thevehicle be struck by other motorway traffic.
4. Wheel changing should be performed ac- cording to the following instructions.
ZD050A1-E
FULL-SIZED SPARE TYRE For customer convenience and satisfaction,Hyundai has included a full-sized spare tyreand wheel. The following instructions should be observed.
1. Check inflation pressure as soon as possi- ble after installing the spare tyre, and adjust to the specified pressure.
2. The spare tyre pressure should be checked once a month while the tyre is stored.
Spare Tyre Pressure (cold)
D040B01X
Remove the installation bolt to remove the spare
tyre. To install the spare tyre, tighten the bolt firmly with your fingers until the spare tyre hasno more play.
SD060A1-E
IN THE EVENT OF A PUNCTURE
If a puncture occurs whilst driving the vehicle:
1. Bring the car to rest as soon as it is safe to do so and with the minimum amount ofbraking required which will assist in main-taining the maximum amount of control. Thevehicle should be parked wherever possibleupon firm level ground to facilitate wheelchanging.
2. If the vehicle is creating a hazard and the road conditions do not permit the wheel tobe changed safely, assistance should besought. SD070A1-E
CHANGING A FLAT TYRE
D060A01X
It is of the utmost importance that care is
exercised when changing road wheels. Ensure that the parking brake is set and that the gearshift lever is in reverse (P, if the vehicle hasautomatic transaxle).
Tyre Size Inflation Pressure 155/70 R1330 psi (210 kPa)
Page 217 of 249
VEHICLE MAINTENANCE REQUIREMENTS
5-6 F070B01A-GAT
o Cooling SystemCheck the cooling system part, such as radia-
tor, coolant reservoir, hoses and connections for leakage and damage. Replace any dam-aged parts.
F070C01A-AAT
o Engine coolant The coolant should be changed at the intervals
specified in the maintenance schedule.
F070D01X-GAT
o Manual or semi-automatic transaxle
oil
Inspect the manual or semi-automatic transaxle
oil according to the maintenance schedule.
NOTE: If the oil level is low, check for possible
leaks before adding oil. Do not overfill.
F070E01X-AAT
o Automatic transaxle fluidThe fluid level should be in the “HOT” range of
the dipstick, after engine and transaxle are at
normal operating temperature. Check the Auto-matic Transaxle Fluid level with the engine
running and the transaxle in neutral, with theparking brake properly applied. Use ESSOJWS3314 when adding or changing fluid. F070F01A-AAT o Brake hoses and linesVisually check for proper installation, chafing, cracks, deterioration and any leakage. Replaceany deteriorated or damaged parts immediate-ly. F070G02A-AAT
o Brake fluid Check brake fluid level in the brake fluid reser- voir. The level should be between "MIN" and"MAX" marks on the side of the reservoir. Use only hydraulic brake fluid conforming to DOT 3 or DOT 4. F070H01A-AAT
o Rear brake drums/linings, parking
brake
Check the rear brake drums and linings for
scoring, burning, leaking fluid, broken parts,and excessive wear. Inspect the parking brake
system including the parking brake lever andcables. For detailed service procedures, referto the Shop Manual. F070J01A-AAT
o Brake pads, calipers and rotorsCheck the pads for excessive wear, discs for run out and wear, and calipers for fluid leakage. F070K01A-AAT
o Exhaust pipe and mufflerVisually inspect the exhaust pipes, muffler and hangers for cracks, deterioration, or damage.Start the engine and listen carefully for any
exhaust gas leakage. Tighten connections orreplace parts as necessary. F070L01A-AAT
o Suspension mounting bolts Check the suspension connections for loose- ness or damage. Retighten to the specifiedtorque. F070M01A-AAT
o Steering gear box, linkage & boots/
lower arm ball joint
With the vehicle stopped and engine off, check for excessive free-play in the steering wheel.Check the linkage for bends or damage. Check
the dust boots and ball joints for deterioration,cracks, or damage. Replace any damagedparts. F070N01A-AAT
o Power steering pump, belt and hos-
es
Check the power steering pump and hoses for leakage and damage. Replace any damagedor leaking parts immediately. Inspect the powersteering belt for evidence of cuts, cracks, ex-cessive wear, oiliness and proper tension.Replace or adjust it if necessary.
Page 219 of 249
DO-IT-YOURSELF MAINTENANCE 6-1
ZG000A1-E
6. DO-IT-YOURSELF MAINTENANCE
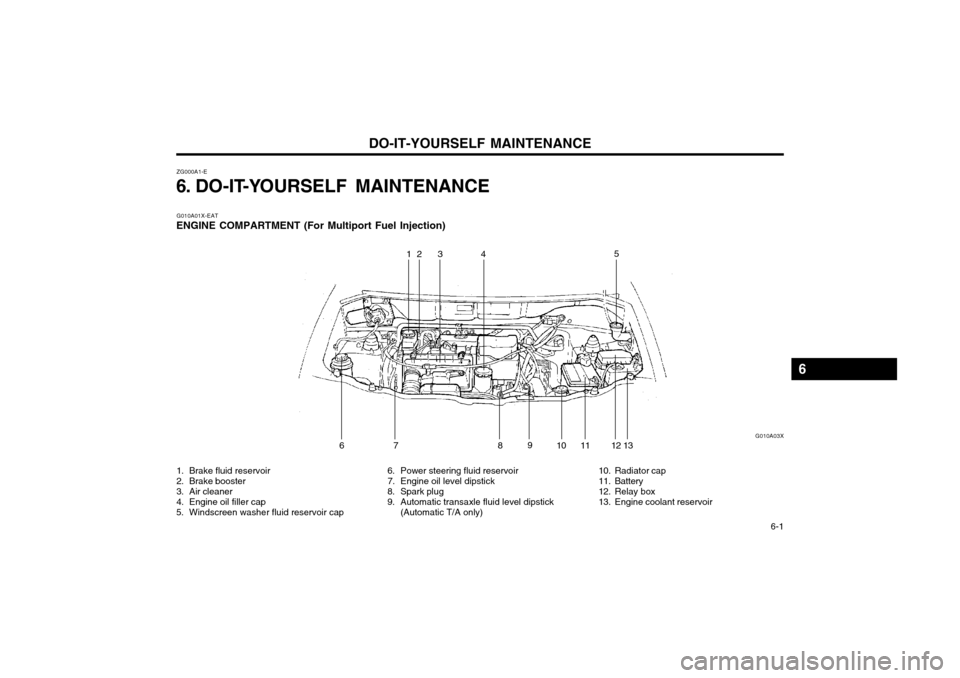
1. Brake fluid reservoir
2. Brake booster
3. Air cleaner
4. Engine oil filler cap
5. Windscreen washer fluid reservoir cap 6. Power steering fluid reservoir
7. Engine oil level dipstick
8. Spark plug
9. Automatic transaxle fluid level dipstick
(Automatic T/A only) 10. Radiator cap
11. Battery
12. Relay box
13. Engine coolant reservoir
G010A01X-EAT
ENGINE COMPARTMENT (For Multiport Fuel Injection)
5
13
129
14
101186 G010A03X
23
7
6
Page 220 of 249
DO-IT-YOURSELF MAINTENANCE
6-2 ZG020B1-E
GENERAL CHECKS Engine Compartment
The following should be checked regularly:
o Engine oil level and condition
o Transaxle fluid level and condition
o Brake reservoir fluid level
o Engine coolant level
o Windscreen washer fluid level
o Accessory drive belt condition
o Coolant hose condition
o Fluid leaks (on or below components)
o Power steering fluid level
o Tyre pressure and condition (including spare)
o Battery condition ZG020C1-A
Vehicle Exterior
The following should be checked monthly:
o Overall appearance and condition
o Wheel condition and wheel nut tightness
o Exhaust system condition
o Light condition and operation
o Windscreen glass condition
o Wiper blade condition
o Paint condition and corrosion
o Fluid leaks
o Door and hood lock condition o Air filter element condition G020C02X-GAT
Vehicle Interior
The following should be checked each time
when the vehicle is driven:
o Lights operation
o Windscreen wipers operation
o Horn operation
o Defroster, heating system operation (and air conditioning, if installed)
o Steering operation and condition
o Mirror condition and operation
o Turn signal operation
o Accelerator pedal operation
o Brake operation, including parking brake
o Manual transaxle operation, including clutch operation
o Automatic transaxle operation, including "Park" mechanism operation
o Seat control condition and operation
o Seat belt condition and operation
o Sunvisor operation
If you notice anything that does not operate
correctly or appear to be functioning correctly, inspect it carefully and seek assistance fromyour Hyundai dealer if service is needed. ZG030A1-A
CHECKING THE ENGINE OIL
Engine oil is essential to the performance andservice of the engine. It is suggested that youcheck the oil level at least once a week innormal use and more often if you are on a tripor driving in severe conditions. ZG030B1-E
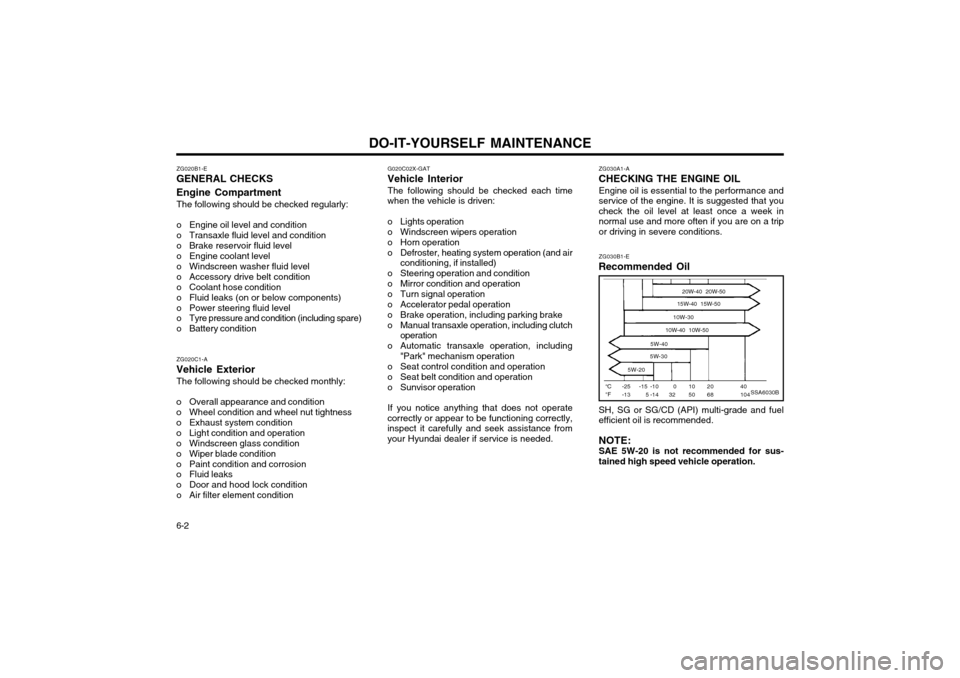
Recommended Oil
SSA6030B°C °F -25-13 20W-40 20W-50
15W-40 15W-50
10W-30
10W-40 10W-50
5W-40
5W-30
5W-20
40104
2068
1050
032
-15 5 -10-14
SH, SG or SG/CD (API) multi-grade and fuel efficient oil is recommended. NOTE: SAE 5W-20 is not recommended for sus-tained high speed vehicle operation.
Page 222 of 249
DO-IT-YOURSELF MAINTENANCE
6-4 G040A01X-GAT
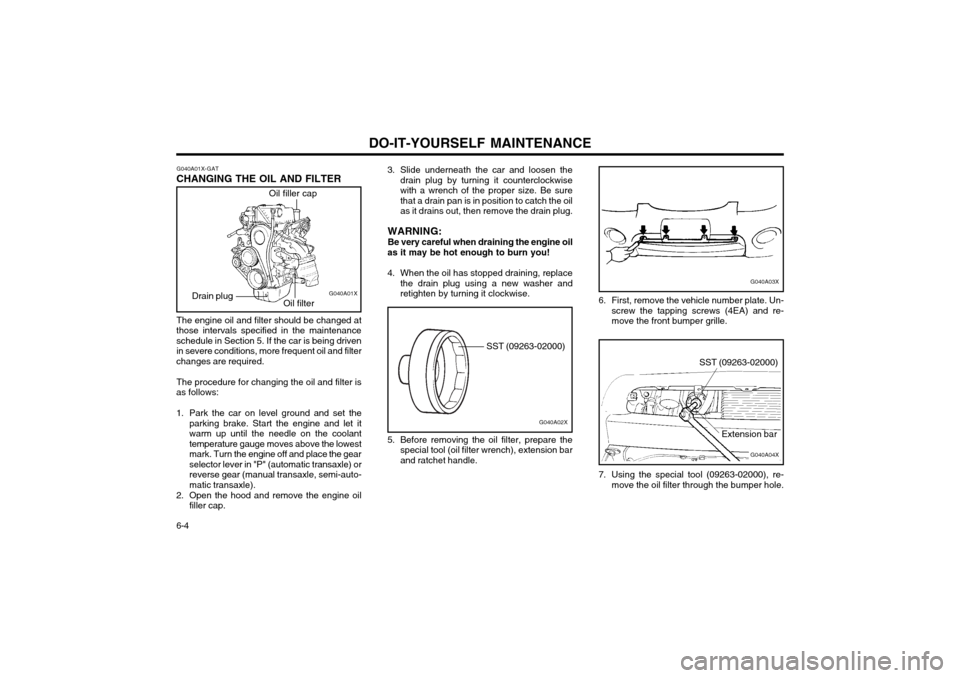
CHANGING THE OIL AND FILTER
Oil filler cap
Oil filter G040A01X
Drain plug
The engine oil and filter should be changed at
those intervals specified in the maintenance schedule in Section 5. If the car is being driven in severe conditions, more frequent oil and filter
changes are required.
The procedure for changing the oil and filter is
as follows:
1. Park the car on level ground and set the parking brake. Start the engine and let it warm up until the needle on the coolanttemperature gauge moves above the lowest
mark. Turn the engine off and place the gearselector lever in "P" (automatic transaxle) orreverse gear (manual transaxle, semi-auto-matic transaxle).
2. Open the hood and remove the engine oil filler cap. 3. Slide underneath the car and loosen the
drain plug by turning it counterclockwisewith a wrench of the proper size. Be sure
that a drain pan is in position to catch the oilas it drains out, then remove the drain plug.
WARNING: Be very careful when draining the engine oil
as it may be hot enough to burn you!
4. When the oil has stopped draining, replace the drain plug using a new washer and retighten by turning it clockwise.
G040A03X
6. First, remove the vehicle number plate. Un- screw the tapping screws (4EA) and re- move the front bumper grille.
G040A04X
SST (09263-02000)
Extension bar
7. Using the special tool (09263-02000), re- move the oil filter through the bumper hole.
G040A02X
SST (09263-02000)
5. Before removing the oil filter, prepare the special tool (oil filter wrench), extension bar and ratchet handle.
Page 223 of 249
DO-IT-YOURSELF MAINTENANCE 6-5
G040A05XNOTE: Always dispose of used engine oil in an
environmentally acceptable manner. It is suggested that it be placed in a sealed con-tainer and taken to a service station forreclamation. Do not pour the oil on theground or put it into the household trash.
WARNING: Used motor oil may cause irritation or can-
cer of the skin if left in contact with the skin for prolonged periods of time. Wash yourhands thoroughly with soap and warm wa-ter as soon as possible after handling usedoil.
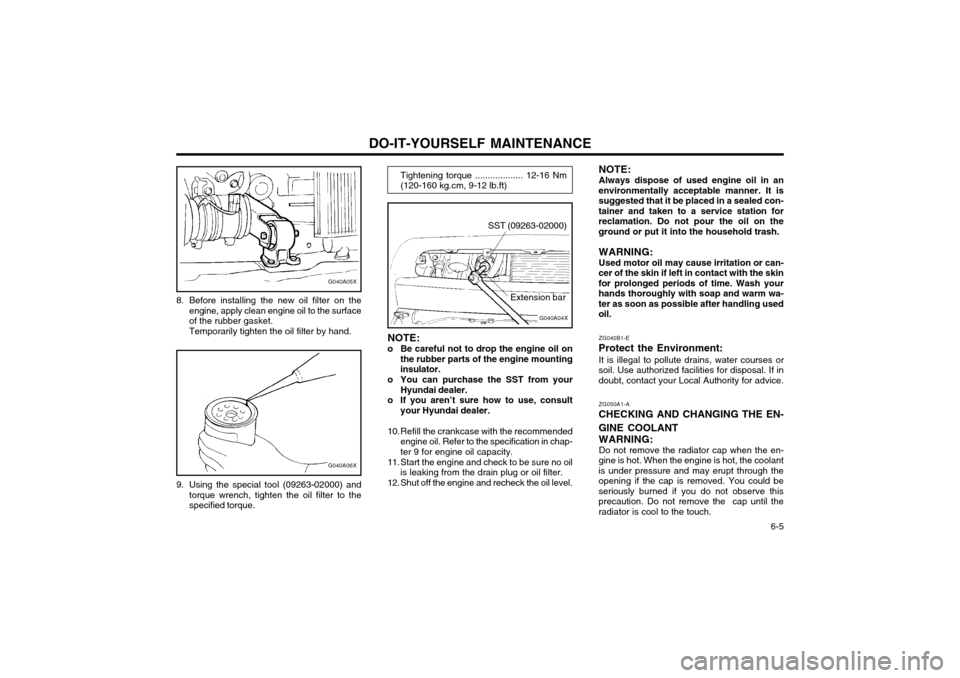
8. Before installing the new oil filter on the
engine, apply clean engine oil to the surfaceof the rubber gasket.Temporarily tighten the oil filter by hand.
G040A06X
9. Using the special tool (09263-02000) andtorque wrench, tighten the oil filter to the specified torque.
Tightening torque ................... 12-16 Nm (120-160 kg.cm, 9-12 lb.ft)
G040A04X
SST (09263-02000)
Extension bar
NOTE:
o Be careful not to drop the engine oil on the rubber parts of the engine mounting insulator.
o You can purchase the SST from your Hyundai dealer.
o If you aren’t sure how to use, consult your Hyundai dealer.
10. Refill the crankcase with the recommended engine oil. Refer to the specification in chap-ter 9 for engine oil capacity.
11. Start the engine and check to be sure no oil is leaking from the drain plug or oil filter.
12. Shut off the engine and recheck the oil level. ZG040B1-E
Protect the Environment: It is illegal to pollute drains, water courses or
soil. Use authorized facilities for disposal. If indoubt, contact your Local Authority for advice.
ZG050A1-A
CHECKING AND CHANGING THE EN- GINE COOLANT
WARNING: Do not remove the radiator cap when the en-
gine is hot. When the engine is hot, the coolant is under pressure and may erupt through theopening if the cap is removed. You could beseriously burned if you do not observe thisprecaution. Do not remove the cap until theradiator is cool to the touch.
Page 224 of 249
DO-IT-YOURSELF MAINTENANCE
6-6 ZG050B1-A
Recommended Coolant
G050B01A
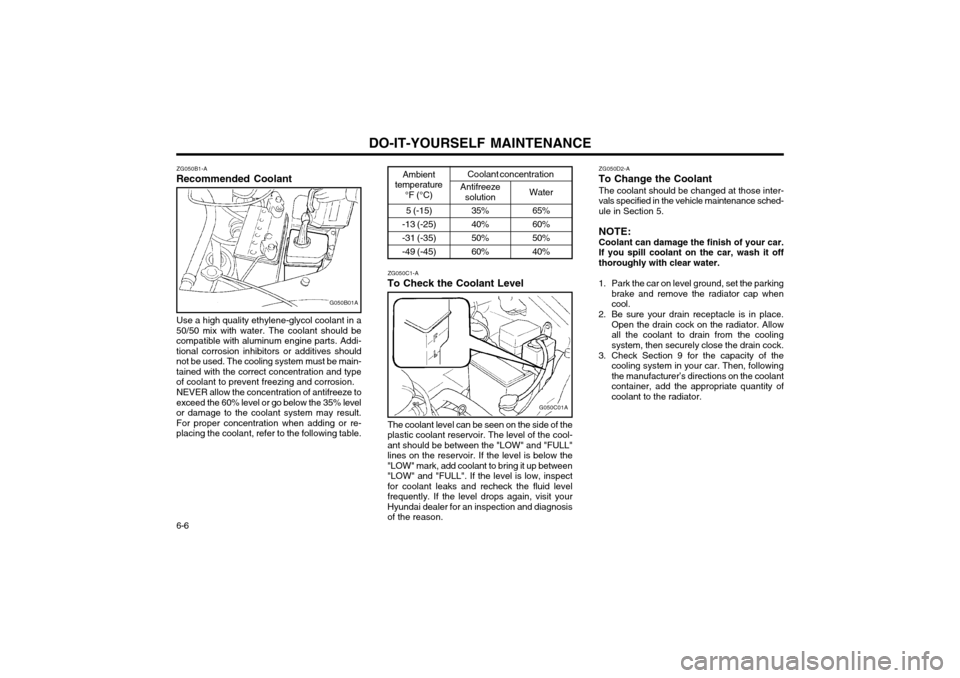
Use a high quality ethylene-glycol coolant in a
50/50 mix with water. The coolant should be compatible with aluminum engine parts. Addi-tional corrosion inhibitors or additives shouldnot be used. The cooling system must be main-tained with the correct concentration and typeof coolant to prevent freezing and corrosion.
NEVER allow the concentration of antifreeze to
exceed the 60% level or go below the 35% levelor damage to the coolant system may result.For proper concentration when adding or re-placing the coolant, refer to the following table.
Coolant concentration
ZG050C1-A
To Check the Coolant Level
G050C01A
The coolant level can be seen on the side of the
plastic coolant reservoir. The level of the cool- ant should be between the "LOW" and "FULL"lines on the reservoir. If the level is below the"LOW" mark, add coolant to bring it up between"LOW" and "FULL". If the level is low, inspectfor coolant leaks and recheck the fluid levelfrequently. If the level drops again, visit yourHyundai dealer for an inspection and diagnosisof the reason. ZG050D2-A
To Change the Coolant
The coolant should be changed at those inter-vals specified in the vehicle maintenance sched-ule in Section 5. NOTE: Coolant can damage the finish of your car. If you spill coolant on the car, wash it offthoroughly with clear water.
1. Park the car on level ground, set the parking brake and remove the radiator cap whencool.
2. Be sure your drain receptacle is in place. Open the drain cock on the radiator. Allowall the coolant to drain from the coolingsystem, then securely close the drain cock.
3. Check Section 9 for the capacity of the cooling system in your car. Then, followingthe manufacturer’s directions on the coolantcontainer, add the appropriate quantity ofcoolant to the radiator.
Water
Antifreeze
solution
35% 40%50%60%
Ambient
temperature °F (°C)
5 (-15)
-13 (-25)-31 (-35)-49 (-45) 65%60%50%40%
Page 225 of 249

DO-IT-YOURSELF MAINTENANCE 6-7
G050D02XG050B01A
4. Turn the radiator cap counterclockwise with- out pressing down on it, until it stops. This relieves any pressure remaining in the cool-ing system. And remove the radiator cap bypushing down and turning counterclockwise. Now fill the radiator with clean demineral- ized or distilled water. Continue to add cleandemineralized or distilled water in small quan-tities until the fluid level stays up in theradiator neck. 5. Start the engine, top off the radiator with
water and then add engine coolant to thereservoir until the level is between "LOW"and "FULL".
6. Replace the radiator and reservoir caps and check to be sure the drain cocks are fullyclosed and not leaking.
WARNING: The cooling fan is controlled by engine cool-
ant temperature and may sometimes oper- ate even when the engine is not running.Use extreme caution when working near theblades of the cooling fan so that you are notinjured by a rotating fan blade. As the en-gine coolant temperature decreases, the fanwill automatically shut off. This is a normalcondition. AG060B1-E
SPARK PLUG REPLACEMENT
This operation should only be performed when
the engine is cold.
1. Remove plug lead from the spark plug to be replaced, pulling the lead by the rubber cap. (Pulling the lead may damage the carbonconductor).
2. Clean around the base of the plug to be removed, and install the plug socket ensur-ing that the ceramic insulator does not be-come damaged. Turn the socket anti-clock-wise to remove the plug.
G060C01A
NOTE: Spark plugs must only be cleaned using
purpose designed equipment. Wire brush-ing may damage the centre electrode insula-tor causing mis-firing to occur.