Page 105 of 399
�µ
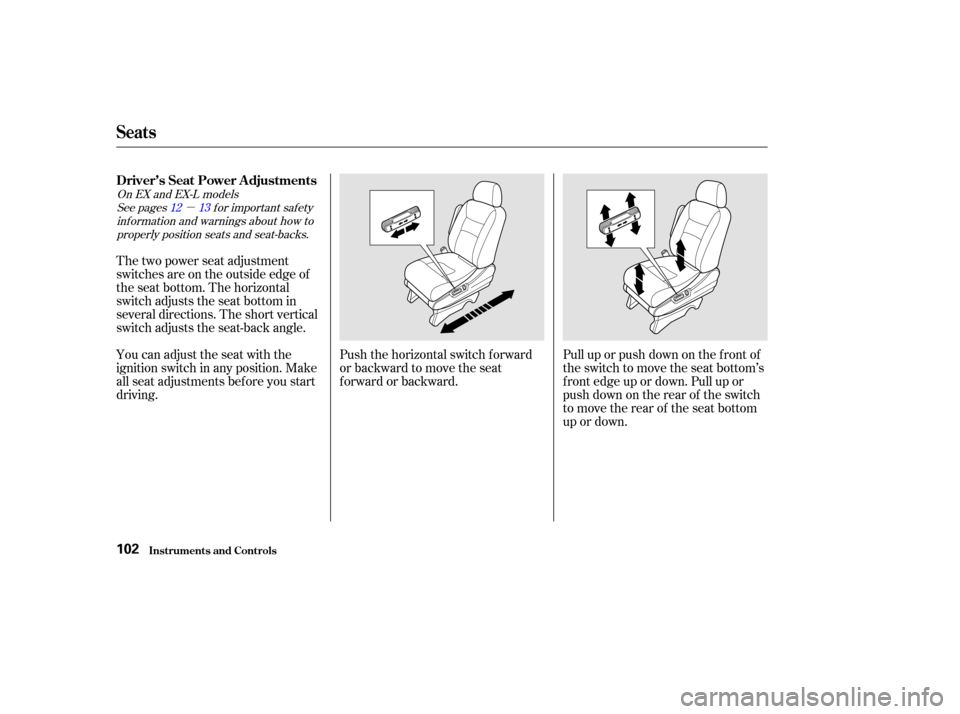
Pull up or push down on the f ront of
the switch to move the seat bottom’s
f ront edge up or down. Pull up or
push down on the rear of the switch
to move the rear of the seat bottom
up or down.
Push the horizontal switch forward
or backward to move the seat
forward or backward.
The two power seat adjustment
switches are on the outside edge of
the seat bottom. The horizontal
switch adjusts the seat bottom in
several directions. The short vertical
switch adjusts the seat-back angle.
You can adjust the seat with the
ignition switch in any position. Make
all seat adjustments bef ore you start
driving.
See pages f or important saf ety
inf ormation and warnings about how toproperly position seats and seat-backs. 12 13
On EX and EX-L models
Inst rument s and Cont rols
Driver’s Seat Power A djustments
Seats
102
Page 115 of 399

The HI or LO indicator lights and
remains lit until you turn it of f by
pushing the opposite side of the
switch lightly. The indicator will turn
off.
In HI, the heater turns of f when the
seat gets warm, and turns back on
after the seat’s temperature drops. It
continues to cycle as long as you
leave it set on HI. The HI indicator
remains lit as a reminder that you
have the heater on.
In LO, the heater runs continuously.
It does not cycle with temperature
changes.Do not use the seat heaters, even
on the LO setting, if the engine is
lef t idling f or an extended period.
They can weaken the battery,
causing hard starting. Use the HI setting only to heat the
seats quickly. Select the LO
setting when the seats f eel warm.
The HI setting draws large
amounts of current f rom the
battery.
Follow these precautions whenever
you use the seat heaters:
Because of the sensors f or the side
airbag system, there is no heater in
the passenger’s seat-back.
Both f ront seats are equipped with
seat heaters. The ignition switch
must be ON (II) to use them.The
seat heater switch is located on each
f ront door. Push the f ront of the
switch, HI, to rapidly heat up the seat.
After the seat reaches a comfortable
temperature, select LO by pushing
the back of the switch. This will keep
the seat warm.
On EX-L model
Seat Heaters
Inst rument s and Cont rols112
Page 116 of 399
Your vehicle’s f ront windows are
electrically-powered. Turn the
ignition switch to ON (II) to raise or
lower either window.
Therearwindowsarealso
electrically-powered (see page ).Each f ront door has a switch that
controls its window. To open the
window, push the switch down and
hold it. Release the switch when you
want the window to stop. Close the
window by pulling back on the
switch and holding it.The driver’s door armrest has a
master power window control panel.
To open the f ront passenger’s
window, push down on the switch
and hold it down until the window
reaches the desired position. To
close the window, pull back on the
window switch. Release the switch
when the window gets to the position
you want.
115
CONT INUED
Power Windows
Inst rument s and Cont rols113
D D
R
RIIVV E
ER
R’ ’SS W
WI INND DO
OW W
S
SW WI ITT C
CH H M
M
A
AI
INN S
SWWI ITT C
CH H
Page 118 of 399
Youcanopenorcloseeachrear
window with the switches on the
driver’s door armrest. The right
switch controls the passenger’s side
rear window and the lef t switch
controls the driver’s side window. To
open the window, push the switch
downandholdit.Releasetheswitch
when you want the window to stop.
Close the window by pulling back on
the switch and holding it.
The power window system has a key-
of f delay f unction. The windows will
stilloperateforuptotenminutes
after you turn off the ignition.
Opening either f ront door cancels
the delay function. You must turn
the ignition switch ON (II) again
bef ore you can operate the windows.
Power Windows
Inst rument s and Cont rols115
R RE
EA
A R
R W
WI INND DO
OW W S
SWWI ITT C
CH H E
ES
S
Page 119 of 399
Turn the ignition switch ON (II).
Move the selector switch to L
(driver’s side) or R (passenger’s
side).Push the appropriate edge of the
adjustment switch to move the
mirrorright,left,up,ordown.
When you f inish, move the
selector switch to the center (off)
position. This turns of f the
adjustment switch so you can’t
move a mirror out of position by
accidentally bumping the switch.
Keeptheinsideandoutsidemirrors
clean and adjusted f or best visibility.
Be sure to adjust the mirrors bef ore
you start driving.
The inside mirror has day and night
positions. The night position reduces
glare f rom headlights behind you.
Flip the tab on the bottom edge of
the mirror to select the day or night
position.
Adjust the outside mirrors with the
adjustment switch on the lef t side of
the dashboard:
1.
2.
3.
4.
Adjusting the Power Mirrors
Mirrors
Inst rument s and Cont rols116
T T
A
A B
B S
SE
EL
LEE C
CT TO
OR R S
SWWI ITT C
CH H
A
AD
DJ
JUUS STTM
M E
EN
NT T S
SWWI ITT C
CH H
Page 120 of 399
Canadian Models
The outside mirrors are heated to re-
move fog and frost. With the ignition
switchON(II),turnontheheaters
by pressing the button. The light in
the button comes on as a reminder.
Press the button again to turn the
heaters off.To apply the parking brake, push the
parking brake pedal down with your
f oot. To release the parking brake,
push on the pedal again. The parking
brake light on the instrument panel
should go out when the parking
brake is f ully released with the
engine running. (see page .)
64
Parking Brake
Mirrors, Parking Brake
Inst rument s and Cont rols117
H H
E
EA
A T
TE
ED
D M
MI
IRRR ROOR R B
BUUT TT
TO
ON N
P
PA
A R
RKKIINNG G B
BRRAA K
KEE P
PE
ED
D A
AL
L
Driving the vehicle with the parking
brake applied can damage the rear
brakes and axles.
Page 121 of 399
Press and hold the H button until
the hour advances to the desired
time.
You can use R to quickly set the time
to the nearest hour. If the displayed
time is before the half hour, pressing
Rsetstheclockbacktotheprevious
hour. If the displayed time is af ter
the half hour, pressing R sets the
clock f orward to the beginning of the
next hour.
For example: 1:06 would RESET to 1:00.
1:52 would RESET to 2:00. To use the center table, pull up the
outside edge of the table until it
latches. To store it, pull the lever and
lower the table.
Press and hold the M button until
the numbers advance to the
desired time.
To set the clock: Turn the ignition switch ON (II) to
display the time. 2.
3.
1.
On models without navigation system
Digital Clock Center Table
Digital Clock, Center Table
Inst rument s and Cont rols118
H HM
M R
R
Page 129 of 399
Your vehicle has two accessory
power sockets. The f ront accessory
power socket is located under the
center pocket. The rear socket is
behind the third seat on the driver’s
side.To use an accessory power socket,
pull out on the cover.
These sockets are intended to supply
power f or 12 volt DC accessories
that are rated 120 watts or less (10
amps). The ignition switch must be
in ACCESSORY (I) or ON (II).
When both sockets are being used,
the combined power rating of both
accessories should be 120 watts or
less (10 amps).The sockets will not power an
automotive type cigarette lighter
element.
Inst rument s and Cont rols
A ccessory Power Socket s
126
F FR
RO ON NTT R
RE
EA
A R
R
 to raise or
lower either window.
Therearwindowsarealso
electrically-powered (see page ).Each f ront door h")

.
Move the selector switch to L
(driver’s side) or R (passenger’s
side).Push the appropriate edge of the
adjustment switch to move the
mirrorright,left,up,ordown.
W")
,turnontheheaters
by pressing the button. The light in
the button comes on as a reminder.
Press")

