Page 142 of 264

BRAKES
Your service brakes are self-adjusting. Refer to the
scheduled maintenance guide for scheduled
maintenance.
Occasional brake noise is normal and often does not
indicate a performance concern with the vehicle's
brake system. In normal operation, automotive brake
systems may emit occasional or intermittent squeal
or groan noises when the brakes are applied. Such
noises are usually heard during the first few brake
applications in the morning; however, they may be
heard at any time while braking and can be
aggravated by environmental conditions such as
cold, heat, moisture, road dust, salt or mud. If a
ªmetal-to-metal,º ªcontinuous grindingº or
ªcontinuous squealº sound is present while braking,
the brake linings may be worn-out and should be
inspected by a qualified service technician.
If you are driving down a long or steep hill,
shift to a lower gear. Do not apply your
brakes continuously, as they may overheat and
become less effective.
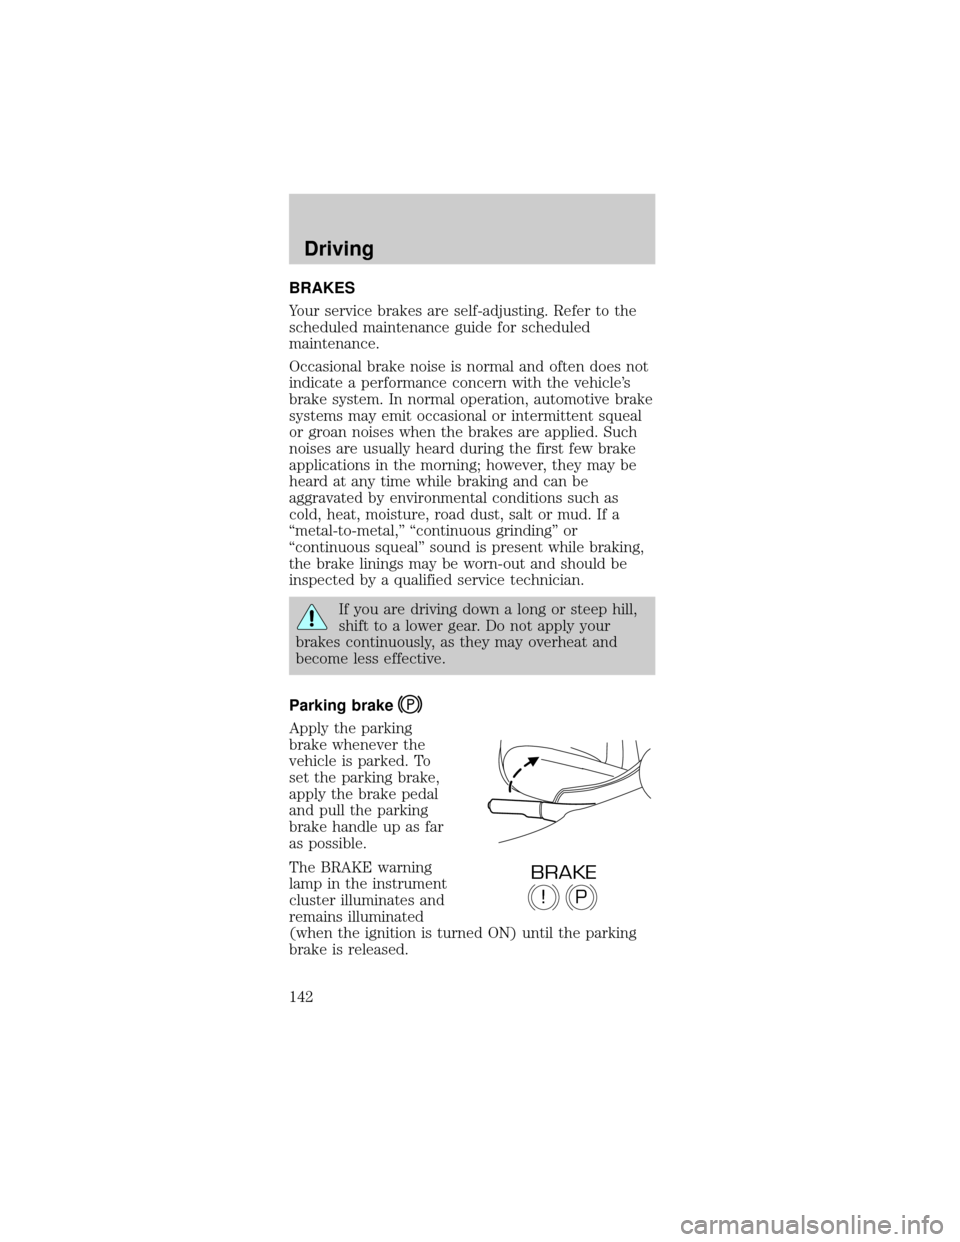
Parking brake
Apply the parking
brake whenever the
vehicle is parked. To
set the parking brake,
apply the brake pedal
and pull the parking
brake handle up as far
as possible.
The BRAKE warning
lamp in the instrument
cluster illuminates and
remains illuminated
(when the ignition is turned ON) until the parking
brake is released.
P!
BRAKE
Driving
142
Page 144 of 264

The ABS operates by
detecting the onset of
wheel lockup during
brake applications and
compensates for this
tendency. The wheels
are prevented from
locking even when the brakes are firmly applied. The
accompanying illustration depicts the advantage of
an ABS equipped vehicle (on bottom) to a non-ABS
equipped vehicle (on top) during hard braking with
loss of front braking traction.
ABS warning lamp
ABS
TheABSwarning lamp in the instrument cluster
momentarily illuminates when the ignition is turned
to the ON position. If the light does not illuminate
momentarily at start up, remains on or continues to
flash, the ABS needs to be serviced.
With the ABS light on,
the anti-lock brake
system is disabled and
normal braking is still
effective unless the brake warning light also remains
illuminated with parking brake released. (If your
brake warning lamp illuminates, have your vehicle
serviced immediately.)
Using ABS
²In an emergency or when maximum efficiency
from the four-wheel ABS is required, apply
continuous force on the brake. The four wheel
ABS will be activated immediately, thus allowing
you to retain full steering control of your vehicle
and, providing there is sufficient space, will
enable you to avoid obstacles and bring the
vehicle to a controlled stop.
²The anti-lock system does not decrease the time
necessary to apply the brakes or always reduce
P!
BRAKE
Driving
144
Page 152 of 264
(Overdrive) can be
deactivated by pressing
the transmission
control switch on the
gearshift lever.
The transmission
control indicator light
(TCIL) will illuminate
on the instrument
cluster.
Drive± Not shown on the display. Activate by
pressing the transmission control switch on the
gearshift lever with the gearshift in the
position.
The O/D OFF indicator will illuminate on the
instrument cluster. Transmission operates in gears
one through three.
(Drive) provides more engine
braking than
(Overdrive) and is useful when:
²driving with a heavy load.
²towing a trailer up or down steep hills.
²additional engine braking is desired. If towing a
trailer, refer toDriving while you towin this
chapter.
O/ D
OFF
Driving
152
Page 166 of 264
Passenger compartment fuse panel
The fuse panel is located below and to the left of
the steering wheel by the brake pedal. Remove the
panel cover to access the fuses.
To remove a fuse use the fuse puller tool provided
on the fuse panel cover.
The fuses are coded as follows:
Fuse/Relay
LocationFuse Amp
RatingPassenger Compartment
Fuse Panel Description
1 20A Cigar lighter
2 20A Engine controls
3 Ð Not used
4 10A RH low beam headlamp
5 15A Instrument cluster, Traction
control switch
6 20A Starter motor relay
7 15A GEM, Interior lamps
8 20A Engine controls
9 30A Mach 460 subwoofers
10 10A LH low beam headlamp
11 15A Back-up lamps
SEE OWNERS MANUAL FOR FUSE INFO
4212345
76891011
131214151617
191820212223
252426272829
313032333435
373638394041
43
44
Roadside Emergencies
166
Page 167 of 264
Fuse/Relay
LocationFuse Amp
RatingPassenger Compartment
Fuse Panel Description
12 Ð Not used
13 15A Electronic flasher
14 Ð Not used
15 15A Power lumbar
16 Ð Not used
17 15A Speed control servo, Shift
lock actuator
18 15A Electronic flasher
19 15A Power mirror switch, GEM,
Anti-theft relay, Power door
locks, Door ajar switches
20 15A Convertible top switch
21 5A Instrument cluster and
Engine control memory
22 Ð Not used
23 15A A/C clutch, Defogger switch
24 30A Climate control blower
motor
25 25A Luggage compartment lid
release
26 30A Wiper/Washer motor, Wiper
relays
27 20A Radio
28 15A GEM, Overdrive cancel
switch
29 15A ABS module
30 15A DRL module
31 10A Data link connector
32 15A Radio, GEM
33 15A Stop lamp switch, Speed
control deactivation switch
34 20A Instrument Ccuster, CCRM,
Data link connector,
Securilock transceiver
module
Roadside Emergencies
167
Page 169 of 264
The high-current fuses are coded as follows.
Fuse/Relay
LocationFuse Amp
RatingPower Distribution Box
Description
Relay 1 Ð Fog lamp interrupt
Relay 2 Ð Int. wiper
Relay 3 Ð Wiper HI/LO
Relay 4 Ð Starter
Relay 5 Ð Fog lamps
1 50A** (4.6L),
30A CB
(3.8L)Electric cooling fan motor
2 30A** Headlamps
3 40A** Starter motor relay, Ignition
switch
4 40A** Ignition switch
5 40A** Ignition switch
6 40A** Instrument cluster, PCM
7 30A** Secondary air injection
(3.8L only)
8 50A** ABS module
9 20A** Auxiliary power point
10 30A** Parklamps
5
RELAY4
RELAY3
RELAY2
RELAY1
RELAY
12
MAXI
29
DIODE28
CB27
MAXI26
MAXI25
MAXI23
MINI
24
MINI
21
MINI
22
MINI
19
MINI17
MINI18
MINI15
MINI13
MINI
14
MINI16
MINI20
MINI
11
MAXI10
MAXI9
MAXI8
MAXI7
MAXI6
MAXI5
MAXI4
MAXI3
MAXI2
MAXI1
MAXI
SEE OWNERS MANUAL CONSULTER LA GUIDE
Roadside Emergencies
169
Page 198 of 264

Do not use chemical solvents or strong
detergents when cleaning the steering wheel
or instrument panel to avoid contamination of the
air bag system.
Cleaning the instrument cluster lens
Wipe the cluster area with a soft, damp cotton towel.
Dry the area with a clean, dry towel.
CLEANING THE INTERIOR FABRIC, CARPETS
AND CLOTH SEATS
Remove dust and loose dirt with a vacuum cleaner.
Remove light stains and soil with Extra Strength
Upholstery Cleaner (E8AZ-19523±AA).
Never saturate the seat covers with cleaning
solution.
Do not use household cleaning products or
glass cleaners, which can stain and discolor the
fabric and affect the flame retardent abilities
of the seat materials.
If grease or tar is present on the material, spot-clean
the area first with Spot and Stain Remover
(F3AZ-19521±WA). Follow up by recleaning the area
with Extra Strength Upholstery Cleaner
(E8AZ-19523±AA).
CLEANING LEATHER SEATS (IF EQUIPPED)
All Ford, Lincoln and Mercury vehicles with leather
seating surfaces have a clear, protective coating over
the leather.
To clean the leather seats, simply use a soft cloth
with Deluxe Leather and Vinyl Cleaner
(F2AZ-19521±WA). Dry the area with a soft cloth.
It is recommended that you use the Deluxe Leather
Care Kit (F8AZ-19G253±AA), available from your
authorized Ford, Lincoln or Mercury dealer. The
mild cleaner and special pad available in the kit
cleans the leather and maintains its natural beauty.
Cleaning
198
Page 227 of 264

If you have run out of fuel:
²You may need to cycle the ignition from OFF to
ON several times after refueling, to allow the fuel
system to pump the fuel from the tank to the
engine.
²Your ªService Engine Soonº indicator may come
on. For more information on the ªService Engine
Soonº indicator, refer to theInstrument Cluster
chapter.
Fuel Filter
For fuel filter replacement, see your dealer or a
qualified service technician. Refer to the scheduled
maintenance guide for the appropriate intervals for
changing the fuel filter.
Replace the fuel filter with an authorized
Motorcraft part. The customer warranty may
be void for any damage to the fuel system if an
authorized Motorcraft fuel filter is not used.
ESSENTIALS OF GOOD FUEL ECONOMY
Measuring techniques
Your best source of information about actual fuel
economy is you, the driver. You must gather
information as accurately and consistently as
possible. Fuel expense, frequency of fillups or fuel
gauge readings are NOT accurate as a measure of
fuel economy. We do not recommend taking fuel
economy measurements during the first 1 600 km
(1 000 miles) of driving (engine break-in period).
You will get a more accurate measurement after
3 000 km±5 000 km (2 000 miles-3 000 miles).
Filling the tank
The advertised fuel capacity of the fuel tank on your
vehicle is equal to the rated refill capacity of the fuel
tank as listed in theRefill capacitiessection of this
chapter.
Maintenance and Specifications
227