Page 49 of 264
POWER SIDE VIEW MIRRORS (IF EQUIPPED)
To adjust your mirrors
1. SelectLto adjust the left mirror
orRto adjust the right mirror.
2. Move the control in the direction
you wish to tilt the mirror.
3. Return to the center position to
disable the adjust function.
Fold-away mirrors
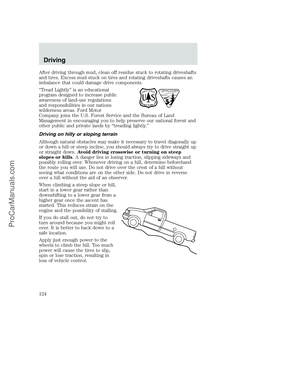
Fold the side mirrors in carefully when driving through a narrow space,
like an automatic car wash.
The telescoping feature (if equipped) allows the mirror to extend
approximately 76 mm (3 inches).
POWER ADJUSTABLE FOOT PEDALS (IF EQUIPPED)
The accelerator and brake pedal
should only be adjusted when the
vehicle is stopped and the gearshift
lever is in the P(Park) position.
Press and hold the rocker control to
adjust accelerator and brake pedal
toward you or away from you.
The adjustment allows for approximately 76 mm (3 inches) of maximum
travel.
Driver Controls
49
ProCarManuals.com
Page 50 of 264

Never adjust the accelerator and brake pedal with feet on pedals
or while the vehicle is moving.
SPEED CONTROL (IF EQUIPPED)
With speed control set, you can maintain a speed of 48 km/h (30 mph)
or more without keeping your foot on the pedal. Speed control does not
work at speeds below 48 km/h (30 mph).
Do not use the speed control in heavy traffic or on roads that
are winding, slippery or unpaved.
Setting speed control
The controls for using your speed
control are located on the steering
wheel for your convenience.
1. Press the ON control and release
it.
2. Accelerate to the desired speed.
3. Press the SET ACCEL control
and release it.
4. Take your foot off the accelerator
pedal.
5. The indicator light on the
instrument cluster will turn on.
Note:
•Vehicle speed may vary momentarily when driving up and down a
steep hill.
•If the vehicle speed increases above the set speed on a downhill, you
may want to apply the brakes to reduce the speed.
•If the vehicle speed decreases more than 16 km/h (10 mph) below
your set speed on an uphill, your speed control will disengage.
R
E
S
S
E
T
A
C
C
E
L
COAST
Driver Controls
50
ProCarManuals.com
Page 51 of 264

Resuming a set speed
Press the RES (resume) control and
release it. This will automatically
return the vehicle to the previously
set speed. The RES control will not
work if the vehicle speed is not
faster than 48 km/h (30 mph).
Increasing speed while using speed control
There are two ways to set a higher
speed:
•Press and hold the SET ACCEL
control until you get to the
desired speed, then release the
control. You can also use the SET
ACCEL control to operate the
Tap-Up function. Press and
release this control to increase the vehicle set speed in small amounts
by 1.6 km/h (1 mph).
•Use the accelerator pedal to get to the desired speed. When the
vehicle reaches that speed press and release the SET ACCEL control.
Reducing speed while using speed control
There are two ways to reduce a set
speed:
•Press and hold the COAST
control until you get to the
desired speed, then release the
control. You can also use the
COAST control to operate the
Tap-Down function. Press and
release this control to decrease the vehicle set speed in small amounts
by 1.6 km/h (1 mph).
R
E
S
S
E
T
A
C
C
E
L
COAST
R
E
S
S
E
T
A
C
C
E
L
COAST
R
E
S
S
E
T
A
C
C
E
L
COAST
Driver Controls
51
ProCarManuals.com
Page 52 of 264
•Depress the brake pedal until the
desired vehicle speed is reached,
press the SET ACCEL control.
Turning off speed control
There are two ways to turn off the speed control:
•Depress the brake pedal or the clutch pedal (if equipped). This will
not erase your vehicles previously set speed.
•Press the speed control OFF
control.
Note:When you turn off the speed
control or the ignition, your speed
control set speed memory is erased.
Indicator light (if equipped)
This light comes on when either the
SET ACCEL or RES controls are
pressed. The vehicle speed must be
at or above 48 km/h (30 mph). It
turns off when the speed control
OFF control is pressed, the brake or
clutch is applied, or the ignition is turned to the OFF position.
R
E
S
S
E
T
A
C
C
E
L
COAST
Driver Controls
52
ProCarManuals.com
Page 53 of 264
CENTER CONSOLE (IF EQUIPPED)
Your vehicle may be equipped with a variety of console features. These
include:
•Utility compartment with
cassette/CD holder
•Coin holder
•Pen holder
•Writing surface
Use only soft cups in the
cupholder. Hard objects can
injure you in a collision.
•Utility compartment
•Pen holder
•Space for lap-top computer
TRIP COMPUTER (IF EQUIPPED)
The trip computer tells you about the condition of your vehicle through
a constant monitor of vehicle systems. You may select display features on
the trip computer for a display of status.
The appearance of your vehicle’s trip computer may differ depending on
your vehicle’s option package, but the functions are the same.
Driver Controls
53
ProCarManuals.com
Page 54 of 264

The trip computer only operates with the ignition in the ON position.
Trip computer features are as follows:
Selectable features
English/metric display
Press this control to change the trip
computer display between metric
and English units.
Mode control
Each press of the MODE control will
display a different feature as follows:
Average fuel economy.The
display will indicate the vehicle’s
average fuel economy in liters/100
km (or miles/gallon) since the
average fuel economy was last reset.
If you calculate your average fuel
economy by dividing liters of fuel used by 100 kilometers traveled (miles
traveled by gallons used), your figure may be different than displayed for
the following reasons:
•your vehicle was not perfectly level during fill-up
•differences in the automatic shut-off points on the fuel pumps at
service stations
•variations in top-off procedure from one fill-up to another
•rounding of the displayed values to the nearest liter (gallon)
To reset the average fuel economy:
1. Press the MODE control repeatedly until average fuel economy is
displayed (this is the only resettable display).
Driver Controls
54
ProCarManuals.com
Page 55 of 264

2. Press the E/M and MODE
controls simultaneously. The display
will illuminate the “AVG” indicator.
While the indicator is lit, release
both controls to reset the average
fuel economy.
Fuel range.This displays the approximate number of kilometers (miles)
left to drive before the fuel tank is empty. The indicated distance to
empty may be inaccurate:
•with sustained, drastic changes in fuel economy (such as trailer
towing), but will eventually recover.
•if the vehicle is started while parked on an incline.
•if less than 30 liters (8 gallons) of fuel is added to the fuel tank.
The fuel range function will flash for five seconds at the following
distances based on fuel remaining and fuel economy calculations:
•80 km (50 miles)
•40 km (25 miles)
•16 km (10 miles)
Outside air temperature
The temperature can be displayed in
Centigrade or Fahrenheit by
pressing the E/M control.
If the outside temperature falls
below 3°C (38°F), the display will
alternate from “ICE” to the outside
temperature at a two second rate
for one minute.
Off.In this mode the display is off.
Compass
The compass display is contained in the overhead console. The vehicle
heading is displayed as one of N, NE, E, SE, S, SW, W and NW.
The compass heading is displayed in average fuel economy modes, fuel
range modes and temperature modes.
The compass reading may be affected when you drive near large
buildings, bridges, power lines and powerful broadcast antennas.
Driver Controls
55
ProCarManuals.com
Page 56 of 264

Magnetic or metallic objects placed in or on the vehicle may also affect
compass accuracy. Adjustments may need to be made to the zone and
calibration of the compass.
Compass zone adjustment
1. Determine which magnetic zone
you are in for your geographic
location by referring to the zone
map.
2. Locate the trip computer on the
overhead console.
3. Turn ignition to the ON position.
4. Press and hold both trip
computer controls. After
approximately four seconds, the trip
computer will enter zone setting
mode. Zone setting mode is
indicated when the display lights the
“ZONE” indicator.
5. Release both controls.
Subsequent pressing of either control will increment the zone. Press the
control repeatedly until the correct zone setting for your geographic
location is displayed on the trip computer.
6. To exit the zone setting mode and save the displayed zone in memory,
release both controls for greater than five seconds.
Compass calibration adjustment
Perform this adjustment in an open area free from steel structures and
high voltage lines.
For optimum calibration, turn off all electrical accessories (heater/air
conditioning, wipers, etc.) and make sure all vehicle doors are shut.
1. Locate the trip computer located in the overhead console.
2. Start the vehicle.
1 2 3
4
5
6 7 8 9 101112 13 14 15
Driver Controls
56
ProCarManuals.com