Page 51 of 200
Reducing speed while using speed control
There are two ways to reduce a set
speed:
•Press and hold the COAST
control until you get to the
desired speed, then release the
control. You can also use the
COAST control to operate the
Tap-Down function. Press and
release this control to decrease the vehicle set speed in small amounts
by 1.6 km/h (1 mph).
•Depress the brake pedal until the
desired vehicle speed is reached,
press the SET ACC control.
Turning off speed control
There are two ways to turn off the speed control:
•Depress the brake pedal or the clutch pedal (if equipped). This will
not erase your vehicles previously set speed.
•Press the speed control OFF
control.
Note:When you turn off the speed
control or the ignition, your speed
control set speed memory is erased.
MOON ROOF (IF EQUIPPED)
The moon roof control is located on the overhead console.
Do not let children play with the moon roof. They may seriously
hurt themselves.
Driver Controls
51
Page 101 of 200
•Make sure the gearshift is in P
(Park).
If starting a vehicle with a manual
transmission:
1. Make sure the parking brake is
set.
2. Push the clutch pedal to the floor.
•Turn the key to 4 (ON) without
turning the key to 5 (START).
Make sure the corresponding lights illuminate or illuminate briefly. If a
light fails to illuminate, have the vehicle serviced.
•If the driver’s safety belt is fastened, the
light may not illuminate.
1
2
34
5
C12345
6
RPMx1000
ABS
CHECK
ENGINE
EFH
H
H
PRN D 2 1THEFT
SPEED
CONT
4WD
HIGH
4WD
LOW
O/D
OFFL
L
MPH 2060
4080
km/h
00
1
20
160100
140
180
20
DOOR
AJAR
CHECK
GAGE
!
BRAKE
CHECK
FUEL
CAP
Driving
101
Page 109 of 200

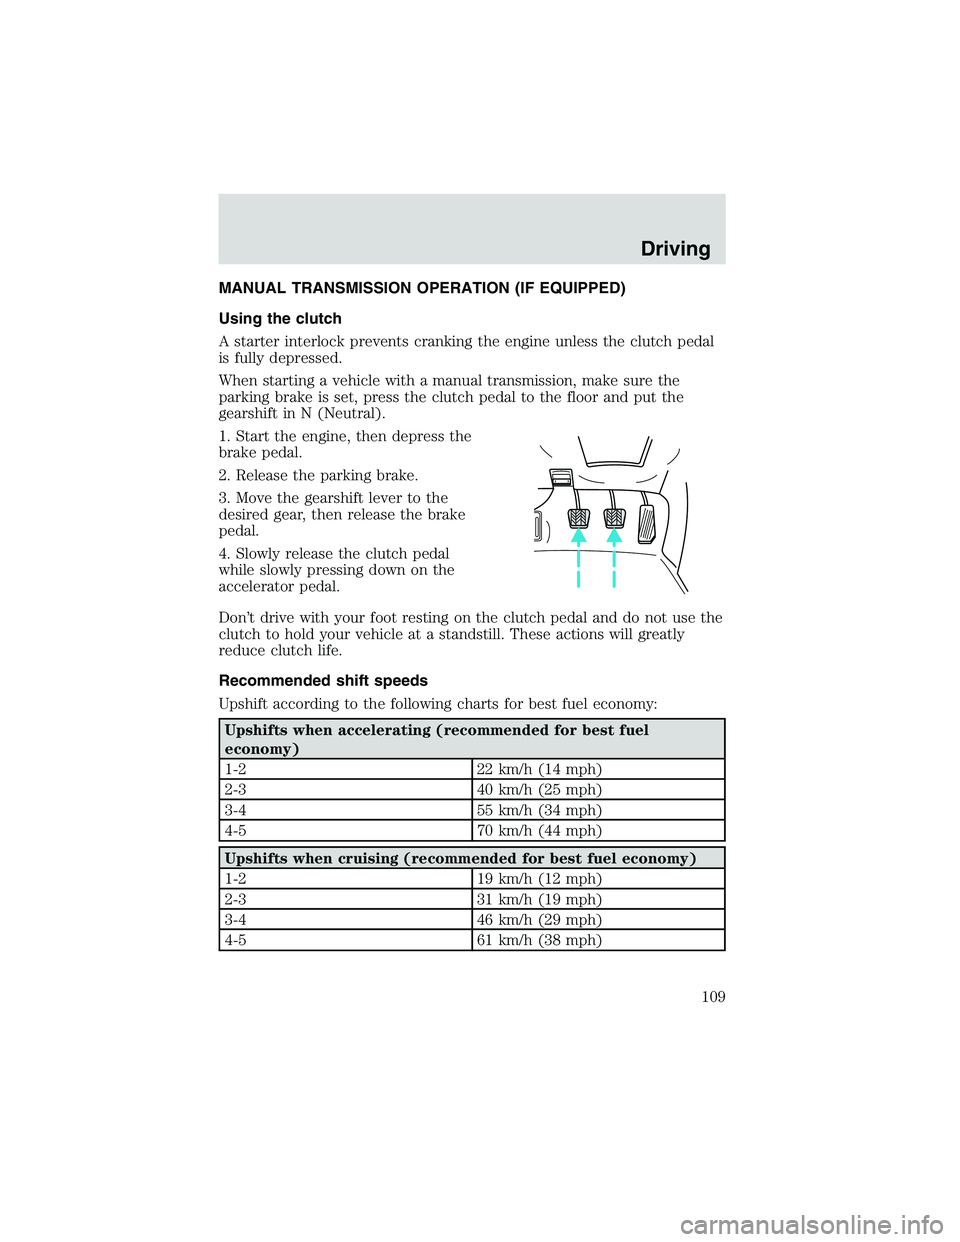
MANUAL TRANSMISSION OPERATION (IF EQUIPPED)
Using the clutch
A starter interlock prevents cranking the engine unless the clutch pedal
is fully depressed.
When starting a vehicle with a manual transmission, make sure the
parking brake is set, press the clutch pedal to the floor and put the
gearshift in N (Neutral).
1. Start the engine, then depress the
brake pedal.
2. Release the parking brake.
3. Move the gearshift lever to the
desired gear, then release the brake
pedal.
4. Slowly release the clutch pedal
while slowly pressing down on the
accelerator pedal.
Don’t drive with your foot resting on the clutch pedal and do not use the
clutch to hold your vehicle at a standstill. These actions will greatly
reduce clutch life.
Recommended shift speeds
Upshift according to the following charts for best fuel economy:
Upshifts when accelerating (recommended for best fuel
economy)
1-2 22 km/h (14 mph)
2-3 40 km/h (25 mph)
3-4 55 km/h (34 mph)
4-5 70 km/h (44 mph)
Upshifts when cruising (recommended for best fuel economy)
1-2 19 km/h (12 mph)
2-3 31 km/h (19 mph)
3-4 46 km/h (29 mph)
4-5 61 km/h (38 mph)
Driving
109
Page 110 of 200
Reverse
Make sure that your vehicle is at a complete stop before you shift into R
(Reverse). You can shift into R (Reverse) only by moving the gearshift
lever from left of 3 (Third) and 4 (Fourth) gears before you shift into R
(Reverse). This is a special lockout feature that protects the transmission
from accidentally being shifted into R (Reverse) when you downshift
from 5th.
Parking your vehicle
1. Disengage the clutch, apply the
brake and shift into N (Neutral).
2. Set parking brake.
3. Shift into 1 (First).
4. Turn the ignition key to position
3 (OFF).
3
2
1
5
4
Driving
110
Page 112 of 200

vehicle is moving; this is normal and should be no reason for concern.
Refer toShifting to/from 4X4 LOWfor proper operation.
Shifting between 2WD and 4X4 HIGH
•Move the 4WD control between 2WD and 4X4 HIGH at any forward
speed.
Note:Do not perform this operation if the rear wheels are slipping.
Shifting to/from 4X4 LOW
1. Bring the vehicle to a complete stop
2. Depress the brake
3. On vehicles equipped with an automatic transmission, place the
transmission in N (Neutral); on vehicles equipped with a manual
transmission, depress the clutch.
4. Move the 4WD control to the desired position.
•If shifting into 4WD LOW, wait for the 4X4 LOW light in the
instrument cluster to turnonindicating the shift is complete.
•If shifting out of 4WD LOW, wait for the 4X4 LOW light in the
instrument cluster turn turnoffindicating the shift is complete.
Driving off-road with truck and utility vehicles
Basic operating principles
Maintain steering wheel control at all times, especially in rough terrain;
sudden changes in terrain can result in abrupt steering wheel motion. Do
not use 4WD on dry, hard surfaced roads (except models equipped with
Auto 4WD).
If your vehicle goes off the edge of the pavement
Slow down and don’t slam on the brakes. Ease the vehicle back onto the
pavement only after reducing your speed.
Do not turn the steering wheel sharply while returning to the
road as this may cause you to lose control of the vehicle.
It may be safer to stay on the shoulder of the road and slow down before
returning to the pavement.
If your vehicle gets stuck
The vehicle may be rocked out by shifting from forward and reverse
gears, stopping between shifts, in a steady pattern. Press lightly on the
Driving
112
Page 133 of 200
Fuse/Relay
LocationFuse Amp
RatingPower Distribution Box Description
9–Not used
10–Not used
11 50A
Cartridge
fuseIgnition switch
12–Not used
13 20A
Cartridge
fuse4x4 motor
14–Not used
15–Not used
16 40A
Cartridge
fuseBlower motor
17–Not used
18–Not used
19–Not used
20–Not used
21 10A Mini
fusePCM memory
22 15A Mini
fuseHorn
23 20A Mini
fuseFuel pump motor
24 25A Mini
fuseHeadlamps
25 10A Mini
fuseA/C clutch solenoid
26–Not used
27 20A Mini
fuseRear power point
Roadside Emergencies
133
Page 135 of 200

Fuse/Relay
LocationFuse Amp
RatingPower Distribution Box Description
50A–Not used
50B–Fuel pump relay
51–Not used
52–Not used
53–PCM diode
54–PCM relay
55–Blower relay
56A–A/C clutch solenoid
56B–Horn relay
CHANGING A FLAT TIRE
If you get a flat tire while driving:
•do not brake heavily.
•gradually decrease the vehicle’s speed.
•hold the steering wheel firmly.
•slowly move to a safe place on the side of the road.
The use of tire sealants is not recommended and may compromise the
integrity of your tires. The use of tire sealants may also affect your tire
pressure monitoring system (if equipped).
Spare tire information
The spare tire can be used as a spare or a regular tire.
Location of the spare tire and tools
The spare tire and tools for your vehicle are stowed in the following
locations:
Tool Location
Spare tire Under the vehicle, just in front of
the rear bumper
Jack, Jack handle, jack handle
extension, wheel lug nut wrenchIn the passenger side rear cab
compartment behind the access
door in trim panel
Roadside Emergencies
135
Page 160 of 200
OPENING THE HOOD
1. Inside the vehicle, pull the hood
release handle.
2. Go to the front of the vehicle and
release the latch located in the
center between the hood and the
grille.
3. Lift the hood.
4.0L SOHC V6 ENGINE
1. Windshield washer fluid reservoir
2. Automatic transmission fluid
dipstick (if equipped)
3. Engine oil filler cap
4. Engine oil dipstick
5. Brake fluid reservoir6. Power distribution box
7. Clutch fluid reservoir
8. Battery
9. Power steering fluid reservoir
10. Air filter assembly
11. Engine coolant reservoir
12345
981110
6
7
Maintenance and Specifications
160