Page 210 of 312

The fuses are coded as follows:
Fuse/Relay
LocationFuse Amp
RatingPassenger Compartment Fuse
Panel Description
1 30A Radio Sense, 4x4, ABS Control
Module
2 20A Folding Mirror, Moon Roof,
Heated Seats, Moon roof
3 20A Radio, Amplifier, Power Antenna
4 5A Digital Transmission Range Sensor
5 15A Flasher Relay (Turn, Hazards)
6 10A Right Horn
7 15A Heated Mirrors
8 30A Washer Pump Relays (Front and
Rear), Front Wiper Control
9 15A Rear Wiper Coil and Contact
10 10A Heated Backlight Relay Coil,
Heated Seat Module, Temp Blend
Actuator, A/C Clutch Contact
11 Ð Not Used
12 5A Foglamp Switch,4x4module
13 5A Over Drive Cancel Switch, GEM
Start, Flex Fuel Sender
14 5A PATS Module
15 5A 4 x 4, Memory Seat Disable
16 5A Power Mirror, Security Module
(turn), Manual Climate Control
17 15A Delayed Acc. Coil, Battery Saver,
Interior Lamps
18 10A Left Horn
19 Ð Not Used
20 5A Memory Module, GEM Module
21 5A Instrument Cluster, Compass,
Flasher Coil
22 Ð Not Used
23 15A Brake Pedal Position Switch
24 15A Cigar Lighter, OBD II
Roadside emergencies
210
Page 211 of 312
Fuse/Relay
LocationFuse Amp
RatingPassenger Compartment Fuse
Panel Description
25 5A Mode, Temperature Actuator,
Auxiliary Climate Control, Trailer
Tow Battery Charge, Moon Roof
26 7.5A Park Aid, Brake Shift Interlock,
Approach Lamp Relay Coil
27 7.5A Electronic Compass Mirror,
Security Module, Digital
Transmission Range Sensor -
Backup Lamps
28 10A Air Bag Diagnostics
29 5A 4 x 4, GEM Module signal, ABS
Control Module, Moon Roof
30 5A Daytime Running Lamps (DRL),
Remote Solenoid, DEATC Climate
Controller
Roadside emergencies
211
Page 219 of 312
3. Turn the wrench
counterclockwise until tire is
lowered to the ground making sure
the other end of the wrench does
not scuff kick plate, the tire can be
slid rearward and the cable is
slightly slack.
4. Lift tire on one side and remove
the retainer from the spare tire.
Tire change procedure
To prevent the vehicle from moving when you change a tire, be
sure the parking brake is set, then block (in both directions) the
wheel that is diagonally opposite (other side and end of the vehicle) to
the tire being changed.
If the vehicle slips off the jack, you or someone else could be
seriously injured.
Refer to the tire changing instruction sheet for detailed tire change
instructions.
1. Park on a level surface, activate
hazard flashers and set the parking
brake.
2. Place gearshift lever in P (Park)
or in the reverse gear (manual
transmission) and turn engine OFF.
Roadside emergencies
219
Page 220 of 312
When one of the rear wheels is off the ground, the transmission
alone will not prevent the vehicle from moving or slipping off the
jack, even if the transmission is in P (Park) (automatic transmission)
or reverse (manual transmission).
3. Block the diagonally opposite
wheel.
4. Use the tip of the lug wrench to
remove any beauty cap by twisting
the tip under the cap. The carpeted
floor lid can be used as a kneeling
pad.
5. Loosen each wheel lug nut by half
a turn, but do not remove them
until the wheel is raised off the
ground.
6. Assemble the jack handle
extension on the lug nut wrench by
sliding the square end of the jack
handle through the plastic grommet
on the lug nut wrench and into the
square hole on the other side.
Roadside emergencies
220
Page 223 of 312

Do not attempt to push start your vehicle. Automatic
transmissions do not have push-start capability.
Preparing your vehicle
When the battery is disconnected or a new battery is installed, the
transmission must relearn its adaptive strategy. As a result of this, the
transmission may shift firmly. This operation is considered normal and
will not effect function or durability of the transmission. Over time, the
adaptive learning process will fully update transmission operation to its
optimum shift feel.
1.Use only a 12±volt supply to start your vehicle.
2. Do not disconnect the battery of the disabled vehicle as this could
damage the vehicle's electrical system.
3.
Park the booster vehicle close to the hood of the disabled vehicle
making sure the two vehiclesdo nottouch. Set the parking brake on both
vehicles and stay clear of the engine cooling fan and other moving parts.
4. Check all battery terminals and remove any excessive corrosion before
you attach the battery cables. Ensure that vent caps are tight and level.
5. Turn the heater fan on in both vehicles to protect any electrical
surges. Turn all other accessories off.
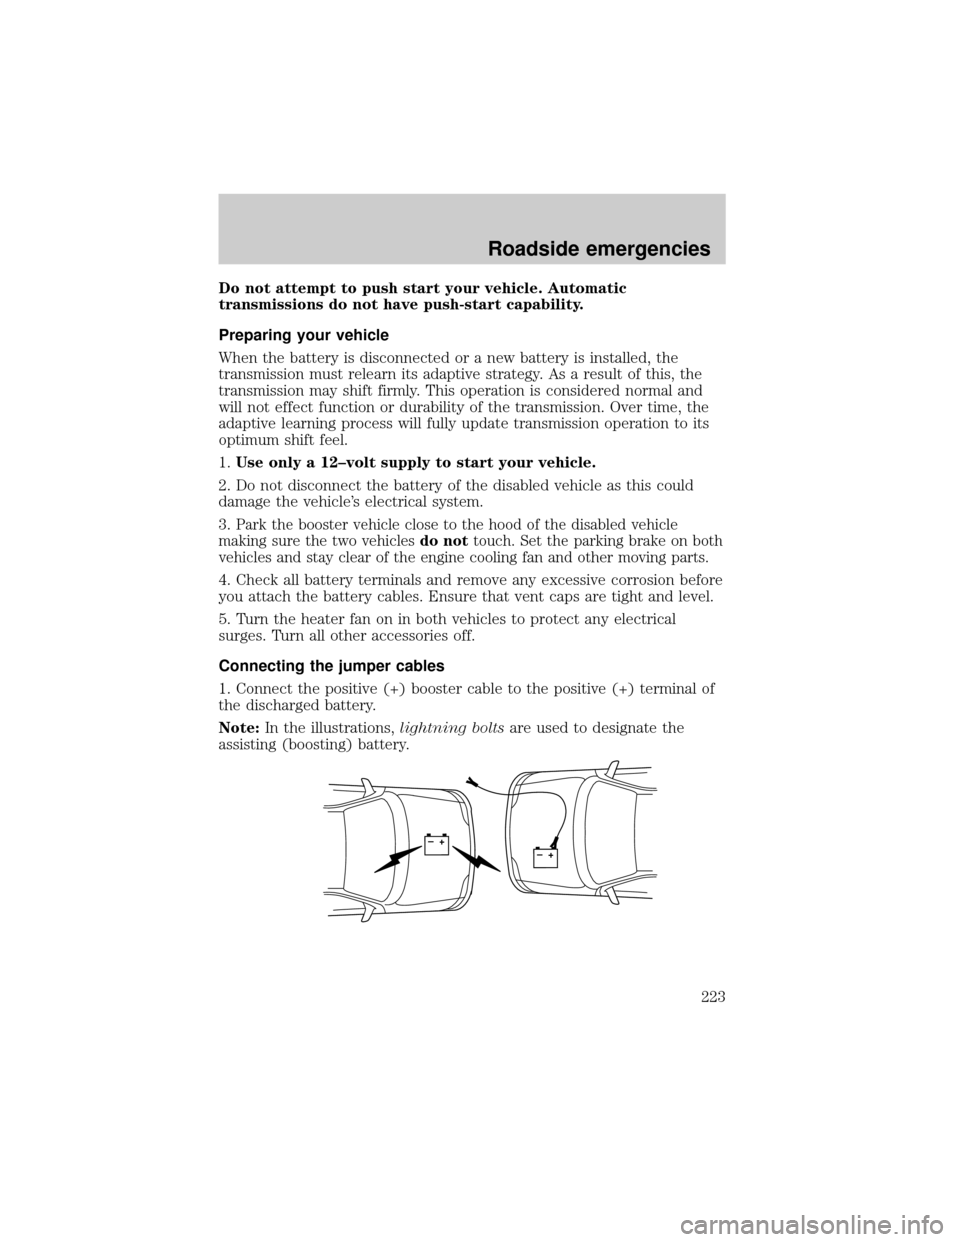
Connecting the jumper cables
1. Connect the positive (+) booster cable to the positive (+) terminal of
the discharged battery.
Note:In the illustrations,lightning boltsare used to designate the
assisting (boosting) battery.
+–+–
Roadside emergencies
223
Page 230 of 312

Working with the engine off
²Automatic transmission:
1. Set the parking brake and ensure the gearshift is securely latched in P
(Park).
2. Turn off the engine and remove the key.
3. Block the wheels to prevent the vehicle from moving unexpectedly.
²Manual transmission:
1. Set the parking brake.
2. Depress the clutch and place the gearshift in 1 (First).
3. Turn off the engine and remove the key.
4. Block the wheels to prevent the vehicle from moving unexpectedly.
Working with the engine on
²Automatic transmission:
1. Set the parking brake and ensure the gearshift is securely latched in P
(Park).
2. Block the wheels to prevent the vehicle from moving unexpectedly.
Do not start your engine with the air cleaner removed and do
not remove it while the engine is running.
²Manual transmission:
1. Set the parking brake, depress the clutch and place the gearshift in
neutral.
2. Block the wheels to prevent the vehicle from moving unexpectedly.
Do not start your engine with the air cleaner removed and do
not remove it while the engine is running.
The cooling fan is automatic and may come on at any time.
Always disconnect the negative terminal of the battery before
working near the fan.
Maintenance and care
230
Page 240 of 312

BRAKE FLUIDAND CLUTCH FLUID
Checking and adding brake fluid/clutch fluid
When equipped with a manual
transmission, your vehicle uses the
same reservoir for brake and clutch
fluid.
Brake/clutch fluid should be
checked and refilled as needed.
Refer to the scheduled maintenance
guide for the service interval
schedules.
1. Clean the reservoir cap before
removal to prevent dirt or water from entering the reservoir.
2. Visually inspect the fluid level.
3. If necessary, add brake/clutch
fluid from a clean un-opened
container until the level reaches
MAX. Do not fill above this line.
4. Use only a DOT 3 brake/clutch
fluid certified to meet Ford specifications. Refer toLubricant
specificationsin theCapacities and specificationschapter.
Brake fluid/clutch fluid is toxic. If brake/clutch fluid contacts the
eyes, flush eyes with running water for 15 minutes. Seek medical
attention if irritation persists. If taken internally, drink water and
induce vomiting. Seek medical attention immediately.
If you use a brake fluid that is not DOT 3, you will cause
permanent damage to your brakes.
Do not let the reservoir for the master cylinder run dry. This
may cause the brakes to fail.
MAX
Maintenance and care
240
Page 248 of 312
²4.0L SOHC V6 engine
²4.6L V8 engine
1. Start the engine and let it run until it reaches normal operating
temperature (the engine coolant temperature gauge indicator will be
near the center of the normal area between H and C).
2. While the engine idles, turn the steering wheel left and right several
times.
3. Turn the engine off.
4. Check the fluid level in the reservoir.
5. The fluid level should be between the MIN and MAX lines. Do not add
fluid if the level is in this range.
6. If the fluid is low, add fluid in small amounts, continuously checking
the level until it reaches the correct operating range. Be sure to put the
cap back on the reservoir.
TRANSMISSION FLUID
Checking automatic transmission fluid (if equipped)
The 5R55W transmission does not have a transmission fluid dipstick.
Maintenance and care
248