Page 13 of 216

Engine oil pressure
Illuminates when the oil pressure
falls below the normal range. Check
the oil level and add oil if needed.
Refer toEngine oilin the
Maintenance and specifications
chapter.
Low fuel
Illuminates when the fuel level in
the fuel tank is at, or near, empty
(refer toFuel gaugein this chapter
for more information).
Check fuel cap
Illuminates when the fuel cap is not
installed correctly. Check the fuel
cap for proper installation. When
the fuel filler cap is properly
re-installed, the light(s) will turn off
after a period of normal driving. Continuing to operate the vehicle with
the check fuel cap light on, can activate theService Engine Soon/Check
Enginewarning light.
It may take a long period of time for the system to detect an
improperly installed fuel filler cap.
For more information, refer toFuel filler capin theMaintenance and
specificationschapter.
Turn signals
Illuminates when the turn signals or
the hazard lights are turned on. If
the lights stay on continuously or
flash faster, check for a burned-out
bulb.
LOW
FUEL
CHECK
FUEL
CAP
Instrument Cluster
13
Page 36 of 216

RADIO RECEPTION FACTORS
Three factors can affect radio reception:
²Distance/strength.The further an FM signal travels, the weaker it is.
The listenable range of the average FM station is approximately 40 km
(24 miles). This range can be affected by ªsignal modulation.º Signal
modulation is a process radio stations use to increase their
strength/volume relative to other stations.
²Terrain.Hills, mountains and tall buildings between your vehicle's
antenna and the radio station signal can cause FM reception problems.
Static can be caused on AM stations by power lines, electric fences,
traffic lights and thunderstorms. Moving away from an interfering
structure (out of its ªshadowº) returns your reception to normal.
²Station overload.Weak signals are sometimes captured by stronger
signals when you pass a broadcast tower. A stronger signal may
temporarily overtake a weaker signal and play while the weak station
frequency is displayed.
The audio system automatically switches to single channel reception if it
will improve the reception of a station normally received in stereo.
AUDIO SYSTEM WARRANTIES AND SERVICE
Refer to theWarranty Guidefor audio system warranty information.
If service is necessary, see your dealer or a qualified technician.
Entertainment Systems
36
Page 46 of 216
3. The ªUPº and ªDNº on the bubble
indicate the directional change (up
or down) of the vertical aim.
4.Usea4mmwrench or socket to
turn the vertical adjusting screw
clockwise or counterclockwise until
the bubble is centered between the
lines.
Repeat the above process to the other headlamp, if necessary.
TURN SIGNAL CONTROL
²Push down to activate the left
turn signal.
²Push up to activate the right turn
signal.
INTERIOR LAMPS
Dome lamp and map lamps (if equipped)
The dome lamp is located overhead
between the driver and passenger
seats.
The dome lamp will stay on if the
control is moved to the ON position.
When the control is moved to the
DOOR position, the lamp will only
come on if a door is opened. If the
control is moved to the OFF
position, the lamp will not come on
at all.
The map lamps and controls are
located on the dome lamp. Press the
controls on either side of each map
lamp to activate the lamps.
DNUP
OFF
OFF DOOR ON
Lights
46
Page 47 of 216
Map lamps (if equipped)
The map lamps and controls are located on the dome lamp. Press the
controls on either side of the dome lamp to activate the map lamps.
If equipped with a moon roof, the
map lamps are located on the moon
roof control panel. Press the control
next to the map lamp to illuminate
the lamp.
BULBS
Replacing exterior bulbs
It is a good idea to check the operation of the following lights frequently:
²Headlamps
²Turn signals
²Foglamps (if equipped)
²High-mount brakelamp
²Tail lamps
²Brakelamps
²Backup lamps
²License plate lamp
²Hazard flashers
Do not remove lamp bulbs unless they will be replaced immediately. If a
bulb is removed for an extended period of time, contaminants may enter
the lamp housings and affect performance.
OPEN
Lights
47
Page 51 of 216

Replacing high-mount brakelamp bulbs
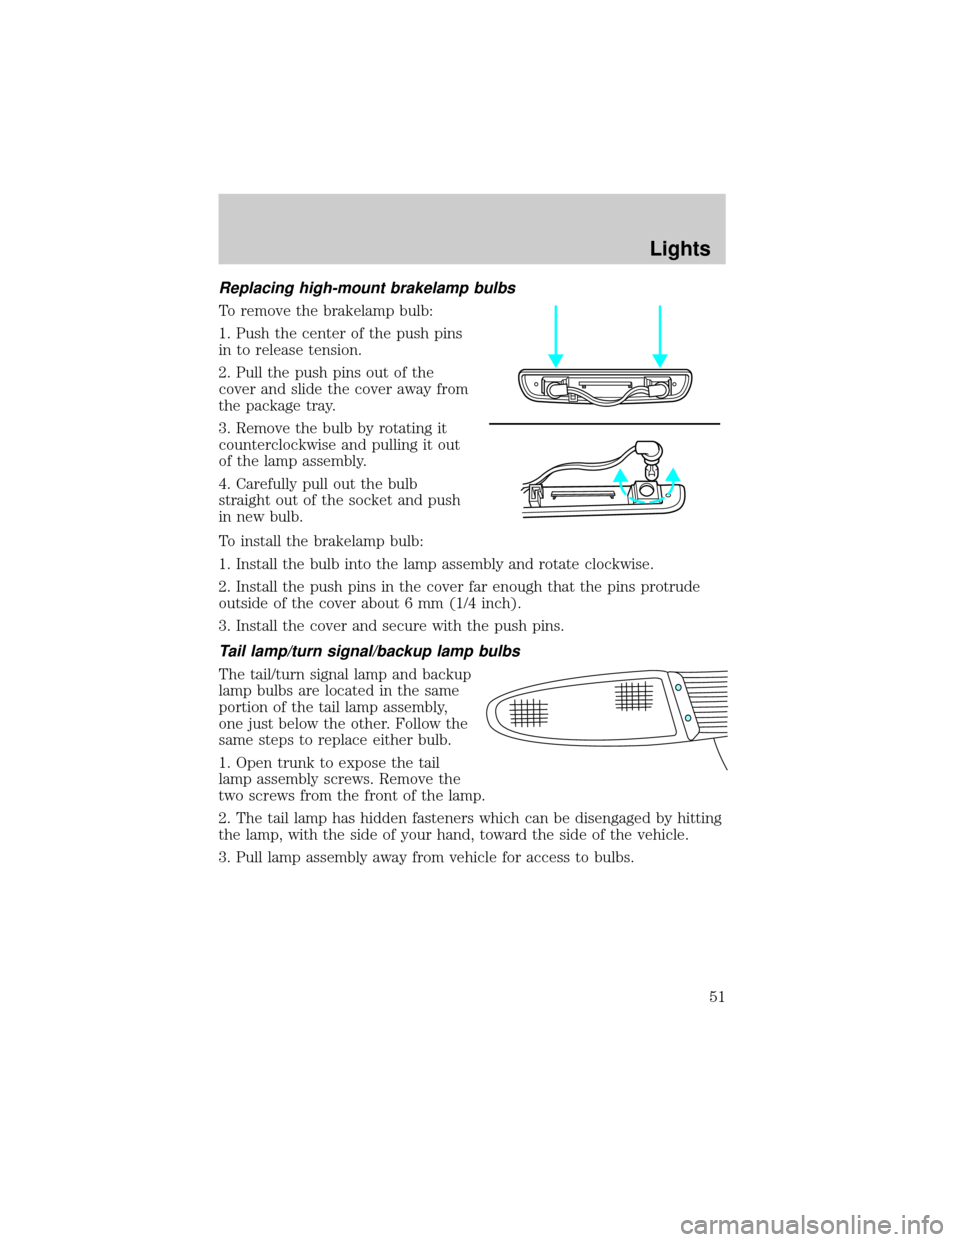
To remove the brakelamp bulb:
1. Push the center of the push pins
in to release tension.
2. Pull the push pins out of the
cover and slide the cover away from
the package tray.
3. Remove the bulb by rotating it
counterclockwise and pulling it out
of the lamp assembly.
4. Carefully pull out the bulb
straight out of the socket and push
in new bulb.
To install the brakelamp bulb:
1. Install the bulb into the lamp assembly and rotate clockwise.
2. Install the push pins in the cover far enough that the pins protrude
outside of the cover about 6 mm (1/4 inch).
3. Install the cover and secure with the push pins.
Tail lamp/turn signal/backup lamp bulbs
The tail/turn signal lamp and backup
lamp bulbs are located in the same
portion of the tail lamp assembly,
one just below the other. Follow the
same steps to replace either bulb.
1. Open trunk to expose the tail
lamp assembly screws. Remove the
two screws from the front of the lamp.
2. The tail lamp has hidden fasteners which can be disengaged by hitting
the lamp, with the side of your hand, toward the side of the vehicle.
3. Pull lamp assembly away from vehicle for access to bulbs.
Lights
51
Page 123 of 216
Fuse/Relay
LocationFuse Amp
RatingPassenger Compartment Fuse
Panel Description
METER 10A Backup Lamps, Engine Coolant
Level Switch, Instrument Cluster,
Rear Window Defrost, Shift Lock,
Warning Chime, Turn Signal
Switch
WIPER 20A Wiper/Washer, Blower Motor Relay
STOP 20A Stop Lamps, Brake Pressure
Switch
TAIL 15A Exterior Lamps, Instrument
Illumination
SUN ROOF 15A Power Moonroof
ASC 10A Speed Control
P. WINDOW 30A CB Power Windows
CIGAR 20A Cigar Lighter
AIR BAG 10A Air Bags
FOG 10A Fog Lamps, Daytime Running
Lamps (DRL)
AUDIO 15A Premium Sound Amplifier, CD
Changer
FUEL INJ. 10A H02S, Evaporative Emission
Purge Flow Sensor
BLOWER 30A CB Blower Motor Relay
Roadside Emergencies
123
Page 125 of 216

Fuse/Relay
LocationFuse Amp
RatingPassenger Compartment Fuse
Panel Description
METER 10A Backup Lamps, Engine Controls,
Instrument Cluster, Rear Window
Defrost, Shift Lock, Warning
Chime, Turn Signal Switch
WIPER 20A Wiper/Washer, Blower Relay
STOP 15A Stop Lamps
TAIL 15A Exterior Lamps, Instrument
Illumination
SUN ROOF 15A Power Moonroof
ASC 10A Speed Control
CIGAR 20A Cigar Lighter
AIR BAG 10A Joint Connector, Air Bag
Diagnostic Monitor
FOG 10A Fog Lamps, Daytime Running
Lamps (DRL)
AUDIO 15A Radio
FUEL
INJECTOR10A HO2S, Evaporative Emission
Purge Flow Sensor
P. WINDOW 30A CB Power Windows
BLOWER 30A CB A/C-Heater
Power distribution box
The power distribution box is located in the engine compartment. The
power distribution box contains high-current fuses that protect your
vehicle's main electrical systems from overloads.
Always disconnect the battery before servicing high current
fuses.
Always replace the cover to the power distribution box before
reconnecting the battery or refilling fluid reservoirs
If the battery has been disconnected and reconnected, refer to the
Batterysection of theMaintenance and specificationschapter.
Roadside Emergencies
125
Page 208 of 216

J
Jack ............................................128
positioning ...............................128
storage .....................................128
Jump-starting your vehicle ......132
K
Keys
key in ignition chime ...............14
positions of the ignition ...........97
L
Lamps
bulb replacement
specifications chart ..................48
cargo lamps ...............................43
daytime running light ...............42
fog lamps ...................................42
headlamps ...........................42, 49
headlamps, flash to pass ..........43
instrument panel, dimming .....43
interior lamps .....................46±49
replacing bulbs .............47, 50±52
Lane change indicator
(see Turn signal) ........................46
Lights, warning and indicator ....10
air bag ........................................12
anti-lock brakes (ABS) ....12, 103
anti-theft ...................................14
brake ..........................................12
charging system ........................12
fuel cap light .............................13
high beam .................................14
low fuel ......................................13
oil pressure ...............................13
safety belt .................................12
service engine soon ..................11
turn signal indicator .................13
Load limits .................................113GAWR ......................................113
GVWR ......................................113
trailer towing ..........................113
Locks
childproof ..................................63
Lubricant specifications ...196, 198
M
Manual transaxle
fluid capacities ........................195
lubricant specifications ..........198
reverse .....................................112
Mirrors
side view mirrors (power) .......56
Moon roof ....................................61
Motorcraft parts ................179, 195
O
Octane rating ............................178
Odometer .....................................17
Oil (see Engine oil) ..................164
P
Panic alarm feature, remote
entry system ................................67
Parking brake ............................104
Parts (see Motorcraft parts) ....195
Power distribution box
(see Fuses) ...............................125
Power door locks ........................63
Power steering ..........................104
fluid, checking and adding ....185
fluid, refill capacity ................195
fluid,
specifications ..................196, 198
Index
208