Page 86 of 256
Never adjust the steering wheel when the vehicle is moving.
AUXILIARY POWER POINT
Power outlets are designed for
accessory plugs only. Do not
hang any type of accessory or
accessory bracket from the plug.
Improper use of the power
outlet can cause damage not
covered by your warranty.
The auxiliary power point is located
on the instrument panel.
A second power point (if equipped)
is located behind the driver’s seat on the upper trim panel.
Do not plug optional electrical accessories into the cigarette
lighter. Use the power point.
POWER WINDOWS (IF EQUIPPED)
Press and hold the rocker switches to open and close windows.
•Press the top portion of the
rocker switch to close.
•Press the bottom portion of the
rocker switch to open.
Driver Controls
86
ProCarManuals.com
Page 131 of 256

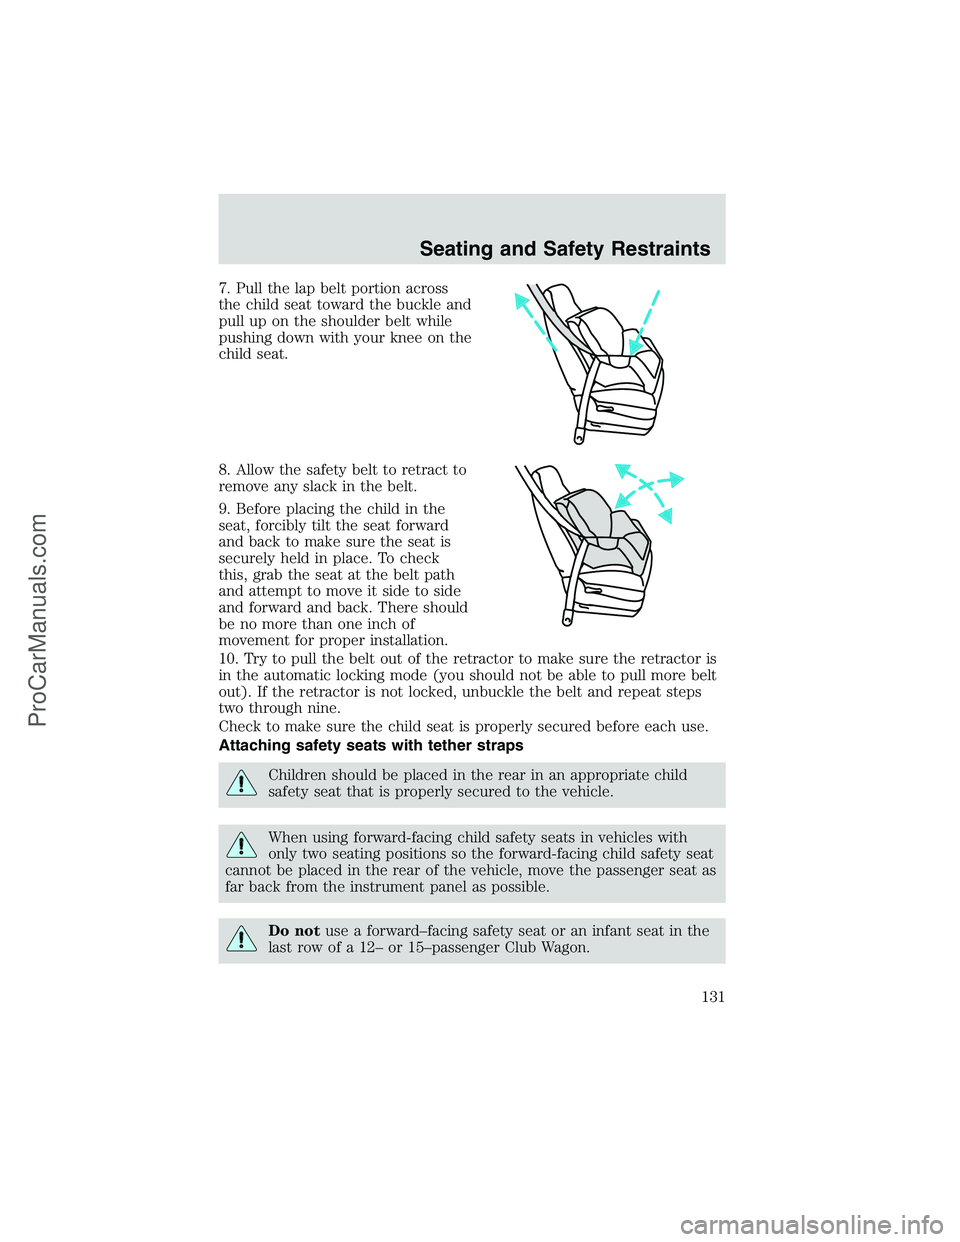
7. Pull the lap belt portion across
the child seat toward the buckle and
pull up on the shoulder belt while
pushing down with your knee on the
child seat.
8. Allow the safety belt to retract to
remove any slack in the belt.
9. Before placing the child in the
seat, forcibly tilt the seat forward
and back to make sure the seat is
securely held in place. To check
this, grab the seat at the belt path
and attempt to move it side to side
and forward and back. There should
be no more than one inch of
movement for proper installation.
10. Try to pull the belt out of the retractor to make sure the retractor is
in the automatic locking mode (you should not be able to pull more belt
out). If the retractor is not locked, unbuckle the belt and repeat steps
two through nine.
Check to make sure the child seat is properly secured before each use.
Attaching safety seats with tether straps
Children should be placed in the rear in an appropriate child
safety seat that is properly secured to the vehicle.
When using forward-facing child safety seats in vehicles with
only two seating positions so the forward-facing child safety seat
cannot be placed in the rear of the vehicle, move the passenger seat as
far back from the instrument panel as possible.
Do notuse a forward–facing safety seat or an infant seat in the
last row of a 12–or 15–passenger Club Wagon.
Seating and Safety Restraints
131
ProCarManuals.com
Page 163 of 256
The fuses are coded as follows.
Fuse/Relay
LocationFuse Amp
RatingPassenger Compartment Fuse
Panel Description
1 20A 4WABS module
2 15A Brake warning lamp, Instrument
cluster, Warning chime, 4WABS
relay, Warning indicators, Low
vacuum warning switch (Diesel
only)
3 15A Main light switch, RKE module,
Radio, Instrument illumination,
E-Traveler VCP and video
screens, Overhead console
4 15A Power locks w/RKE, Illuminated
entry, Warning chime, Modified
vehicle, Main light switch,
Courtesy lamps
1234
5
7
689101142
43
44 13 12 14
15 16 17
19 18
2021 22 23
25 24
26 27 28 29
31 30 32 33 3435
37
3638 3940
41
Roadside Emergencies
163
ProCarManuals.com
Page 164 of 256

Fuse/Relay
LocationFuse Amp
RatingPassenger Compartment Fuse
Panel Description
5 20A RKE module, Power lock
switches, Memory lock, Power
locks with RKE
6 10A Brake shift interlock, Speed
control, DRL module
7 10A Multi-function switch, Turn signals
8 30A Radio capacitor(s), Ignition coil,
PCM diode, PCM power relay,
Fuel heater (Diesel only), Glow
plug relay (Diesel only)
9 30A Wiper control module, Windshield
wiper motor
10 20A Main light switch, Park lamps,
License lamp (external lamps),
Multi-function switch
(flash-to-pass)
11 15A Brake pressure switch,
Multi-function switch (hazards),
Brake lamp switch, Brake lamps
12 15A Transmission Range (TR) sensor,
Backup lamps, Auxiliary battery
relay
13 15A Blend door actuator, A/C heater,
Function selector switch
14 5A Instrument cluster (air bag and
charge indicator)
15 5A Trailer battery charge relay
16 30A Power seats
17—Not used
18—Not used
19 10A Air bag diagnostic monitor
20 5A Overdrive cancel switch
21 30A Power windows*
22 15A Memory power radio, E-Traveler
radio, E-Traveler console
Roadside Emergencies
164
ProCarManuals.com
Page 194 of 256

Clean the outside of the windshield or rear window with a non-abrasive
cleaner such as Ultra Clear Spray Glass Cleaner (E4AZ-19C507–AA),
available from your authorized Ford, Lincoln or Mercury dealer. If after
cleaning the glass surface, the water sheets from the glass (e.g., does not
bead), then the window is clean.
The windshield, rear window and wiper blades should be cleaned
regularly. Wiper blades can be cleaned with isopropyl (rubbing) alcohol
or windshield washer solution. Be sure to replace wiper blades when
they appear worn or do not function properly.
WINDOWS AND WIPER BLADES
The windshield, rear window and wiper blades should be cleaned
regularly. If the wiper does not wipe properly, substances on the
windshield, rear window or the wiper blades may be the cause. These
may include hot wax treatments used by commercial car washes, tree
sap, or other organic contamination. To clean these items, please follow
these tips:
•The windshield or rear window may be cleaned with a non-abrasive
cleaner such as Motorcraft Ultra Clear Spray Glass Cleaner (ZC-23),
available from your dealer.
•Do not use abrasives, as they may cause scratches.
•Do not use fuel, kerosene, or paint thinner to clean any parts.
•Wiper blades can be cleaned with isopropyl (rubbing) alcohol or
windshield washer solution. Be sure to replace wiper blades when they
appear worn or do not function properly.
INSTRUMENT PANEL AND CLUSTER LENS
Clean the instrument panel with a damp cloth, then dry with a dry cloth.
•Avoid cleaners or polish that increase the gloss of the upper portion of
the instrument panel. The dull finish in this area helps protect the
driver from undesirable windshield reflection.
Do not use chemical solvents or strong detergents when cleaning
the steering wheel or instrument panel to avoid contamination of
the air bag system.
•Be certain to wash or wipe your hands clean if you have been in
contact with certain products such as insect repellent and suntan
lotion in order to avoid possible damage to the painted surfaces.
Cleaning
194
ProCarManuals.com
Page 199 of 256
OPENING THE HOOD
1. Inside the vehicle, pull the hood
release handle located under the
bottom left corner of the instrument
panel.
2. Go to the front of the vehicle and release the auxiliary latch that is
located in the center top of the grill.
3. Lift the hood and secure it with the prop rod.
IDENTIFYING COMPONENTS IN THE ENGINE COMPARTMENT
Engine compartment component locations
Refer to the7.3 Liter Power Stroke Direct Injection Turbo Diesel
Owner’s Guide Supplementfor diesel engine component locations.
HOOD
Maintenance and Specifications
199
ProCarManuals.com
Page 246 of 256
Dimension Body style
E-250 E-350 E-450
Super DutyE-550
Super Duty
(4)
Wheelbase3 149.6 mm
(124 in)3 505 mm
(138 in)
4 013 mm
(158 in)
4 470 mm
(176 in)4 013 mm
(158 in)
4 470 mm
(176 in)4 051 mm
(159.5 in)
4 508 mm
(177.5 in)
4 864 mm
(191.5 in)
5 321 mm
(209.5 in)
5 930 mm
(233.5 in)
(5) Overall
lengthRefer to Body Builder for specifications.
VEHICLE IDENTIFICATION NUMBER
Complete Ford built vehicles
The vehicle identification number is attached to your vehicle in the
following places:
•On the metal tag attached to the top of the instrument panel on the
driver’s side.
•On the certification label. This
label is required by the National
Highway Traffic Safety
Administration and is made of
special material. If it is tampered
with, it will be destroyed or a
destruction pattern will appear.
Maintenance and Specifications
246
ProCarManuals.com
Page 251 of 256

A
ABS (see Brakes) .....................141
Air bag supplemental restraint
system ................................119–120
and child safety seats ............121
description ..............................120
disposal ....................................124
driver air bag ..........................122
indicator light ...................12, 123
operation .................................122
passenger air bag ...................122
Air cleaner filter ...............229, 235
Air conditioning
manual heating and air
conditioning system .................71
Ambulance packages ....................6
Antifreeze (see Engine
coolant) .....................................209
Anti-lock brake system
(see Brakes) ..............................141
Audio system
(see Radio) ................17, 22, 28, 36
Automatic transmission
driving an automatic
overdrive .................................146
fluid, adding ............................227
fluid, checking ........................227
fluid, refill capacities ..............236
fluid, specification ..................243
Auxiliary power point .................86
Axle
lubricant specifications ..240, 243
refill capacities ........................236
traction lok ..............................143
B
Battery .......................................204acid, treating emergencies .....204
charging system warning
light ............................................12
disconnecting ..........................206
jumping a disabled battery ....175
maintenance-free ....................204
replacement, specifications ...235
servicing ..................................204
voltage gauge ............................15
BeltMinder .................................115
Brakes ........................................140
anti-lock ...................................141
anti-lock brake system (ABS)
warning light .....................12, 142
brake warning light ..................11
fluid, checking and adding ....226
fluid, refill capacities ..............236
fluid, specifications .........240, 243
lubricant specifications ..240, 243
shift interlock ..........................145
Break-in period .............................5
Bulbs ............................................79
C
Capacities for refilling fluids ....236
CD-6 disc .....................................36
CD-single premium .....................28
Changing a tire .........................168
Child safety restraints ..............125
child safety belts ....................125
Child safety seats ......................127
in front seat ............................129
in rear seat ..............................129
tether anchorage hardware ...131
Cleaning your vehicle
engine compartment ..............192
exterior ....................................195
instrument panel ....................194
Index
251
ProCarManuals.com