2002 DODGE RAM glove box
[x] Cancel search: glove boxPage 2082 of 2255
instrument panel just inboard of the glove box. Vehi-
cles equipped with a manual transmission have a
lighted storage bin installed on the instrument panel
in place of the fold-down cup holder.
WARNING: ON VEHICLES EQUIPPED WITH AIR-
BAGS, DISABLE THE AIRBAG SYSTEM BEFORE
ATTEMPTING ANY STEERING WHEEL, STEERING
COLUMN, SEAT BELT TENSIONER, OR INSTRU-
MENT PANEL COMPONENT DIAGNOSIS OR SER-
VICE. DISCONNECT AND ISOLATE THE BATTERY
NEGATIVE (GROUND) CABLE, THEN WAIT TWO
MINUTES FOR THE AIRBAG SYSTEM CAPACITOR
TO DISCHARGE BEFORE PERFORMING FURTHER
DIAGNOSIS OR SERVICE. THIS IS THE ONLY SURE
WAY TO DISABLE THE AIRBAG SYSTEM. FAILURE
TO TAKE THE PROPER PRECAUTIONS COULD
RESULT IN ACCIDENTAL AIRBAG DEPLOYMENT
AND POSSIBLE PERSONAL INJURY.
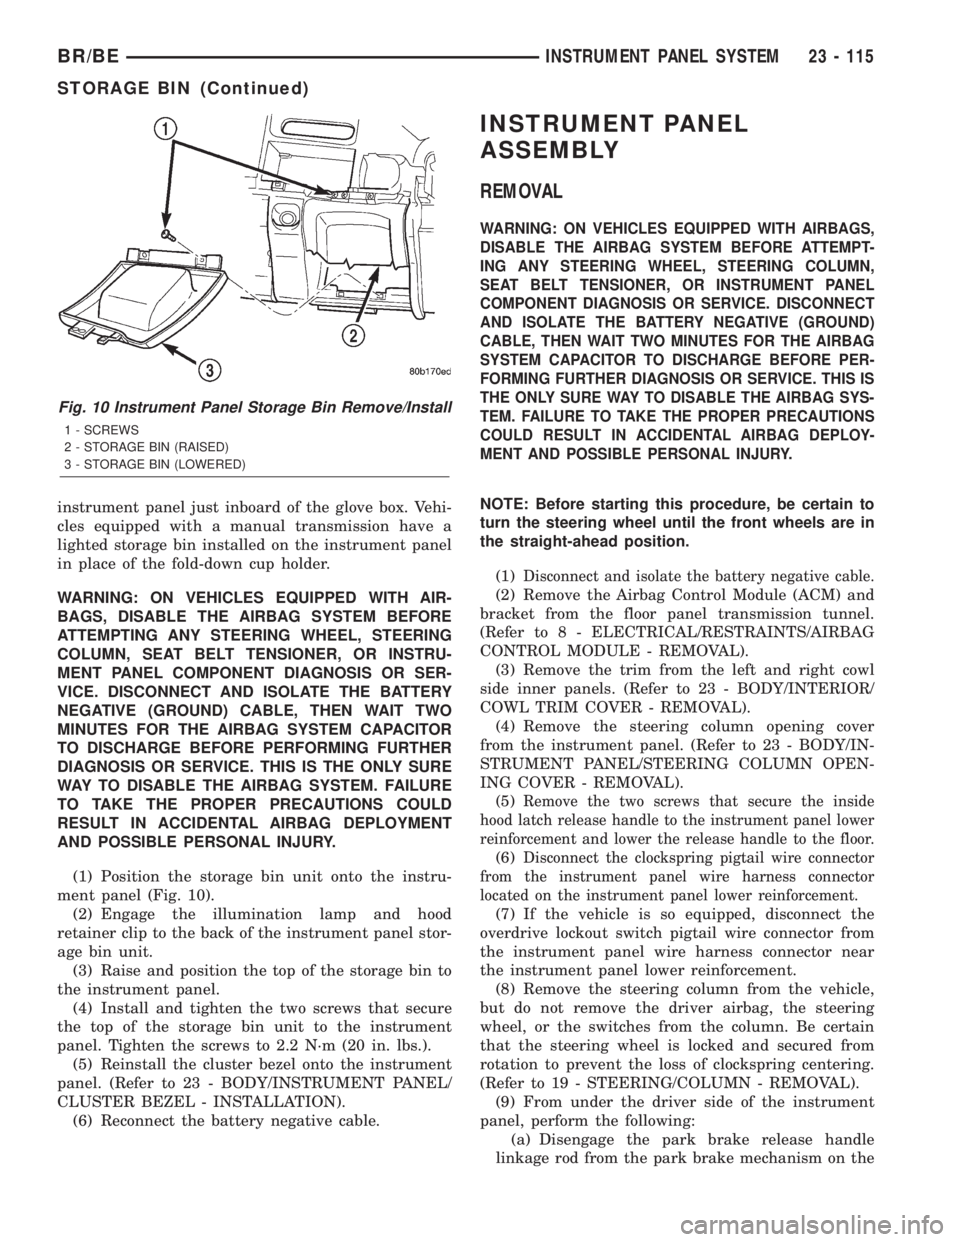
(1) Position the storage bin unit onto the instru-
ment panel (Fig. 10).
(2) Engage the illumination lamp and hood
retainer clip to the back of the instrument panel stor-
age bin unit.
(3) Raise and position the top of the storage bin to
the instrument panel.
(4) Install and tighten the two screws that secure
the top of the storage bin unit to the instrument
panel. Tighten the screws to 2.2 N´m (20 in. lbs.).
(5) Reinstall the cluster bezel onto the instrument
panel. (Refer to 23 - BODY/INSTRUMENT PANEL/
CLUSTER BEZEL - INSTALLATION).
(6) Reconnect the battery negative cable.
INSTRUMENT PANEL
ASSEMBLY
REMOVAL
WARNING: ON VEHICLES EQUIPPED WITH AIRBAGS,
DISABLE THE AIRBAG SYSTEM BEFORE ATTEMPT-
ING ANY STEERING WHEEL, STEERING COLUMN,
SEAT BELT TENSIONER, OR INSTRUMENT PANEL
COMPONENT DIAGNOSIS OR SERVICE. DISCONNECT
AND ISOLATE THE BATTERY NEGATIVE (GROUND)
CABLE, THEN WAIT TWO MINUTES FOR THE AIRBAG
SYSTEM CAPACITOR TO DISCHARGE BEFORE PER-
FORMING FURTHER DIAGNOSIS OR SERVICE. THIS IS
THE ONLY SURE WAY TO DISABLE THE AIRBAG SYS-
TEM. FAILURE TO TAKE THE PROPER PRECAUTIONS
COULD RESULT IN ACCIDENTAL AIRBAG DEPLOY-
MENT AND POSSIBLE PERSONAL INJURY.
NOTE: Before starting this procedure, be certain to
turn the steering wheel until the front wheels are in
the straight-ahead position.
(1)
Disconnect and isolate the battery negative cable.
(2) Remove the Airbag Control Module (ACM) and
bracket from the floor panel transmission tunnel.
(Refer to 8 - ELECTRICAL/RESTRAINTS/AIRBAG
CONTROL MODULE - REMOVAL).
(3) Remove the trim from the left and right cowl
side inner panels. (Refer to 23 - BODY/INTERIOR/
COWL TRIM COVER - REMOVAL).
(4) Remove the steering column opening cover
from the instrument panel. (Refer to 23 - BODY/IN-
STRUMENT PANEL/STEERING COLUMN OPEN-
ING COVER - REMOVAL).
(5)
Remove the two screws that secure the inside
hood latch release handle to the instrument panel lower
reinforcement and lower the release handle to the floor.
(6)Disconnect the clockspring pigtail wire connector
from the instrument panel wire harness connector
located on the instrument panel lower reinforcement.
(7) If the vehicle is so equipped, disconnect the
overdrive lockout switch pigtail wire connector from
the instrument panel wire harness connector near
the instrument panel lower reinforcement.
(8) Remove the steering column from the vehicle,
but do not remove the driver airbag, the steering
wheel, or the switches from the column. Be certain
that the steering wheel is locked and secured from
rotation to prevent the loss of clockspring centering.
(Refer to 19 - STEERING/COLUMN - REMOVAL).
(9) From under the driver side of the instrument
panel, perform the following:
(a) Disengage the park brake release handle
linkage rod from the park brake mechanism on the
Fig. 10 Instrument Panel Storage Bin Remove/Install
1 - SCREWS
2 - STORAGE BIN (RAISED)
3 - STORAGE BIN (LOWERED)
BR/BEINSTRUMENT PANEL SYSTEM 23 - 115
STORAGE BIN (Continued)
Page 2139 of 2255
(1) The relay common feed terminal cavity (30) is
connected to fused battery feed. There should be bat-
tery voltage at the cavity for relay terminal 30 at all
times. If OK, go to Step 2. If not OK, repair the open
circuit to the fuse in the PDC as required.
(2) The relay normally closed terminal (87A) is not
used in this application. Go to Step 3.
(3) The relay normally open terminal cavity (87) is
connected to the compressor clutch coil. There should
be continuity between this cavity and the A/C com-
pressor clutch relay output circuit cavity of the com-
pressor clutch coil wire harness connector. If OK, go
to Step 4. If not OK, repair the open circuit as
required.
(4) The relay coil battery terminal (86) is con-
nected to the fused ignition switch output (run/start)
circuit. There should be battery voltage at the cavity
for relay terminal 86 with the ignition switch in the
On position. If OK, go to Step 5. If not OK, repair the
open circuit to the fuse in the junction block as
required.
(5) The coil ground terminal cavity (85) is switched
to ground through the Powertrain Control Module
(PCM). There should be continuity between this cav-
ity and the A/C compressor clutch relay control cir-
cuit cavity of the PCM wire harness connector C
(gray) at all times. If not OK, repair the open circuit
as required.
REMOVAL
(1) Disconnect and isolate the battery negative
cable.
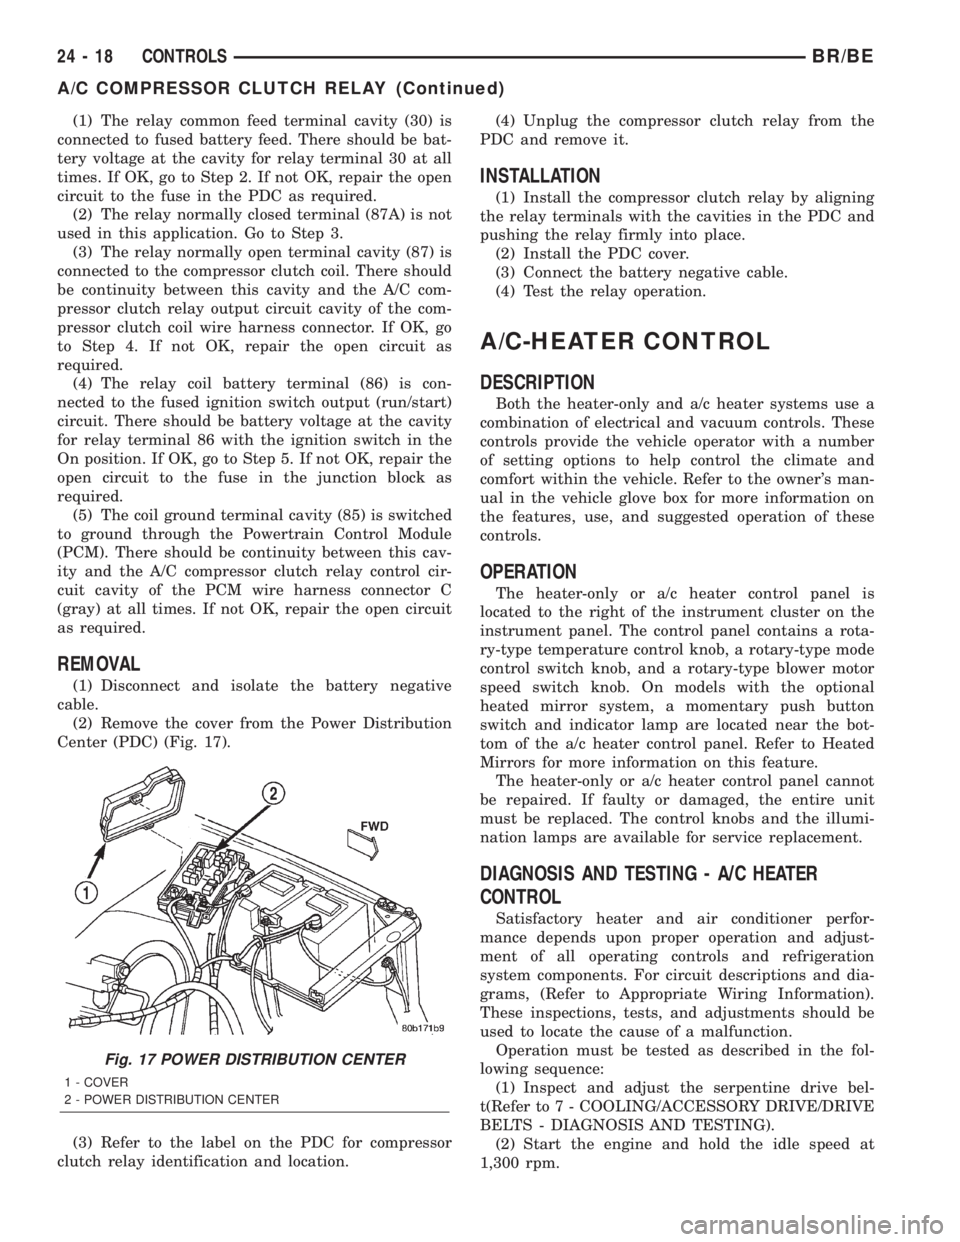
(2) Remove the cover from the Power Distribution
Center (PDC) (Fig. 17).
(3) Refer to the label on the PDC for compressor
clutch relay identification and location.(4) Unplug the compressor clutch relay from the
PDC and remove it.
INSTALLATION
(1) Install the compressor clutch relay by aligning
the relay terminals with the cavities in the PDC and
pushing the relay firmly into place.
(2) Install the PDC cover.
(3) Connect the battery negative cable.
(4) Test the relay operation.
A/C-HEATER CONTROL
DESCRIPTION
Both the heater-only and a/c heater systems use a
combination of electrical and vacuum controls. These
controls provide the vehicle operator with a number
of setting options to help control the climate and
comfort within the vehicle. Refer to the owner's man-
ual in the vehicle glove box for more information on
the features, use, and suggested operation of these
controls.
OPERATION
The heater-only or a/c heater control panel is
located to the right of the instrument cluster on the
instrument panel. The control panel contains a rota-
ry-type temperature control knob, a rotary-type mode
control switch knob, and a rotary-type blower motor
speed switch knob. On models with the optional
heated mirror system, a momentary push button
switch and indicator lamp are located near the bot-
tom of the a/c heater control panel. Refer to Heated
Mirrors for more information on this feature.
The heater-only or a/c heater control panel cannot
be repaired. If faulty or damaged, the entire unit
must be replaced. The control knobs and the illumi-
nation lamps are available for service replacement.
DIAGNOSIS AND TESTING - A/C HEATER
CONTROL
Satisfactory heater and air conditioner perfor-
mance depends upon proper operation and adjust-
ment of all operating controls and refrigeration
system components. For circuit descriptions and dia-
grams, (Refer to Appropriate Wiring Information).
These inspections, tests, and adjustments should be
used to locate the cause of a malfunction.
Operation must be tested as described in the fol-
lowing sequence:
(1) Inspect and adjust the serpentine drive bel-
t(Refer to 7 - COOLING/ACCESSORY DRIVE/DRIVE
BELTS - DIAGNOSIS AND TESTING).
(2) Start the engine and hold the idle speed at
1,300 rpm.
Fig. 17 POWER DISTRIBUTION CENTER
1 - COVER
2 - POWER DISTRIBUTION CENTER
24 - 18 CONTROLSBR/BE
A/C COMPRESSOR CLUTCH RELAY (Continued)
Page 2140 of 2255
(3) On vehicles with air conditioning, turn the
temperature control knob to the extreme counter
clockwise (Cool) position, and set the mode control
switch knob to the Bi-Level (A/C) position. The out-
side (recirculation) air door should be open to outside
air. If not OK, (Refer to 24 - HEATING & AIR CON-
DITIONING/CONTROLS - DIAGNOSIS AND TEST-
ING - VACUUM SYSTEM).
(4) Open the vehicle windows. Test the blower
motor operation in all speeds. If not OK, (Refer to 24
- HEATING & AIR CONDITIONING/DISTRIBU-
TION/BLOWER MOTOR - DIAGNOSIS AND TEST-
ING).
(5) On vehicles with air conditioning, the compres-
sor should be running and the air conditioning sys-
tem in operation unless the ambient air temperature
is below about -1É C (30É F). If not OK, (Refer to 24 -
HEATING & AIR CONDITIONING - DIAGNOSIS
AND TESTING - A/C PERFORMANCE).
(6) Check the mode control switch operation. The
heater and air conditioner systems should respond as
described in the owner's manual in the vehicle glove
box to each mode selected. Reduce the engine speed
to normal idle. The vacuum will be high at low idle
and the vacuum actuators should respond quickly. If
not OK, (Refer to 24 - HEATING & AIR CONDI-
TIONING/CONTROLS - DIAGNOSIS AND TEST-
ING - VACUUM SYSTEM).
(7) If the vacuum tests, and the electrical compo-
nent and circuit tests reveal no problems, disassem-
ble the HVAC housing to inspect for mechanical
misalignment or binding of the mode doors (Refer to
24 - HEATING & AIR CONDITIONING/DISTRIBU-
TION/HVAC HOUSING - DISASSEMBLY)
REMOVAL
WARNING: ON VEHICLES EQUIPPED WITH AIR-
BAGS, DISABLE THE AIRBAG SYSTEM BEFORE
ATTEMPTING ANY STEERING WHEEL, STEERING
COLUMN, OR INSTRUMENT PANEL COMPONENT
DIAGNOSIS OR SERVICE. DISCONNECT AND ISO-
LATE THE BATTERY NEGATIVE (GROUND) CABLE,
THEN WAIT TWO MINUTES FOR THE AIRBAG SYS-
TEM CAPACITOR TO DISCHARGE BEFORE PER-
FORMING FURTHER DIAGNOSIS OR SERVICE. THIS
IS THE ONLY SURE WAY TO DISABLE THE AIRBAG
SYSTEM. FAILURE TO TAKE THE PROPER PRE-
CAUTIONS COULD RESULT IN AN ACCIDENTAL
AIRBAG DEPLOYMENT AND POSSIBLE PERSONAL
INJURY.
(1) Disconnect and isolate the battery negative
cable.
(2) Reach under the instrument panel near the
driver side of the floor panel transmission tunnel andunplug the a/c heater control to HVAC housing vac-
uum harness connector.
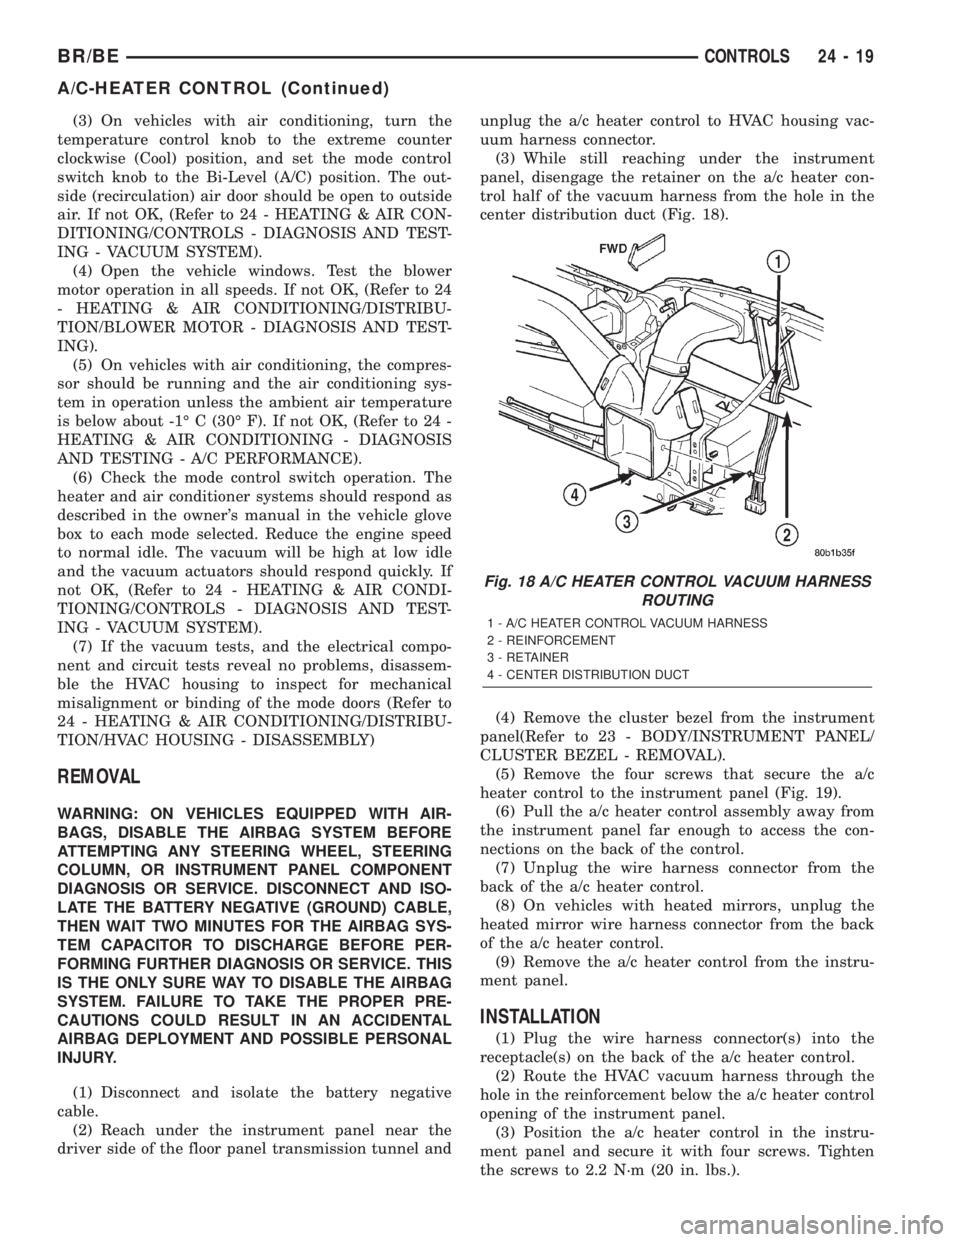
(3) While still reaching under the instrument
panel, disengage the retainer on the a/c heater con-
trol half of the vacuum harness from the hole in the
center distribution duct (Fig. 18).
(4) Remove the cluster bezel from the instrument
panel(Refer to 23 - BODY/INSTRUMENT PANEL/
CLUSTER BEZEL - REMOVAL).
(5) Remove the four screws that secure the a/c
heater control to the instrument panel (Fig. 19).
(6) Pull the a/c heater control assembly away from
the instrument panel far enough to access the con-
nections on the back of the control.
(7) Unplug the wire harness connector from the
back of the a/c heater control.
(8) On vehicles with heated mirrors, unplug the
heated mirror wire harness connector from the back
of the a/c heater control.
(9) Remove the a/c heater control from the instru-
ment panel.
INSTALLATION
(1) Plug the wire harness connector(s) into the
receptacle(s) on the back of the a/c heater control.
(2) Route the HVAC vacuum harness through the
hole in the reinforcement below the a/c heater control
opening of the instrument panel.
(3) Position the a/c heater control in the instru-
ment panel and secure it with four screws. Tighten
the screws to 2.2 N´m (20 in. lbs.).
Fig. 18 A/C HEATER CONTROL VACUUM HARNESS
ROUTING
1 - A/C HEATER CONTROL VACUUM HARNESS
2 - REINFORCEMENT
3 - RETAINER
4 - CENTER DISTRIBUTION DUCT
BR/BECONTROLS 24 - 19
A/C-HEATER CONTROL (Continued)
Page 2148 of 2255

(1) Disconnect and isolate the battery negative
cable.
(2) Remove the instrument panel assembly from
the vehicle(Refer to 23 - BODY/INSTRUMENT PAN-
EL/INSTRUMENT PANEL ASSEMBLY - REMOV-
AL).
(3) Unplug the vacuum harness connector from the
panel/defrost door actuator (Fig. 26).
(4) Using a trim stick or another suitable wide
flat-bladed tool, gently pry the panel/defrost door
crank arm off the panel/defrost door pivot.
(5) Remove the two screws that secure the panel/
defrost door actuator to the HVAC housing.
(6) Remove the panel/defrost door actuator from
the HVAC housing.
INSTALLATION - HEAT/DEFROST DOOR
ACTUATOR
NOTE: Before installing the heat/defrost door actua-
tor, be certain that the heat/defrost door is not bind-
ing.
(1) Install the heat/defrost door actuator from the
HVAC housing. Tighten the actuator mounting
screws to 2.2 N´m (20 in. lbs.).
(2) Carefully snap the heat/defrost door crank arm
on the heat/defrost door pivot.(3) Plug in the two vacuum harness connectors to
the heat/defrost door actuator.
(4) Install the HVAC housing in the vehicle. (Refer
to 24 - HEATING & AIR CONDITIONING/DISTRI-
BUTION/HVAC HOUSING - INSTALLATION)
(5) Connect the battery negative cable.
INSTALLATION - PANEL/DEFROST DOOR
ACTUATOR
NOTE: Before installing the panel/defrost door
actuator, be certain that the panel/defrost door is
not binding.
(1) Install the panel/defrost door actuator on the
HVAC housing. Tighten the mounting screws to 2.2
N´m (20 in. lbs.).
(2) Carefully snap the panel/defrost door crank
arm on the panel/defrost door pivot.
(3) Plug the vacuum harness connector to the pan-
el/defrost door actuator.
(4) Install the instrument panel assembly in the
vehicle(Refer to 23 - BODY/INSTRUMENT PANEL/
INSTRUMENT PANEL ASSEMBLY - INSTALLA-
TION).
(5) Connect the battery negative cable.
RECIRCULATION DOOR
ACTUATOR
REMOVAL
WARNING: ON VEHICLES EQUIPPED WITH AIR-
BAGS, DISABLE THE AIRBAG SYSTEM BEFORE
ATTEMPTING ANY STEERING WHEEL, STEERING
COLUMN, OR INSTRUMENT PANEL COMPONENT
DIAGNOSIS OR SERVICE. DISCONNECT AND ISO-
LATE THE BATTERY NEGATIVE (GROUND) CABLE,
THEN WAIT TWO MINUTES FOR THE AIRBAG SYS-
TEM CAPACITOR TO DISCHARGE BEFORE PER-
FORMING FURTHER DIAGNOSIS OR SERVICE. THIS
IS THE ONLY SURE WAY TO DISABLE THE AIRBAG
SYSTEM. FAILURE TO TAKE THE PROPER PRE-
CAUTIONS COULD RESULT IN AN ACCIDENTAL
AIRBAG DEPLOYMENT AND POSSIBLE PERSONAL
INJURY.
(1) Disconnect and isolate the battery negative
cable.
(2) Remove the glove box from the instrument pan-
el(Refer to 23 - BODY/INSTRUMENT PANEL/IN-
STRUMENT PANEL ASSEMBLY - REMOVAL).
Fig. 26 PANEL/DEFROST DOOR ACTUATOR
1 - VACUUM LINE
2 - PANEL/DEFROST ACTUATOR
3 - SHAFT RETAINER
BR/BECONTROLS 24 - 27
MODE DOOR ACTUATOR (Continued)
Page 2149 of 2255
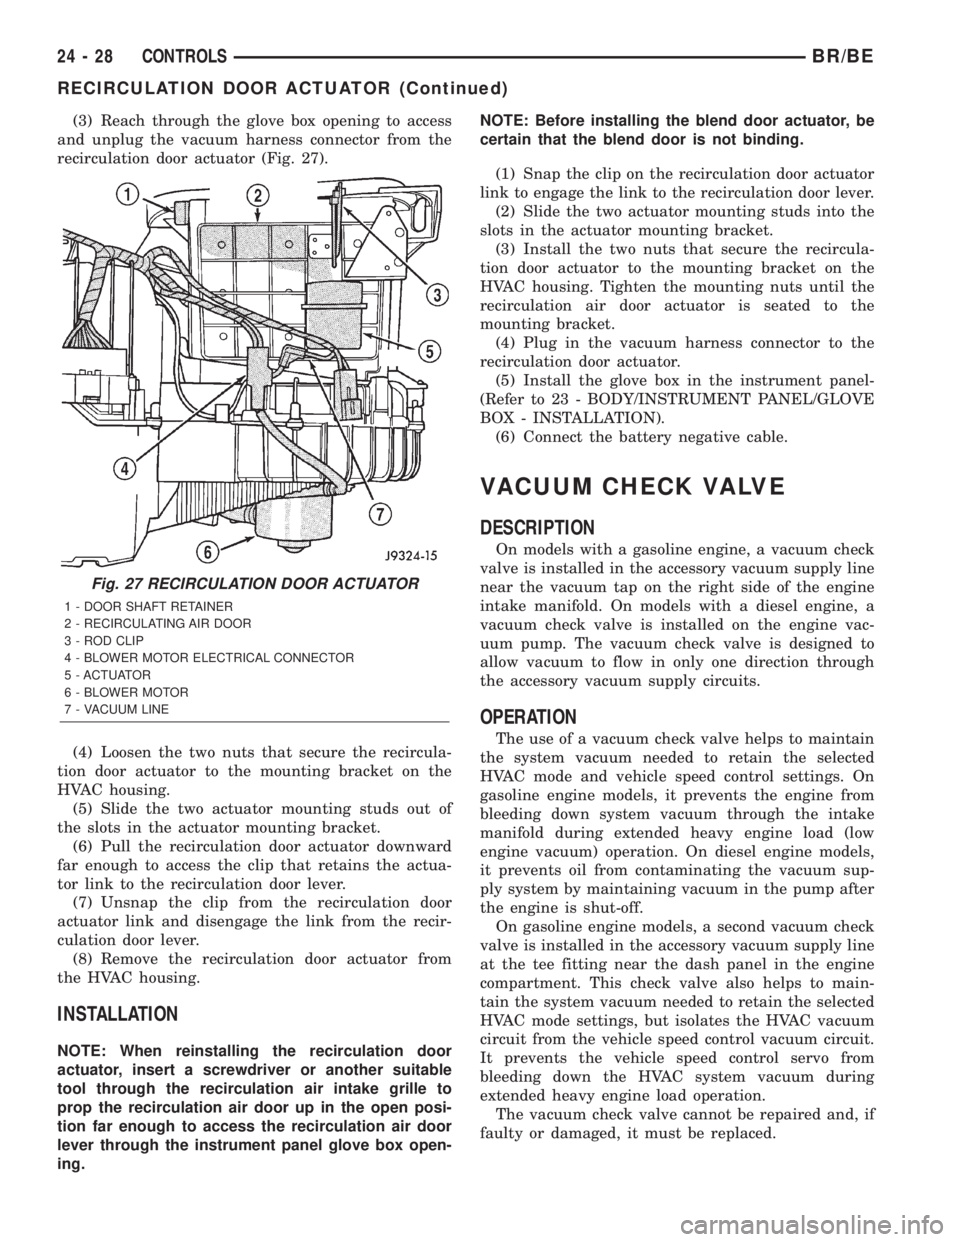
(3) Reach through the glove box opening to access
and unplug the vacuum harness connector from the
recirculation door actuator (Fig. 27).
(4) Loosen the two nuts that secure the recircula-
tion door actuator to the mounting bracket on the
HVAC housing.
(5) Slide the two actuator mounting studs out of
the slots in the actuator mounting bracket.
(6) Pull the recirculation door actuator downward
far enough to access the clip that retains the actua-
tor link to the recirculation door lever.
(7) Unsnap the clip from the recirculation door
actuator link and disengage the link from the recir-
culation door lever.
(8) Remove the recirculation door actuator from
the HVAC housing.
INSTALLATION
NOTE: When reinstalling the recirculation door
actuator, insert a screwdriver or another suitable
tool through the recirculation air intake grille to
prop the recirculation air door up in the open posi-
tion far enough to access the recirculation air door
lever through the instrument panel glove box open-
ing.NOTE: Before installing the blend door actuator, be
certain that the blend door is not binding.
(1) Snap the clip on the recirculation door actuator
link to engage the link to the recirculation door lever.
(2) Slide the two actuator mounting studs into the
slots in the actuator mounting bracket.
(3) Install the two nuts that secure the recircula-
tion door actuator to the mounting bracket on the
HVAC housing. Tighten the mounting nuts until the
recirculation air door actuator is seated to the
mounting bracket.
(4) Plug in the vacuum harness connector to the
recirculation door actuator.
(5) Install the glove box in the instrument panel-
(Refer to 23 - BODY/INSTRUMENT PANEL/GLOVE
BOX - INSTALLATION).
(6) Connect the battery negative cable.
VACUUM CHECK VALVE
DESCRIPTION
On models with a gasoline engine, a vacuum check
valve is installed in the accessory vacuum supply line
near the vacuum tap on the right side of the engine
intake manifold. On models with a diesel engine, a
vacuum check valve is installed on the engine vac-
uum pump. The vacuum check valve is designed to
allow vacuum to flow in only one direction through
the accessory vacuum supply circuits.
OPERATION
The use of a vacuum check valve helps to maintain
the system vacuum needed to retain the selected
HVAC mode and vehicle speed control settings. On
gasoline engine models, it prevents the engine from
bleeding down system vacuum through the intake
manifold during extended heavy engine load (low
engine vacuum) operation. On diesel engine models,
it prevents oil from contaminating the vacuum sup-
ply system by maintaining vacuum in the pump after
the engine is shut-off.
On gasoline engine models, a second vacuum check
valve is installed in the accessory vacuum supply line
at the tee fitting near the dash panel in the engine
compartment. This check valve also helps to main-
tain the system vacuum needed to retain the selected
HVAC mode settings, but isolates the HVAC vacuum
circuit from the vehicle speed control vacuum circuit.
It prevents the vehicle speed control servo from
bleeding down the HVAC system vacuum during
extended heavy engine load operation.
The vacuum check valve cannot be repaired and, if
faulty or damaged, it must be replaced.
Fig. 27 RECIRCULATION DOOR ACTUATOR
1 - DOOR SHAFT RETAINER
2 - RECIRCULATING AIR DOOR
3 - ROD CLIP
4 - BLOWER MOTOR ELECTRICAL CONNECTOR
5 - ACTUATOR
6 - BLOWER MOTOR
7 - VACUUM LINE
24 - 28 CONTROLSBR/BE
RECIRCULATION DOOR ACTUATOR (Continued)
Page 2152 of 2255
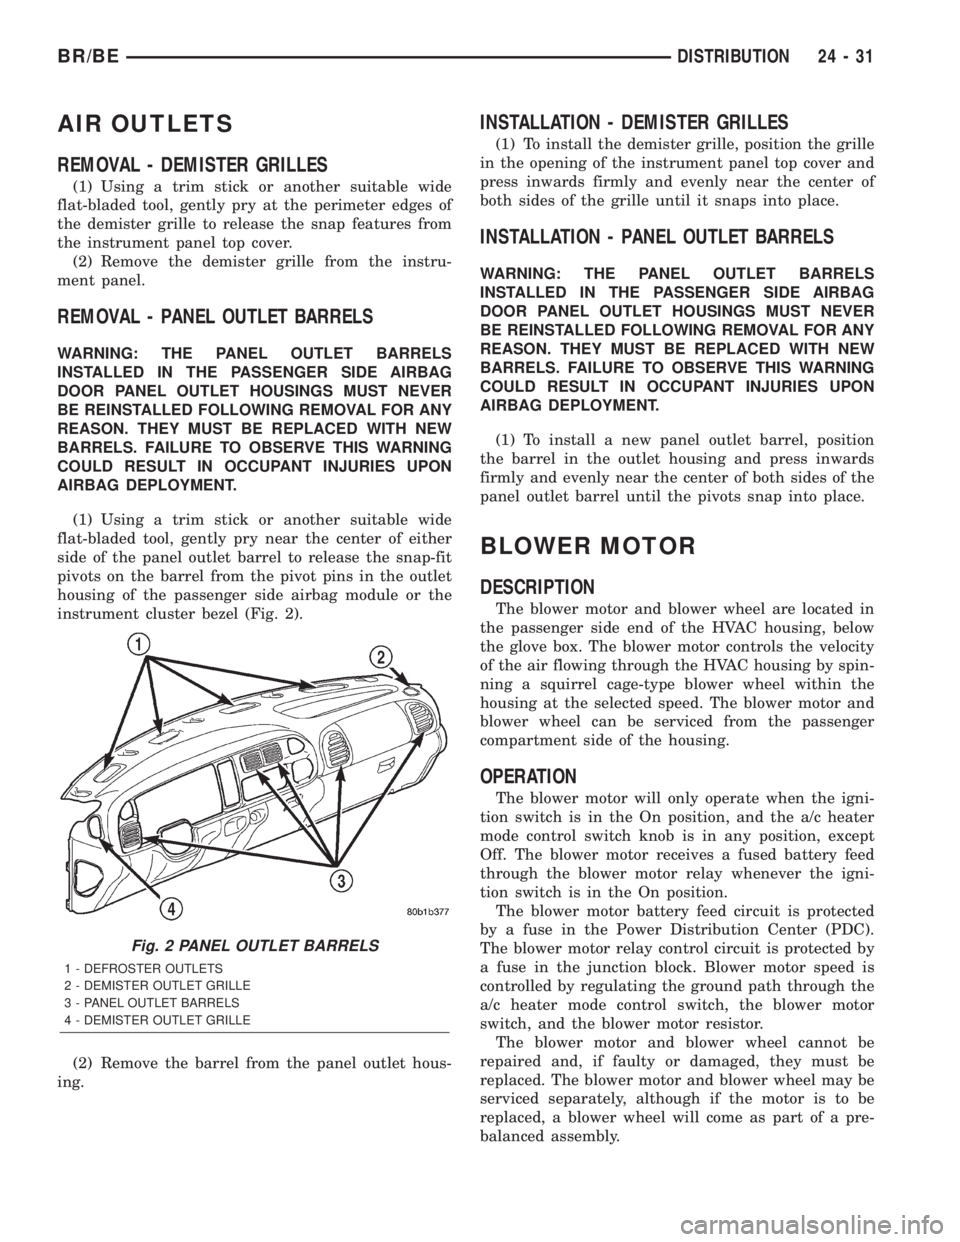
AIR OUTLETS
REMOVAL - DEMISTER GRILLES
(1) Using a trim stick or another suitable wide
flat-bladed tool, gently pry at the perimeter edges of
the demister grille to release the snap features from
the instrument panel top cover.
(2) Remove the demister grille from the instru-
ment panel.
REMOVAL - PANEL OUTLET BARRELS
WARNING: THE PANEL OUTLET BARRELS
INSTALLED IN THE PASSENGER SIDE AIRBAG
DOOR PANEL OUTLET HOUSINGS MUST NEVER
BE REINSTALLED FOLLOWING REMOVAL FOR ANY
REASON. THEY MUST BE REPLACED WITH NEW
BARRELS. FAILURE TO OBSERVE THIS WARNING
COULD RESULT IN OCCUPANT INJURIES UPON
AIRBAG DEPLOYMENT.
(1) Using a trim stick or another suitable wide
flat-bladed tool, gently pry near the center of either
side of the panel outlet barrel to release the snap-fit
pivots on the barrel from the pivot pins in the outlet
housing of the passenger side airbag module or the
instrument cluster bezel (Fig. 2).
(2) Remove the barrel from the panel outlet hous-
ing.
INSTALLATION - DEMISTER GRILLES
(1) To install the demister grille, position the grille
in the opening of the instrument panel top cover and
press inwards firmly and evenly near the center of
both sides of the grille until it snaps into place.
INSTALLATION - PANEL OUTLET BARRELS
WARNING: THE PANEL OUTLET BARRELS
INSTALLED IN THE PASSENGER SIDE AIRBAG
DOOR PANEL OUTLET HOUSINGS MUST NEVER
BE REINSTALLED FOLLOWING REMOVAL FOR ANY
REASON. THEY MUST BE REPLACED WITH NEW
BARRELS. FAILURE TO OBSERVE THIS WARNING
COULD RESULT IN OCCUPANT INJURIES UPON
AIRBAG DEPLOYMENT.
(1) To install a new panel outlet barrel, position
the barrel in the outlet housing and press inwards
firmly and evenly near the center of both sides of the
panel outlet barrel until the pivots snap into place.
BLOWER MOTOR
DESCRIPTION
The blower motor and blower wheel are located in
the passenger side end of the HVAC housing, below
the glove box. The blower motor controls the velocity
of the air flowing through the HVAC housing by spin-
ning a squirrel cage-type blower wheel within the
housing at the selected speed. The blower motor and
blower wheel can be serviced from the passenger
compartment side of the housing.
OPERATION
The blower motor will only operate when the igni-
tion switch is in the On position, and the a/c heater
mode control switch knob is in any position, except
Off. The blower motor receives a fused battery feed
through the blower motor relay whenever the igni-
tion switch is in the On position.
The blower motor battery feed circuit is protected
by a fuse in the Power Distribution Center (PDC).
The blower motor relay control circuit is protected by
a fuse in the junction block. Blower motor speed is
controlled by regulating the ground path through the
a/c heater mode control switch, the blower motor
switch, and the blower motor resistor.
The blower motor and blower wheel cannot be
repaired and, if faulty or damaged, they must be
replaced. The blower motor and blower wheel may be
serviced separately, although if the motor is to be
replaced, a blower wheel will come as part of a pre-
balanced assembly.
Fig. 2 PANEL OUTLET BARRELS
1 - DEFROSTER OUTLETS
2 - DEMISTER OUTLET GRILLE
3 - PANEL OUTLET BARRELS
4 - DEMISTER OUTLET GRILLE
BR/BEDISTRIBUTION 24 - 31
Page 2219 of 2255
AIR LEAK VACUUM TEST - DIAGNOSIS
AND TESTING, FUEL SYSTEM...........14-57
AIR PUMP FILTER - INSTALLATION......25-30
AIR PUMP FILTER - REMOVAL..........25-30
AIR TESTING TRANSMISSION CLUTCH
AND BAND OPERATION - DIAGNOSIS
AND TESTING................21-100,21-272
AIR TO OIL COOLER - INSTALLATION.....7-87
AIR TO OIL COOLER - REMOVAL.........7-86
AIRBAG - ASSEMBLY, DRIVER..........8O-16
AIRBAG - DESCRIPTION, DRIVER........8O-14
AIRBAG - DESCRIPTION, PASSENGER....8O-21
AIRBAG - DISASSEMBLY, DRIVER.......8O-15
AIRBAG - INSTALLATION, DRIVER.......8O-17
AIRBAG - INSTALLATION, PASSENGER . . . 8O-23
AIRBAG - OPERATION, DRIVER.........8O-14
AIRBAG - OPERATION, PASSENGER......8O-21
AIRBAG - REMOVAL, DRIVER...........8O-14
AIRBAG - REMOVAL, PASSENGER.......8O-21
AIRBAG CONTROL MODULE -
DESCRIPTION........................8O-6
AIRBAG CONTROL MODULE -
INSTALLATION.......................8O-8
AIRBAG CONTROL MODULE -
OPERATION..........................8O-6
AIRBAG CONTROL MODULE - REMOVAL . . . 8O-7
AIRBAG DEPLOYMENT - STANDARD
PROCEDURE, SERVICE AFTER AN........8O-4
AIRBAG INDICATOR - DESCRIPTION.......8J-15
AIRBAG INDICATOR - OPERATION.......8J-15
AIRBAG ON/OFF SWITCH -
DESCRIPTION, PASSENGER............8O-23
AIRBAG ON/OFF SWITCH -
INSTALLATION, PASSENGER...........8O-25
AIRBAG ON/OFF SWITCH - OPERATION,
PASSENGER........................8O-24
AIRBAG ON/OFF SWITCH - REMOVAL,
PASSENGER........................8O-24
AIRBAG SYSTEM - DIAGNOSIS AND
TESTING............................8O-4
AIRBAG SYSTEM - SPECIAL TOOLS.......8O-6
AIRBAGS - STANDARD PROCEDURE,
HANDLING NON-DEPLOYED.............8O-4
AIRFLOW - DESCRIPTION, HVAC
SYSTEM............................24-30
AJAR SWITCH - DESCRIPTION, DOOR....8L-34
AJAR SWITCH - DIAGNOSIS AND
TESTING, DOOR.....................8L-34
AJAR SWITCH - INSTALLATION, DOOR . . . 8L-35
AJAR SWITCH - REMOVAL, DOOR.......8L-35
ALIGNMENT - DESCRIPTION, WHEEL.......2-1
ALIGNMENT - OPERATION, WHEEL........2-2
ALIGNMENT I.F.S. - STANDARD
PROCEDURES.........................2-3
ALIGNMENT LINK/COIL SUSPENSION -
STANDARD PROCEDURE.................2-5
ALIGNMENT, SPECIAL TOOLS -
HEADLAMP..........................8L-4
ALIGNMENT, SPECIFICATIONS............2-6
ALUMINUM THREAD REPAIR -
STANDARD PROCEDURE........21-114,21-286
AMBIENT TEMP SENSOR - DESCRIPTION . 8M-12
AMBIENT TEMP SENSOR -
INSTALLATION......................8M-13
AMBIENT TEMP SENSOR - OPERATION . . 8M-12
AMBIENT TEMP SENSOR - REMOVAL
....8M-12
AMBIENT TEMPERATURE SENSOR -
DIAGNOSIS AND TESTING
.............8M-12
AMPERAGE TEST - DIAGNOSIS AND
TESTING, FUEL PUMP
.................14-10
ANTENNA - DIAGNOSIS AND TESTING
.....8A-5
ANTENNA BODY & CABLE -
DESCRIPTION
........................8A-4
ANTENNA BODY & CABLE -
INSTALLATION
.......................8A-6
ANTENNA BODY & CABLE - OPERATION
. . . 8A-4
ANTENNA BODY & CABLE - REMOVAL
.....8A-6
ANTENNA CABLE - INSTALLATION,
INSTRUMENT PANEL
..................8A-9
ANTENNA CABLE - REMOVAL,
INSTRUMENT PANEL
..................8A-9
ANTILOCK BRAKE - DESCRIPTION,
CONTROLLER
.......................8E-11
ANTILOCK BRAKE - INSTALLATION,
CONTROLLER
.......................8E-12
ANTILOCK BRAKE - OPERATION,
CONTROLLER
.......................8E-11ANTILOCK BRAKE - REMOVAL,
CONTROLLER.......................8E-11
ANTILOCK BRAKES - DIAGNOSIS AND
TESTING............................5-36
A-PILLAR GRAB HANDLE -
INSTALLATION......................23-119
A-PILLAR GRAB HANDLE - REMOVAL . . . 23-119
A-PILLAR TRIM - INSTALLATION.......23-119
A-PILLAR TRIM - REMOVAL...........23-119
A-PILLAR TWEETER SPEAKER -
INSTALLATION.......................8A-19
A-PILLAR TWEETER SPEAKER -
REMOVAL..........................8A-18
APPLICATION TABLE, SPECIFICATIONS -
A/C ................................24-7
APPLIQUE - INSTALLATION........23-63,23-68
APPLIQUE - REMOVAL...........23-63,23-68
ARM / ADJUSTER ASSEMBLY -
INSTALLATION, ROCKER................9-26
ARM / ADJUSTER ASSEMBLY -
REMOVAL, ROCKER...................9-26
ARM / ADJUSTER ASSY - CLEANING,
ROCKER............................9-146
ARM / ADJUSTER ASSY - DESCRIPTION,
ROCKER............................9-145
ARM / ADJUSTER ASSY - INSPECTION,
ROCKER............................9-146
ARM / ADJUSTER ASSY -
INSTALLATION, ROCKER...........9-148,9-84
ARM / ADJUSTER ASSY - REMOVAL,
ROCKER.......................9-145,9-84
ARM - DESCRIPTION, WIPER............8R-11
ARM - INSTALLATION, LOWER
CONTROL.......................2-10,2-20
ARM - INSTALLATION, UPPER
CONTROL.......................2-13,2-19
ARM - INSTALLATION, WIPER..........8R-12
ARM - OPERATION, WIPER............8R-11
ARM - REMOVAL, LOWER CONTROL . . 2-10,2-20
ARM - REMOVAL, UPPER CONTROL . . 2-13,2-19
ARM - REMOVAL, WIPER..............8R-12
ARMREST/CONSOLE - INSTALLATION,
CENTER SEAT......................23-132
ARMREST/CONSOLE - REMOVAL,
CENTER SEAT......................23-132
ARMREST/LATCH COVER -
INSTALLATION, CENTER SEAT.........23-132
ARMREST/LATCH COVER - REMOVAL,
CENTER SEAT......................23-132
ASD AND FUEL PUMP RELAYS -
DIAGNOSIS AND TESTING...............8I-4
ASD SENSE - PCM INPUT - OPERATION....8I-4
ASH RECEIVER - INSTALLATION........23-107
ASH RECEIVER - REMOVAL...........23-107
ASSEMBLY - INSTALLATION,
INSTRUMENT PANEL.................23-117
ASSEMBLY - INSTALLATION, ROCKER
ARM / ADJUSTER.....................9-26
ASSEMBLY - OVERHEAD CONSOLE
ASSEMBLY..........................8M-8
ASSEMBLY - REMOVAL, INSTRUMENT
PANEL............................23-115
ASSEMBLY - REMOVAL, ROCKER ARM /
ADJUSTER...........................9-26
ASSEMBLY, ASSEMBLY - OVERHEAD
CONSOLE...........................8M-8
ASSEMBLY, AXLE VACUUM MOTOR.......3-34
ASSEMBLY, DIAGNOSIS AND
TESTING....................21-122,21-294
ASSEMBLY, DIFFERENTIAL . 3-126,3-38,3-66,3-97
ASSEMBLY, DIFFERENTIAL - POWR-LOK . . . 3-99
ASSEMBLY, DIFFERENTIAL -
TRAC-LOK......................3-129,3-70
ASSEMBLY, DOUBLE CARDAN
UNIVERSAL JOINTS
...................3-11
ASSEMBLY, DRIVER AIRBAG
...........8O-16
ASSEMBLY, FLYWHEEL
.................6-14
ASSEMBLY, FRONT CLUTCH
.....21-162,21-333
ASSEMBLY, FRONT SERVO
......21-164,21-335
ASSEMBLY, GLOVE BOX
..............23-111
ASSEMBLY, HVAC HOUSING
............24-36
ASSEMBLY, INSTRUMENT CLUSTER
......8J-12
ASSEMBLY, MANUAL - NV4500
.........21-21
ASSEMBLY, MANUAL - NV5600
.........21-64
ASSEMBLY, OIL PUMP
.................9-49
ASSEMBLY, OIL PUMP
.........21-169,21-340
ASSEMBLY, OVERDRIVE UNIT
....21-180,21-354ASSEMBLY, OVERRUNNING CLUTCH
CAM/OVERDRIVE PISTON
RETAINER...................21-193,21-364
ASSEMBLY, PLANETARY GEARTRAIN/
OUTPUT SHAFT...............21-199,21-371
ASSEMBLY, REAR CLUTCH......21-205,21-377
ASSEMBLY, REAR SERVO.......21-207,21-379
ASSEMBLY, SINGLE CARDAN
UNIVERSAL JOINTS....................3-9
ASSEMBLY, TRANSFER CASE - NV241HD . 21-480
ASSEMBLY, TRANSFER CASE - NV241LD . 21-445
ASSEMBLY, VALVE BODY.......21-248,21-420
ASSIST HANDLE - INSTALLATION.......23-124
ASSIST HANDLE - REMOVAL..........23-124
ASSY - CLEANING, ROCKER ARM /
ADJUSTER..........................9-146
ASSY - DESCRIPTION, ROCKER ARM /
ADJUSTER..........................9-145
ASSY - INSPECTION, ROCKER ARM /
ADJUSTER..........................9-146
ASSY - INSTALLATION, ROCKER ARM /
ADJUSTER......................9-148,9-84
ASSY - REMOVAL, ROCKER ARM /
ADJUSTER......................9-145,9-84
AUDIO - DESCRIPTION.................8A-1
AUDIO - DIAGNOSIS AND TESTING.......8A-2
AUDIO - OPERATION...................8A-2
AUDIO SYSTEMS, SPECIAL TOOLS.......8A-4
AUTO. TRANS. - INSTALLATION, DIESEL
WITH..........................8P-12,8P-6
AUTO. TRANS. - REMOVAL, DIESEL
WITH...........................8P-5,8P-9
AUTOMATIC DAY / NIGHT MIRROR -
DESCRIPTION.......................8N-11
AUTOMATIC DAY / NIGHT MIRROR -
INSTALLATION......................8N-13
AUTOMATIC DAY / NIGHT MIRROR -
OPERATION.........................8N-12
AUTOMATIC DAY / NIGHT MIRROR -
REMOVAL..........................8N-13
AUTOMATIC DAY/NIGHT MIRROR -
DIAGNOSIS AND TESTING.............8N-12
AUTOMATIC TRANSMISSION - 46RE -
DESCRIPTION.......................21-89
AUTOMATIC TRANSMISSION - 46RE -
OPERATION.........................21-91
AUTOMATIC TRANSMISSION - 47RE -
DESCRIPTION......................21-261
AUTOMATIC TRANSMISSION - 47RE -
OPERATION........................21-263
AUTOMATIC TRANSMISSION -
DIAGNOSIS AND TESTING.......21-268,21-96
AUTOMATIC TRANSMISSION FLUID -
DESCRIPTION.........................0-6
AUTOMATIC TRANSMISSION FLUID -
OPERATION...........................0-6
AXLE - 248FBI - ADJUSTMENTS, FRONT . . . 3-19
AXLE - 248FBI - DESCRIPTION, FRONT....3-14
AXLE - 248FBI - INSTALLATION, FRONT....3-18
AXLE - 248FBI - OPERATION, FRONT......3-14
AXLE - 248FBI - REMOVAL, FRONT.......3-18
AXLE - 248RBI - ADJUSTMENTS, REAR....3-51
AXLE - 248RBI - DESCRIPTION, REAR.....3-46
AXLE - 248RBI - INSTALLATION, REAR....3-51
AXLE - 248RBI - OPERATION, REAR.......3-46
AXLE - 248RBI - REMOVAL, REAR........3-51
AXLE - 267RBI - ADJUSTMENTS, REAR....3-83
AXLE - 267RBI - DESCRIPTION, REAR.....3-78
AXLE - 267RBI - INSTALLATION, REAR....3-82
AXLE - 267RBI - OPERATION, REAR.......3-78
AXLE - 267RBI - REMOVAL, REAR........3-82
AXLE - 286RBI - ADJUSTMENTS, REAR . . . 3-112
AXLE - 286RBI - DESCRIPTION, REAR....3-107
AXLE - 286RBI - INSTALLATION, REAR . . . 3-112
AXLE - 286RBI - OPERATION, REAR......3-108
AXLE - 286RBI - REMOVAL, REAR.......3-112
AXLE - DIAGNOSIS AND
TESTING...............3-108,3-15,3-47,3-80
AXLE - INSTALLATION, DANA 44.....2-20,2-21
AXLE - INSTALLATION, DANA 60.....2-20,2-22
AXLE - INSTALLATION, INTERMEDIATE....3-30
AXLE - REMOVAL, DANA 44.............2-21
AXLE - REMOVAL, DANA 60.............2-21
AXLE, 248FBI - FRONT
.................3-27
AXLE, 248RBI - REAR
..................3-59
AXLE, 267RBI - REAR
..................3-91
AXLE, 286 RBI - REAR
................3-120
AXLE, 286RBI - REAR
.................3-120
2 INDEXBR/BE
Description Group-Page Description Group-Page Description Group-Page
Page 2221 of 2255
BLOCK - DIAGNOSIS AND TESTING,
JUNCTION........................8W-97-7
BLOCK - INSPECTION, ENGINE.......9-27,9-85
BLOCK HEATER - 5.9L - DESCRIPTION,
ENGINE.............................7-44
BLOCK HEATER - 5.9L - INSTALLATION,
ENGINE.............................7-44
BLOCK HEATER - 5.9L - OPERATION,
ENGINE.............................7-44
BLOCK HEATER - 5.9L - REMOVAL,
ENGINE.............................7-44
BLOCK HEATER - 5.9L DIESEL -
DESCRIPTION, ENGINE.................7-46
BLOCK HEATER - 5.9L DIESEL -
INSTALLATION, ENGINE................7-46
BLOCK HEATER - 5.9L DIESEL -
OPERATION, ENGINE...................7-46
BLOCK HEATER - 5.9L DIESEL -
REMOVAL, ENGINE....................7-46
BLOCK HEATER - 8.0L - DESCRIPTION,
ENGINE.............................7-45
BLOCK HEATER - 8.0L - INSTALLATION,
ENGINE.............................7-45
BLOCK HEATER - 8.0L - OPERATION,
ENGINE.............................7-45
BLOCK HEATER - 8.0L - REMOVAL,
ENGINE.............................7-45
BLOCK REFACING - STANDARD
PROCEDURE, CYLINDER...............9-148
BLOWER MOTOR - DESCRIPTION.......24-31
BLOWER MOTOR - DIAGNOSIS AND
TESTING...........................24-32
BLOWER MOTOR - INSTALLATION........24-32
BLOWER MOTOR - OPERATION.........24-31
BLOWER MOTOR - REMOVAL...........24-32
BLOWER MOTOR RELAY - DESCRIPTION . . 24-22
BLOWER MOTOR RELAY - DIAGNOSIS
AND TESTING.......................24-22
BLOWER MOTOR RELAY -
INSTALLATION.......................24-23
BLOWER MOTOR RELAY - OPERATION . . . 24-22
BLOWER MOTOR RELAY - REMOVAL.....24-23
BLOWER MOTOR RESISTOR BLOCK -
DESCRIPTION.......................24-23
BLOWER MOTOR RESISTOR BLOCK -
DIAGNOSIS AND TESTING.............24-23
BLOWER MOTOR RESISTOR BLOCK -
INSTALLATION.......................24-24
BLOWER MOTOR RESISTOR BLOCK -
OPERATION.........................24-23
BLOWER MOTOR RESISTOR BLOCK -
REMOVAL..........................24-24
BLOWER MOTOR SWITCH -
DESCRIPTION.......................24-24
BLOWER MOTOR SWITCH - DIAGNOSIS
AND TESTING.......................24-25
BLOWER MOTOR SWITCH - OPERATION . . 24-24
BLOWER MOTOR SWITCH - REMOVAL . . . 24-25
BODY - ADJUSTMENTS, VALVE . . 21-257,21-428
BODY - ASSEMBLY, VALVE......21-248,21-420
BODY & CABLE - DESCRIPTION,
ANTENNA...........................8A-4
BODY & CABLE - INSTALLATION,
ANTENNA...........................8A-6
BODY & CABLE - OPERATION, ANTENNA . . . 8A-4
BODY & CABLE - REMOVAL, ANTENNA....8A-6
BODY - CLEANING, VALVE......21-244,21-418
BODY - DESCRIPTION, THROTTLE.......14-47
BODY - DESCRIPTION, VALVE....21-218,21-391
BODY - DISASSEMBLY, VALVE . . . 21-237,21-409
BODY - INSPECTION, VALVE.....21-244,21-419
BODY - INSTALLATION, VALVE . . . 21-256,21-428
BODY - OPERATION, THROTTLE.........14-47
BODY - OPERATION, VALVE.....21-223,21-394
BODY - REMOVAL, VALVE.......21-236,21-407
BODY CODE PLATE - DESCRIPTION.....Intro.-4
BODY GAP AND FLUSH
MEASUREMENTS, SPECIFICATIONS......23-56
BODY OPENING DIMENSIONS,
SPECIFICATIONS.....................23-60
BODY SEALER LOCATIONS,
SPECIFICATIONS
.....................23-47
BODY SIDE MOLDINGS - INSTALLATION
. . 23-87
BODY SIDE MOLDINGS - REMOVAL
......23-86
BODY STRIPES AND DECALS -
INSTALLATION
.......................23-87
BODY STRIPES AND DECALS -
REMOVAL
..........................23-87BODY VENT - INSTALLATION..........23-126
BODY VENT - REMOVAL..............23-126
BOOST PRESSURE - DIAGNOSIS AND
TESTING...........................14-93
BOOST PRESSURE - DIAGNOSIS AND
TESTING, TURBOCHARGER.............11-13
BOOSTER - DIAGNOSIS AND TESTING,
HYDRAULIC..........................5-18
BOOSTER - DIAGNOSIS AND TESTING,
MASTER CYLINDER/POWER.............5-26
BOOSTER - INSTALLATION, POWER
BRAKE..............................5-19
BOOSTER - REMOVAL, POWER BRAKE....5-19
BOOT - INSTALLATION, 4WD FLOOR
SHIFT.............................23-122
BOOT - MANUAL TRANSMISSION -
INSTALLATION, SHIFT................23-122
BOOT - MANUAL TRANSMISSION -
REMOVAL, SHIFT....................23-122
BOOT - REMOVAL, 4WD FLOOR SHIFT . . . 23-122
BORE - DE-GLAZE - STANDARD
PROCEDURE, CYLINDER...............9-148
BORE HONING - STANDARD
PROCEDURE, CYLINDER............9-11,9-65
BORE REPAIR - STANDARD
PROCEDURE, CAM...................9-151
BORE REPAIR - STANDARD
PROCEDURE, CYLINDER...............9-149
BOX - ASSEMBLY, GLOVE.............23-111
BOX - DISASSEMBLY, GLOVE..........23-110
BOX - INSTALLATION, CARGO..........23-97
BOX - REMOVAL, CARGO..............23-97
BOX LAMP AND SWITCH -
INSTALLATION, GLOVE................8L-36
BOX LAMP AND SWITCH - REMOVAL,
GLOVE.............................8L-35
BOX LATCH STRIKER - INSTALLATION,
GLOVE............................23-112
BOX LATCH STRIKER - REMOVAL,
GLOVE............................23-111
BOX OPENING UPPER TRIM -
INSTALLATION, GLOVE...............23-112
BOX OPENING UPPER TRIM - REMOVAL,
GLOVE............................23-112
B-PILLAR DOOR SEAL - INSTALLATION . . 23-151
B-PILLAR DOOR SEAL - REMOVAL......23-151
B-PILLAR TRIM - INSTALLATION.......23-120
B-PILLAR TRIM - REMOVAL...........23-120
BRACKET - INSTALLATION, CAB
CHASSIS ADAPTER...................13-10
BRACKET - INSTALLATION, REARVIEW
MIRROR SUPPORT..................23-126
BRACKET - REMOVAL, CAB CHASSIS
ADAPTER...........................13-10
BRAKE - DESCRIPTION, CONTROLLER
ANTILOCK..........................8E-11
BRAKE - DESCRIPTION, PARKING........5-28
BRAKE - INSTALLATION, CONTROLLER
ANTILOCK..........................8E-12
BRAKE - OPERATION, CONTROLLER
ANTILOCK..........................8E-11
BRAKE - OPERATION, PARKING..........5-28
BRAKE - REMOVAL, CONTROLLER
ANTILOCK..........................8E-11
BRAKE BOOSTER - INSTALLATION,
POWER.............................5-19
BRAKE BOOSTER - REMOVAL, POWER....5-19
BRAKE CABLE - INSTALLATION, FRONT
PARKING............................5-30
BRAKE CABLE - INSTALLATION, REAR
PARK...............................5-30
BRAKE CABLE - REMOVAL, FRONT
PARKING............................5-29
BRAKE CABLE - REMOVAL, REAR PARK . . . 5-29
BRAKE CALIPERS - DESCRIPTION, DISC . . . 5-10
BRAKE CALIPERS - OPERATION, DISC.....5-10
BRAKE FLUID CONTAMINATION -
DIAGNOSIS AND TESTING..............5-15
BRAKE FLUID LEVEL - STANDARD
PROCEDURE.........................5-15
BRAKE FLUID, SPECIFICATIONS
..........5-15
BRAKE INDICATOR - DESCRIPTION,
BRAKE/PARK
........................8J-15
BRAKE INDICATOR - DIAGNOSIS AND
TESTING
...........................8J-16
BRAKE INDICATOR - OPERATION,
BRAKE/PARK
........................8J-15
BRAKE LAMP SWITCH - DESCRIPTION
....8L-4BRAKE LAMP SWITCH - DIAGNOSIS
AND TESTING........................8L-5
BRAKE LAMP SWITCH - INSTALLATION....8L-6
BRAKE LAMP SWITCH - OPERATION......8L-4
BRAKE LAMP SWITCH - REMOVAL.......8L-5
BRAKE ROTOR, DIAGNOSIS AND
TESTING - DISC......................5-20
BRAKE SHOES - ADJUSTMENT, PARKING . . 5-33
BRAKE, SPECIFICATIONS - BASE..........5-2
BRAKE SYSTEM - DIAGNOSIS AND
TESTING, BASE........................5-5
BRAKE SYSTEM - STANDARD
PROCEDURE, BLEEDING ABS............5-36
BRAKE/PARK BRAKE INDICATOR -
DESCRIPTION.......................8J-15
BRAKE/PARK BRAKE INDICATOR -
OPERATION.........................8J-15
BRAKES - ABS - DESCRIPTION...........5-35
BRAKES - ABS - OPERATION............5-36
BRAKES - DIAGNOSIS AND TESTING,
ANTILOCK...........................5-36
BRAKES, SPECIAL TOOLS - BASE.........5-4
BR/BE PAINT COLOR CODES,
SPECIFICATIONS - 2002..............23-129
BREAKER - DESCRIPTION, CIRCUIT....8W-97-4
BREAKER - DIAGNOSIS AND TESTING,
CIRCUIT.........................8W-97-4
BREAK-IN - STANDARD PROCEDURE,
A/C COMPRESSOR CLUTCH............24-13
BREATHER VAPOR CANISTER -
INSTALLATION, CRANKCASE.............9-126
BREATHER VAPOR CANISTER -
REMOVAL, CRANKCASE...............9-125
BUCKLE - INSTALLATION, FRONT SEAT
BELT ..............................8O-20
BUCKLE - INSTALLATION, REAR SEAT
BELT ..............................8O-27
BUCKLE - REMOVAL, FRONT SEAT BELT . . 8O-20
BUCKLE - REMOVAL, REAR SEAT BELT . . . 8O-27
BUMPER - INSTALLATION, FRONT........13-4
BUMPER - INSTALLATION, REAR.........13-6
BUMPER - INSTALLATION, SLAM........23-67
BUMPER - REMOVAL, FRONT............13-4
BUMPER - REMOVAL, REAR.............13-6
BUMPER - REMOVAL, SLAM...........23-67
BUMPER - SPORT - INSTALLATION,
FRONT..............................13-5
BUMPER - SPORT - REMOVAL, FRONT....13-5
BUMPERS - DESCRIPTION..............13-1
BURNT FLUID - DIAGNOSIS AND
TESTING, CAUSES OF..........21-157,21-327
BUS - DESCRIPTION, CCD DATA..........8E-6
BUS - DIAGNOSIS AND TESTING, CCD
DATA ..............................8E-11
BUS - OPERATION, CCD DATA...........8E-7
BUSHING - INSTALLATION,
DISTRIBUTOR........................9-35
BUSHING - INSTALLATION, EXTENSION
HOUSING....................21-156,21-326
BUSHING - REMOVAL, DISTRIBUTOR......9-35
BUSHING - REMOVAL, EXTENSION
HOUSING....................21-156,21-326
BUSHING AND SEAL - INSTALLATION,
EXTENSION HOUSING..........21-460,21-497
BUSHING AND SEAL - REMOVAL,
EXTENSION HOUSING..........21-460,21-497
BUSHINGS - INSTALLATION.............2-27
BUSHINGS - REMOVAL.................2-27
BYPASS HOSE WITH AIR CONDITIONING
- INSTALLATION, WATER PUMP..........7-76
BYPASS HOSE WITH AIR CONDITIONING
- REMOVAL, WATER PUMP..............7-73
BYPASS HOSE WITHOUT AIR
CONDITIONING - INSTALLATION,
WATER PUMP........................7-77
BYPASS HOSE WITHOUT AIR
CONDITIONING - REMOVAL, WATER
PUMP..............................7-76
CAB - INSTALLATION, CLUB/QUAD.......8O-20
CAB - INSTALLATION, STANDARD.......8O-19
CAB - REMOVAL, CLUB/QUAD
..........8O-19
CAB - REMOVAL, STANDARD
...........8O-18
CAB CHASSIS ADAPTER BRACKET -
INSTALLATION
.......................13-10
CAB CHASSIS ADAPTER BRACKET -
REMOVAL
..........................13-10
CAB SIDE PANEL SPEAKER -
INSTALLATION, REAR
.................8A-20
4 INDEXBR/BE
Description Group-Page Description Group-Page Description Group-Page