2002 DODGE RAM engine
[x] Cancel search: enginePage 235 of 2255

IMPROPER RELEASE OR CLUTCH ENGAGEMENT
Clutch release or engagement problems are caused
by wear or damage to one or more clutch compo-
nents. A visual inspection of the release components
will usually reveal the problem part.
Release problems can result in hard shifting and
noise. Items to look for are: leaks at the clutch cylin-
ders and interconnecting line; loose slave cylinder
bolts; worn/loose release fork and pivot stud; dam-
aged release bearing; and a worn clutch disc, or pres-
sure plate.
Normal condensation in vehicles that are stored or
out of service for long periods of time can generate
enough corrosion to make the disc stick to the fly-
wheel, or pressure plate. If this condition is experi-
enced, correction only requires that the disc be
loosened manually through the inspection plate open-
ing.
Engagement problems usually result in slip, chat-
ter/shudder, and noisy operation. The primary causes
are clutch disc contamination; clutch disc wear; mis-
alignment, or distortion; flywheel damage; or a com-
bination of the foregoing. A visual inspection is
required to determine the part actually causing the
problem.
CLUTCH MISALIGNMENT
Clutch components must be in proper alignment
with the crankshaft and transmission input shaft.
Misalignment caused by excessive runout or warpage
of any clutch component will cause grab, chatter and
improper clutch release.
CLUTCH COVER AND DISC RUNOUT
Check the clutch disc before installation. Axial
(face) runout of anewdisc should not exceed 0.50
mm (0.020 in.). Measure runout about 6 mm (1/4 in.)
from the outer edge of the disc facing. Obtain
another disc if runout is excessive.
Check condition of the clutch before installation. A
warped cover or diaphragm spring will cause grab
and incomplete release or engagement. Be careful
when handling the cover and disc. Impact can distort
the cover, diaphragm spring, release fingers and the
hub of the clutch disc.
Use an alignment tool when positioning the disc on
the flywheel. The tool prevents accidental misalign-
ment which could result in cover distortion and disc
damage.
A frequent cause of clutch cover distortion (and
consequent misalignment) is improper bolt tighten-
ing.
DIAGNOSIS CHART
The clutch inspection chart (Fig. 3) outlines items
to be checked before and during clutch installation.
Use the chart as a check list to help avoid overlook-
ing potential problem sources during service opera-
tions.
The diagnosis charts Diagnosis Chart describe
common clutch problems, causes and correction.
Fault conditions are listed at the top of each chart.
Conditions, causes and corrective action are outlined
in the indicated columns.
The charts are provided as a convenient reference
when diagnosing faulty clutch operation.
DIAGNOSIS CHART
CONDITION POSSIBLE CAUSES CORRECTION
Disc facing worn out 1. Normal wear. 1. Replace cover and disc.
2. Driver frequently rides (slips) the
clutch. Results in rapid overheating
and wear.2. Replace cover and disc.
3. Insufficient clutch cover
diaphragm spring tension.3. Replace cover and disc.
Clutch disc facing contaminated with
oil, grease, or clutch fluid.1. Leak at rear main engine seal or
transmission input shaft seal.1. Replace appropriate seal.
2. Excessive amount of grease
applied to the input shaft splines.2. Remove grease and apply the
correct amount of grease.
3. Road splash, water entering
housing.3. Replace clutch disc. Clean clutch
cover and reuse if in good condition.
4. Slave cylinder leaking. 4. Replace hydraulic clutch linkage.
6 - 4 CLUTCHBR/BE
CLUTCH (Continued)
Page 238 of 2255
SPECIFICATIONS - CLUTCH
TORQUE SPECIFICATIONS
DESCRIPTION N´m Ft. Lbs. In. Lbs.
Nut, slave cylinder 19-26 14-19 170-230
Bolt, clutch cover-5/16 in. 23 17 -
Bolt, clutch cover-3/8 in. 41 30 -
Pivot, release bearing 23 17 -
Screw, fluid reservoir 5 - 40
CLUTCH DISC
REMOVAL
(1) Raise and support vehicle.
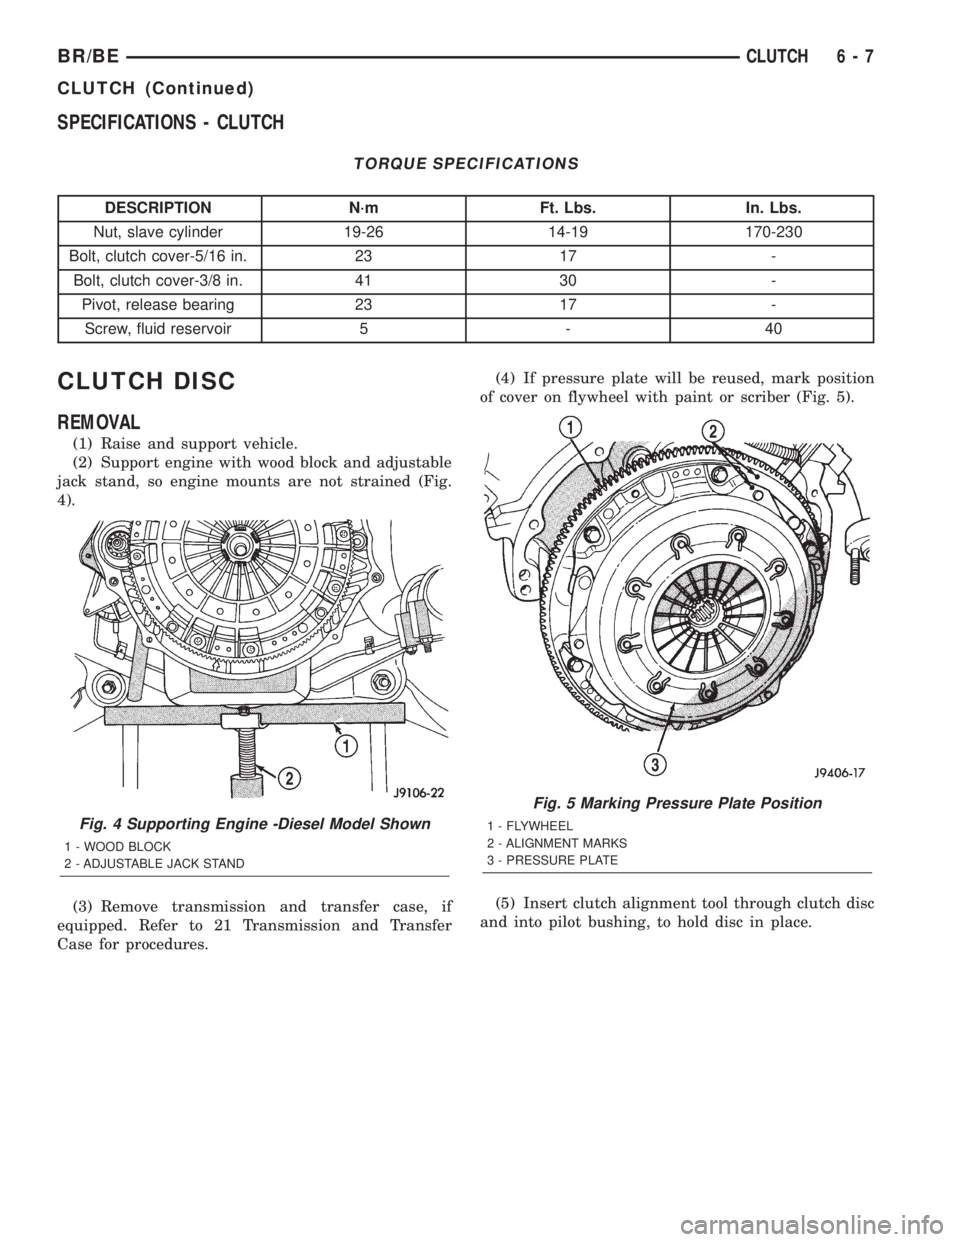
(2) Support engine with wood block and adjustable
jack stand, so engine mounts are not strained (Fig.
4).
(3) Remove transmission and transfer case, if
equipped. Refer to 21 Transmission and Transfer
Case for procedures.(4) If pressure plate will be reused, mark position
of cover on flywheel with paint or scriber (Fig. 5).
(5) Insert clutch alignment tool through clutch disc
and into pilot bushing, to hold disc in place.
Fig. 4 Supporting Engine -Diesel Model Shown
1 - WOOD BLOCK
2 - ADJUSTABLE JACK STAND
Fig. 5 Marking Pressure Plate Position
1 - FLYWHEEL
2 - ALIGNMENT MARKS
3 - PRESSURE PLATE
BR/BECLUTCH 6 - 7
CLUTCH (Continued)
Page 240 of 2255
CLUTCH HOUSING
DIAGNOSIS AND TESTING - CLUTCH HOUSING
The clutch housing maintains alignment between
the crankshaft and transmission input shaft. Mis-
alignment can cause clutch noise, hard shifting,
incomplete release and chatter. Also premature pilot
bearing, cover release fingers and clutch disc wear.
In severe cases, it can cause premature wear of the
transmission input shaft and front bearing.
NOTE: Only the NV4500 clutch housing can be
checked using the following bore and face runout
procedures. The NV5600 clutch housing is a inte-
gral part of the transmission and can only be
checked off the vehicle.
CLUTCH HOUSING BORE RUNOUT
CAUTION: On diesel engines if housing bore runout
exceeds 0.015 inch, the clutch housing/transmis-
sion adapter plate must be replaced. On gas
engines if housing bore runout exceeds 0.053 in.
the clutch housing must be replaced.
NOTE: Offset dowels are available for gas engines
to correct housing bore runout. They are not avail-
able for diesel engines.
(1) Remove the clutch housing and strut.
(2) Remove the clutch cover and disc.
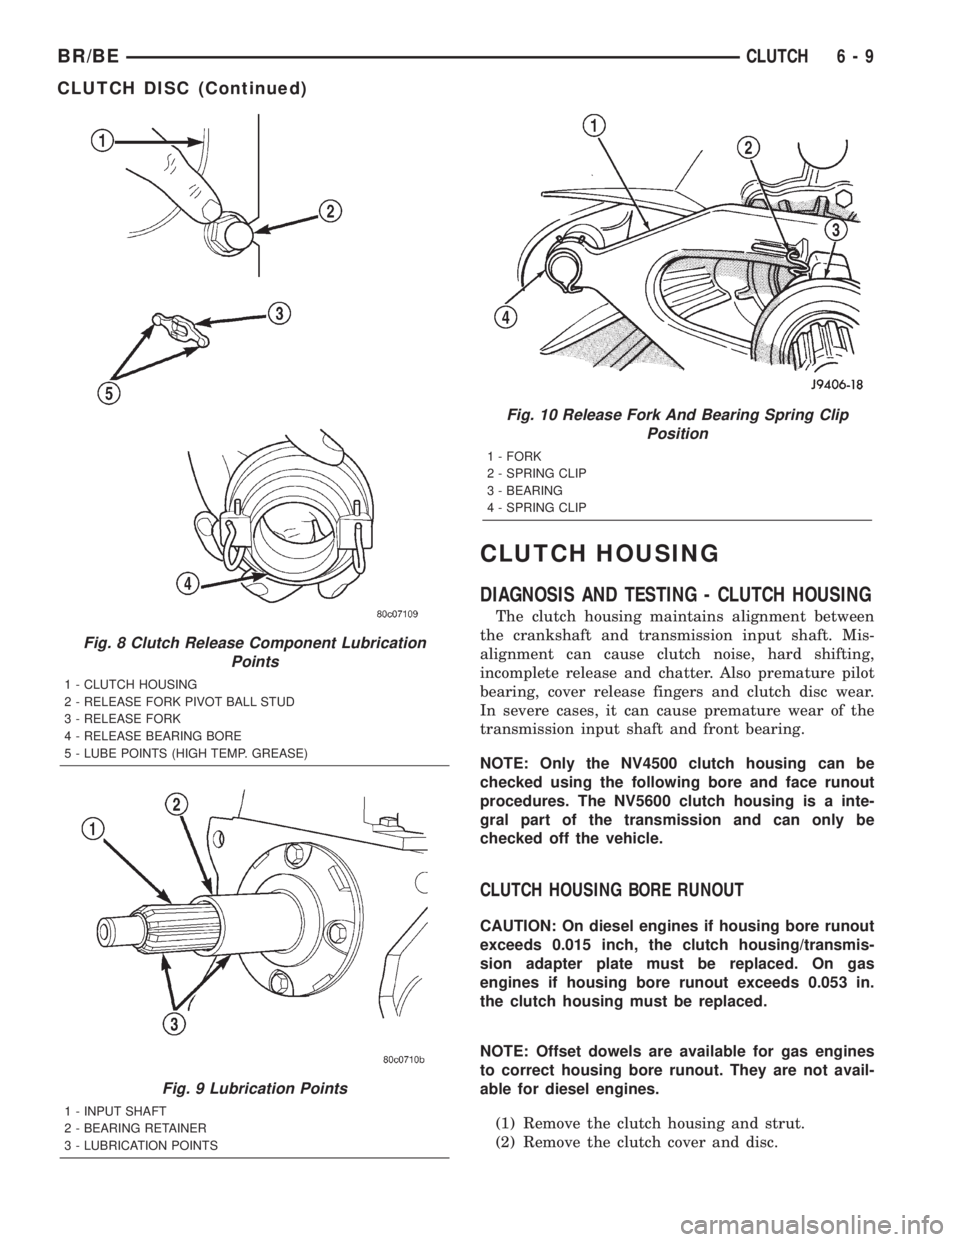
Fig. 8 Clutch Release Component Lubrication
Points
1 - CLUTCH HOUSING
2 - RELEASE FORK PIVOT BALL STUD
3 - RELEASE FORK
4 - RELEASE BEARING BORE
5 - LUBE POINTS (HIGH TEMP. GREASE)
Fig. 9 Lubrication Points
1 - INPUT SHAFT
2 - BEARING RETAINER
3 - LUBRICATION POINTS
Fig. 10 Release Fork And Bearing Spring Clip
Position
1 - FORK
2 - SPRING CLIP
3 - BEARING
4 - SPRING CLIP
BR/BECLUTCH 6 - 9
CLUTCH DISC (Continued)
Page 242 of 2255
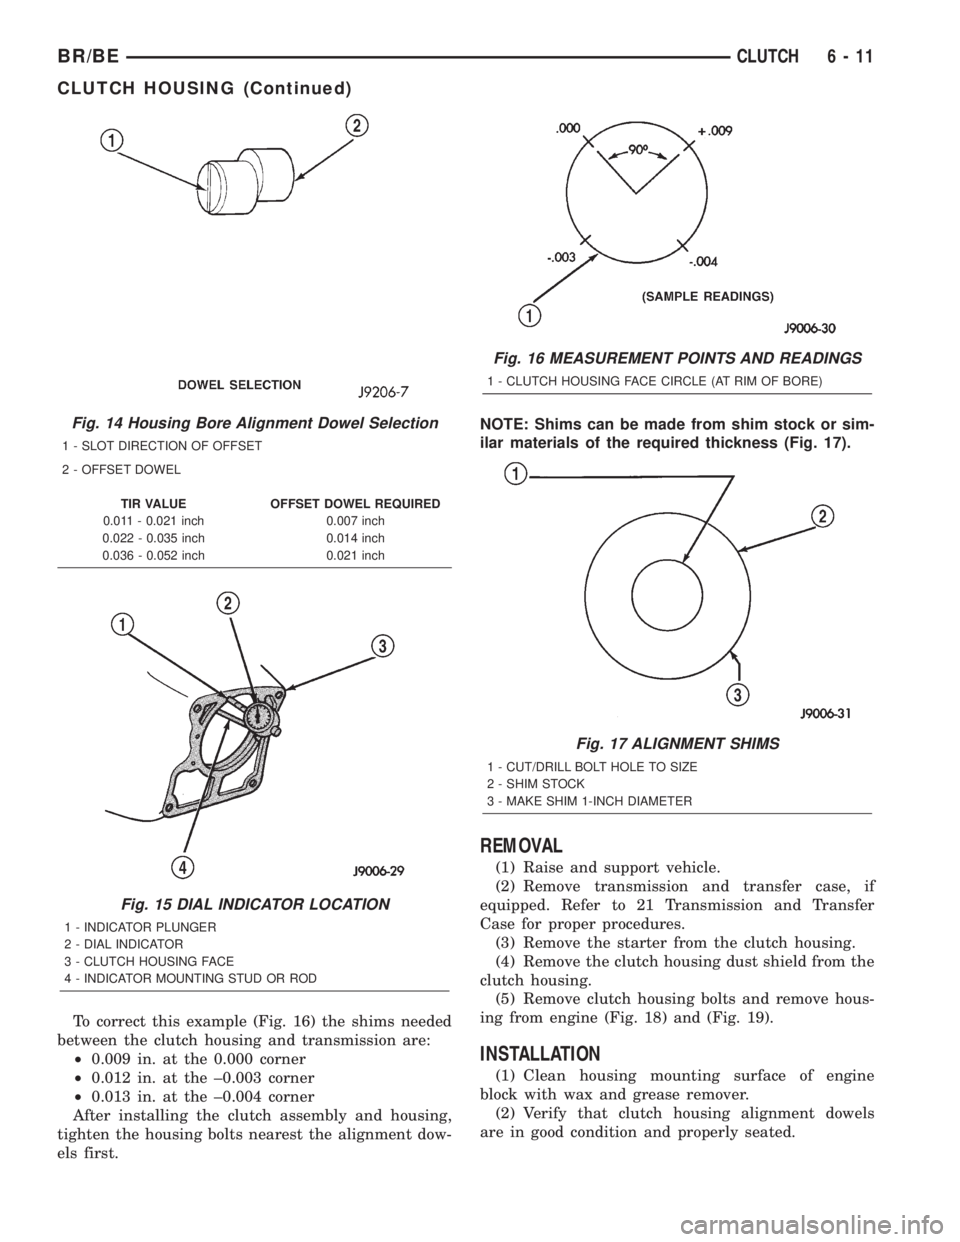
To correct this example (Fig. 16) the shims needed
between the clutch housing and transmission are:
²0.009 in. at the 0.000 corner
²0.012 in. at the ±0.003 corner
²0.013 in. at the ±0.004 corner
After installing the clutch assembly and housing,
tighten the housing bolts nearest the alignment dow-
els first.NOTE: Shims can be made from shim stock or sim-
ilar materials of the required thickness (Fig. 17).
REMOVAL
(1) Raise and support vehicle.
(2) Remove transmission and transfer case, if
equipped. Refer to 21 Transmission and Transfer
Case for proper procedures.
(3) Remove the starter from the clutch housing.
(4) Remove the clutch housing dust shield from the
clutch housing.
(5) Remove clutch housing bolts and remove hous-
ing from engine (Fig. 18) and (Fig. 19).
INSTALLATION
(1) Clean housing mounting surface of engine
block with wax and grease remover.
(2) Verify that clutch housing alignment dowels
are in good condition and properly seated.
Fig. 14 Housing Bore Alignment Dowel Selection
1 - SLOT DIRECTION OF OFFSET
2 - OFFSET DOWEL
TIR VALUE OFFSET DOWEL REQUIRED
0.011 - 0.021 inch 0.007 inch
0.022 - 0.035 inch 0.014 inch
0.036 - 0.052 inch 0.021 inch
Fig. 15 DIAL INDICATOR LOCATION
1 - INDICATOR PLUNGER
2 - DIAL INDICATOR
3 - CLUTCH HOUSING FACE
4 - INDICATOR MOUNTING STUD OR ROD
Fig. 16 MEASUREMENT POINTS AND READINGS
1 - CLUTCH HOUSING FACE CIRCLE (AT RIM OF BORE)
Fig. 17 ALIGNMENT SHIMS
1 - CUT/DRILL BOLT HOLE TO SIZE
2 - SHIM STOCK
3 - MAKE SHIM 1-INCH DIAMETER
BR/BECLUTCH 6 - 11
CLUTCH HOUSING (Continued)
Page 243 of 2255
(3) Transfer slave cylinder, release fork and boot,
fork pivot stud and wire/hose brackets to new hous-
ing.
(4) Lubricate release fork and pivot contact sur-
faces with Mopar High Temperature wheel bearing
grease or equivalent before installation.
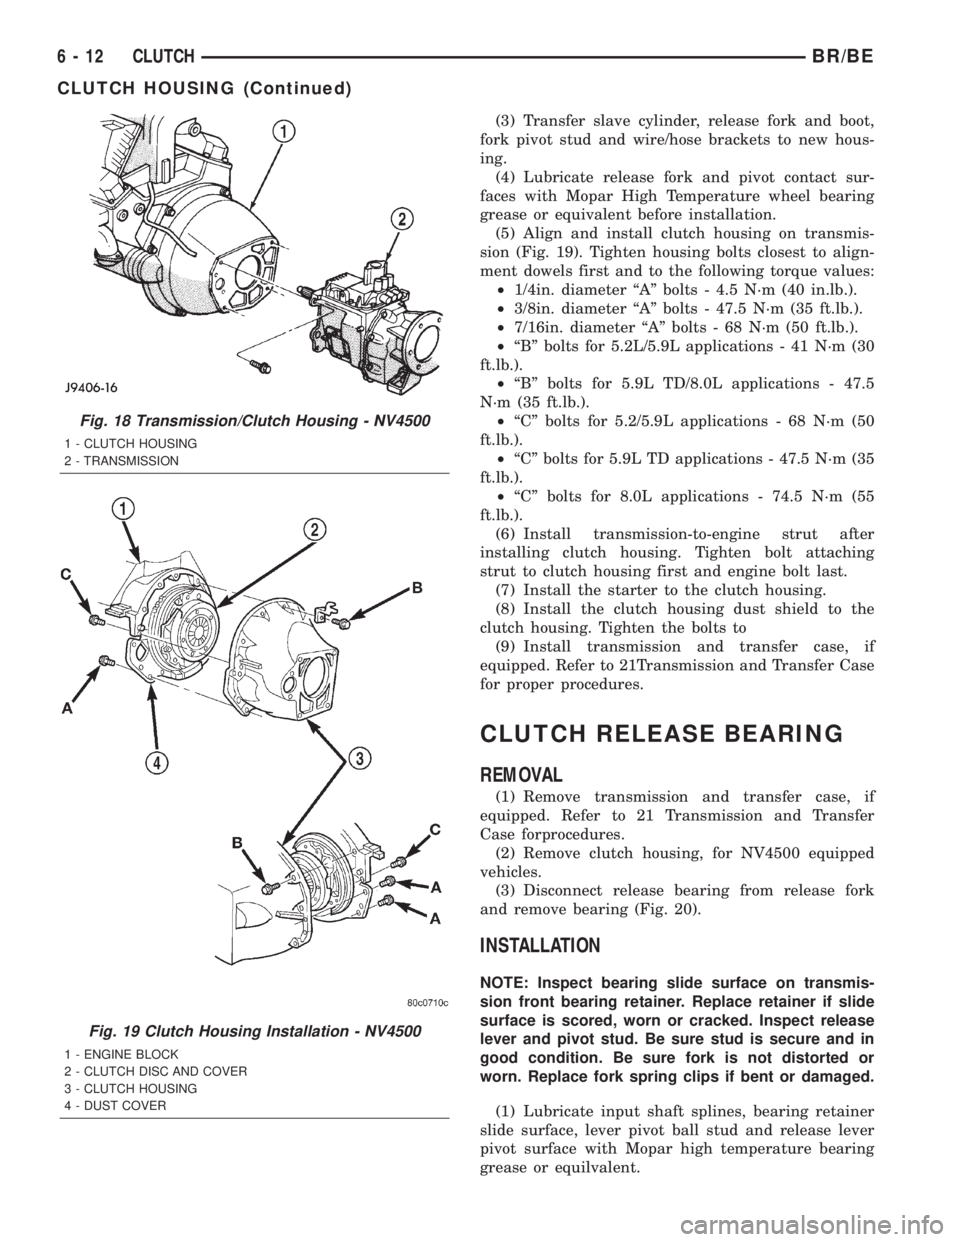
(5) Align and install clutch housing on transmis-
sion (Fig. 19). Tighten housing bolts closest to align-
ment dowels first and to the following torque values:
²1/4in. diameter ªAº bolts - 4.5 N´m (40 in.lb.).
²3/8in. diameter ªAº bolts - 47.5 N´m (35 ft.lb.).
²7/16in. diameter ªAº bolts - 68 N´m (50 ft.lb.).
²ªBº bolts for 5.2L/5.9L applications - 41 N´m (30
ft.lb.).
²ªBº bolts for 5.9L TD/8.0L applications - 47.5
N´m (35 ft.lb.).
²ªCº bolts for 5.2/5.9L applications - 68 N´m (50
ft.lb.).
²ªCº bolts for 5.9L TD applications - 47.5 N´m (35
ft.lb.).
²ªCº bolts for 8.0L applications - 74.5 N´m (55
ft.lb.).
(6) Install transmission-to-engine strut after
installing clutch housing. Tighten bolt attaching
strut to clutch housing first and engine bolt last.
(7) Install the starter to the clutch housing.
(8) Install the clutch housing dust shield to the
clutch housing. Tighten the bolts to
(9) Install transmission and transfer case, if
equipped. Refer to 21Transmission and Transfer Case
for proper procedures.
CLUTCH RELEASE BEARING
REMOVAL
(1) Remove transmission and transfer case, if
equipped. Refer to 21 Transmission and Transfer
Case forprocedures.
(2) Remove clutch housing, for NV4500 equipped
vehicles.
(3) Disconnect release bearing from release fork
and remove bearing (Fig. 20).
INSTALLATION
NOTE: Inspect bearing slide surface on transmis-
sion front bearing retainer. Replace retainer if slide
surface is scored, worn or cracked. Inspect release
lever and pivot stud. Be sure stud is secure and in
good condition. Be sure fork is not distorted or
worn. Replace fork spring clips if bent or damaged.
(1) Lubricate input shaft splines, bearing retainer
slide surface, lever pivot ball stud and release lever
pivot surface with Mopar high temperature bearing
grease or equilvalent.
Fig. 18 Transmission/Clutch Housing - NV4500
1 - CLUTCH HOUSING
2 - TRANSMISSION
Fig. 19 Clutch Housing Installation - NV4500
1 - ENGINE BLOCK
2 - CLUTCH DISC AND COVER
3 - CLUTCH HOUSING
4 - DUST COVER
6 - 12 CLUTCHBR/BE
CLUTCH HOUSING (Continued)
Page 244 of 2255
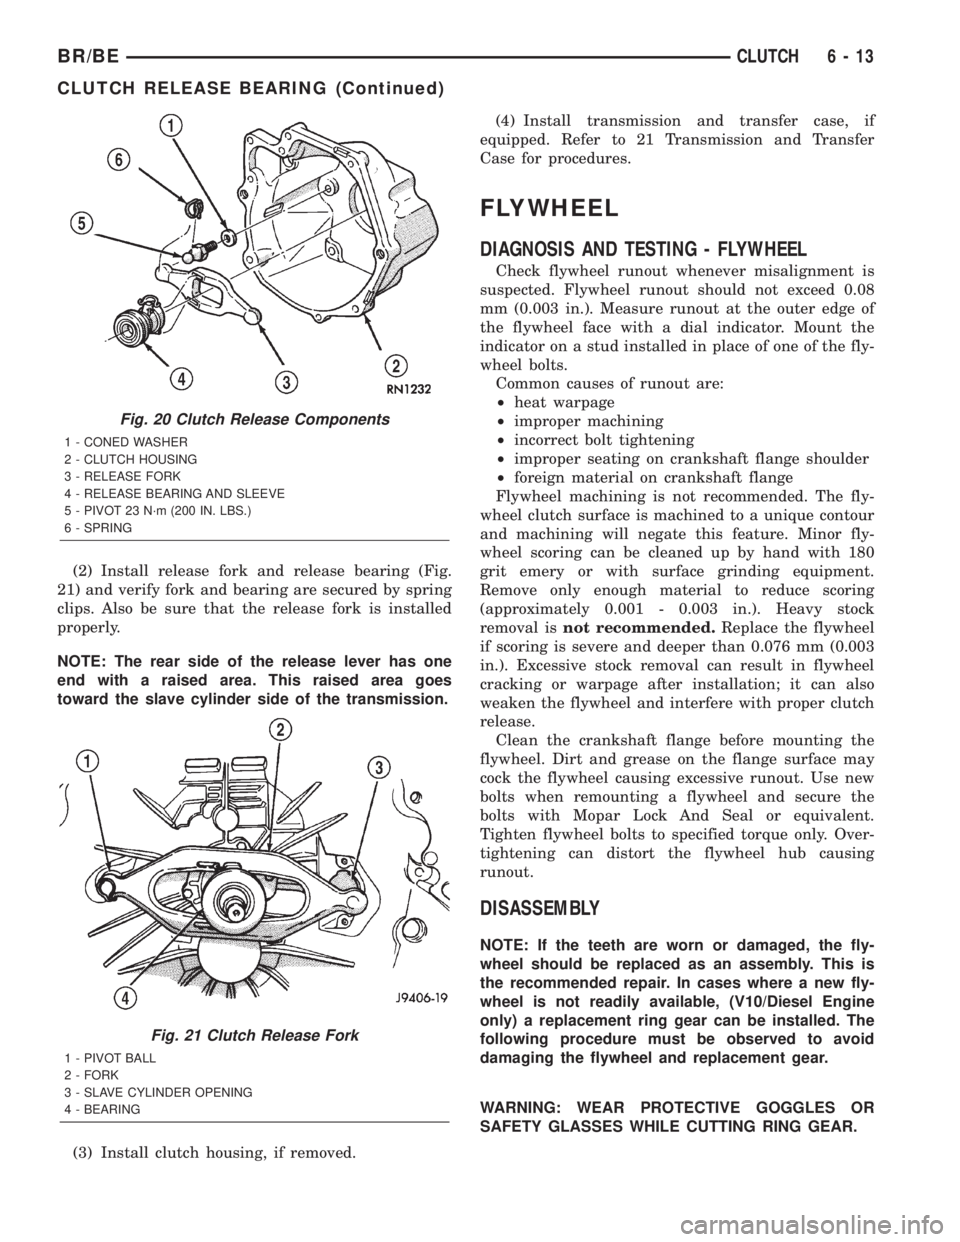
(2) Install release fork and release bearing (Fig.
21) and verify fork and bearing are secured by spring
clips. Also be sure that the release fork is installed
properly.
NOTE: The rear side of the release lever has one
end with a raised area. This raised area goes
toward the slave cylinder side of the transmission.
(3) Install clutch housing, if removed.(4) Install transmission and transfer case, if
equipped. Refer to 21 Transmission and Transfer
Case for procedures.
FLYWHEEL
DIAGNOSIS AND TESTING - FLYWHEEL
Check flywheel runout whenever misalignment is
suspected. Flywheel runout should not exceed 0.08
mm (0.003 in.). Measure runout at the outer edge of
the flywheel face with a dial indicator. Mount the
indicator on a stud installed in place of one of the fly-
wheel bolts.
Common causes of runout are:
²heat warpage
²improper machining
²incorrect bolt tightening
²improper seating on crankshaft flange shoulder
²foreign material on crankshaft flange
Flywheel machining is not recommended. The fly-
wheel clutch surface is machined to a unique contour
and machining will negate this feature. Minor fly-
wheel scoring can be cleaned up by hand with 180
grit emery or with surface grinding equipment.
Remove only enough material to reduce scoring
(approximately 0.001 - 0.003 in.). Heavy stock
removal isnot recommended.Replace the flywheel
if scoring is severe and deeper than 0.076 mm (0.003
in.). Excessive stock removal can result in flywheel
cracking or warpage after installation; it can also
weaken the flywheel and interfere with proper clutch
release.
Clean the crankshaft flange before mounting the
flywheel. Dirt and grease on the flange surface may
cock the flywheel causing excessive runout. Use new
bolts when remounting a flywheel and secure the
bolts with Mopar Lock And Seal or equivalent.
Tighten flywheel bolts to specified torque only. Over-
tightening can distort the flywheel hub causing
runout.
DISASSEMBLY
NOTE: If the teeth are worn or damaged, the fly-
wheel should be replaced as an assembly. This is
the recommended repair. In cases where a new fly-
wheel is not readily available, (V10/Diesel Engine
only) a replacement ring gear can be installed. The
following procedure must be observed to avoid
damaging the flywheel and replacement gear.
WARNING: WEAR PROTECTIVE GOGGLES OR
SAFETY GLASSES WHILE CUTTING RING GEAR.
Fig. 20 Clutch Release Components
1 - CONED WASHER
2 - CLUTCH HOUSING
3 - RELEASE FORK
4 - RELEASE BEARING AND SLEEVE
5 - PIVOT 23 N´m (200 IN. LBS.)
6 - SPRING
Fig. 21 Clutch Release Fork
1 - PIVOT BALL
2 - FORK
3 - SLAVE CYLINDER OPENING
4 - BEARING
BR/BECLUTCH 6 - 13
CLUTCH RELEASE BEARING (Continued)
Page 245 of 2255
(1) Mark position of the old gear for alignment ref-
erence on the flywheel. Use a scriber for this pur-
pose.
(2) Remove the old gear by cutting most of the way
through it (at one point) with an abrasive cut-off
wheel. Then complete removal with a cold chisel or
punch.
ASSEMBLY
NOTE: The ring gear is a shrink fit on the flywheel.
This means the gear must be expanded by heating
in order to install it. The method of heating and
expanding the gear is extremely important. Every
surface of the gear must be heated at the same
time to produce uniform expansion. An oven or
similar enclosed heating device must be used. Tem-
perature required for uniform expansion is approxi-
mately 375É F.
CAUTION: Do not use an oxy/acetylene torch to
remove the old gear, or to heat and expand a new
gear. The high temperature of the torch flame can
cause localized heating that will damage the fly-
wheel. In addition, using the torch to heat a replace-
ment gear will cause uneven heating and
expansion. The torch flame can also anneal the
gear teeth resulting in rapid wear and damage after
installation.
WARNING: WEAR PROTECTIVE GOGGLES OR
SAFETY GLASSES AND HEAT RESISTENT GLOVES
WHEN HANDLING A HEATED RING GEAR.
(1) The heated gear must be installed evenly to
avoid misalignment or distortion.
(2) Position and install the heated ring gear on the
flywheel with a shop press and a suitable press
plates.
(3) Place flywheel on work bench and let it cool in
normal shop air. Allow the ring gear to cool down
completely before installation it on the engine.
CAUTION: Do not use water or compressed air to
cool the flywheel. The rapid cooling produced by
water or compressed air will distort or crack the
new gear.
PILOT BEARING
REMOVAL
(1) Remove transmission, transfer case, if
equipped and clutch housing. Refer to 21 Transmis-
sion and Transfer Case for procedures.
(2) Remove pressure plate and disc.
(3) Using a suitable blind hole puller to remove
pilot bearing.
INSTALLATION
(1) Clean bearing bore with solvent and wipe dry
with shop towel.
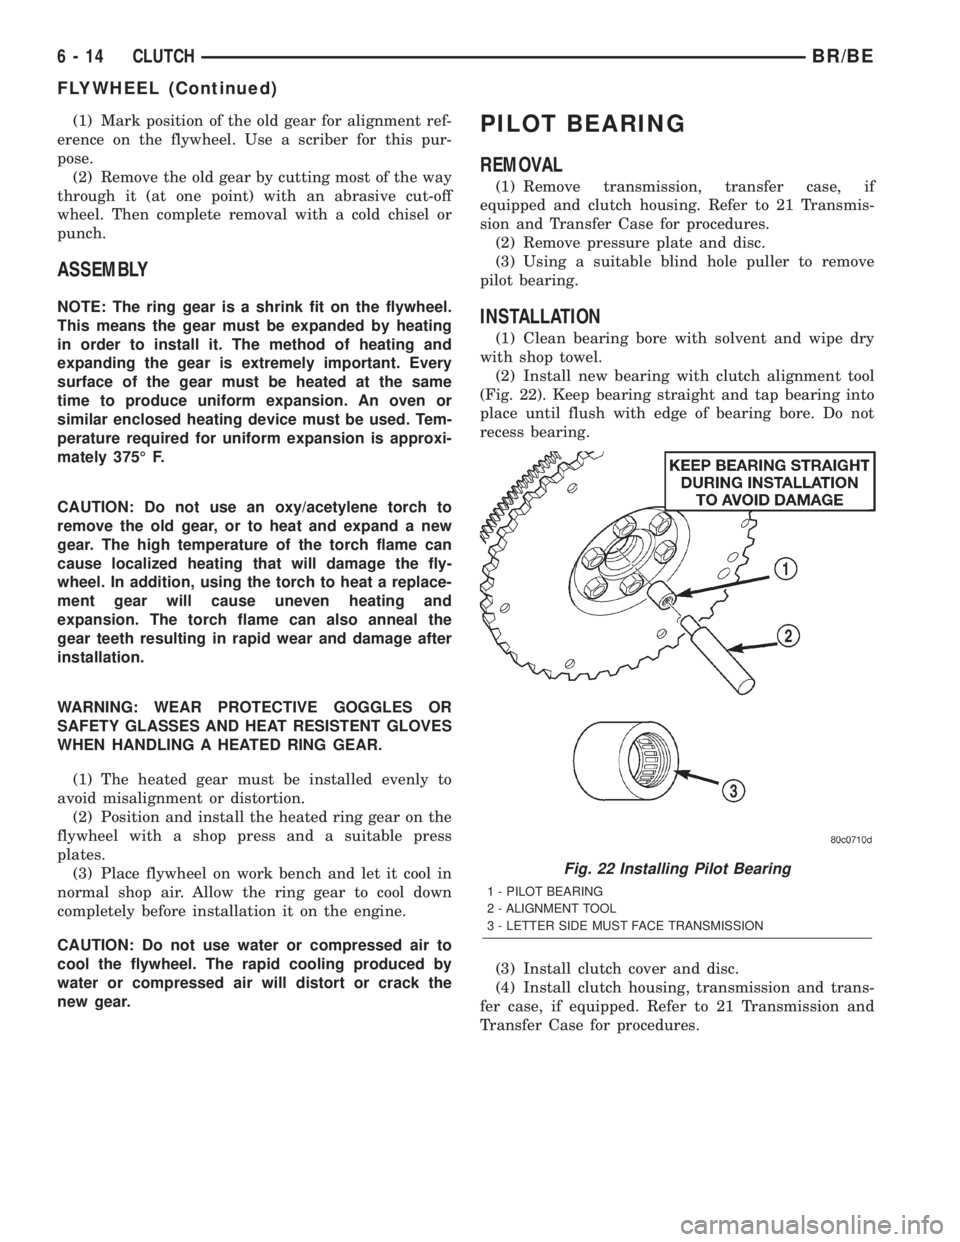
(2) Install new bearing with clutch alignment tool
(Fig. 22). Keep bearing straight and tap bearing into
place until flush with edge of bearing bore. Do not
recess bearing.
(3) Install clutch cover and disc.
(4) Install clutch housing, transmission and trans-
fer case, if equipped. Refer to 21 Transmission and
Transfer Case for procedures.
Fig. 22 Installing Pilot Bearing
1 - PILOT BEARING
2 - ALIGNMENT TOOL
3 - LETTER SIDE MUST FACE TRANSMISSION
6 - 14 CLUTCHBR/BE
FLYWHEEL (Continued)
Page 247 of 2255
(5) Remove the plastic clip securing the hydraulic
line to the dash panel from the upper dash panel
stud.
(6) Lower vehicle.
(7) Disconnect clutch pedal interlock switch wires.
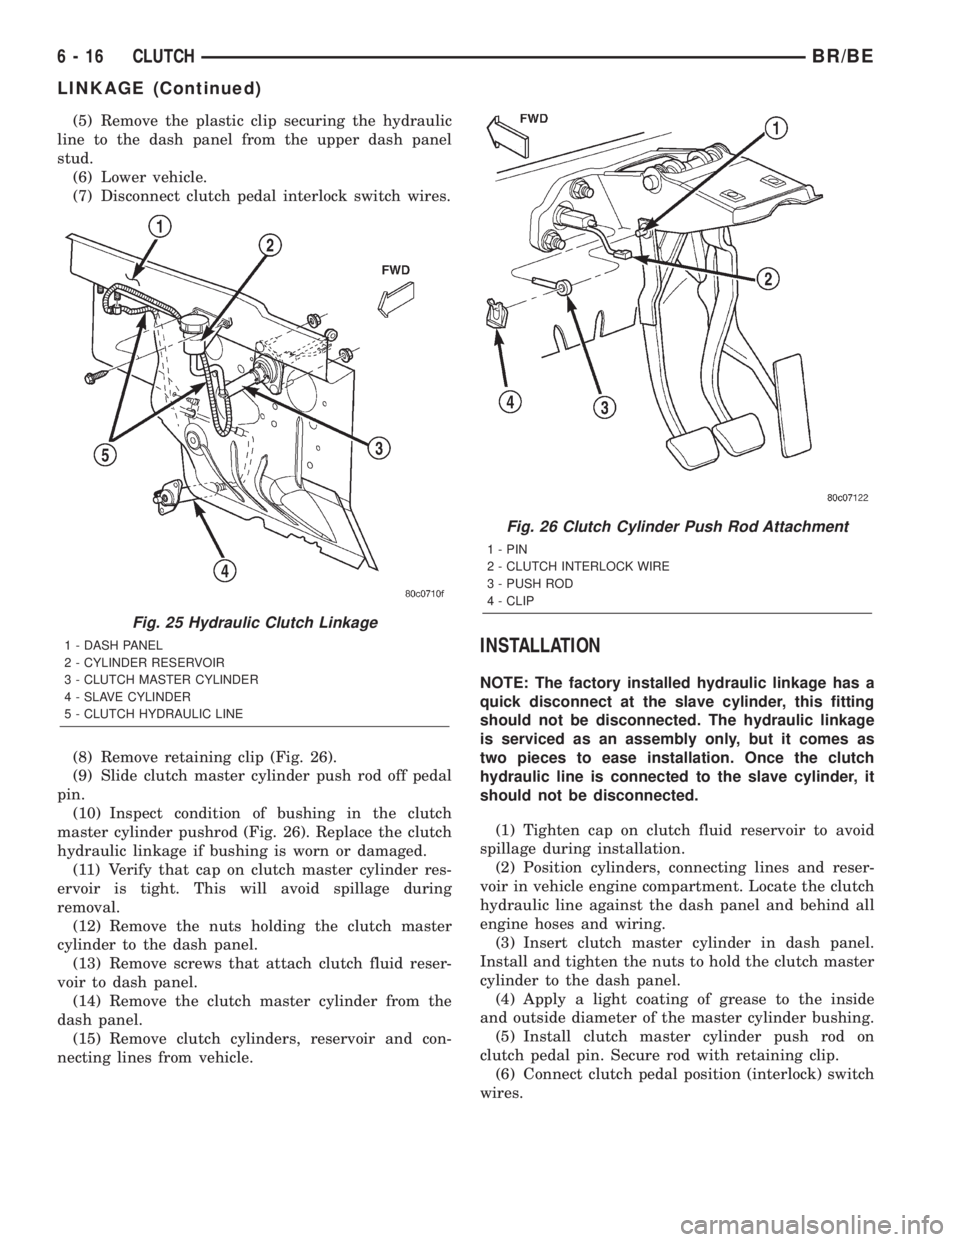
(8) Remove retaining clip (Fig. 26).
(9) Slide clutch master cylinder push rod off pedal
pin.
(10) Inspect condition of bushing in the clutch
master cylinder pushrod (Fig. 26). Replace the clutch
hydraulic linkage if bushing is worn or damaged.
(11) Verify that cap on clutch master cylinder res-
ervoir is tight. This will avoid spillage during
removal.
(12) Remove the nuts holding the clutch master
cylinder to the dash panel.
(13) Remove screws that attach clutch fluid reser-
voir to dash panel.
(14) Remove the clutch master cylinder from the
dash panel.
(15) Remove clutch cylinders, reservoir and con-
necting lines from vehicle.
INSTALLATION
NOTE: The factory installed hydraulic linkage has a
quick disconnect at the slave cylinder, this fitting
should not be disconnected. The hydraulic linkage
is serviced as an assembly only, but it comes as
two pieces to ease installation. Once the clutch
hydraulic line is connected to the slave cylinder, it
should not be disconnected.
(1) Tighten cap on clutch fluid reservoir to avoid
spillage during installation.
(2) Position cylinders, connecting lines and reser-
voir in vehicle engine compartment. Locate the clutch
hydraulic line against the dash panel and behind all
engine hoses and wiring.
(3) Insert clutch master cylinder in dash panel.
Install and tighten the nuts to hold the clutch master
cylinder to the dash panel.
(4) Apply a light coating of grease to the inside
and outside diameter of the master cylinder bushing.
(5) Install clutch master cylinder push rod on
clutch pedal pin. Secure rod with retaining clip.
(6) Connect clutch pedal position (interlock) switch
wires.
Fig. 25 Hydraulic Clutch Linkage
1 - DASH PANEL
2 - CYLINDER RESERVOIR
3 - CLUTCH MASTER CYLINDER
4 - SLAVE CYLINDER
5 - CLUTCH HYDRAULIC LINE
Fig. 26 Clutch Cylinder Push Rod Attachment
1 - PIN
2 - CLUTCH INTERLOCK WIRE
3 - PUSH ROD
4 - CLIP
6 - 16 CLUTCHBR/BE
LINKAGE (Continued)