2002 DODGE RAM seats
[x] Cancel search: seatsPage 612 of 2255

(8) Remove the screw that secures the retractor to
the B-pillar.
(9) Remove the front shoulder belt and retractor
from the B-pillar.
REMOVAL - CLUB/QUAD CAB
The front seat shoulder belt and retractor are inte-
gral to the driver and passenger front seat backs on
club cab and quad cab models.
WARNING: DURING AND FOLLOWING ANY SEAT
BELT SERVICE, CAREFULLY INSPECT ALL SEAT
BELTS, BUCKLES, MOUNTING HARDWARE, AND
RETRACTORS FOR PROPER INSTALLATION,
OPERATION, OR DAMAGE. REPLACE ANY BELT
THAT IS CUT, FRAYED, OR TORN. STRAIGHTEN
ANY BELT THAT IS TWISTED. TIGHTEN ANY
LOOSE FASTENERS. REPLACE ANY BELT THAT
HAS A DAMAGED OR INOPERATIVE BUCKLE OR
RETRACTOR. REPLACE ANY BELT THAT HAS A
BENT OR DAMAGED LATCH PLATE OR ANCHOR
PLATE. NEVER ATTEMPT TO REPAIR A SEAT BELT
COMPONENT. ALWAYS REPLACE DAMAGED OR
FAULTY SEAT BELT COMPONENTS WITH THE COR-
RECT, NEW AND UNUSED REPLACEMENT PARTS
LISTED IN THE MOPAR PARTS CATALOG.
(1) Remove the trim cover from the front seat back
frame. (Refer to 23 - BODY/SEATS/SEAT BACK
COVER - REMOVAL).
(2) Remove the screws that secure the retractor
cover to the seat back frame.
(3) Remove the retractor cover from the seat back
frame.
(4) Remove the two screws that secure the seat
belt retractor to the seat back frame (Fig. 16).(5) Remove the front shoulder belt and retractor
from the seat back frame.
INSTALLATION
INSTALLATION - STANDARD CAB
WARNING: DURING AND FOLLOWING ANY SEAT
BELT SERVICE, CAREFULLY INSPECT ALL SEAT
BELTS, BUCKLES, MOUNTING HARDWARE, AND
RETRACTORS FOR PROPER INSTALLATION,
OPERATION, OR DAMAGE. REPLACE ANY BELT
THAT IS CUT, FRAYED, OR TORN. STRAIGHTEN
ANY BELT THAT IS TWISTED. TIGHTEN ANY
LOOSE FASTENERS. REPLACE ANY BELT THAT
HAS A DAMAGED OR INOPERATIVE BUCKLE OR
RETRACTOR. REPLACE ANY BELT THAT HAS A
BENT OR DAMAGED LATCH PLATE OR ANCHOR
PLATE. NEVER ATTEMPT TO REPAIR A SEAT BELT
COMPONENT. ALWAYS REPLACE DAMAGED OR
FAULTY SEAT BELT COMPONENTS WITH THE COR-
RECT, NEW AND UNUSED REPLACEMENT PARTS
LISTED IN THE MOPAR PARTS CATALOG.
(1) Position the retractor onto the B-pillar (Fig.
15).
(2) Install and tighten the screw that secures the
retractor to the B-pillar. Tighten the screw to 40 N´m
(29 ft. lbs.).
(3) Engage the front seat shoulder belt turning
loop and lower seat belt anchor plate with the B-pil-
lar trim.
(4) Reinstall the trim onto the B-pillar. (Refer to
23 - BODY/INTERIOR/B-PILLAR TRIM - INSTAL-
LATION).
(5) Position the shoulder belt turning loop onto the
height adjuster.
Fig. 15 Front Shoulder Belt - Standard Cab
1 - TURNING LOOP COVER
2 - SHOULDER BELT ASSEMBLY
Fig. 16 Seat Belt Retractor
1 - RETRACTOR SCREWS
2 - SEAT BACK FRAME
BR/BERESTRAINTS 8O - 19
FRONT SEAT BELT & RETRACTOR (Continued)
Page 613 of 2255

(6) Install and tighten the screw that secures the
shoulder belt turning loop to the height adjuster.
Tighten the screw to 30 N´m (22 ft. lbs.).
(7) Fold and snap the cover over the front shoulder
belt turning loop to conceal the screw that secures
the turning loop to the height adjuster.
(8) Install and tighten the screw that secures the
lower seat belt anchor plate to the floor panel near
the base of the B-pillar. Tighten the screw to 40 N´m
(29 ft. lbs.).
INSTALLATION - CLUB/QUAD CAB
The front seat shoulder belt and retractor are inte-
gral to the driver and passenger front seat backs on
club cab and quad cab models.
WARNING: DURING AND FOLLOWING ANY SEAT
BELT SERVICE, CAREFULLY INSPECT ALL SEAT
BELTS, BUCKLES, MOUNTING HARDWARE, AND
RETRACTORS FOR PROPER INSTALLATION,
OPERATION, OR DAMAGE. REPLACE ANY BELT
THAT IS CUT, FRAYED, OR TORN. STRAIGHTEN
ANY BELT THAT IS TWISTED. TIGHTEN ANY
LOOSE FASTENERS. REPLACE ANY BELT THAT
HAS A DAMAGED OR INOPERATIVE BUCKLE OR
RETRACTOR. REPLACE ANY BELT THAT HAS A
BENT OR DAMAGED LATCH PLATE OR ANCHOR
PLATE. NEVER ATTEMPT TO REPAIR A SEAT BELT
COMPONENT. ALWAYS REPLACE DAMAGED OR
FAULTY SEAT BELT COMPONENTS WITH THE COR-
RECT, NEW AND UNUSED REPLACEMENT PARTS
LISTED IN THE MOPAR PARTS CATALOG.
(1) Position the front shoulder belt and retractor
onto the seat back frame.
(2) Install and tighten the two screws that secure
the seat belt retractor to the seat back frame (Fig.
16). Tighten the screws to 16 N´m (12 ft. lbs.).
(3) Position the retractor cover onto the seat back
frame.
(4) Install and tighten the screws that secure the
retractor cover to the seat back frame. Tighten the
screws to 2 N´m (17 in. lbs.).
(5) Reinstall the trim cover onto the front seat
back frame. (Refer to 23 - BODY/SEATS/SEAT BACK
COVER - INSTALLATION).
FRONT SEAT BELT BUCKLE
REMOVAL
WARNING: DURING AND FOLLOWING ANY SEAT
BELT SERVICE, CAREFULLY INSPECT ALL SEAT
BELTS, BUCKLES, MOUNTING HARDWARE, AND
RETRACTORS FOR PROPER INSTALLATION,
OPERATION, OR DAMAGE. REPLACE ANY BELTTHAT IS CUT, FRAYED, OR TORN. STRAIGHTEN
ANY BELT THAT IS TWISTED. TIGHTEN ANY
LOOSE FASTENERS. REPLACE ANY BELT THAT
HAS A DAMAGED OR INOPERATIVE BUCKLE OR
RETRACTOR. REPLACE ANY BELT THAT HAS A
BENT OR DAMAGED LATCH PLATE OR ANCHOR
PLATE. NEVER ATTEMPT TO REPAIR A SEAT BELT
COMPONENT. ALWAYS REPLACE DAMAGED OR
FAULTY SEAT BELT COMPONENTS WITH THE COR-
RECT, NEW AND UNUSED REPLACEMENT PARTS
LISTED IN THE MOPAR PARTS CATALOG.
(1) Move the front seat to its most forward position
for easiest access to the front seat belt buckle
anchors.
(2) Tilt both front seat backs forward far enough to
access the seat belt buckle anchor screws.
(3) On the driver's side only, disconnect the body
wire harness connector for the seat belt switch from
the seat belt switch pigtail wire connector on the seat
belt buckle.
(4) Remove the screw that secures the seat belt
buckle to the anchor on the seat cushion frame.
(5) Remove the front seat belt buckle from the seat
cushion frame.
INSTALLATION
WARNING: DURING AND FOLLOWING ANY SEAT
BELT SERVICE, CAREFULLY INSPECT ALL SEAT
BELTS, BUCKLES, MOUNTING HARDWARE, AND
RETRACTORS FOR PROPER INSTALLATION,
OPERATION, OR DAMAGE. REPLACE ANY BELT
THAT IS CUT, FRAYED, OR TORN. STRAIGHTEN
ANY BELT THAT IS TWISTED. TIGHTEN ANY
LOOSE FASTENERS. REPLACE ANY BELT THAT
HAS A DAMAGED OR INOPERATIVE BUCKLE OR
RETRACTOR. REPLACE ANY BELT THAT HAS A
BENT OR DAMAGED LATCH PLATE OR ANCHOR
PLATE. NEVER ATTEMPT TO REPAIR A SEAT BELT
COMPONENT. ALWAYS REPLACE DAMAGED OR
FAULTY SEAT BELT COMPONENTS WITH THE COR-
RECT, NEW AND UNUSED REPLACEMENT PARTS
LISTED IN THE MOPAR PARTS CATALOG.
(1) Position the front seat belt buckle onto the seat
cushion frame.
(2) On the driver's side only, reconnect the body
wire harness connector for the seat belt switch to the
seat belt switch pigtail wire connector on the seat
belt buckle.
(3) Install and tighten the screw that secures the
seat belt buckle to the anchor on the seat cushion
frame. Tighten the screw to 40 N´m (29 ft. lbs.).
8O - 20 RESTRAINTSBR/BE
FRONT SEAT BELT & RETRACTOR (Continued)
Page 619 of 2255

(5) Position the passenger airbag on/off switch and
face plate unit to the opening in the instrument
panel (Fig. 21).
(6) Install and tighten the three screws that secure
the passenger airbag on/off switch face plate to the
instrument panel. Tighten the screws to 2.2 N´m (20
in. lbs.).
(7) Reinstall the glove box onto the instrument
panel. (Refer to 23 - BODY/INSTRUMENT PANEL/
GLOVE BOX - INSTALLATION).
(8) Reinstall the cluster bezel onto the instrument
panel. (Refer to 23 - BODY/INSTRUMENT PANEL/
CLUSTER BEZEL - INSTALLATION).
(9) Do not reconnect the battery negative cable at
this time. The airbag system verification test proce-
dure should be performed following service of any
airbag system component. (Refer to 8 - ELECTRI-
CAL/RESTRAINTS - STANDARD PROCEDURE -
VERIFICATION TEST).
REAR SEAT BELT &
RETRACTOR
REMOVAL
WARNING: DURING AND FOLLOWING ANY SEAT
BELT SERVICE, CAREFULLY INSPECT ALL SEAT
BELTS, BUCKLES, MOUNTING HARDWARE, AND
RETRACTORS FOR PROPER INSTALLATION,
OPERATION, OR DAMAGE. REPLACE ANY BELT
THAT IS CUT, FRAYED, OR TORN. STRAIGHTEN
ANY BELT THAT IS TWISTED. TIGHTEN ANY
LOOSE FASTENERS. REPLACE ANY BELT THAT
HAS A DAMAGED OR INOPERATIVE BUCKLE OR
RETRACTOR. REPLACE ANY BELT THAT HAS A
BENT OR DAMAGED LATCH PLATE OR ANCHOR
PLATE. NEVER ATTEMPT TO REPAIR A SEAT BELT
COMPONENT. ALWAYS REPLACE DAMAGED OR
FAULTY SEAT BELT COMPONENTS WITH THE COR-
RECT, NEW AND UNUSED REPLACEMENT PARTS
LISTED IN THE MOPAR PARTS CATALOG.
(1) Remove the rear seat from the passenger com-
partment. (Refer to 23 - BODY/SEATS/REAR SEAT -
REMOVAL).
(2) Remove the trim cover from the door sill.
(Refer to 23 - BODY/INTERIOR/DOOR SILL TRIM -
REMOVAL).
(3) Remove the screw that secures the lower seat
belt anchor plate to the quarter inner panel near the
base of the C-pillar (Fig. 23).
(4) Unsnap and lift the rear shoulder belt turning
loop cover to access the screw that secures the turn-
ing loop to the quarter inner panel near the top of
the C-pillar.(5) Remove the screw that secures the shoulder
belt turning loop to the quarter inner panel.
(6) Remove the trim from the quarter inner panel.
(Refer to 23 - BODY/INTERIOR/QUARTER TRIM
PANEL - REMOVAL).
(7) Disengage the rear seat shoulder belt turning
loop and lower seat belt anchor plate from the quar-
ter trim panel.
(8) Remove the screw that secures the retractor to
the quarter inner panel near the C-pillar.
(9) Remove the rear shoulder belt and retractor
from the quarter inner panel.
INSTALLATION
WARNING: DURING AND FOLLOWING ANY SEAT
BELT SERVICE, CAREFULLY INSPECT ALL SEAT
BELTS, BUCKLES, MOUNTING HARDWARE, AND
RETRACTORS FOR PROPER INSTALLATION,
OPERATION, OR DAMAGE. REPLACE ANY BELT
THAT IS CUT, FRAYED, OR TORN. STRAIGHTEN
ANY BELT THAT IS TWISTED. TIGHTEN ANY
LOOSE FASTENERS. REPLACE ANY BELT THAT
HAS A DAMAGED OR INOPERATIVE BUCKLE OR
RETRACTOR. REPLACE ANY BELT THAT HAS A
BENT OR DAMAGED LATCH PLATE OR ANCHOR
PLATE. NEVER ATTEMPT TO REPAIR A SEAT BELT
COMPONENT. ALWAYS REPLACE DAMAGED OR
FAULTY SEAT BELT COMPONENTS WITH THE COR-
RECT, NEW AND UNUSED REPLACEMENT PARTS
LISTED IN THE MOPAR PARTS CATALOG.
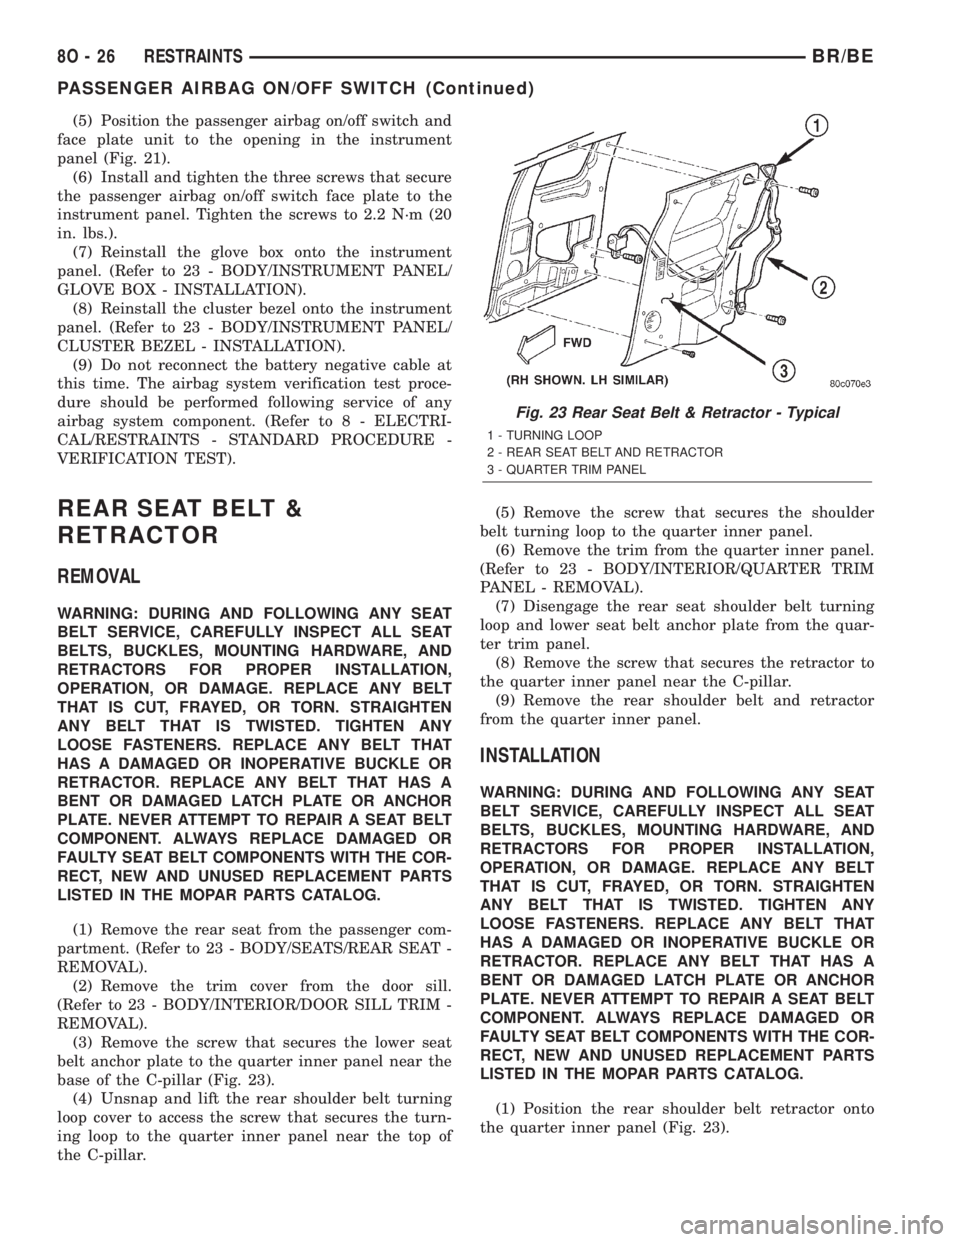
(1) Position the rear shoulder belt retractor onto
the quarter inner panel (Fig. 23).
Fig. 23 Rear Seat Belt & Retractor - Typical
1 - TURNING LOOP
2 - REAR SEAT BELT AND RETRACTOR
3 - QUARTER TRIM PANEL
8O - 26 RESTRAINTSBR/BE
PASSENGER AIRBAG ON/OFF SWITCH (Continued)
Page 620 of 2255

(2) Install and tighten the screw that secures the
retractor to the quarter inner panel. Tighten the
screw to 40 N´m (29 ft. lbs.).
(3) Engage the rear seat shoulder belt turning loop
and lower seat belt anchor plate with the quarter
trim panel.
(4) Reinstall the trim onto the quarter inner panel.
(Refer to 23 - BODY/INTERIOR/QUARTER TRIM
PANEL - INSTALLATION).
(5) Position the shoulder belt turning loop onto the
quarter inner panel near the top of the C-pillar.
(6) Install and tighten the screw that secures the
shoulder belt turning loop to the quarter inner panel.
Tighten the screw to 40 N´m (29 ft. lbs.).
(7) Fold and snap the cover over the rear shoulder
belt turning loop to conceal the screw that secures
the turning loop to the quarter inner panel.
(8) Position the lower seat belt anchor plate onto
the quarter inner panel near the base of the C-pillar.
(9) Install and tighten the screw that secures the
lower seat belt anchor plate to the quarter inner
panel near the base of the C-pillar. Tighten the screw
to 40 N´m (29 ft. lbs.).
(10) Reinstall the trim cover onto the door sill.
(Refer to 23 - BODY/INTERIOR/DOOR SILL TRIM -
INSTALLATION).
(11) Reinstall the rear seat into the passenger
compartment. (Refer to 23 - BODY/SEATS/REAR
SEAT - INSTALLATION).
REAR SEAT BELT BUCKLE
REMOVAL
WARNING: DURING AND FOLLOWING ANY SEAT
BELT SERVICE, CAREFULLY INSPECT ALL SEAT
BELTS, BUCKLES, MOUNTING HARDWARE, AND
RETRACTORS FOR PROPER INSTALLATION,
OPERATION, OR DAMAGE. REPLACE ANY BELT
THAT IS CUT, FRAYED, OR TORN. STRAIGHTEN
ANY BELT THAT IS TWISTED. TIGHTEN ANY
LOOSE FASTENERS. REPLACE ANY BELT THAT
HAS A DAMAGED OR INOPERATIVE BUCKLE OR
RETRACTOR. REPLACE ANY BELT THAT HAS A
BENT OR DAMAGED LATCH PLATE OR ANCHOR
PLATE. NEVER ATTEMPT TO REPAIR A SEAT BELT
COMPONENT. ALWAYS REPLACE DAMAGED OR
FAULTY SEAT BELT COMPONENTS WITH THE COR-
RECT, NEW AND UNUSED REPLACEMENT PARTS
LISTED IN THE MOPAR PARTS CATALOG.
(1) Disengage the rear seat latch by pulling the
release handle on the underside of the rear seat
cushion.(2) Fold the rear seat unit up and back against the
cab back panel (stowed position) for access to the
rear seat belt buckle anchors.
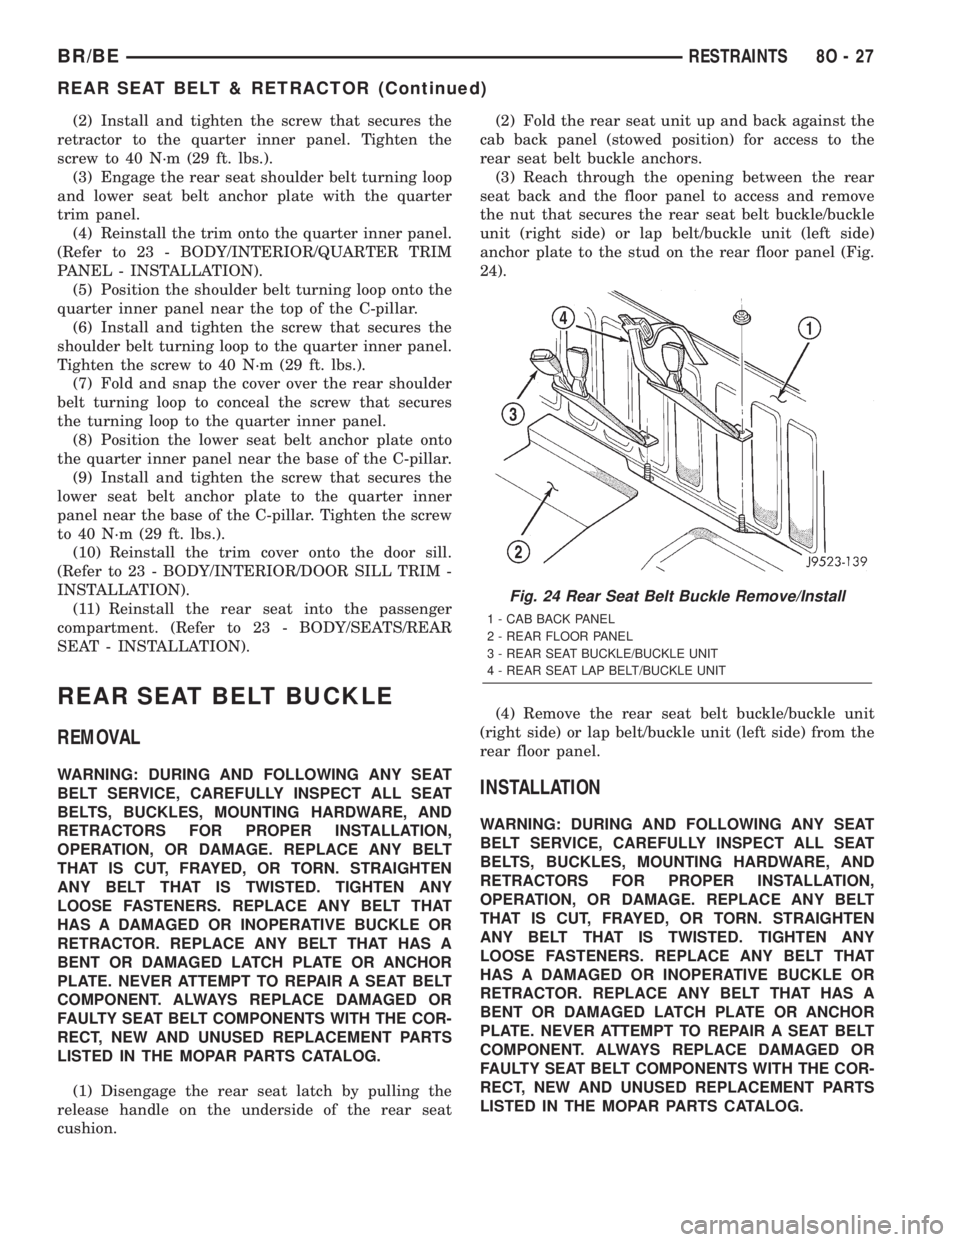
(3) Reach through the opening between the rear
seat back and the floor panel to access and remove
the nut that secures the rear seat belt buckle/buckle
unit (right side) or lap belt/buckle unit (left side)
anchor plate to the stud on the rear floor panel (Fig.
24).
(4) Remove the rear seat belt buckle/buckle unit
(right side) or lap belt/buckle unit (left side) from the
rear floor panel.INSTALLATION
WARNING: DURING AND FOLLOWING ANY SEAT
BELT SERVICE, CAREFULLY INSPECT ALL SEAT
BELTS, BUCKLES, MOUNTING HARDWARE, AND
RETRACTORS FOR PROPER INSTALLATION,
OPERATION, OR DAMAGE. REPLACE ANY BELT
THAT IS CUT, FRAYED, OR TORN. STRAIGHTEN
ANY BELT THAT IS TWISTED. TIGHTEN ANY
LOOSE FASTENERS. REPLACE ANY BELT THAT
HAS A DAMAGED OR INOPERATIVE BUCKLE OR
RETRACTOR. REPLACE ANY BELT THAT HAS A
BENT OR DAMAGED LATCH PLATE OR ANCHOR
PLATE. NEVER ATTEMPT TO REPAIR A SEAT BELT
COMPONENT. ALWAYS REPLACE DAMAGED OR
FAULTY SEAT BELT COMPONENTS WITH THE COR-
RECT, NEW AND UNUSED REPLACEMENT PARTS
LISTED IN THE MOPAR PARTS CATALOG.
Fig. 24 Rear Seat Belt Buckle Remove/Install
1 - CAB BACK PANEL
2 - REAR FLOOR PANEL
3 - REAR SEAT BUCKLE/BUCKLE UNIT
4 - REAR SEAT LAP BELT/BUCKLE UNIT
BR/BERESTRAINTS 8O - 27
REAR SEAT BELT & RETRACTOR (Continued)
Page 662 of 2255

WIRING
TABLE OF CONTENTS
page page
AIRBAG SYSTEM.................... 8W-43-1
AIR CONDITIONING-HEATER........... 8W-42-1
ALL WHEEL ANTILOCK BRAKES........ 8W-35-1
AUDIO SYSTEM..................... 8W-47-1
BUS COMMUNICATIONS.............. 8W-18-1
CENTRAL TIMER MODULE............. 8W-45-1
CHARGING SYSTEM.................. 8W-20-1
COMPONENT INDEX.................. 8W-02-1
CONNECTOR/GROUND/SPLICE
LOCATION........................ 8W-91-1
CONNECTOR PIN-OUTS............... 8W-80-1
FRONT LIGHTING.................... 8W-50-1
FUEL/IGNITION SYSTEM.............. 8W-30-1
GROUND DISTRIBUTION.............. 8W-15-1
HORN/CIGAR LIGHTER/POWER OUTLET . . 8W-41-1
INSTRUMENT CLUSTER............... 8W-40-1
INTERIOR LIGHTING.................. 8W-44-1
JUNCTION BLOCK.................... 8W-12-1OVERHEAD CONSOLE................. 8W-49-1
POWER DISTRIBUTION............... 8W-10-1
POWER DISTRIBUTION............... 8W-97-1
POWER DOOR LOCKS................ 8W-61-1
POWER MIRRORS................... 8W-62-1
POWER SEATS...................... 8W-63-1
POWER WINDOWS................... 8W-60-1
REAR LIGHTING..................... 8W-51-1
REAR WHEEL ANTILOCK BRAKES....... 8W-34-1
SPLICE INFORMATION................ 8W-70-1
STARTING SYSTEM.................. 8W-21-1
TRAILER TOW....................... 8W-54-1
TRANSMISSION CONTROL SYSTEM..... 8W-31-1
TURN SIGNALS...................... 8W-52-1
VEHICLE SPEED CONTROL............ 8W-33-1
VEHICLE THEFT SECURITY SYSTEM..... 8W-39-1
WIPERS............................ 8W-53-1
WIRING DIAGRAM INFORMATION....... 8W-01-1 BR/BEWIRING 8W - 1
Page 920 of 2255

8W-63 POWER SEATS
Component Page
Circuit Breaker 2.................. 8W-63-2, 3
Driver Heated Seat Cushion.......... 8W-63-6, 8
Driver Heated Seat Switch............. 8W-63-5
Driver Lumbar Motor................. 8W-63-3
Driver Power Seat Front Vertical
Motor......................... 8W-63-2, 3
Driver Power Seat Horizontal Motor.... 8W-63-2, 3
Driver Power Seat Rear Vertical Motor . . 8W-63-2, 3
Driver Power Seat Switch............ 8W-63-2, 3
Fuse 1 (JB)....................... 8W-63-5, 7
Fuse 2 (JB)....................... 8W-63-5, 7
G201............................ 8W-63-5, 7
G300........................ 8W-63-3, 4, 6, 8
G301.............................. 8W-63-2Component Page
Heated Seat Relay................. 8W-63-5, 7
Joint Connector No. 5............... 8W-63-5, 7
Joint Connector No. 8............... 8W-63-5, 7
Junction Block................ 8W-63-2, 3, 5, 7
Passenger Heated Seat Cushion..... 8W-63-4, 6, 8
Passenger Heated Seat Switch.......... 8W-63-7
Passenger Lumbar Motor.............. 8W-63-4
Passenger Power Seat Front Vertical
Motor........................... 8W-63-4
Passenger Power Seat Horizontal Motor . . . 8W-63-4
Passenger Power Seat Rear Vertical
Motor........................... 8W-63-4
Passenger Power Seat Switch........... 8W-63-4
Seat Heat Interface Module...... 8W-63-5, 6, 7, 8
BR/BE8W-63 POWER SEATS 8W - 63 - 1
Page 936 of 2255

8W-80 CONNECTOR PIN-OUTS
Component Page
4WD Switch........................ 8W-80-4
A/C Compressor Clutch................ 8W-80-4
A/C Heater Control................... 8W-80-4
A/C Heater Temperature Select......... 8W-80-4
A/C High Pressure Switch............. 8W-80-4
A/C Low Pressure Switch.............. 8W-80-5
Accelerator Pedal Position Sensor
(Diesel).......................... 8W-80-5
Aftermarket Trailer Tow Connector...... 8W-80-5
Airbag Control Module................ 8W-80-5
Ambient Temperature Sensor........... 8W-80-6
Ash Receiver Lamp................... 8W-80-6
Automatic Day/Night Mirror............ 8W-80-6
Back-Up Lamp Switch (M/T)........... 8W-80-6
Battery Temperature Sensor............ 8W-80-7
Blend Door Actuator.................. 8W-80-7
Blower Motor....................... 8W-80-7
Blower Motor Resistor Block............ 8W-80-7
Brake Lamp Switch.................. 8W-80-7
Brake Pressure Switch................ 8W-80-8
Bypass Jumper (A/T)................. 8W-80-8
C105.............................. 8W-80-8
C105.............................. 8W-80-8
C106.............................. 8W-80-8
C106.............................. 8W-80-8
C114 .............................. 8W-80-9
C114 .............................. 8W-80-9
C125 (Diesel)....................... 8W-80-9
C125 (Diesel)....................... 8W-80-9
C126 (Diesel)....................... 8W-80-10
C126 (Diesel)....................... 8W-80-10
C129............................. 8W-80-10
C129............................. 8W-80-11
C130 (Diesel)....................... 8W-80-11
C130 (Diesel) (In PDC)............... 8W-80-12
C130 (Gas)........................ 8W-80-13
C130 (Gas) (In PDC)................. 8W-80-14
C134............................. 8W-80-15
C134............................. 8W-80-17
C203............................. 8W-80-18
C203............................. 8W-80-19
C205............................. 8W-80-20
C205............................. 8W-80-20
C206 (Heated Seats)................. 8W-80-20
C206 (Heated Seats)................. 8W-80-21
C237............................. 8W-80-21
C237............................. 8W-80-21
C303............................. 8W-80-22
C303............................. 8W-80-22
C308............................. 8W-80-22
C308............................. 8W-80-22
C329 (Club Cab).................... 8W-80-22Component Page
C329 (Club Cab).................... 8W-80-23
C329 (Standard Cab)................ 8W-80-23
C329 (Standard Cab)................ 8W-80-23
C333 (Club Cab).................... 8W-80-23
C333 (Club Cab).................... 8W-80-23
C333 (Standard Cab)................ 8W-80-24
C333 (Standard Cab)................ 8W-80-24
C342............................. 8W-80-24
C342............................. 8W-80-24
C343............................. 8W-80-24
C343............................. 8W-80-24
C344 (Dual Rear Wheels)............. 8W-80-25
C344 (Dual Rear Wheels)............. 8W-80-25
C345............................. 8W-80-25
C345............................. 8W-80-25
C346............................. 8W-80-26
C346............................. 8W-80-26
C347............................. 8W-80-26
C347............................. 8W-80-27
C348............................. 8W-80-27
C348............................. 8W-80-28
C352............................. 8W-80-28
C352............................. 8W-80-28
C353............................. 8W-80-28
C353............................. 8W-80-28
C358............................. 8W-80-29
C358............................. 8W-80-29
C359 (Heated Seat).................. 8W-80-29
C359 (Heated Seat).................. 8W-80-29
C360 (Club Cab).................... 8W-80-30
C360 (Club Cab).................... 8W-80-30
C361............................. 8W-80-30
C361............................. 8W-80-30
C364............................. 8W-80-31
C364............................. 8W-80-31
C365 (Heated Seat).................. 8W-80-31
C365 (Heated Seat).................. 8W-80-31
Camshaft Position Sensor (8.0L Gas).... 8W-80-32
Camshaft Position Sensor (Diesel)...... 8W-80-32
Camshaft Position Sensor
(Gas Except 8.0L)................. 8W-80-32
Cargo Lamp No. 1................... 8W-80-32
Cargo Lamp No. 2................... 8W-80-32
Center High Mounted Stop Lamp No. 1 . . 8W-80-33
Center High Mounted Stop Lamp No. 2 . . 8W-80-33
Center Identification Lamp............ 8W-80-33
Central Timer Module C1............. 8W-80-33
Central Timer Module C2............. 8W-80-34
Cigar Lighter...................... 8W-80-34
Clockspring C1..................... 8W-80-34
Clockspring C2..................... 8W-80-34
Clockspring C3..................... 8W-80-35
BR/BE8W-80 CONNECTOR PIN-OUTS 8W - 80 - 1
Page 955 of 2255

C203 - (I/P HARNESS SIDE)
CAV CIRCUIT
21 X54 18VT
21 X54 18VT
22 P34 22PK/BK (CTM)
22 P34 20PK/BK (POWER LOCK/WINDOW
(CTM))
23 P31 22PK/DG (CTM)
23 P31 22PK/DG (CTM)
24 X55 18BR/RD
24 X55 18BR/RD
25 X53 18DG
25 X53 18DG
26 X56 18DB/RD
26 X56 18DB/RD
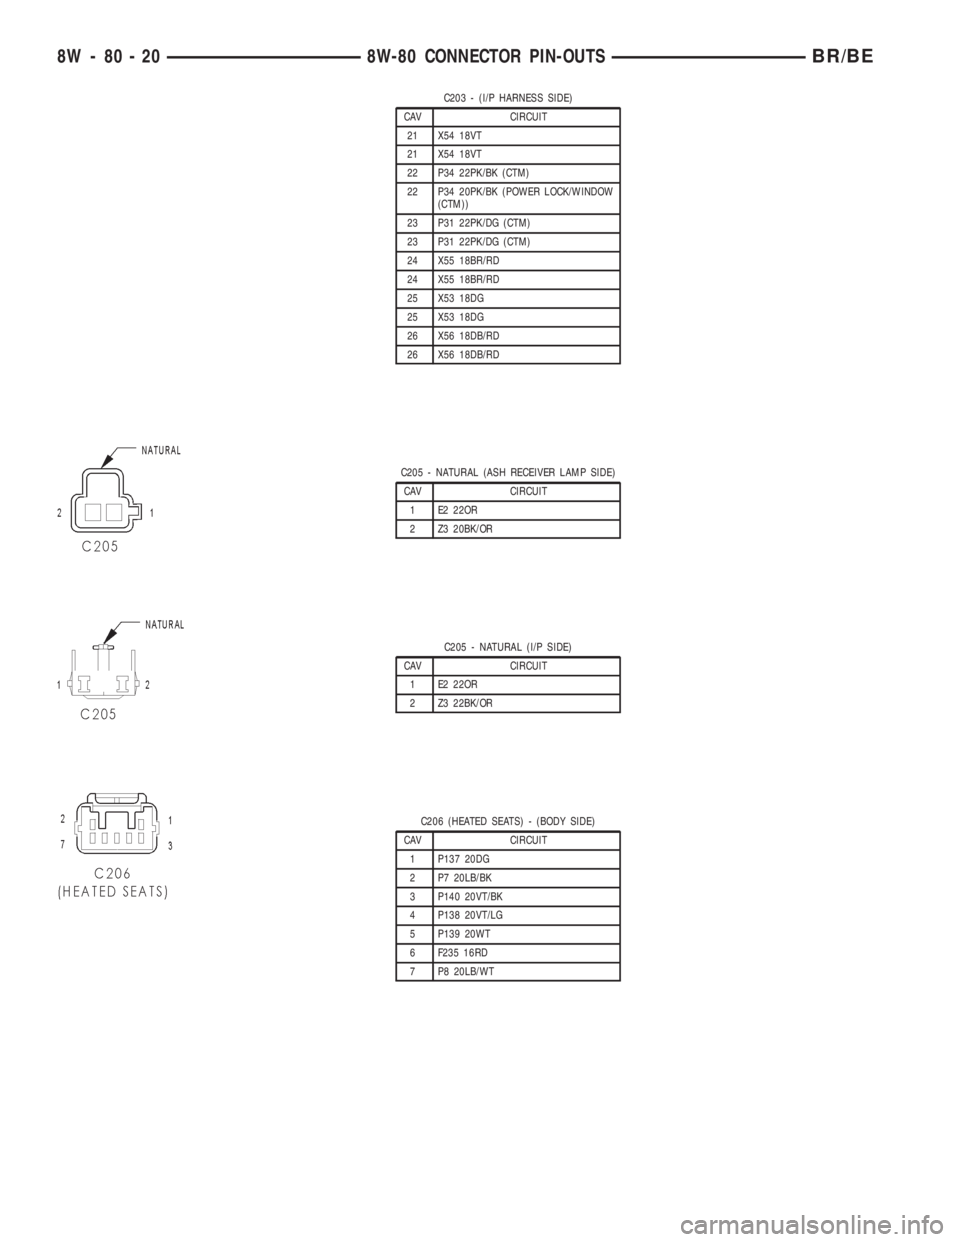
C205 - NATURAL (ASH RECEIVER LAMP SIDE)
CAV CIRCUIT
1 E2 22OR
2 Z3 20BK/OR
C205 - NATURAL (I/P SIDE)
CAV CIRCUIT
1 E2 22OR
2 Z3 22BK/OR
C206 (HEATED SEATS) - (BODY SIDE)
CAV CIRCUIT
1 P137 20DG
2 P7 20LB/BK
3 P140 20VT/BK
4 P138 20VT/LG
5 P139 20WT
6 F235 16RD
7 P8 20LB/WT
8W - 80 - 20 8W-80 CONNECTOR PIN-OUTSBR/BE