2002 DODGE RAM clutch
[x] Cancel search: clutchPage 1518 of 2255
(6) Reverse assembly on the bench.
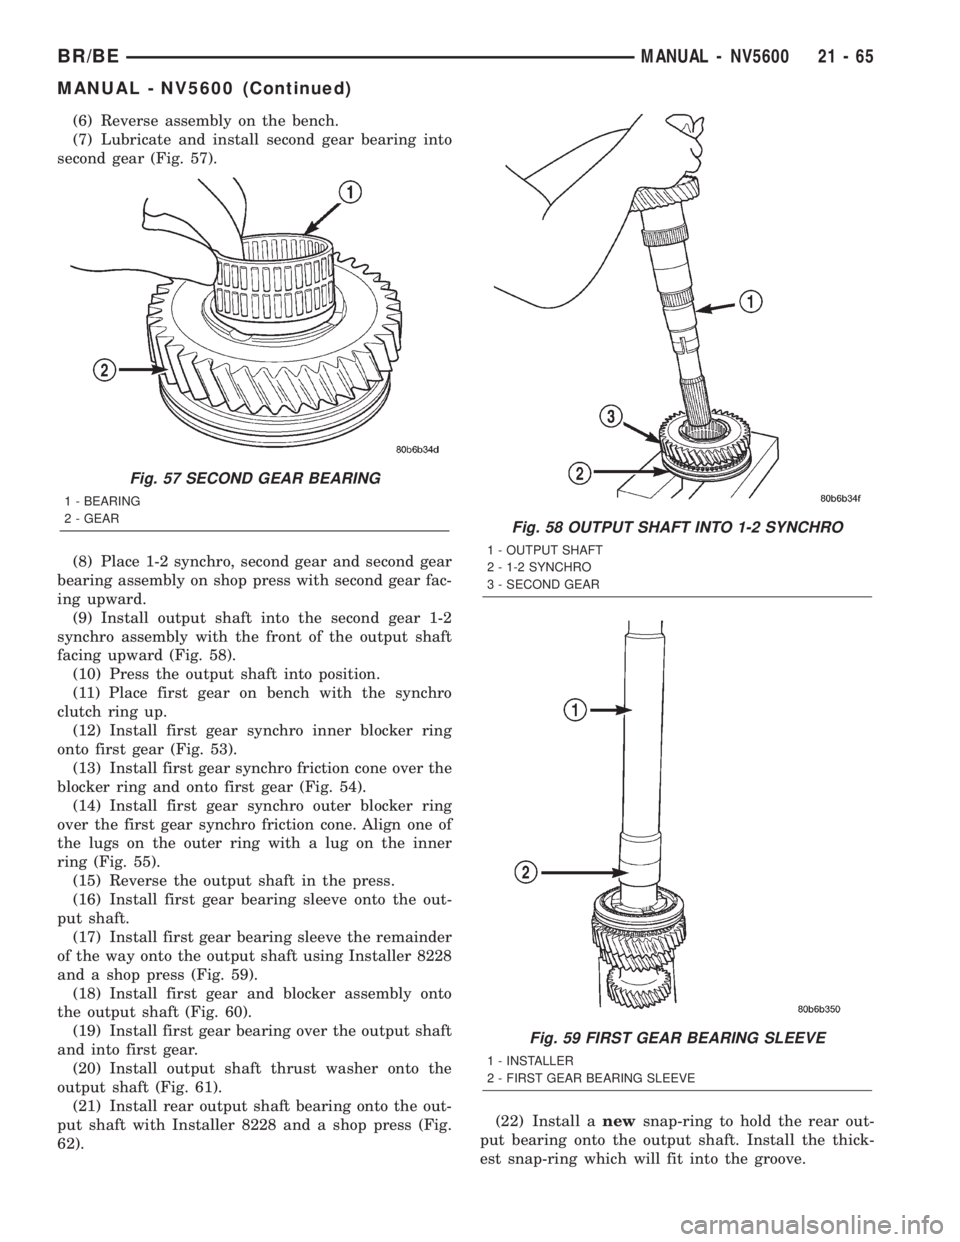
(7) Lubricate and install second gear bearing into
second gear (Fig. 57).
(8) Place 1-2 synchro, second gear and second gear
bearing assembly on shop press with second gear fac-
ing upward.
(9) Install output shaft into the second gear 1-2
synchro assembly with the front of the output shaft
facing upward (Fig. 58).
(10) Press the output shaft into position.
(11) Place first gear on bench with the synchro
clutch ring up.
(12) Install first gear synchro inner blocker ring
onto first gear (Fig. 53).
(13) Install first gear synchro friction cone over the
blocker ring and onto first gear (Fig. 54).
(14) Install first gear synchro outer blocker ring
over the first gear synchro friction cone. Align one of
the lugs on the outer ring with a lug on the inner
ring (Fig. 55).
(15) Reverse the output shaft in the press.
(16) Install first gear bearing sleeve onto the out-
put shaft.
(17) Install first gear bearing sleeve the remainder
of the way onto the output shaft using Installer 8228
and a shop press (Fig. 59).
(18) Install first gear and blocker assembly onto
the output shaft (Fig. 60).
(19) Install first gear bearing over the output shaft
and into first gear.
(20) Install output shaft thrust washer onto the
output shaft (Fig. 61).
(21) Install rear output shaft bearing onto the out-
put shaft with Installer 8228 and a shop press (Fig.
62).(22) Install anewsnap-ring to hold the rear out-
put bearing onto the output shaft. Install the thick-
est snap-ring which will fit into the groove.
Fig. 57 SECOND GEAR BEARING
1 - BEARING
2 - GEAR
Fig. 58 OUTPUT SHAFT INTO 1-2 SYNCHRO
1 - OUTPUT SHAFT
2 - 1-2 SYNCHRO
3 - SECOND GEAR
Fig. 59 FIRST GEAR BEARING SLEEVE
1 - INSTALLER
2 - FIRST GEAR BEARING SLEEVE
BR/BEMANUAL - NV5600 21 - 65
MANUAL - NV5600 (Continued)
Page 1521 of 2255
COUNTERSHAFT
(1) Place third countershaft gear on the bench
with the synchro clutch ring up.
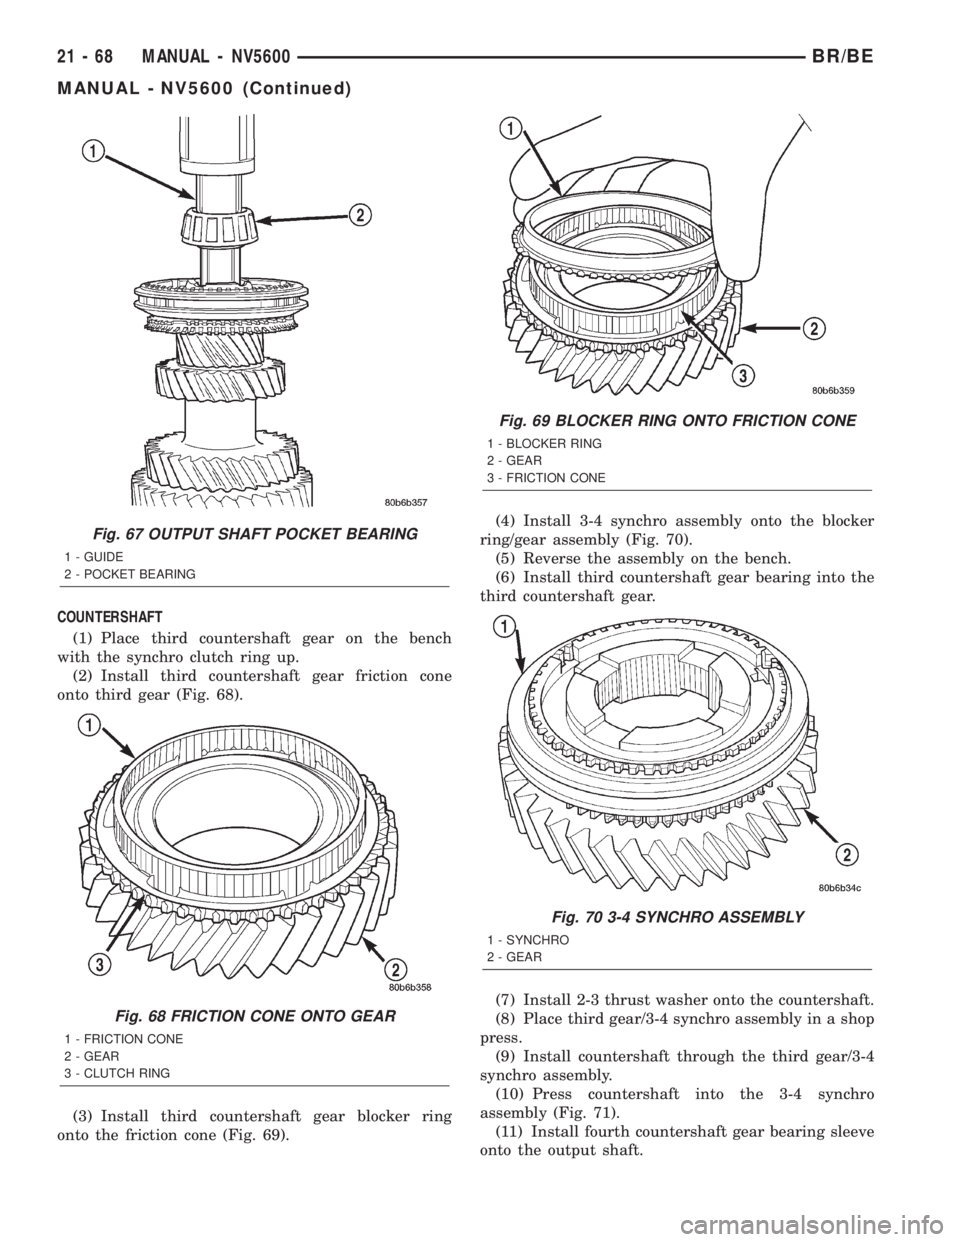
(2) Install third countershaft gear friction cone
onto third gear (Fig. 68).
(3) Install third countershaft gear blocker ring
onto the friction cone (Fig. 69).(4) Install 3-4 synchro assembly onto the blocker
ring/gear assembly (Fig. 70).
(5) Reverse the assembly on the bench.
(6) Install third countershaft gear bearing into the
third countershaft gear.
(7) Install 2-3 thrust washer onto the countershaft.
(8) Place third gear/3-4 synchro assembly in a shop
press.
(9) Install countershaft through the third gear/3-4
synchro assembly.
(10) Press countershaft into the 3-4 synchro
assembly (Fig. 71).
(11) Install fourth countershaft gear bearing sleeve
onto the output shaft.
Fig. 67 OUTPUT SHAFT POCKET BEARING
1 - GUIDE
2 - POCKET BEARING
Fig. 68 FRICTION CONE ONTO GEAR
1 - FRICTION CONE
2 - GEAR
3 - CLUTCH RING
Fig. 69 BLOCKER RING ONTO FRICTION CONE
1 - BLOCKER RING
2 - GEAR
3 - FRICTION CONE
Fig. 70 3-4 SYNCHRO ASSEMBLY
1 - SYNCHRO
2 - GEAR
21 - 68 MANUAL - NV5600BR/BE
MANUAL - NV5600 (Continued)
Page 1522 of 2255

(12) Press fourth countershaft bearing sleeve onto
the countershaft with Installer 8228 and a shop
press.
(13) Place fourth countershaft gear on the bench
with the synchro clutch ring up.
(14) Install fourth countershaft gear friction cone
onto fourth countershaft gear (Fig. 68).
(15) Install fourth countershaft gear blocker ring
onto the friction cone (Fig. 69).
(16) Install fourth countershaft gear bearing into
the fourth countershaft gear.
(17) Place sixth countershaft gear in the shop
press.
(18) Position fourth countershaft gear assembly
onto the sixth countershaft gear (Fig. 72).
(19) Install countershaft into the fourth/sixth coun-
tershaft gear assembly in the shop press.
(20) Press countershaft into sixth gear (Fig. 73).
CAUTION: Gear and shaft must be aligned while
pressing or the gear will bind on the shaft.
(21) Place fifth countershaft gear into the shop
press.
Fig. 71 COUNTERSHAFT INTO 3-4 SYNCHRO
1 - COUNTERSHAFT
2 - 2-3 THRUST WASHER
3 - THIRD COUNTERSHAFT GEAR
Fig. 72 FOURTH COUNTERSHAFT ONTO SIXTH
COUNTERSHAFT GEAR
1 - FOURTH BEARING
2 - FOURTH COUNTERSHAFT GEAR
3 - SIXTH COUNTERSHAFT GEAR
Fig. 73 COUNTERSHAFT TO SIXTH
COUNTERSHAFT GEAR
1 - COUNTERSHAFT
2 - SIXTH COUNTERSHAFT GEAR
3 - 3-4 SYNCHRO
BR/BEMANUAL - NV5600 21 - 69
MANUAL - NV5600 (Continued)
Page 1524 of 2255
CLUTCH HOUSING
(1) Install input shaft bearing race so that the
bearing race protrudes 0.3 in. above the front surface
of the clutch housing. Install bearing race with
Remover/Installer 8237 and Handle C-4171.
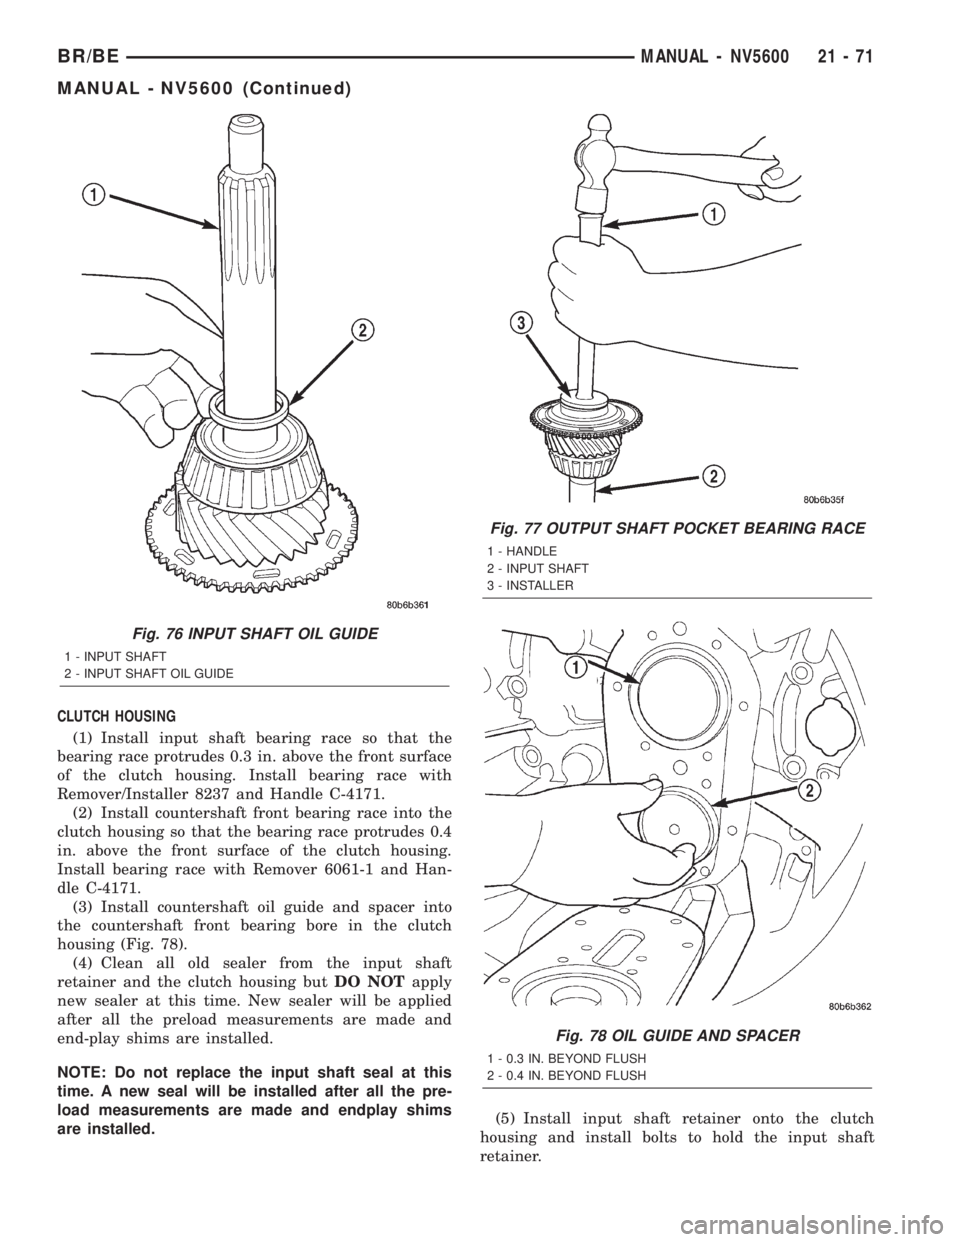
(2) Install countershaft front bearing race into the
clutch housing so that the bearing race protrudes 0.4
in. above the front surface of the clutch housing.
Install bearing race with Remover 6061-1 and Han-
dle C-4171.
(3) Install countershaft oil guide and spacer into
the countershaft front bearing bore in the clutch
housing (Fig. 78).
(4) Clean all old sealer from the input shaft
retainer and the clutch housing butDO NOTapply
new sealer at this time. New sealer will be applied
after all the preload measurements are made and
end-play shims are installed.
NOTE: Do not replace the input shaft seal at this
time. A new seal will be installed after all the pre-
load measurements are made and endplay shims
are installed.(5) Install input shaft retainer onto the clutch
housing and install bolts to hold the input shaft
retainer.
Fig. 76 INPUT SHAFT OIL GUIDE
1 - INPUT SHAFT
2 - INPUT SHAFT OIL GUIDE
Fig. 77 OUTPUT SHAFT POCKET BEARING RACE
1 - HANDLE
2 - INPUT SHAFT
3 - INSTALLER
Fig. 78 OIL GUIDE AND SPACER
1 - 0.3 IN. BEYOND FLUSH
2 - 0.4 IN. BEYOND FLUSH
BR/BEMANUAL - NV5600 21 - 71
MANUAL - NV5600 (Continued)
Page 1525 of 2255
GEARTRAIN
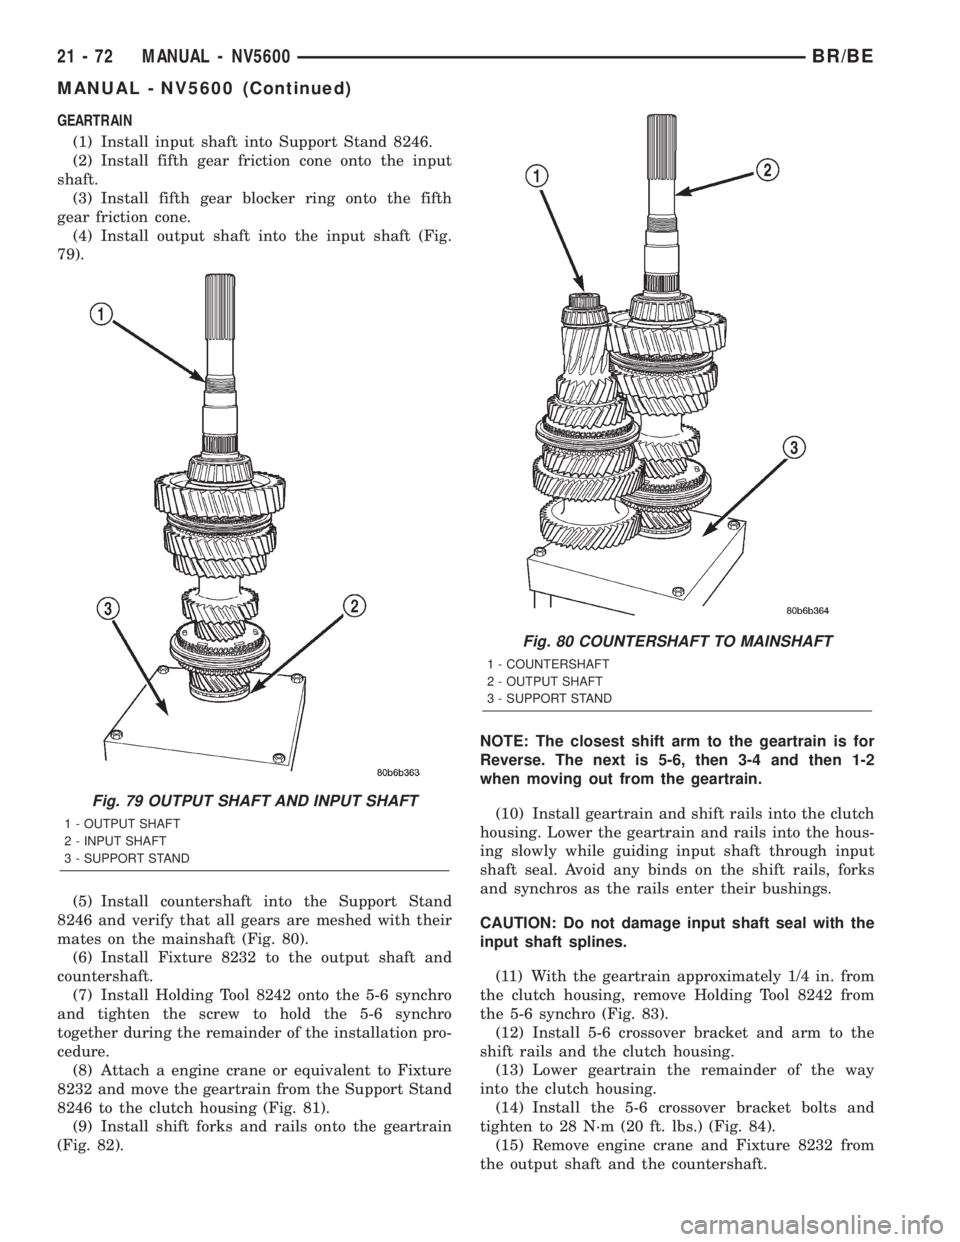
(1) Install input shaft into Support Stand 8246.
(2) Install fifth gear friction cone onto the input
shaft.
(3) Install fifth gear blocker ring onto the fifth
gear friction cone.
(4) Install output shaft into the input shaft (Fig.
79).
(5) Install countershaft into the Support Stand
8246 and verify that all gears are meshed with their
mates on the mainshaft (Fig. 80).
(6) Install Fixture 8232 to the output shaft and
countershaft.
(7) Install Holding Tool 8242 onto the 5-6 synchro
and tighten the screw to hold the 5-6 synchro
together during the remainder of the installation pro-
cedure.
(8) Attach a engine crane or equivalent to Fixture
8232 and move the geartrain from the Support Stand
8246 to the clutch housing (Fig. 81).
(9) Install shift forks and rails onto the geartrain
(Fig. 82).NOTE: The closest shift arm to the geartrain is for
Reverse. The next is 5-6, then 3-4 and then 1-2
when moving out from the geartrain.
(10) Install geartrain and shift rails into the clutch
housing. Lower the geartrain and rails into the hous-
ing slowly while guiding input shaft through input
shaft seal. Avoid any binds on the shift rails, forks
and synchros as the rails enter their bushings.
CAUTION: Do not damage input shaft seal with the
input shaft splines.
(11) With the geartrain approximately 1/4 in. from
the clutch housing, remove Holding Tool 8242 from
the 5-6 synchro (Fig. 83).
(12) Install 5-6 crossover bracket and arm to the
shift rails and the clutch housing.
(13) Lower geartrain the remainder of the way
into the clutch housing.
(14) Install the 5-6 crossover bracket bolts and
tighten to 28 N´m (20 ft. lbs.) (Fig. 84).
(15) Remove engine crane and Fixture 8232 from
the output shaft and the countershaft.
Fig. 79 OUTPUT SHAFT AND INPUT SHAFT
1 - OUTPUT SHAFT
2 - INPUT SHAFT
3 - SUPPORT STAND
Fig. 80 COUNTERSHAFT TO MAINSHAFT
1 - COUNTERSHAFT
2 - OUTPUT SHAFT
3 - SUPPORT STAND
21 - 72 MANUAL - NV5600BR/BE
MANUAL - NV5600 (Continued)
Page 1527 of 2255
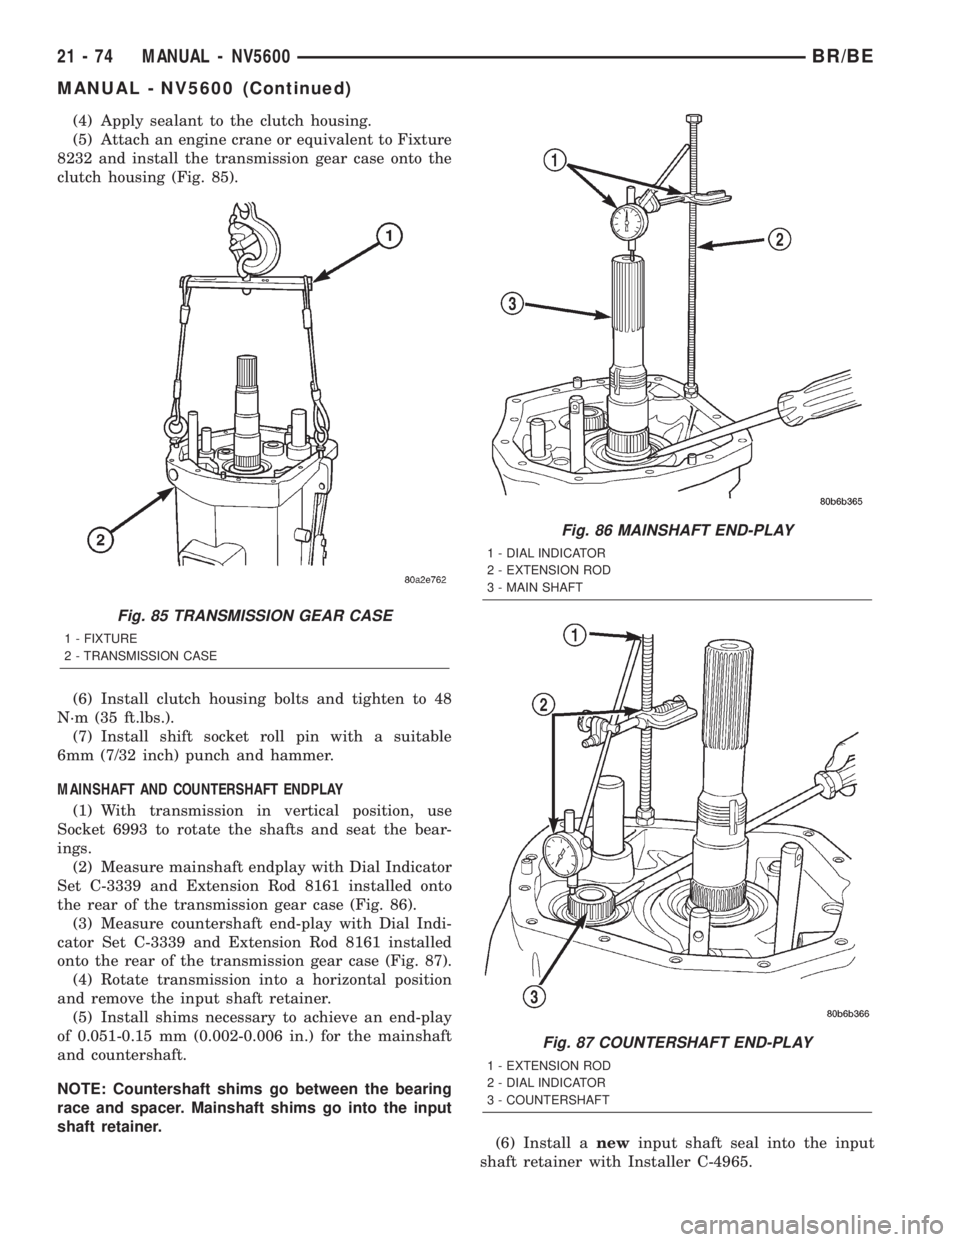
(4) Apply sealant to the clutch housing.
(5) Attach an engine crane or equivalent to Fixture
8232 and install the transmission gear case onto the
clutch housing (Fig. 85).
(6) Install clutch housing bolts and tighten to 48
N´m (35 ft.lbs.).
(7) Install shift socket roll pin with a suitable
6mm (7/32 inch) punch and hammer.
MAINSHAFT AND COUNTERSHAFT ENDPLAY
(1) With transmission in vertical position, use
Socket 6993 to rotate the shafts and seat the bear-
ings.
(2) Measure mainshaft endplay with Dial Indicator
Set C-3339 and Extension Rod 8161 installed onto
the rear of the transmission gear case (Fig. 86).
(3) Measure countershaft end-play with Dial Indi-
cator Set C-3339 and Extension Rod 8161 installed
onto the rear of the transmission gear case (Fig. 87).
(4) Rotate transmission into a horizontal position
and remove the input shaft retainer.
(5) Install shims necessary to achieve an end-play
of 0.051-0.15 mm (0.002-0.006 in.) for the mainshaft
and countershaft.
NOTE: Countershaft shims go between the bearing
race and spacer. Mainshaft shims go into the input
shaft retainer.
(6) Install anewinput shaft seal into the input
shaft retainer with Installer C-4965.
Fig. 85 TRANSMISSION GEAR CASE
1 - FIXTURE
2 - TRANSMISSION CASE
Fig. 86 MAINSHAFT END-PLAY
1 - DIAL INDICATOR
2 - EXTENSION ROD
3 - MAIN SHAFT
Fig. 87 COUNTERSHAFT END-PLAY
1 - EXTENSION ROD
2 - DIAL INDICATOR
3 - COUNTERSHAFT
21 - 74 MANUAL - NV5600BR/BE
MANUAL - NV5600 (Continued)
Page 1528 of 2255
(7) Install input shaft oil guide with C-3972-A and
Handle C-4171.
(8) Apply sealer to the input shaft retainer and
install retainer onto the clutch housing. Install bolts
and tighten to 28 N´m (20 ft.lbs.).
REVERSE GEAR
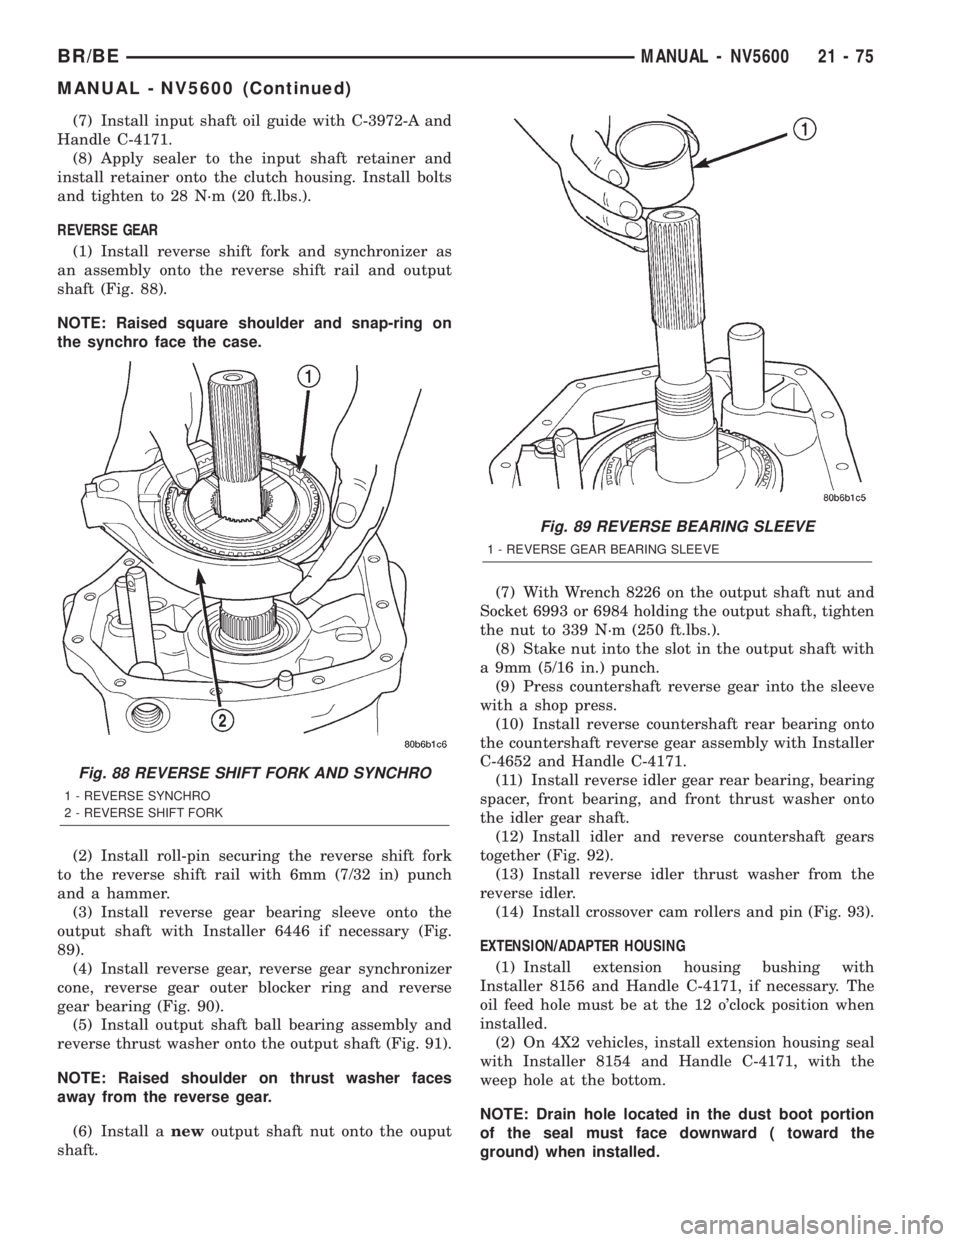
(1) Install reverse shift fork and synchronizer as
an assembly onto the reverse shift rail and output
shaft (Fig. 88).
NOTE: Raised square shoulder and snap-ring on
the synchro face the case.
(2) Install roll-pin securing the reverse shift fork
to the reverse shift rail with 6mm (7/32 in) punch
and a hammer.
(3) Install reverse gear bearing sleeve onto the
output shaft with Installer 6446 if necessary (Fig.
89).
(4) Install reverse gear, reverse gear synchronizer
cone, reverse gear outer blocker ring and reverse
gear bearing (Fig. 90).
(5) Install output shaft ball bearing assembly and
reverse thrust washer onto the output shaft (Fig. 91).
NOTE: Raised shoulder on thrust washer faces
away from the reverse gear.
(6) Install anewoutput shaft nut onto the ouput
shaft.(7) With Wrench 8226 on the output shaft nut and
Socket 6993 or 6984 holding the output shaft, tighten
the nut to 339 N´m (250 ft.lbs.).
(8) Stake nut into the slot in the output shaft with
a 9mm (5/16 in.) punch.
(9) Press countershaft reverse gear into the sleeve
with a shop press.
(10) Install reverse countershaft rear bearing onto
the countershaft reverse gear assembly with Installer
C-4652 and Handle C-4171.
(11) Install reverse idler gear rear bearing, bearing
spacer, front bearing, and front thrust washer onto
the idler gear shaft.
(12) Install idler and reverse countershaft gears
together (Fig. 92).
(13) Install reverse idler thrust washer from the
reverse idler.
(14) Install crossover cam rollers and pin (Fig. 93).
EXTENSION/ADAPTER HOUSING
(1) Install extension housing bushing with
Installer 8156 and Handle C-4171, if necessary. The
oil feed hole must be at the 12 o'clock position when
installed.
(2) On 4X2 vehicles, install extension housing seal
with Installer 8154 and Handle C-4171, with the
weep hole at the bottom.
NOTE: Drain hole located in the dust boot portion
of the seal must face downward ( toward the
ground) when installed.
Fig. 88 REVERSE SHIFT FORK AND SYNCHRO
1 - REVERSE SYNCHRO
2 - REVERSE SHIFT FORK
Fig. 89 REVERSE BEARING SLEEVE
1 - REVERSE GEAR BEARING SLEEVE
BR/BEMANUAL - NV5600 21 - 75
MANUAL - NV5600 (Continued)
Page 1531 of 2255
(24) Install shift tower onto the transmission case
and tighten bolts to 9 N´m (7 ft.lbs.).
INSTALLATION
NOTE: If installing a new transmission, use all com-
ponents supplied with the transmission. If a new
shift tower is supplied with the new transmission,
do not re-use the original shift tower.
(1) Apply a light coat of Mopar high temperature
bearing grease or equivalent to contact surfaces of
following components:
²input shaft splines.
²release bearing slide surface of front retainer.
²release bearing bore.
²release fork.
²release fork ball stud.
²propeller shaft slip yoke.
(2) Apply sealer to threads of bottom PTO cover
bolt and install bolt in case.
(3) Mount transmission on jack and position trans-
mission under vehicle.
(4) Raise transmission until input shaft is centered
in clutch disc hub.
(5) Move transmission forward and start input
shaft in clutch disc and pilot bushing/bearing.
(6) Work transmission forward until seated against
engine block. Do not allow transmission to remain
unsupported after input shaft has entered clutch
disc.
(7) Install and tighten transmission-to-engine
block bolts.
(8) Install clutch slave cylinder.
(9) Connect backup light switch wires.
(10) Position transmission harness wires in clips
on transmission.(11) Install transmission mount on transmission or
rear crossmember.
(12) Install rear crossmember.
(13) Remove transmission jack and engine support
fixture.
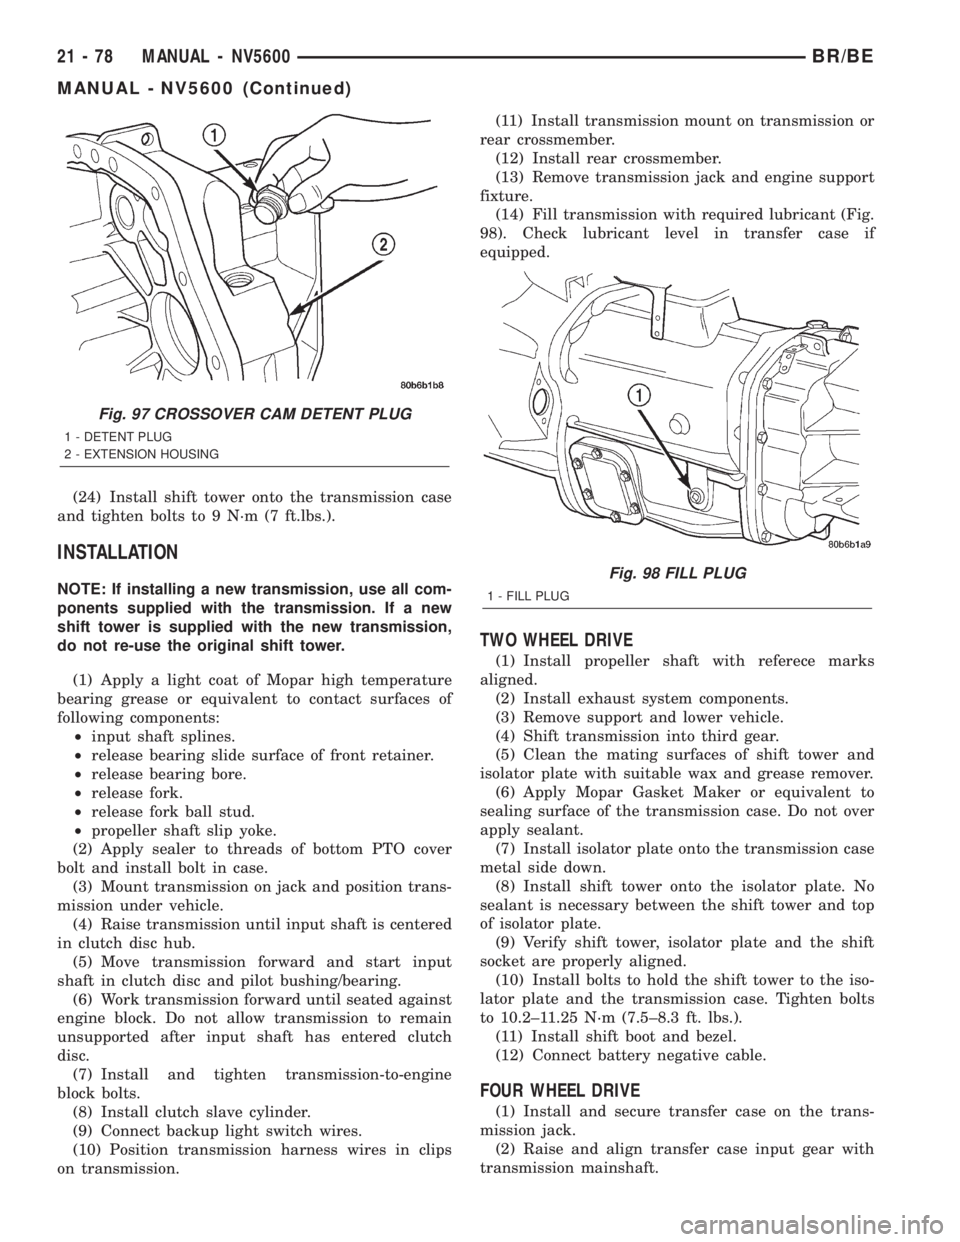
(14) Fill transmission with required lubricant (Fig.
98). Check lubricant level in transfer case if
equipped.
TWO WHEEL DRIVE
(1) Install propeller shaft with referece marks
aligned.
(2) Install exhaust system components.
(3) Remove support and lower vehicle.
(4) Shift transmission into third gear.
(5) Clean the mating surfaces of shift tower and
isolator plate with suitable wax and grease remover.
(6) Apply Mopar Gasket Maker or equivalent to
sealing surface of the transmission case. Do not over
apply sealant.
(7) Install isolator plate onto the transmission case
metal side down.
(8) Install shift tower onto the isolator plate. No
sealant is necessary between the shift tower and top
of isolator plate.
(9) Verify shift tower, isolator plate and the shift
socket are properly aligned.
(10) Install bolts to hold the shift tower to the iso-
lator plate and the transmission case. Tighten bolts
to 10.2±11.25 N´m (7.5±8.3 ft. lbs.).
(11) Install shift boot and bezel.
(12) Connect battery negative cable.
FOUR WHEEL DRIVE
(1) Install and secure transfer case on the trans-
mission jack.
(2) Raise and align transfer case input gear with
transmission mainshaft.
Fig. 97 CROSSOVER CAM DETENT PLUG
1 - DETENT PLUG
2 - EXTENSION HOUSING
Fig. 98 FILL PLUG
1 - FILL PLUG
21 - 78 MANUAL - NV5600BR/BE
MANUAL - NV5600 (Continued)