2002 CHRYSLER TOWN AND COUNTRY brakes
[x] Cancel search: brakesPage 80 of 2399

DIFFERENTIAL & DRIVELINE
TABLE OF CONTENTS
page page
HALF SHAFT - FRONT.....................1
HALF SHAFT - REAR.....................14PROPELLER SHAFT.....................22
REAR DRIVELINE MODULE................24
HALF SHAFT - FRONT
TABLE OF CONTENTS
page page
HALF SHAFT - FRONT
DESCRIPTION..........................1
DIAGNOSIS AND TESTING - HALF SHAFT.....1
REMOVAL.............................2
INSTALLATION..........................4
SPECIFICATIONS - HALF SHAFT - FRONT....6
CV BOOT - INNER
REMOVAL.............................6INSTALLATION..........................6
CV BOOT - OUTER
REMOVAL.............................10
INSTALLATION.........................10
OUTER CV JOINT BEARING SHIELD
REMOVAL.............................13
INSTALLATION.........................13
HALF SHAFT - FRONT
DESCRIPTION
All vehicles use an unequal length half shaft sys-
tem (Fig. 1).
The left half shaft uses a tuned rubber damper
weight. When replacing the left half shaft, be sure
the replacement half shaft has the same damper
weight as the original.
All half shaft assemblies use the same type of
inner and outer joints. The inner joint of both half
shaft assemblies is a tripod joint, and the outer joint
of both half shaft assemblies is a Rzeppa joint. Both
tripod joints and Rzeppa joints are true constant
velocity (CV) joint assemblies. The inner tripod joint
allows for the changes in half shaft length through
the jounce and rebound travel of the front suspen-
sion.
On vehicles equipped with ABS brakes, the outer
CV joint is equipped with a tone wheel used to deter-
mine vehicle speed for ABS brake operation.
The inner tripod joint of both half shafts is splined
into the transaxle side gears. The inner tripod joints
are retained in the side gears of the transaxle using
a snap ring located in the stub shaft of the tripod
joint. The outer CV joint has a stub shaft that issplined into the wheel hub and retained by a steel
hub nut.DIAGNOSIS AND TESTING - HALF SHAFT
VEHICLE INSPECTION
(1) Check for grease in the vicinity of the inboard
tripod joint and outboard CV joint; this is a sign of
inner or outer joint seal boot or seal boot clamp dam-
age.
NOISE AND/OR VIBRATION IN TURNS
A clicking noise and/or a vibration in turns could
be caused by one of the following conditions:
²Damaged outer CV or inner tripod joint seal
boot or seal boot clamps. This will result in the loss
and/or contamination of the joint grease, resulting in
inadequate lubrication of the joint.
²Noise may also be caused by another component
of the vehicle coming in contact with the half shafts.
CLUNKING NOISE DURING ACCELERATION
This noise may be a result of one of the following
conditions:
²A torn seal boot on the inner or outer joint of the
half shaft assembly.
RSDIFFERENTIAL & DRIVELINE3-1
ProCarManuals.com
Page 82 of 2399

(3) Remove the wheel and tire assembly from the
vehicle. (Refer to 22 - TIRES/WHEELS - REMOVAL)
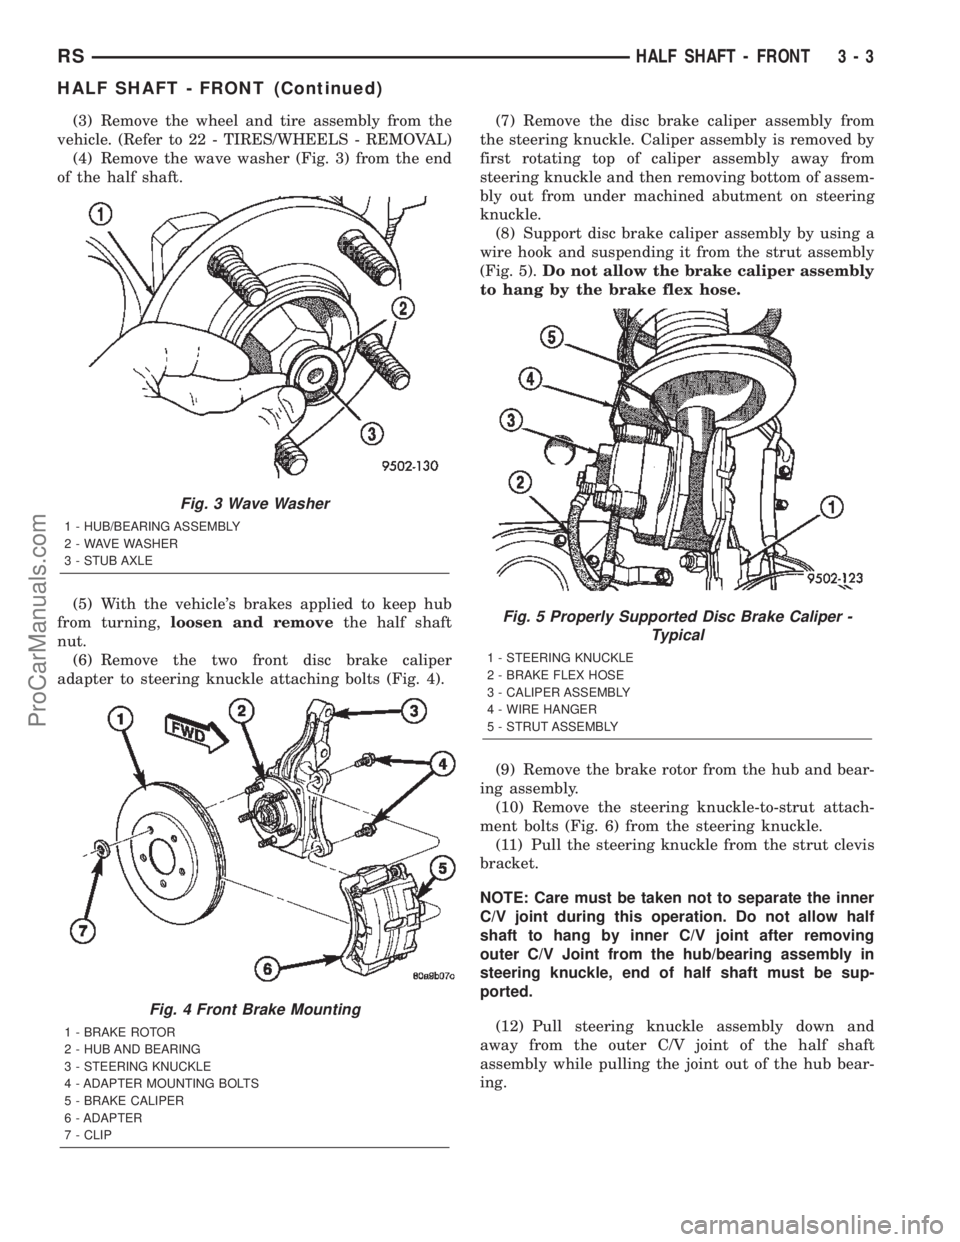
(4) Remove the wave washer (Fig. 3) from the end
of the half shaft.
(5) With the vehicle's brakes applied to keep hub
from turning,loosen and removethe half shaft
nut.
(6) Remove the two front disc brake caliper
adapter to steering knuckle attaching bolts (Fig. 4).(7) Remove the disc brake caliper assembly from
the steering knuckle. Caliper assembly is removed by
first rotating top of caliper assembly away from
steering knuckle and then removing bottom of assem-
bly out from under machined abutment on steering
knuckle.
(8) Support disc brake caliper assembly by using a
wire hook and suspending it from the strut assembly
(Fig. 5).Do not allow the brake caliper assembly
to hang by the brake flex hose.
(9) Remove the brake rotor from the hub and bear-
ing assembly.
(10) Remove the steering knuckle-to-strut attach-
ment bolts (Fig. 6) from the steering knuckle.
(11) Pull the steering knuckle from the strut clevis
bracket.
NOTE: Care must be taken not to separate the inner
C/V joint during this operation. Do not allow half
shaft to hang by inner C/V joint after removing
outer C/V Joint from the hub/bearing assembly in
steering knuckle, end of half shaft must be sup-
ported.
(12) Pull steering knuckle assembly down and
away from the outer C/V joint of the half shaft
assembly while pulling the joint out of the hub bear-
ing.
Fig. 3 Wave Washer
1 - HUB/BEARING ASSEMBLY
2 - WAVE WASHER
3 - STUB AXLE
Fig. 4 Front Brake Mounting
1 - BRAKE ROTOR
2 - HUB AND BEARING
3 - STEERING KNUCKLE
4 - ADAPTER MOUNTING BOLTS
5 - BRAKE CALIPER
6 - ADAPTER
7 - CLIP
Fig. 5 Properly Supported Disc Brake Caliper -
Typical
1 - STEERING KNUCKLE
2 - BRAKE FLEX HOSE
3 - CALIPER ASSEMBLY
4 - WIRE HANGER
5 - STRUT ASSEMBLY
RSHALF SHAFT - FRONT3-3
HALF SHAFT - FRONT (Continued)
ProCarManuals.com
Page 84 of 2399

CAUTION: If the vehicle being serviced is equipped
with eccentric strut assembly attaching bolts, the
eccentric bolt must be installed in the bottom (slot-
ted) hole on the strut clevis bracket (Fig. 10).
(7) Install steering knuckle in clevis bracket of
strut damper assembly. Install the strut damper to
steering knuckle attaching bolts. Tighten both bolts
to a torque of 81 N´m (60 ft. lbs.) plus an additional
1/4 turn.
(8) Install braking disc on hub and bearing assem-
bly.(9) Install disc brake caliper assembly on steering
knuckle. Caliper is installed by first sliding bottom of
caliper assembly under abutment on steering
knuckle, and then rotating top of caliper against top
abutment.
(10) Install disc brake caliper adapter to steering
knuckle attaching bolts (Fig. 4). Tighten the disc
brake caliper adapter attaching bolts to a torque of
169 N´m (125 ft. lbs.).
(11) Clean all foreign matter from the threads of
the outer CV joint. Install the washer and half shaft
to hub/bearing assembly nut on half shaft and
securely tighten nut.
(12) Install front wheel and tire assembly. Install
and tighten the wheel mounting stud nuts in proper
sequence until all nuts are torqued to half the
required specification. Then repeat the tightening
sequence to the full specified torque of 135 N´m (100
ft. lbs.).
(13) Lower vehicle.
(14) With the vehicle's brakes applied to keep hub
from turning, tighten the hub nut to a torque of 244
N´m (180 ft. lbs.) (Fig. 11).
(15) Install the spring wave washer on the end of
the half shaft.
(16) Install the hub nut lock, and anewcotter pin
(Fig. 2). Wrap cotter pin prongs tightly around the
hub nut lock as shown in (Fig. 2).
(17) Check for correct fluid level in transaxle
assembly. (Refer to 21 - TRANSMISSION/TRANS-
AXLE/AUTOMATIC - 41TE/FLUID - STANDARD
PROCEDURE)
Fig. 9 Outer CV Joint Inspection
1 - OUTER C/V JOINT
2 - THIS AREA OF OUTER C/V JOINT MUST BE FREE OF ALL
DEBRIS AND MOISTURE, BEFORE INSTALLATION INTO
STEERING KNUCKLE.
Fig. 10 Correctly Installed Eccentric Attaching Bolt
1 - STEERING KNUCKLE
2 - FLANGED BOLT IN TOP HOLE
3 - CAM BOLT IN BOTTOM HOLE
4 - STRUT CLEVIS BRACKET
Fig. 11 Torquing Front Half Shaft To Hub Nut
1 - TORQUE WRENCH
RSHALF SHAFT - FRONT3-5
HALF SHAFT - FRONT (Continued)
ProCarManuals.com
Page 93 of 2399

HALF SHAFT - REAR
TABLE OF CONTENTS
page page
HALF SHAFT - REAR
DESCRIPTION.........................14
DIAGNOSIS AND TESTING - HALF SHAFT....14
REMOVAL.............................15
INSTALLATION.........................15SPECIFICATIONS - HALF SHAFT - FRONT . . . 16
CV BOOT - INNER/OUTER
REMOVAL.............................17
INSTALLATION.........................18
HALF SHAFT - REAR
DESCRIPTION
The inner and outer joints of both half shaft
assemblies are tripod joints. The tripod joints are
true constant velocity (CV) joint assemblies, which
allow for the changes in half shaft length through
the jounce and rebound travel of the rear suspension.
On vehicles equipped with ABS brakes, the outer
CV joint is equipped with a tone wheel used to deter-
mine vehicle speed for ABS brake operation.
The inner tripod joint of both half shafts is bolted
rear differential assembly's output flanges. The outer
CV joint has a stub shaft that is splined into the
wheel hub and retained by a steel hub nut.
DIAGNOSIS AND TESTING - HALF SHAFT
VEHICLE INSPECTION
(1) Check for grease in the vicinity of the inboard
tripod joint and outboard CV joint; this is a sign of
inner or outer joint seal boot or seal boot clamp dam-
age.
NOISE AND/OR VIBRATION IN TURNS
A clicking noise and/or a vibration in turns could
be caused by one of the following conditions:
²Damaged outer CV or inner tripod joint seal
boot or seal boot clamps. This will result in the loss
and/or contamination of the joint grease, resulting in
inadequate lubrication of the joint.²Noise may also be caused by another component
of the vehicle coming in contact with the half shafts.
CLUNKING NOISE DURING ACCELERATION
This noise may be a result of one of the following
conditions:
²A torn seal boot on the inner or outer joint of the
half shaft assembly.
²A loose or missing clamp on the inner or outer
joint of the half shaft assembly.
²A damaged or worn half shaft CV joint.
SHUDDER OR VIBRATION DURING ACCELERATION
This problem could be a result of:
²A worn or damaged half shaft inner tripod joint.
²A sticking tripod joint spider assembly (inner tri-
pod joint only).
²Improper wheel alignment. (Refer to 2 - SUS-
PENSION/WHEEL ALIGNMENT - STANDARD
PROCEDURE)
VIBRATION AT HIGHWAY SPEEDS
This problem could be a result of:
²Foreign material (mud, etc.) packed on the back-
side of the wheel(s).
²Out of balance tires or wheels. (Refer to 22 -
TIRES/WHEELS - STANDARD PROCEDURE)
²Improper tire and/or wheel runout. (Refer to 22 -
TIRES/WHEELS - DIAGNOSIS AND TESTING)
3 - 14 HALF SHAFT - REARRS
ProCarManuals.com
Page 130 of 2399

BRAKES
TABLE OF CONTENTS
page page
BRAKES - BASE........................... 1BRAKES - ABS........................... 85
BRAKES - BASE
TABLE OF CONTENTS
page page
BRAKES - BASE
DESCRIPTION
DESCRIPTION - BASE BRAKES...........3
DESCRIPTION - BASE BRAKES (EXPORT) . . . 3
OPERATION - BASE BRAKES..............3
WARNING.............................4
CAUTION..............................4
DIAGNOSIS AND TESTING - BASE BRAKE
SYSTEM.............................4
STANDARD PROCEDURE - BASE BRAKE
BLEEDING............................7
SPECIFICATIONS
BRAKE FASTENER TORQUE.............9
SPECIAL TOOLS
BASE BRAKE SYSTEM..................9
BRAKE FLUID LEVEL SWITCH
DESCRIPTION.........................10
OPERATION...........................10
REMOVAL.............................10
INSTALLATION.........................10
ADJUSTABLE PEDAL SWITCH
DESCRIPTION.........................11
DIAGNOSIS AND TESTING - ADJUSTABLE
PEDAL SWITCH.......................11
REMOVAL.............................11
INSTALLATION.........................12
PEDAL POSITION SENSOR
DESCRIPTION.........................12
DIAGNOSIS AND TESTING - PEDAL
POSITION SENSOR....................13
REMOVAL.............................13
INSTALLATION.........................13
HYDRAULIC/MECHANICAL
DESCRIPTION
DESCRIPTION - DISC BRAKES (FRONT) . . . 14
DESCRIPTION - DISC BRAKES (REAR)....15
DESCRIPTION - DISC BRAKES (EXPORT) . . 15DESCRIPTION - DRUM BRAKES (REAR) . . . 16
OPERATION
OPERATION - DISC BRAKES (FRONT).....16
OPERATION - DISC BRAKES (REAR)......16
DIAGNOSIS AND TESTING - DRUM BRAKE
AUTOMATIC ADJUSTER................16
BRAKE LINES
DESCRIPTION - BRAKE TUBES AND HOSES . 17
OPERATION - BRAKE TUBES AND HOSES . . . 17
INSPECTION - BRAKE TUBES AND HOSES . . . 17
BRAKE PADS/SHOES - FRONT
REMOVAL
REMOVAL - FRONT DISC BRAKE SHOES
(DISC/DISC BRAKES)..................17
REMOVAL - FRONT DISC BRAKE SHOES
(DISC/DRUM BRAKES).................18
CLEANING - DISC BRAKE SHOES..........18
INSPECTION - DISC BRAKE SHOES........18
INSTALLATION
INSTALLATION - FRONT DISC BRAKE
SHOES.............................19
INSTALLATION - FRONT DISC BRAKE
SHOES (DISC/DRUM BRAKES)...........19
BRAKE PADS/SHOES - REAR DISC
REMOVAL - REAR DISC BRAKE SHOES.....19
CLEANING - DISC BRAKE SHOES..........21
INSPECTION - DISC BRAKE SHOES........21
INSTALLATION - REAR DISC BRAKE SHOES . . 21
BRAKE PADS/SHOES - REAR DRUM
REMOVAL - REAR DRUM BRAKE SHOES....22
INSPECTION - REAR DRUM BRAKE SHOE
LINING..............................25
INSTALLATION - REAR DRUM BRAKE SHOES . 25
ADJUSTMENTS
ADJUSTMENT - REAR DRUM BRAKE
SHOES.............................26
RSBRAKES5-1
ProCarManuals.com
Page 131 of 2399

DISC BRAKE CALIPER - FRONT
REMOVAL
REMOVAL - FRONT DISC BRAKE CALIPER
(DISC/DISC BRAKES)..................26
REMOVAL - FRONT DISC BRAKE CALIPER
(DISC/DRUM BRAKES).................26
DISASSEMBLY
DISASSEMBLY - CALIPER GUIDE PIN
BUSHINGS (DISC/DISC BRAKES).........27
DISASSEMBLY - CALIPER PISTON AND
SEAL...............................27
CLEANING - CALIPER...................28
INSPECTION - CALIPER..................28
ASSEMBLY
ASSEMBLY - CALIPER GUIDE PIN
BUSHINGS (DISC/DISC BRAKES).........28
ASSEMBLY - CALIPER PISTON AND SEAL . . 28
INSTALLATION
INSTALLATION - FRONT DISC BRAKE
CALIPER (DISC/DISC BRAKES)...........29
INSTALLATION - FRONT DISC BRAKE
CALIPER (DISC/DRUM BRAKES)..........30
DISC BRAKE CALIPER - REAR
REMOVAL - REAR DISC BRAKE CALIPER....30
DISASSEMBLY - CALIPER PISTON AND SEAL . 31
CLEANING - CALIPER...................32
INSPECTION - CALIPER..................32
ASSEMBLY - CALIPER PISTON AND SEAL . . . 32
INSTALLATION - REAR DISC BRAKE CALIPER . 33
DISC BRAKE CALIPER ADAPTER
REMOVAL - FRONT DISC BRAKE CALIPER
ADAPTER...........................34
INSTALLATION - FRONT DISC BRAKE
CALIPER ADAPTER....................34
DISC BRAKE CALIPER GUIDE PINS
REMOVAL - DISC BRAKE CALIPER GUIDE
PINS (DISC/DRUM BRAKES).............34
INSTALLATION - DISC BRAKE CALIPER
GUIDE PINS (DISC/DRUM BRAKES).......34
DRUM
REMOVAL.............................35
INSTALLATION.........................35
FLUID
DIAGNOSIS AND TESTING - BRAKE FLUID
CONTAMINATION.....................35
STANDARD PROCEDURE - BRAKE FLUID
LEVEL CHECKING.....................35
SPECIFICATIONS
BRAKE FLUID........................35
JUNCTION BLOCK
DESCRIPTION - NON-ABS JUNCTION BLOCK . 36
OPERATION - NON-ABS JUNCTION BLOCK . . 36
REMOVAL - NON-ABS JUNCTION BLOCK....36
INSTALLATION - NON-ABS JUNCTION BLOCK . 36
MASTER CYLINDER
DESCRIPTION
DESCRIPTION........................37DESCRIPTION - RHD..................38
OPERATION...........................38
STANDARD PROCEDURE - MASTER
CYLINDER BLEEDING..................38
REMOVAL
REMOVAL - LHD......................39
REMOVAL - RHD......................40
DISASSEMBLY - MASTER CYLINDER (FLUID
RESERVOIR).........................40
ASSEMBLY - MASTER CYLINDER (FLUID
RESERVOIR).........................41
INSTALLATION
INSTALLATION - LHD..................41
INSTALLATION - RHD..................42
PEDAL - ADJUSTABLE
DESCRIPTION.........................42
OPERATION...........................42
DIAGNOSIS AND TESTING - ADJUSTABLE
PEDAL SYSTEM......................43
REMOVAL.............................43
INSTALLATION.........................45
PEDAL TORQUE SHAFT - RHD
REMOVAL.............................47
INSTALLATION.........................47
POWER BRAKE BOOSTER
DESCRIPTION.........................48
OPERATION...........................49
DIAGNOSIS AND TESTING - POWER BRAKE
BOOSTER...........................49
REMOVAL
REMOVAL - LHD......................50
REMOVAL - RHD......................52
INSTALLATION
INSTALLATION - LHD..................53
INSTALLATION - RHD..................55
PROPORTIONING VALVE
DESCRIPTION - PROPORTIONING VALVE
(HEIGHT SENSING)....................56
OPERATION - PROPORTIONING VALVE
(HEIGHT SENSING)....................57
DIAGNOSIS AND TESTING -
PROPORTIONING VALVE (HEIGHT
SENSING)...........................57
REMOVAL - PROPORTIONING VALVE
(HEIGHT SENSING)....................58
INSTALLATION - PROPORTIONING VALVE
(HEIGHT SENSING)....................59
ROTOR
DIAGNOSIS AND TESTING - BRAKE ROTOR . . 59
STANDARD PROCEDURE - BRAKE ROTOR
MACHINING..........................61
REMOVAL - FRONT BRAKE ROTOR........62
INSTALLATION - FRONT BRAKE ROTOR.....62
SPECIFICATIONS
BRAKE ROTOR.......................63
BRAKE ROTOR - EXPORT..............63
5 - 2 BRAKES - BASERS
ProCarManuals.com
Page 132 of 2399

SUPPORT PLATE - DRUM BRAKE
REMOVAL.............................64
INSTALLATION.........................64
WHEEL CYLINDERS
REMOVAL.............................65
INSPECTION..........................65
INSTALLATION.........................65
PARKING BRAKE
DESCRIPTION
DESCRIPTION........................65
DESCRIPTION - EXPORT...............66
OPERATION...........................66
STANDARD PROCEDURE
STANDARD PROCEDURE - PARKING
BRAKE AUTOMATIC ADJUSTER TENSION
RELEASE...........................66
STANDARD PROCEDURE - PARKING
BRAKE AUTOMATIC ADJUSTER TENSION
RESET.............................67
CABLES - PARKING BRAKE
REMOVAL
REMOVAL - PARKING BRAKE CABLE
(FRONT)............................67
REMOVAL - PARKING BRAKE CABLE
(INTERMEDIATE)......................68
REMOVAL - PARKING BRAKE CABLE
(RIGHT REAR)........................69
REMOVAL - PARKING BRAKE CABLE (LEFT
REAR)..............................70INSTALLATION
INSTALLATION - PARKING BRAKE CABLE
(FRONT)............................71
INSTALLATION - PARKING BRAKE CABLE
(INTERMEDIATE)......................71
INSTALLATION - PARKING BRAKE CABLE
(RIGHT REAR)........................72
INSTALLATION - PARKING BRAKE CABLE
(LEFT REAR).........................72
ADJUSTMENTS
ADJUSTMENT - PARKING BRAKE CABLES . 72
CABLES - PARKING BRAKE (EXPORT)
REMOVAL - FRONT CABLE...............72
INSTALLATION - FRONT CABLE............72
LEVER - PARKING BRAKE
REMOVAL.............................72
INSTALLATION.........................73
LEVER - PARKING BRAKE (EXPORT)
REMOVAL - PARKING BRAKE LEVER AND
FRONT CABLE.......................74
INSTALLATION - PARKING BRAKE LEVER
AND FRONT CABLE...................75
SHOES - PARKING BRAKE
REMOVAL.............................75
INSTALLATION.........................81
ADJUSTMENTS
ADJUSTMENT - PARKING BRAKE SHOES . . 83
BRAKES - BASE
DESCRIPTION
DESCRIPTION - BASE BRAKES
The base brake system consists of the following
components:
²Brake pedal
²Power brake booster
²Master cylinder
²Brake tubes and hoses
²Proportioning valve (non-ABS vehicles only)
²Disc brakes
²Drum brakes
²Brake lamp switch
²Brake fluid level switch
²Parking brakes
Front disc brakes control the braking of the front
wheels; rear braking is controlled by rear drum
brakes or rear disc brakes depending on options.
The hydraulic brake system is diagonally split on
both the non-antilock braking systems and antilock
braking systems. That means the left front and right
rear brakes are on one hydraulic circuit and the right
front and left rear are on the other.For information on the brake lamp switch, (Refer
to 8 - ELECTRICAL/LAMPS/LIGHTING - EXTERI-
OR/BRAKE LAMP SWITCH - DESCRIPTION)
Vehicles equipped with the optional antilock brake
system (ABS) use a system designated Mark 20e. It
is available with or without traction control. This
system shares most base brake hardware used on
vehicles without ABS. ABS components are described
in detail in ANTILOCK BRAKE SYSTEM.
DESCRIPTION - BASE BRAKES (EXPORT)
Four-Wheel Disc Antilock Brakes are standard on
all models.
OPERATION - BASE BRAKES
When a vehicle needs to be stopped, the driver
applies the brake pedal. The brake pedal pushes the
input rod of the power brake booster into the booster.
The booster uses vacuum to ease pedal effort as force
is transferred through the booster to the master cyl-
inder. The booster's output rod pushes in the master
cylinder's primary and secondary pistons applying
hydraulic pressure through the chassis brake tubes
to the brakes at each tire and wheel assembly.
The parking brakes are foot-operated. When
applied, the parking brake lever pulls on cables that
actuate brake shoes at each rear wheel. These shoes
RSBRAKES - BASE5-3
ProCarManuals.com
Page 133 of 2399

come in contact with a hub mounted drum (drum for
disc/drum brakes or drum-in-hat for disc/disc brakes)
and hold it in place.
WARNING
WARNING: DUST AND DIRT ACCUMULATING ON
BRAKE PARTS DURING NORMAL USE MAY CON-
TAIN ASBESTOS FIBERS FROM PRODUCTION OR
AFTERMARKET BRAKE LININGS. BREATHING
EXCESSIVE CONCENTRATIONS OF ASBESTOS
FIBERS CAN CAUSE SERIOUS BODILY HARM.
EXERCISE CARE WHEN SERVICING BRAKE
PARTS. DO NOT SAND OR GRIND BRAKE LINING
UNLESS EQUIPMENT USED IS DESIGNED TO CON-
TAIN THE DUST RESIDUE. DO NOT CLEAN BRAKE
PARTS WITH COMPRESSED AIR OR BY DRY
BRUSHING. CLEANING SHOULD BE DONE BY
DAMPENING THE BRAKE COMPONENTS WITH A
FINE MIST OF WATER, THEN WIPING THE BRAKE
COMPONENTS CLEAN WITH A DAMPENED CLOTH.
DISPOSE OF CLOTH AND ALL RESIDUE CONTAIN-
ING ASBESTOS FIBERS IN AN IMPERMEABLE
CONTAINER WITH THE APPROPRIATE LABEL. FOL-
LOW PRACTICES PRESCRIBED BY THE OCCUPA-
TIONAL SAFETY AND HEALTH ADMINISTRATION
(OSHA) AND THE ENVIRONMENTAL PROTECTION
AGENCY (EPA) FOR THE HANDLING, PROCESSING,
AND DISPOSING OF DUST OR DEBRIS THAT MAY
CONTAIN ASBESTOS FIBERS.
CAUTION
CAUTION: During service procedures, grease or
any other foreign material must be kept off brake
shoe assemblies, and braking surfaces of brake
rotor or drum, and external surfaces of hub and
bearing assembly.
CAUTION: Handling of brake rotors and calipers
must be done in such a way as to avoid damage to
the rotor and scratching or nicking of brake lining
on the brake shoes.
CAUTION: At no time when servicing a vehicle, can
a sheet metal screw, bolt or other metal fastener be
installed in the shock tower to take the place of an
original plastic clip. Also, NO holes can be drilled
into the front shock tower in the area shown in (Fig.1), for the installation of any metal fasteners into
the shock tower. Because of the minimum clear-
ance in this area (Fig. 1), installation of metal fas-
teners could damage the coil spring coating and
lead to a corrosion failure of the spring. If a plastic
clip is missing, or is lost or broken during servicing
a vehicle, replace only with the equivalent part
listed in the Mopar parts catalog.
CAUTION: Only the recommended jacking or hoist-
ing positions for this vehicle are to be used when-
ever it is necessary to lift a vehicle. Failure to raise
a vehicle from the recommended locations could
result in lifting a vehicle by the hydraulic control
unit mounting bracket. Lifting a vehicle by the
hydraulic control unit mounting bracket will result
in damage to the mounting bracket and the hydrau-
lic control unit.
DIAGNOSIS AND TESTING - BASE BRAKE
SYSTEM
NOTE: There are three diagnosis charts following
that cover the RED BRAKE WARNING INDICATOR
LAMP, BRAKE NOISE and OTHER BRAKE CONDI-
TIONS.
Fig. 1 Shock Tower To Spring Minimum Clearance
Area
1 - SHOCK TOWER
2 - COIL SPRING
3 - NO SHEET METAL SCREWS, BOLTS, OR ANY OTHER
METAL FASTENERS ARE TO BE INSTALLED INTO SHOCK
TOWER IN THIS AREA. ALSO, NO HOLES ARE TO BE DRILLED
INTO SHOCK TOWER IN THIS SAME AREA.
5 - 4 BRAKES - BASERS
BRAKES - BASE (Continued)
ProCarManuals.com