2002 CHRYSLER TOWN AND COUNTRY timing
[x] Cancel search: timingPage 1392 of 2399
STANDARD PROCEDURE - CHECKING
CRANKSHAFT END PLAY
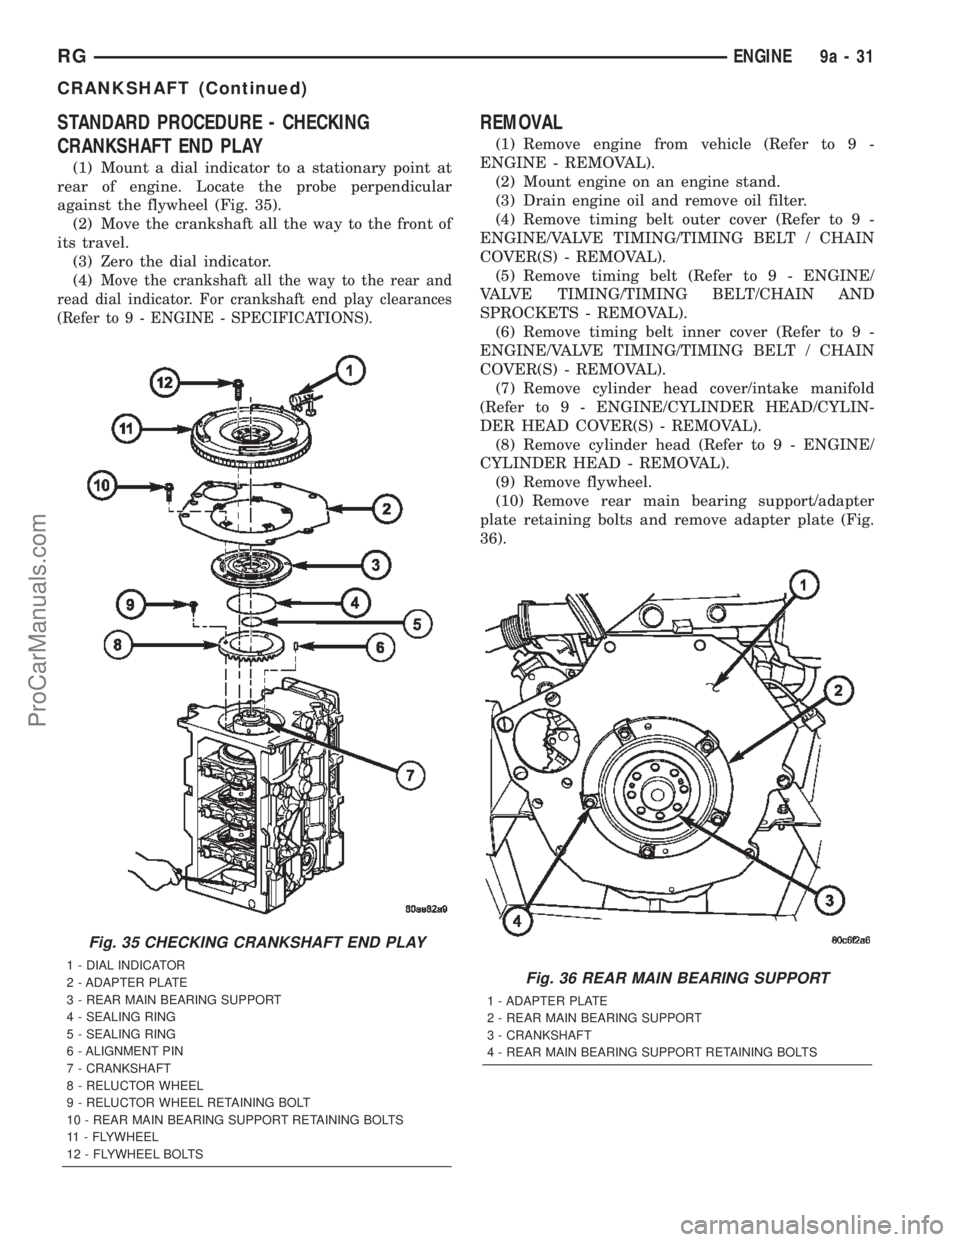
(1) Mount a dial indicator to a stationary point at
rear of engine. Locate the probe perpendicular
against the flywheel (Fig. 35).
(2) Move the crankshaft all the way to the front of
its travel.
(3) Zero the dial indicator.
(4)
Move the crankshaft all the way to the rear and
read dial indicator. For crankshaft end play clearances
(Refer to 9 - ENGINE - SPECIFICATIONS).
REMOVAL
(1) Remove engine from vehicle (Refer to 9 -
ENGINE - REMOVAL).
(2) Mount engine on an engine stand.
(3) Drain engine oil and remove oil filter.
(4) Remove timing belt outer cover (Refer to 9 -
ENGINE/VALVE TIMING/TIMING BELT / CHAIN
COVER(S) - REMOVAL).
(5) Remove timing belt (Refer to 9 - ENGINE/
VALVE TIMING/TIMING BELT/CHAIN AND
SPROCKETS - REMOVAL).
(6) Remove timing belt inner cover (Refer to 9 -
ENGINE/VALVE TIMING/TIMING BELT / CHAIN
COVER(S) - REMOVAL).
(7) Remove cylinder head cover/intake manifold
(Refer to 9 - ENGINE/CYLINDER HEAD/CYLIN-
DER HEAD COVER(S) - REMOVAL).
(8) Remove cylinder head (Refer to 9 - ENGINE/
CYLINDER HEAD - REMOVAL).
(9) Remove flywheel.
(10) Remove rear main bearing support/adapter
plate retaining bolts and remove adapter plate (Fig.
36).
Fig. 35 CHECKING CRANKSHAFT END PLAY
1 - DIAL INDICATOR
2 - ADAPTER PLATE
3 - REAR MAIN BEARING SUPPORT
4 - SEALING RING
5 - SEALING RING
6 - ALIGNMENT PIN
7 - CRANKSHAFT
8 - RELUCTOR WHEEL
9 - RELUCTOR WHEEL RETAINING BOLT
10 - REAR MAIN BEARING SUPPORT RETAINING BOLTS
11 - FLYWHEEL
12 - FLYWHEEL BOLTSFig. 36 REAR MAIN BEARING SUPPORT
1 - ADAPTER PLATE
2 - REAR MAIN BEARING SUPPORT
3 - CRANKSHAFT
4 - REAR MAIN BEARING SUPPORT RETAINING BOLTS
RGENGINE9a-31
CRANKSHAFT (Continued)
ProCarManuals.com
Page 1393 of 2399
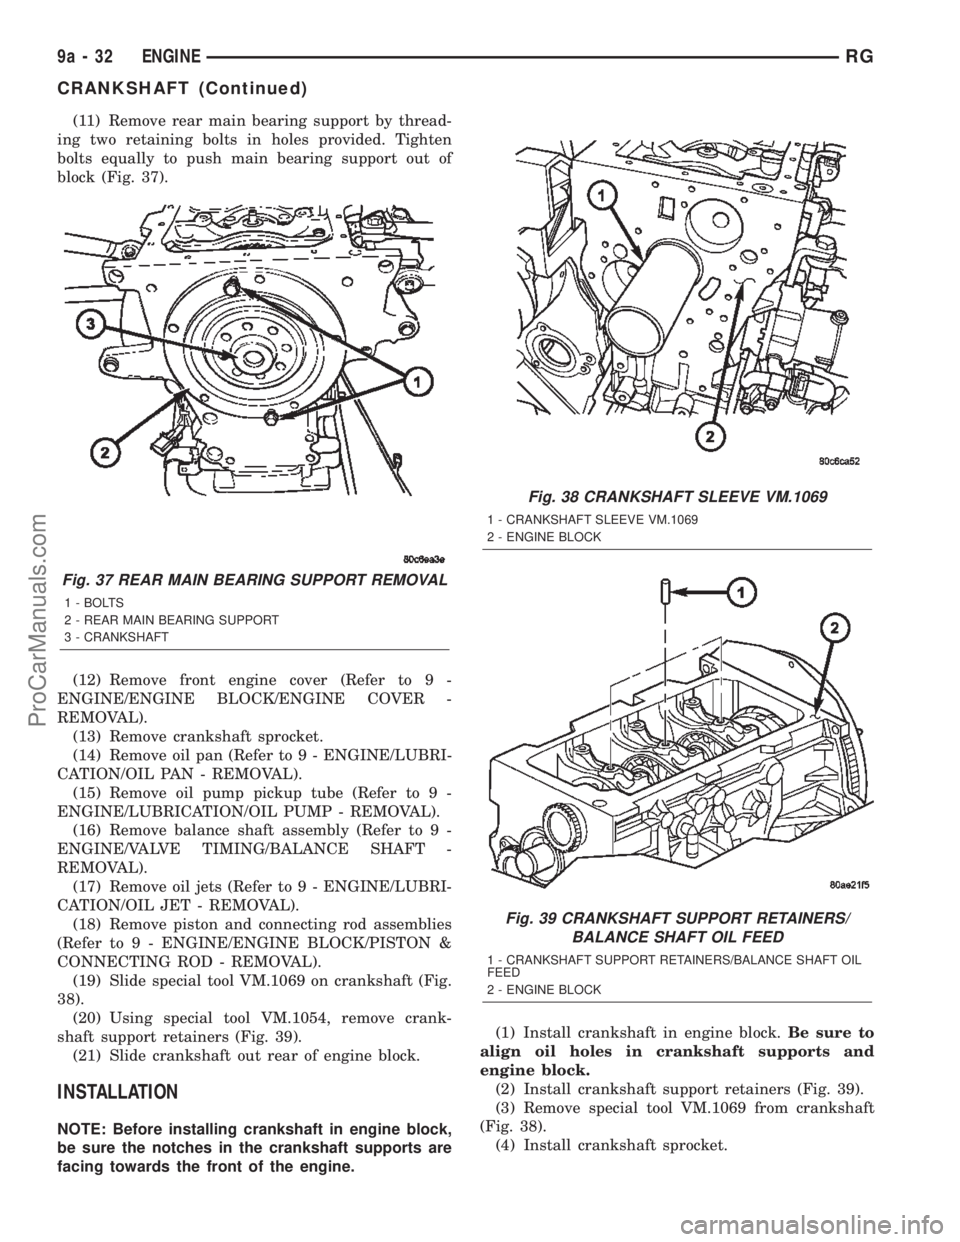
(11) Remove rear main bearing support by thread-
ing two retaining bolts in holes provided. Tighten
bolts equally to push main bearing support out of
block (Fig. 37).
(12) Remove front engine cover (Refer to 9 -
ENGINE/ENGINE BLOCK/ENGINE COVER -
REMOVAL).
(13) Remove crankshaft sprocket.
(14) Remove oil pan (Refer to 9 - ENGINE/LUBRI-
CATION/OIL PAN - REMOVAL).
(15) Remove oil pump pickup tube (Refer to 9 -
ENGINE/LUBRICATION/OIL PUMP - REMOVAL).
(16) Remove balance shaft assembly (Refer to 9 -
ENGINE/VALVE TIMING/BALANCE SHAFT -
REMOVAL).
(17) Remove oil jets (Refer to 9 - ENGINE/LUBRI-
CATION/OIL JET - REMOVAL).
(18) Remove piston and connecting rod assemblies
(Refer to 9 - ENGINE/ENGINE BLOCK/PISTON &
CONNECTING ROD - REMOVAL).
(19) Slide special tool VM.1069 on crankshaft (Fig.
38).
(20) Using special tool VM.1054, remove crank-
shaft support retainers (Fig. 39).
(21) Slide crankshaft out rear of engine block.
INSTALLATION
NOTE: Before installing crankshaft in engine block,
be sure the notches in the crankshaft supports are
facing towards the front of the engine.(1) Install crankshaft in engine block.Be sure to
align oil holes in crankshaft supports and
engine block.
(2) Install crankshaft support retainers (Fig. 39).
(3) Remove special tool VM.1069 from crankshaft
(Fig. 38).
(4) Install crankshaft sprocket.
Fig. 37 REAR MAIN BEARING SUPPORT REMOVAL
1 - BOLTS
2 - REAR MAIN BEARING SUPPORT
3 - CRANKSHAFT
Fig. 38 CRANKSHAFT SLEEVE VM.1069
1 - CRANKSHAFT SLEEVE VM.1069
2 - ENGINE BLOCK
Fig. 39 CRANKSHAFT SUPPORT RETAINERS/
BALANCE SHAFT OIL FEED
1 - CRANKSHAFT SUPPORT RETAINERS/BALANCE SHAFT OIL
FEED
2 - ENGINE BLOCK
9a - 32 ENGINERG
CRANKSHAFT (Continued)
ProCarManuals.com
Page 1394 of 2399
(5) Install front engine cover (Refer to 9 -
ENGINE/ENGINE BLOCK/ENGINE COVER -
INSTALLATION).
(6) Install rear main bearing support in engine
block.Be sure to align oil hole in rear main
bearing support with hole in block.
(7) Install adapter plate and retaining bolts (Fig.
36). Torque bolts to 27.5N´m.
(8) Install flywheel.
(9) Install piston and connecting rod assemblies
(Refer to 9 - ENGINE/ENGINE BLOCK/PISTON &
CONNECTING ROD - INSTALLATION).
(10) Install oil jets (Refer to 9 - ENGINE/LUBRI-
CATION/OIL JET - INSTALLATION).
(11) Install balance shaft assembly (Refer to 9 -
ENGINE/VALVE TIMING/BALANCE SHAFT -
INSTALLATION).
(12)
Install oil pump pickup tube (Refer to 9 -
ENGINE/LUBRICATION/OIL PUMP - INSTALLATION).
(13) Install oil pan (Refer to 9 - ENGINE/LUBRI-
CATION/OIL PAN - INSTALLATION).
(14) Install cylinder head (Refer to 9 - ENGINE/
CYLINDER HEAD - INSTALLATION).
(15) Install cylinder head cover/intake manifold
(Refer to 9 - ENGINE/CYLINDER HEAD/CYLIN-
DER HEAD COVER(S) - INSTALLATION).
(16) Install timing belt inner cover (Refer to 9 -
ENGINE/VALVE TIMING/TIMING BELT / CHAIN
COVER(S) - INSTALLATION).
(17) Install timing belt (Refer to 9 - ENGINE/
VALVE TIMING/TIMING BELT/CHAIN AND
SPROCKETS - INSTALLATION) .
(18) Install timing belt outer cover (Refer to 9 -
ENGINE/VALVE TIMING/TIMING BELT / CHAIN
COVER(S) - INSTALLATION).
(19) Install engine in vehicle.
(20) Fill engine oil with proper oil to correct level.
CYLINDER LINERS
DESCRIPTION
The cylinder wall liner used on this engine is of
the wet design. O-rings are used to seal the liner to
the engine block.
REMOVAL
(1) Remove engine from vehicle.
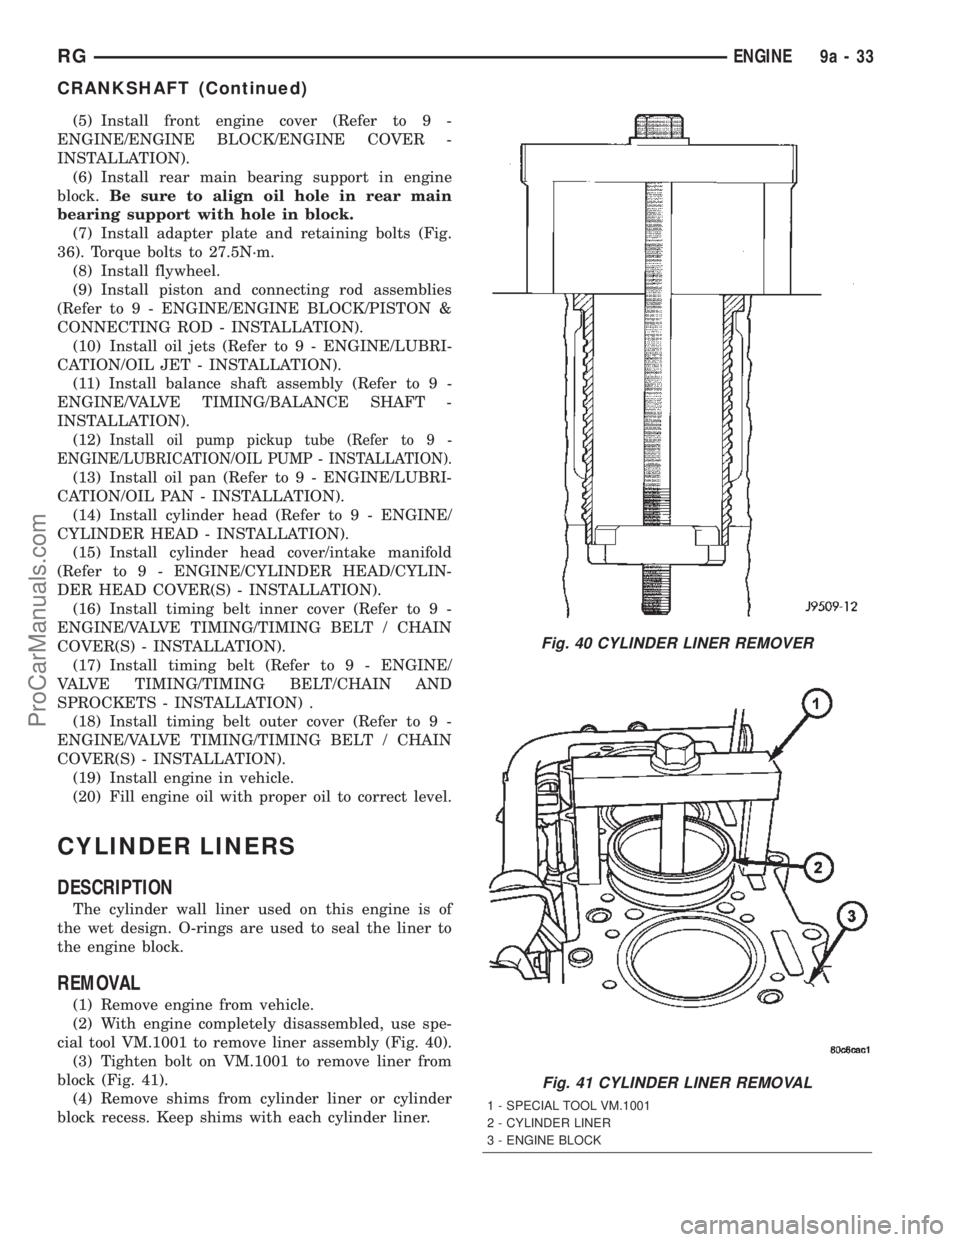
(2) With engine completely disassembled, use spe-
cial tool VM.1001 to remove liner assembly (Fig. 40).
(3) Tighten bolt on VM.1001 to remove liner from
block (Fig. 41).
(4) Remove shims from cylinder liner or cylinder
block recess. Keep shims with each cylinder liner.
Fig. 40 CYLINDER LINER REMOVER
Fig. 41 CYLINDER LINER REMOVAL
1 - SPECIAL TOOL VM.1001
2 - CYLINDER LINER
3 - ENGINE BLOCK
RGENGINE9a-33
CRANKSHAFT (Continued)
ProCarManuals.com
Page 1396 of 2399
INTERNAL VACUUM PUMP
DESCRIPTION
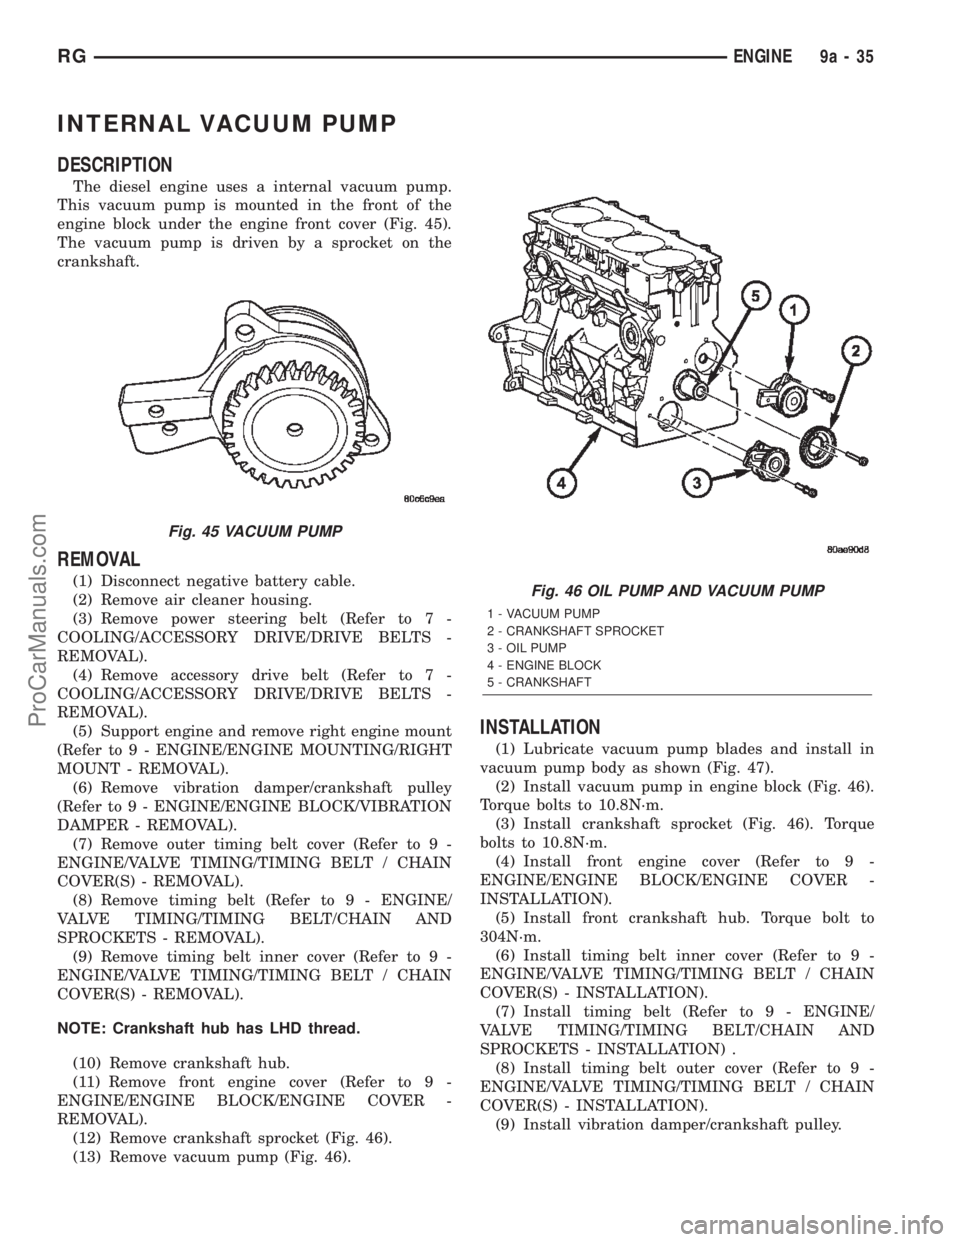
The diesel engine uses a internal vacuum pump.
This vacuum pump is mounted in the front of the
engine block under the engine front cover (Fig. 45).
The vacuum pump is driven by a sprocket on the
crankshaft.
REMOVAL
(1) Disconnect negative battery cable.
(2) Remove air cleaner housing.
(3) Remove power steering belt (Refer to 7 -
COOLING/ACCESSORY DRIVE/DRIVE BELTS -
REMOVAL).
(4) Remove accessory drive belt (Refer to 7 -
COOLING/ACCESSORY DRIVE/DRIVE BELTS -
REMOVAL).
(5) Support engine and remove right engine mount
(Refer to 9 - ENGINE/ENGINE MOUNTING/RIGHT
MOUNT - REMOVAL).
(6) Remove vibration damper/crankshaft pulley
(Refer to 9 - ENGINE/ENGINE BLOCK/VIBRATION
DAMPER - REMOVAL).
(7) Remove outer timing belt cover (Refer to 9 -
ENGINE/VALVE TIMING/TIMING BELT / CHAIN
COVER(S) - REMOVAL).
(8) Remove timing belt (Refer to 9 - ENGINE/
VALVE TIMING/TIMING BELT/CHAIN AND
SPROCKETS - REMOVAL).
(9) Remove timing belt inner cover (Refer to 9 -
ENGINE/VALVE TIMING/TIMING BELT / CHAIN
COVER(S) - REMOVAL).
NOTE: Crankshaft hub has LHD thread.
(10) Remove crankshaft hub.
(11) Remove front engine cover (Refer to 9 -
ENGINE/ENGINE BLOCK/ENGINE COVER -
REMOVAL).
(12) Remove crankshaft sprocket (Fig. 46).
(13) Remove vacuum pump (Fig. 46).
INSTALLATION
(1) Lubricate vacuum pump blades and install in
vacuum pump body as shown (Fig. 47).
(2) Install vacuum pump in engine block (Fig. 46).
Torque bolts to 10.8N´m.
(3) Install crankshaft sprocket (Fig. 46). Torque
bolts to 10.8N´m.
(4) Install front engine cover (Refer to 9 -
ENGINE/ENGINE BLOCK/ENGINE COVER -
INSTALLATION).
(5) Install front crankshaft hub. Torque bolt to
304N´m.
(6) Install timing belt inner cover (Refer to 9 -
ENGINE/VALVE TIMING/TIMING BELT / CHAIN
COVER(S) - INSTALLATION).
(7) Install timing belt (Refer to 9 - ENGINE/
VALVE TIMING/TIMING BELT/CHAIN AND
SPROCKETS - INSTALLATION) .
(8) Install timing belt outer cover (Refer to 9 -
ENGINE/VALVE TIMING/TIMING BELT / CHAIN
COVER(S) - INSTALLATION).
(9) Install vibration damper/crankshaft pulley.
Fig. 45 VACUUM PUMP
Fig. 46 OIL PUMP AND VACUUM PUMP
1 - VACUUM PUMP
2 - CRANKSHAFT SPROCKET
3 - OIL PUMP
4 - ENGINE BLOCK
5 - CRANKSHAFT
RGENGINE9a-35
ProCarManuals.com
Page 1398 of 2399
(3) Raise vehicle on hoist.
(4) Remove oil pan (Refer to 9 - ENGINE/LUBRI-
CATION/OIL PAN - REMOVAL).
(5) Remove oil pump pickup tube.(Refer to 9 -
ENGINE/LUBRICATION/OIL PUMP - REMOVAL)
(6) Remove balance shaft assembly (Refer to 9 -
ENGINE/VALVE TIMING/BALANCE SHAFT -
REMOVAL).
(7) Remove top ridge of cylinder bores with a ridge
reamer before removing pistons from cylinder block.
Be sure to keep top of pistons covered during
this operation.
(8) Piston and connecting rods must be removed
from top of cylinder block. Rotate crankshaft so that
each connecting rod is centered in cylinder bore.NOTE: Be careful not to nick or scratch crankshaft
journals
(9) After removal, install bearing cap on the mat-
ing rod and mark pistons with matching cylinder
number when removed from engine block.
PISTON PIN - REMOVAL
(1) Secure connecting rods in a soft jawed vice.
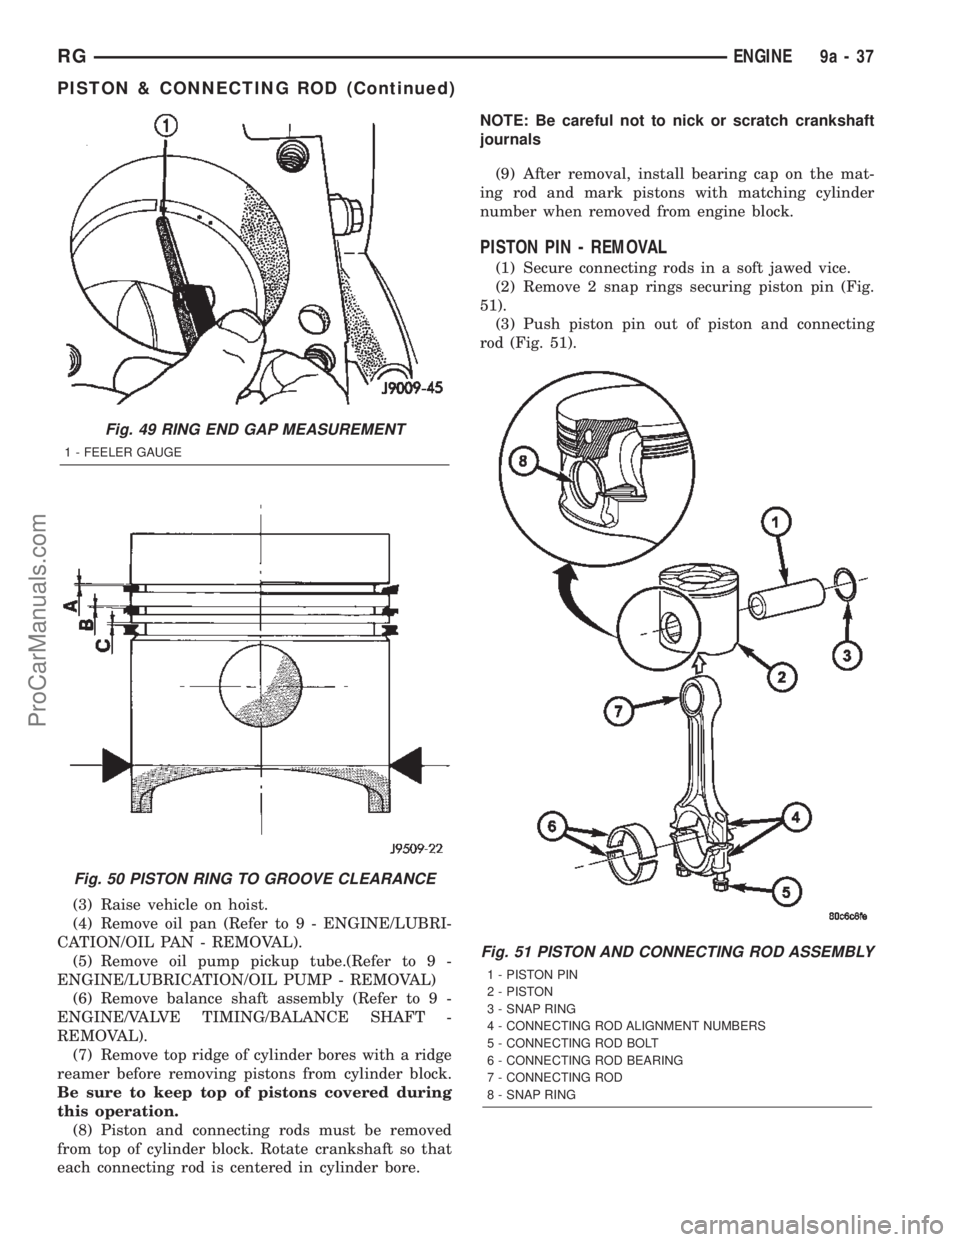
(2) Remove 2 snap rings securing piston pin (Fig.
51).
(3) Push piston pin out of piston and connecting
rod (Fig. 51).
Fig. 49 RING END GAP MEASUREMENT
1 - FEELER GAUGE
Fig. 50 PISTON RING TO GROOVE CLEARANCE
Fig. 51 PISTON AND CONNECTING ROD ASSEMBLY
1 - PISTON PIN
2 - PISTON
3 - SNAP RING
4 - CONNECTING ROD ALIGNMENT NUMBERS
5 - CONNECTING ROD BOLT
6 - CONNECTING ROD BEARING
7 - CONNECTING ROD
8 - SNAP RING
RGENGINE9a-37
PISTON & CONNECTING ROD (Continued)
ProCarManuals.com
Page 1401 of 2399
assembly, determined by the numbers stamped on
the crown of individual pistons. Engine cylinders are
numbered starting from gear train end of the engine.
Face arrow on top of piston toward front of
engine. Therefore, the numbers stamped on connect-
ing rod big end should face toward the injection
pump side of engine. To insert piston into cylinder
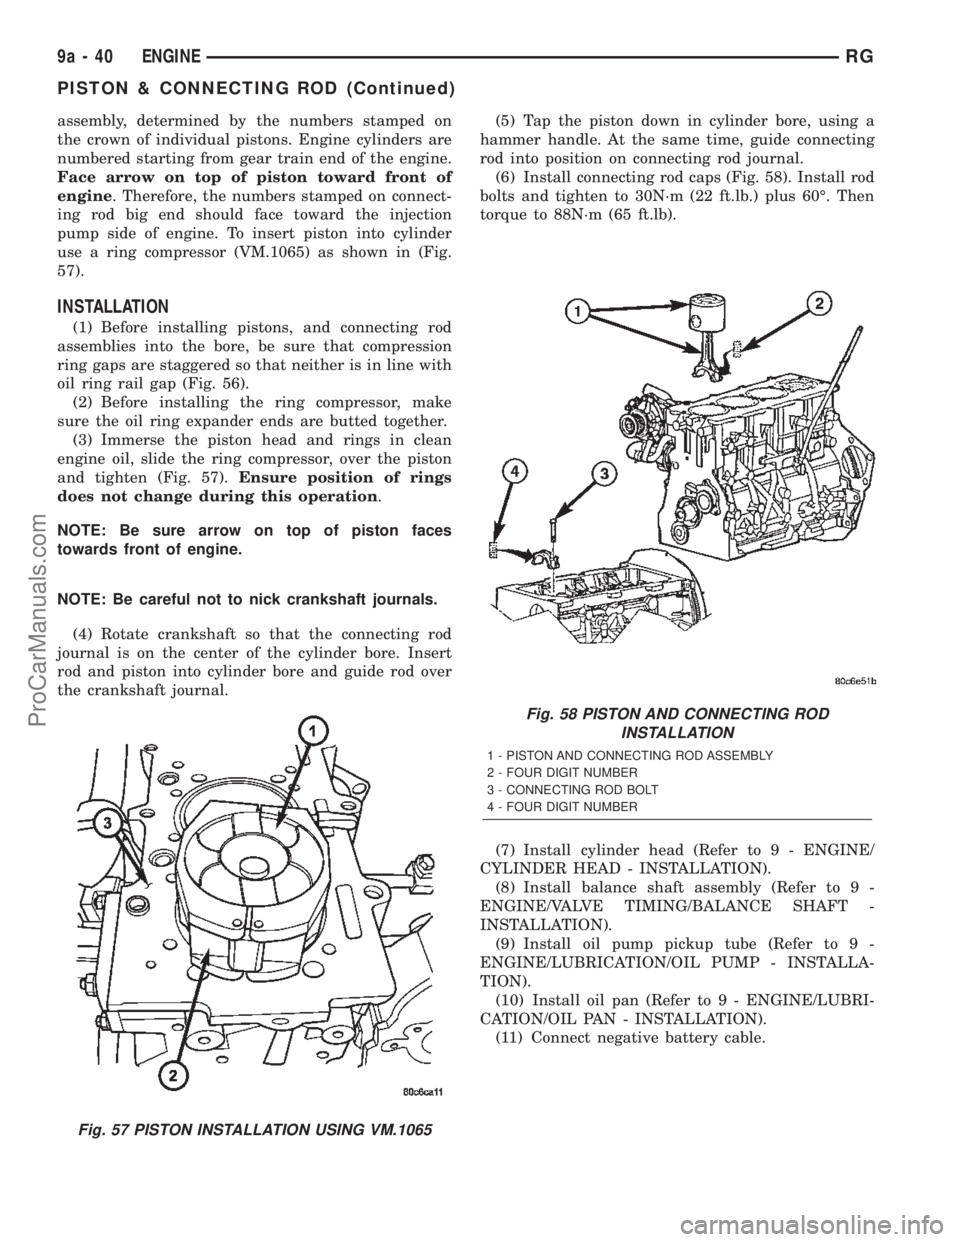
use a ring compressor (VM.1065) as shown in (Fig.
57).
INSTALLATION
(1) Before installing pistons, and connecting rod
assemblies into the bore, be sure that compression
ring gaps are staggered so that neither is in line with
oil ring rail gap (Fig. 56).
(2) Before installing the ring compressor, make
sure the oil ring expander ends are butted together.
(3) Immerse the piston head and rings in clean
engine oil, slide the ring compressor, over the piston
and tighten (Fig. 57).Ensure position of rings
does not change during this operation.
NOTE: Be sure arrow on top of piston faces
towards front of engine.
NOTE: Be careful not to nick crankshaft journals.
(4) Rotate crankshaft so that the connecting rod
journal is on the center of the cylinder bore. Insert
rod and piston into cylinder bore and guide rod over
the crankshaft journal.(5) Tap the piston down in cylinder bore, using a
hammer handle. At the same time, guide connecting
rod into position on connecting rod journal.
(6) Install connecting rod caps (Fig. 58). Install rod
bolts and tighten to 30N´m (22 ft.lb.) plus 60É. Then
torque to 88N´m (65 ft.lb).
(7) Install cylinder head (Refer to 9 - ENGINE/
CYLINDER HEAD - INSTALLATION).
(8) Install balance shaft assembly (Refer to 9 -
ENGINE/VALVE TIMING/BALANCE SHAFT -
INSTALLATION).
(9) Install oil pump pickup tube (Refer to 9 -
ENGINE/LUBRICATION/OIL PUMP - INSTALLA-
TION).
(10) Install oil pan (Refer to 9 - ENGINE/LUBRI-
CATION/OIL PAN - INSTALLATION).
(11) Connect negative battery cable.
Fig. 57 PISTON INSTALLATION USING VM.1065
Fig. 58 PISTON AND CONNECTING ROD
INSTALLATION
1 - PISTON AND CONNECTING ROD ASSEMBLY
2 - FOUR DIGIT NUMBER
3 - CONNECTING ROD BOLT
4 - FOUR DIGIT NUMBER
9a - 40 ENGINERG
PISTON & CONNECTING ROD (Continued)
ProCarManuals.com
Page 1402 of 2399
CRANKSHAFT OIL SEAL -
FRONT
REMOVAL
(1) Disconnect negative battery cable.
(2) Remove air cleaner housing.
(3) Support engine and remove right engine mount
(Refer to 9 - ENGINE/ENGINE MOUNTING/RIGHT
MOUNT - REMOVAL).
(4) Remove power steering belt (Refer to 7 -
COOLING/ACCESSORY DRIVE/DRIVE BELTS -
REMOVAL).
(5) Remove accessory drive belt (Refer to 7 -
COOLING/ACCESSORY DRIVE/DRIVE BELTS -
REMOVAL).
(6) Remove vibration damper/crankshaft pulley
(Refer to 9 - ENGINE/ENGINE BLOCK/VIBRATION
DAMPER - REMOVAL).
(7) Remove outer timing belt cover (Refer to 9 -
ENGINE/VALVE TIMING/TIMING BELT / CHAIN
COVER(S) - REMOVAL).
(8) Remove timing belt (Refer to 9 - ENGINE/
VALVE TIMING/TIMING BELT/CHAIN AND
SPROCKETS - REMOVAL).
(9) Remove timing belt inner cover (Refer to 9 -
ENGINE/VALVE TIMING/TIMING BELT / CHAIN
COVER(S) - REMOVAL).
NOTE: Crankshaft hub retaining bolt has LHD
thread.
(10) Remove crankshaft hub.
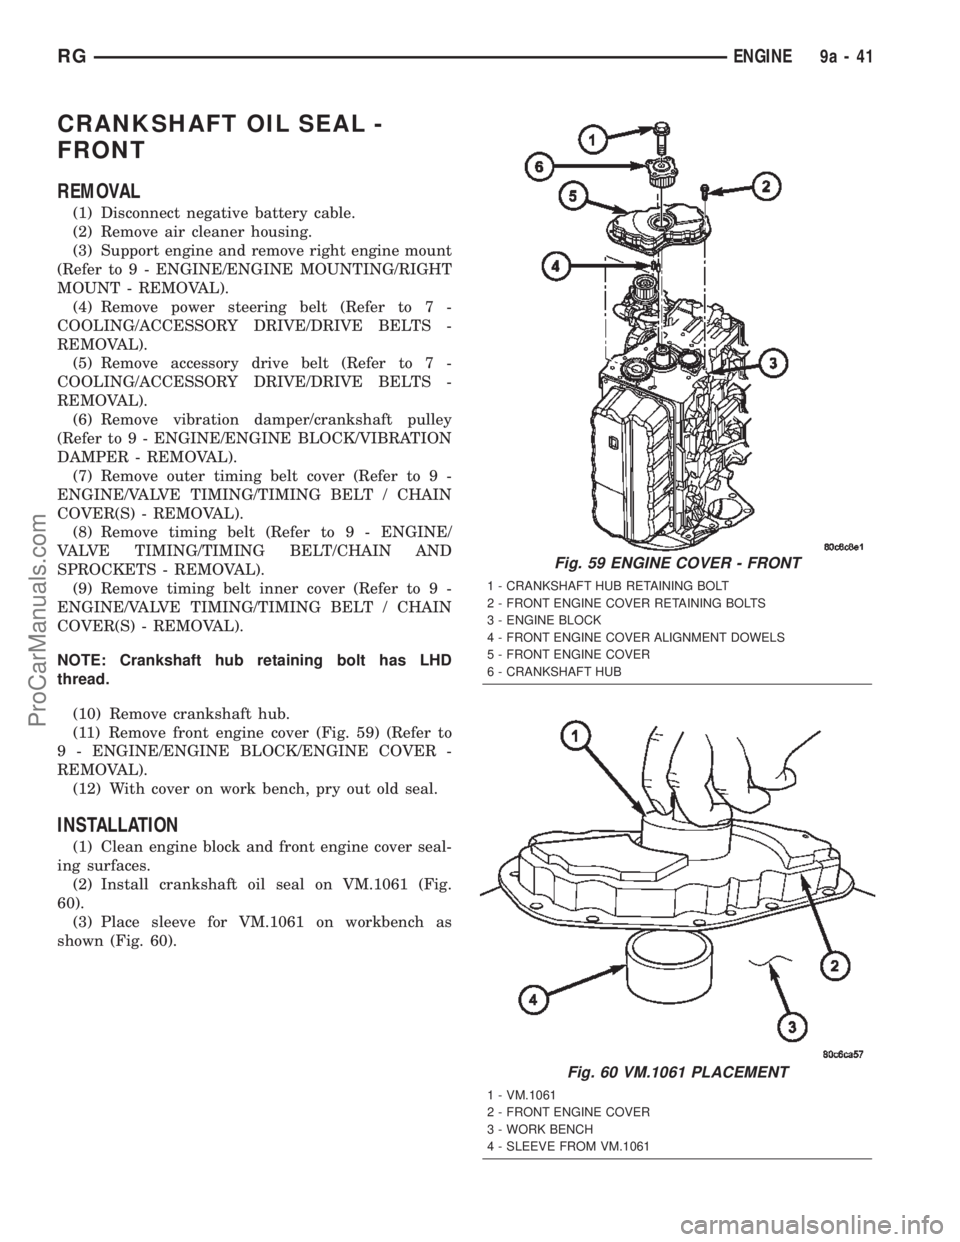
(11) Remove front engine cover (Fig. 59) (Refer to
9 - ENGINE/ENGINE BLOCK/ENGINE COVER -
REMOVAL).
(12) With cover on work bench, pry out old seal.
INSTALLATION
(1) Clean engine block and front engine cover seal-
ing surfaces.
(2) Install crankshaft oil seal on VM.1061 (Fig.
60).
(3) Place sleeve for VM.1061 on workbench as
shown (Fig. 60).
Fig. 59 ENGINE COVER - FRONT
1 - CRANKSHAFT HUB RETAINING BOLT
2 - FRONT ENGINE COVER RETAINING BOLTS
3 - ENGINE BLOCK
4 - FRONT ENGINE COVER ALIGNMENT DOWELS
5 - FRONT ENGINE COVER
6 - CRANKSHAFT HUB
Fig. 60 VM.1061 PLACEMENT
1 - VM.1061
2 - FRONT ENGINE COVER
3 - WORK BENCH
4 - SLEEVE FROM VM.1061
RGENGINE9a-41
ProCarManuals.com
Page 1403 of 2399
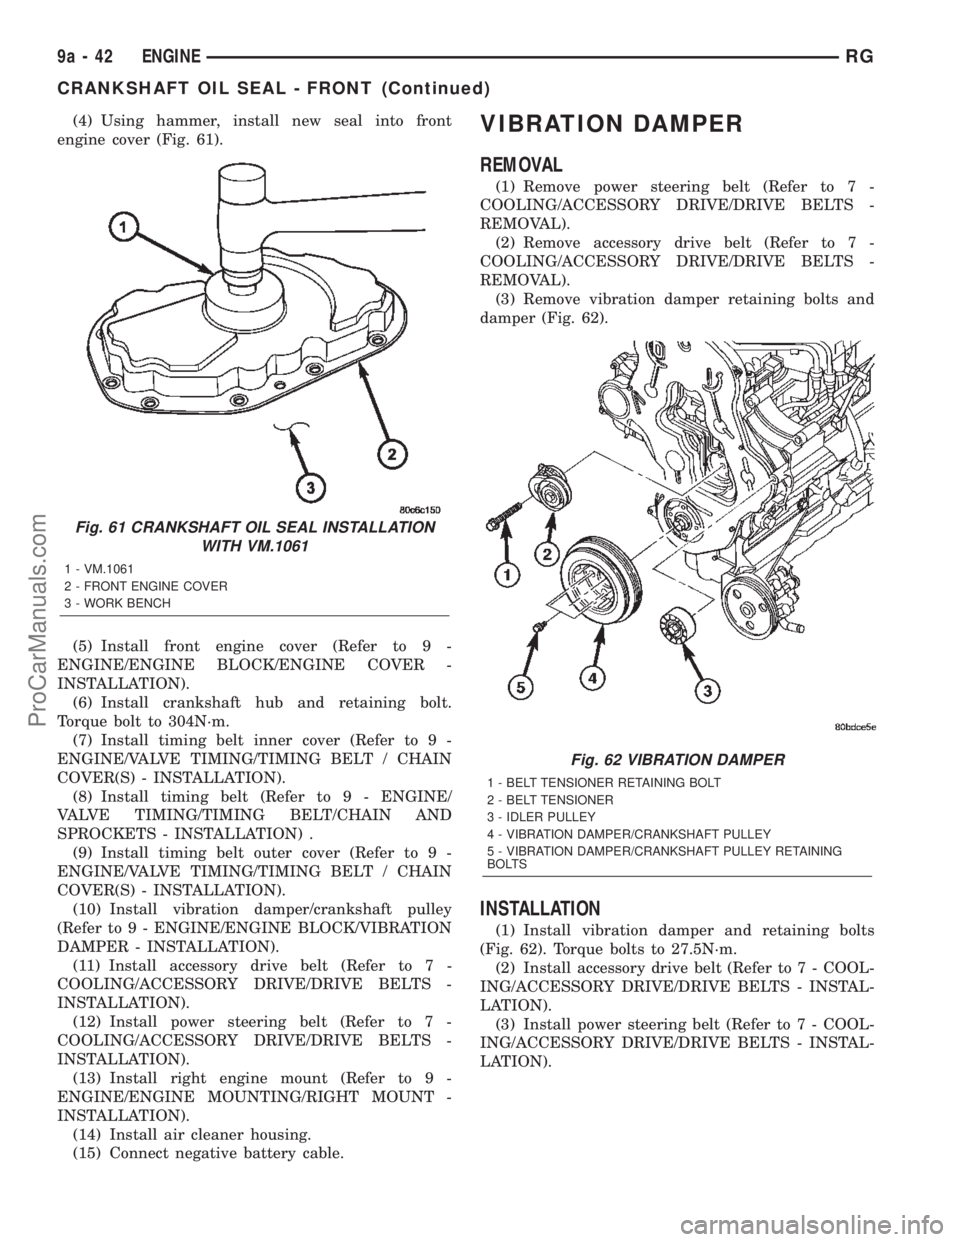
(4) Using hammer, install new seal into front
engine cover (Fig. 61).
(5) Install front engine cover (Refer to 9 -
ENGINE/ENGINE BLOCK/ENGINE COVER -
INSTALLATION).
(6) Install crankshaft hub and retaining bolt.
Torque bolt to 304N´m.
(7) Install timing belt inner cover (Refer to 9 -
ENGINE/VALVE TIMING/TIMING BELT / CHAIN
COVER(S) - INSTALLATION).
(8) Install timing belt (Refer to 9 - ENGINE/
VALVE TIMING/TIMING BELT/CHAIN AND
SPROCKETS - INSTALLATION) .
(9) Install timing belt outer cover (Refer to 9 -
ENGINE/VALVE TIMING/TIMING BELT / CHAIN
COVER(S) - INSTALLATION).
(10) Install vibration damper/crankshaft pulley
(Refer to 9 - ENGINE/ENGINE BLOCK/VIBRATION
DAMPER - INSTALLATION).
(11) Install accessory drive belt (Refer to 7 -
COOLING/ACCESSORY DRIVE/DRIVE BELTS -
INSTALLATION).
(12) Install power steering belt (Refer to 7 -
COOLING/ACCESSORY DRIVE/DRIVE BELTS -
INSTALLATION).
(13) Install right engine mount (Refer to 9 -
ENGINE/ENGINE MOUNTING/RIGHT MOUNT -
INSTALLATION).
(14) Install air cleaner housing.
(15) Connect negative battery cable.VIBRATION DAMPER
REMOVAL
(1) Remove power steering belt (Refer to 7 -
COOLING/ACCESSORY DRIVE/DRIVE BELTS -
REMOVAL).
(2) Remove accessory drive belt (Refer to 7 -
COOLING/ACCESSORY DRIVE/DRIVE BELTS -
REMOVAL).
(3) Remove vibration damper retaining bolts and
damper (Fig. 62).
INSTALLATION
(1) Install vibration damper and retaining bolts
(Fig. 62). Torque bolts to 27.5N´m.
(2) Install accessory drive belt (Refer to 7 - COOL-
ING/ACCESSORY DRIVE/DRIVE BELTS - INSTAL-
LATION).
(3) Install power steering belt (Refer to 7 - COOL-
ING/ACCESSORY DRIVE/DRIVE BELTS - INSTAL-
LATION).
Fig. 61 CRANKSHAFT OIL SEAL INSTALLATION
WITH VM.1061
1 - VM.1061
2 - FRONT ENGINE COVER
3 - WORK BENCH
Fig. 62 VIBRATION DAMPER
1 - BELT TENSIONER RETAINING BOLT
2 - BELT TENSIONER
3 - IDLER PULLEY
4 - VIBRATION DAMPER/CRANKSHAFT PULLEY
5 - VIBRATION DAMPER/CRANKSHAFT PULLEY RETAINING
BOLTS
9a - 42 ENGINERG
CRANKSHAFT OIL SEAL - FRONT (Continued)
ProCarManuals.com