Page 200 of 397
. RDS is a system that receives data along with
the audio of the FM station you are currently tuned to.
You can use RDS to d")
3-28
Using RDS
Your audio system is equipped with a Radio Data System
(RDS). RDS is a system that receives data along with
the audio of the FM station you are currently tuned to.
You can use RDS to display program information and
to control your radio. With RDS, the radio can do
the following:
�Seek only to stations with the types of programs
you want to listen to,
�seek to stations with traffic announcements,
�receive announcements concerning local and
national emergencies, and
�receive and display messages from radio stations.
RDS features are only available on FM stations that
broadcast RDS information. The RDS features of your
radio rely on receiving specific RDS information from
these stations. These features will only work when the
RDS information is available. In rare cases, a radio
station may broadcast incorrect information that will
cause the radio features to work improperly. If this
happens, contact the radio station.When you are tuned to an RDS station, the station
name will appear on the display, instead of the
frequency. Most RDS stations provide their station
name, the time of day and a Program Type (PTY) for
their current programming. Some stations also provide
the name of the current program.
Finding RDS Stations
To find RDS stations perform the following steps:
1. Push the SEEK TYPE button or turn the P
-TYPE
LIST knob to display the program type list.
2. Turn the P
-TYPE LIST knob either clockwise or
counterclockwise to select a program type. The list is
alphabetical. If you select ANY TYPE your radio
will seek to the first PTY available.
3. Push the SEEK TYPE button to activate search.
Page 201 of 397
: Turn this knob clockwise
to increase volume when RDS interrupts regular play.
Turn it counterclockwise to decrease volume.
DISP (Display): Press this knob to change what appear")
3-29
� VOL � (Volume): Turn this knob clockwise
to increase volume when RDS interrupts regular play.
Turn it counterclockwise to decrease volume.
DISP (Display): Press this knob to change what appears
on the display while using RDS. Pressing this knob will
also display an RDS station frequency or program type
when the radio is on. The display options are station
name, station frequency, PTY and the name of the
program (if available). Pressing and holding this knob
will activate the RDS default display.
Finding a PTY Station
P
-TYPE LIST (Program Type): Turn this knob
clockwise or counterclockwise to select the Program
Type (PTY) you want to listen to. TYPE and a PTY
will appear on the display. Press the SEEK TYPE button
and the radio will seek to the first RDS broadcaster of
the selected program type. If the radio cannot find the
desired program type, NONE will appear on the display
and the radio will return to the last station you were
listening to.BAND (Alternate Frequency): Alternate frequency
allows the radio to switch to a stronger station with
the same program type. Press and hold BAND for
two seconds to turn alternate frequency on. AF ON will
appear on the display. The radio may switch to stronger
stations. Press and hold BAND again for two seconds
to turn alternate frequency off. AF OFF will appear on
the display. The radio will not switch to other stations.
When you turn the ignition off and then on again,
the alternate frequency feature will automatically be
turned on.
SEEK TYPE: Press this button to go to a station with
the last selected PTY; TYPE and the last selected PTY
will appear on the display, if it is not already showing.
Press SEEK TYPE a second time to seek. If a station
with the selected PTY is not found, the radio will return
to the original station and display NONE.
Page 205 of 397

3-33
� SEEK �: The right arrow is the same as the
NEXT pushbutton, and the left arrow is the same as the
PREV pushbutton. If the arrows are held or pressed
more than once, the player will continue moving
forward or backward through the tape. SEEK and a
positive or negative number will appear on the display.
BAND: Press this button to listen to the radio when
a tape is playing. The tape will stop but remain in
the player.
TAPE CD: Press this button to play a tape when
listening to the radio. Press TAPE CD to switch
between the tape and compact disc if both are loaded.
The inactive tape or CD will remain safely inside the
radio for future listening.
EJT (Eject): Press this button, located to the right
of the cassette tape slot, to stop a tape when it is playing
or to eject a tape when it is not playing. Eject may be
activated with the radio off. Cassette tapes may be
loaded with the radio off if this button is pressed first.Cassette Tape Messages
CHK TAPE (Check Tape): If this message appears on
the radio display, the tape won't play because of one of
the following errors.
�The tape is tight and the player can't turn the tape
hubs. Remove the tape. Hold the tape with the
open end down and try to turn the right hub
counterclockwise with a pencil. Turn the tape over
and repeat. If the hubs do not turn easily, your tape
may be damaged and should not be used in the
player. Try a new tape to make sure your player is
working properly.
�The tape is broken. Try a new tape.
�The tape is wrapped around the tape head.
Attempt to get the cassette out. Try a new tape.
CLEAN: If this message appears on the display, the
cassette tape player needs to be cleaned. It will still play
tapes, but you should clean it as soon as possible to
prevent damage to the tapes and player. See ªCare of
Your Cassette Tape Playerº in the Index.
If any error occurs repeatedly or if an error can't be
corrected, contact your dealer.
Page 225 of 397

4-13
An emergency like this requires close attention and a
quick decision. If you are holding the steering wheel at
the recommended 9 and 3 o'clock positions, you can
turn it a full 180 degrees very quickly without removing
either hand. But you have to act fast, steer quickly, and
just as quickly straighten the wheel once you have
avoided the object.
The fact that such emergency situations are always
possible is a good reason to practice defensive driving at
all times and wear safety belts properly.
Off-Road Recovery
You may find that your right wheels have dropped off the
edge of a road onto the shoulder while you're driving.
If the level of the shoulder is only slightly below the
pavement, recovery should be fairly easy. Ease off the
accelerator and then, if there is nothing in the way, steer so
that your vehicle straddles the edge of the pavement. You
can turn the steering wheel up to one
-quarter turn until the
right front tire contacts the pavement edge. Then turn your
steering wheel to go straight down the roadway.
Page 271 of 397
5-18 How to Add Coolant to the Radiator
NOTICE:
Your engine has a specific radiator fill procedure.
Failure to follow this procedure could cause your
engine to overheat and be severely damaged.
The radiator pressure cap is located in the front of the
engine compartment near the diagonal cross brace on the
passenger's side of the vehicle. See ªEngine Compartment
Overviewº in the Index for more information on location.You can remove the radiator pressure cap when the
cooling system, including the radiator pressure cap and
upper radiator hose, is no longer hot.
1. Turn the pressure cap slowly counterclockwise until
it first stops. (Don't press down while turning the
pressure cap.)
If you hear a hiss, wait for that to stop. A hiss means
there is still some pressure left.2. Then keep turning the pressure cap, but now push
down as you turn it. Remove the pressure cap.
Page 272 of 397
5-19
CAUTION:
You can be burned if you spill coolant on hot
engine parts. Coolant contains ethylene glycol
and it will burn if the engine parts are hot
enough. Don't spill coolant on a hot engine.
3. If you have the 3800 V6 engine, remove the 3800
Series II V6 engine cover shield to access the bleed valve.
A. Clean the area around the engine oil fill tube and
cap before removing. Twist the oil fill tube, with
cap attached, counterclockwise and remove it.
B. Lift the engine cover shield at the front, slide the
catch tab out of the engine bracket and remove
the cover shield.
C. Put the oil fill tube, with cap attached, in the valve
cover oil fill hole until you're ready to replace the
cover shield.
Page 274 of 397
5-21
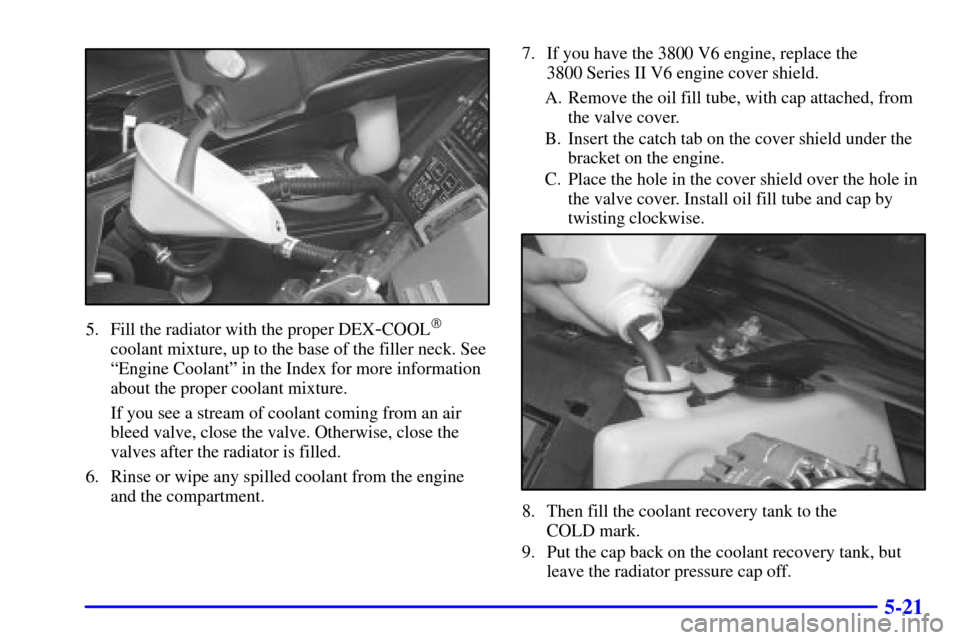
5. Fill the radiator with the proper DEX-COOL�
coolant mixture, up to the base of the filler neck. See
ªEngine Coolantº in the Index for more information
about the proper coolant mixture.
If you see a stream of coolant coming from an air
bleed valve, close the valve. Otherwise, close the
valves after the radiator is filled.
6. Rinse or wipe any spilled coolant from the engine
and the compartment.7. If you have the 3800 V6 engine, replace the
3800 Series II V6 engine cover shield.
A. Remove the oil fill tube, with cap attached, from
the valve cover.
B. Insert the catch tab on the cover shield under the
bracket on the engine.
C. Place the hole in the cover shield over the hole in
the valve cover. Install oil fill tube and cap by
twisting clockwise.
8. Then fill the coolant recovery tank to the
COLD mark.
9. Put the cap back on the coolant recovery tank, but
leave the radiator pressure cap off.
Page 277 of 397
5-24
The following steps will tell you how to use the jack and
change a tire.
Removing the Spare Tire and Tools
The equipment you'll need is in the trunk. The steps for
removing the compact spare tire and installing it on the
vehicle are listed below.
1. Turn the center nut on
the compact spare tire
cover counterclockwise
to remove it. Then
remove the cover.