Page 2063 of 5127
12. Place the compact spare tire on the wheel-mounting
surface.
{CAUTION:
Never use oil or grease on studs or nuts. If
you do, the nuts might come loose. Your wheel
could fall off, causing a serious accident.
13. Install the wheel nuts with the rounded end of the
nuts toward the wheel. Tighten each nut by hand
clockwise until the wheel is held against the hub.
14. Lower the vehicle by turning the wheel wrench
counterclockwise. Lower the jack completely.
{CAUTION:
Incorrect wheel nuts or improperly tightened
wheel nuts can cause the wheel to come loose
and even come off. This could lead to an
accident. Be sure to use the correct wheel
nuts. If you have to replace them, be sure to
get new GM original equipment wheel nuts.
Stop somewhere as soon as you can and have
the nuts tightened with a torque wrench to the
proper torque speci�cation. SeeCapacities
and Specifications on page 5-80for wheel nut
torque speci�cation.
Notice:Improperly tightened wheel nuts can lead
to brake pulsation and rotor damage. To avoid
expensive brake repairs, evenly tighten the wheel
nuts in the proper sequence and to the proper
torque speci�cation. SeeCapacities and
Specifications on page 5-80for the wheel nut torque
speci�cation.
5-64
Page 2076 of 5127
Fuses Usage
LTR Cigar Lighter
HORN,
REAR/FOGHorn, Rear Fog Lamps
RADIO, CLK Audio, Clock
STOP Stop Lamp
TRN/SIG Turn Signal
CLSTR,
HAZRDInstrument Panel Cluster, Hazard
Flasher
CLSTR, CLK Instrument Panel Cluster, Clock
DR/LCK Door Lock, Remote Keyless Entry
BCK/UP Back-Up Lamp
ECM, TCMEngine Control Module,
Transmission Control Module
ECM, TCMEngine Control Module,
Transmission Control Module
WPR, WSWA Wiper, Washer
DIS,
INJECTORDirect Ignition System, Injector
ENG FUSE Engine Fuse
AIRBAG Airbag
HVAC HVAC Blower
ABS Anti-lock Brake System
BLANK Not Used
BLANK Not Used
DIODE (ABS) Anti-lock Brake System DiodeFuses Usage
BLANK Not Used
BLANK Not Used
CLK, RADIO Clock, Audio
Engine Compartment Fuse Block
The engine compartment fuse block is located on the
driver’s side of the vehicle, near the battery. SeeEngine
Compartment Overview on page 5-12for more
information on location. To access the fuses, pull out
the top and bottom flaps to release the cover. To
reinstall the cover, push the cover until it is secure.
5-77
Page 2078 of 5127
Fuses Usage
LOW BEAM RT Passenger’s Side Headlamp Low
ILLUM RTParking Lamp Right Side,
Illumination Circuit
LOW BEAM LT Driver’s Side Headlamp Low
ILLUM LTParking Lamp Left Side, License
Plate Lamp
INT LTS Room Lamp
BLANK Not Used
DEFOG Defogger
S/ROOF Sunroof
ILLUM LAMPS Illumination Relay
HORN Horn
HEAD LAMPS Headlamps
FUEL Fuel Pump
A/C Air Conditioning Compressor
FOG LAMPS Front Fog Lamp
HVAC
BLOWERHeating, Ventilation, Air Conditioning
Blower
ABS Anti-lock Brake System
I/P FUSE
BATT.Instrument Panel Fuse Box
COOL FAN Radiator Fan
IGN 2 Ignition 2Fuses Usage
BLANK Blank
IGN 1 Ignition 1
PWR WNDW Power Windows
SPARE Spare
Relays Usage
BLANK Not Used
COOL
FAN LOWCooling Fan Low
HEAD
LAMPS HIHeadlamp High
HEAD
LAMPS LOWHeadlamp Low
PWR WNDW Power Window
FRT FOG Fog Lamp
COOL FN
CNTRLCooling Fan Control
FUEL PUMP Fuel Pump
A/C COMPRSR Air Conditioning Compressor
COOL FAN HI Cooling Fan High
ILLUM LAMPS Illumination Lamps
BLANK Not Used
5-79
Page 2082 of 5127
Maintenance Schedule......................................6-2
Introduction...................................................6-2
Maintenance Requirements..............................6-2
Your Vehicle and the Environment....................6-2
How This Section is Organized.........................6-3
Part A: Scheduled Maintenance Services...........6-4
Using the Maintenance Schedule......................6-4
Selecting the Right Schedule...........................6-5
Short Trip/City Scheduled Maintenance..............6-6
Long Trip/Highway Scheduled Maintenance......6-13
Part B: Owner Checks and Services................6-18
At Each Fuel Fill..........................................6-18At Least Once a Month.................................6-18
At Least Twice a Year...................................6-19
At Least Once a Year...................................6-20
Part C: Periodic Maintenance Inspections.........6-23
Steering, Suspension and Front Drive Axle
Boot and Seal Inspection............................6-23
Exhaust System Inspection............................6-23
Fuel System Inspection..................................6-23
Engine Cooling System Inspection...................6-24
Brake System Inspection................................6-24
Part D: Recommended Fluids and Lubricants. . . .6-25
Part E: Maintenance Record...........................6-27
Section 6 Maintenance Schedule
6-1
Page 2086 of 5127
Selecting the Right Schedule
First you will need to decide which of the two schedules
is right for your vehicle. Here is how to decide which
schedule to follow:
Short Trip/City De�nition
Follow the Short Trip/City Scheduled Maintenance if any
one of these conditions is true for your vehicle:
•Most trips are less than 5 miles (8 km). This is
particularly important when outside temperatures
are below freezing.
•Most trips include extensive idling, such as frequent
driving in stop-and-go traffic.
•If the vehicle is used for delivery service, police,
taxi or other commercial application.
One of the reasons you should follow this schedule if
you operate your vehicle under any of these conditions
is that these conditions cause engine oil to break
down sooner.
Short Trip/City Intervals
Every 3,000 Miles (5 000 km):Engine Oil and Filter
Change (or 3 months, whichever occurs first).
Every 6,000 Miles (10 000 km):Tire Rotation.
Every 15,000 Miles (25 000 km):Engine Air Cleaner
Filter Inspection. Passenger Compartment Air Filter
Replacement. Drive Belt(s) Inspection.
Every 30,000 Miles (50 000 km):Engine Air Cleaner
Filter Replacement. Spark Plug Replacement. Cooling
System Service. EVAP System Service. PCV System
Service. Timing Belt Inspection. Brake/Clutch Fluid
Change (or 24 months, whichever occurs first).
Every 42,000 Miles (70 000 km):Engine Oil Pan Drain
Plug Washer Replacement.
Every 60,000 Miles (100 000 km):Spark Plug Wire
Replacement. Timing Belt Replacement. EVAP System
Solenoid Valve Replacement.
Every 90,000 Miles (150 000 km):Fuel Filter
Replacement.
These intervals only summarize maintenance services.
Be sure to follow the complete scheduled maintenance
on the following pages.
6-5
Page 2087 of 5127
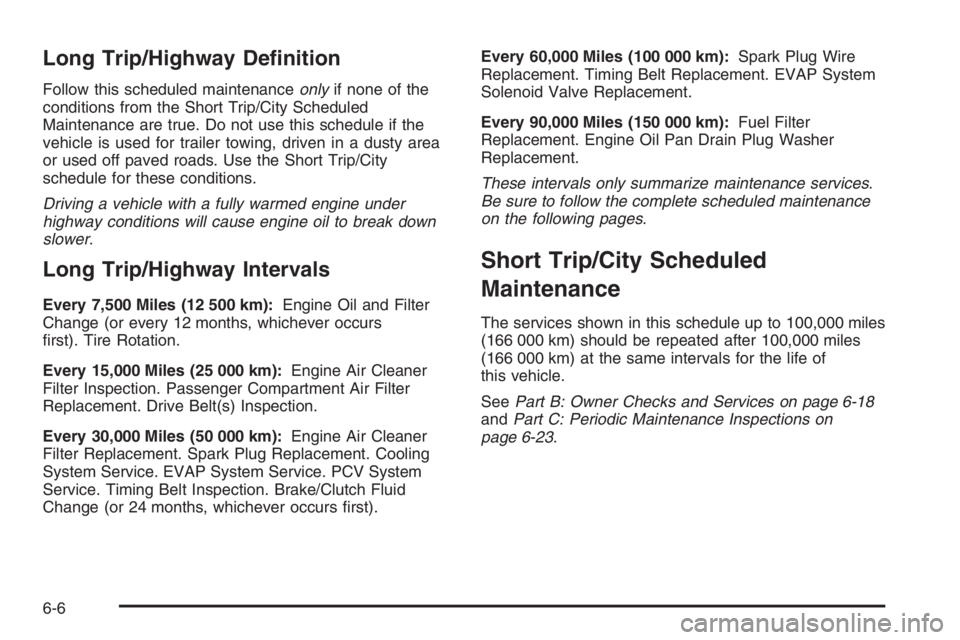
Long Trip/Highway De�nition
Follow this scheduled maintenanceonlyif none of the
conditions from the Short Trip/City Scheduled
Maintenance are true. Do not use this schedule if the
vehicle is used for trailer towing, driven in a dusty area
or used off paved roads. Use the Short Trip/City
schedule for these conditions.
Driving a vehicle with a fully warmed engine under
highway conditions will cause engine oil to break down
slower.
Long Trip/Highway Intervals
Every 7,500 Miles (12 500 km):Engine Oil and Filter
Change (or every 12 months, whichever occurs
first). Tire Rotation.
Every 15,000 Miles (25 000 km):Engine Air Cleaner
Filter Inspection. Passenger Compartment Air Filter
Replacement. Drive Belt(s) Inspection.
Every 30,000 Miles (50 000 km):Engine Air Cleaner
Filter Replacement. Spark Plug Replacement. Cooling
System Service. EVAP System Service. PCV System
Service. Timing Belt Inspection. Brake/Clutch Fluid
Change (or 24 months, whichever occurs first).Every 60,000 Miles (100 000 km):Spark Plug Wire
Replacement. Timing Belt Replacement. EVAP System
Solenoid Valve Replacement.
Every 90,000 Miles (150 000 km):Fuel Filter
Replacement. Engine Oil Pan Drain Plug Washer
Replacement.
These intervals only summarize maintenance services.
Be sure to follow the complete scheduled maintenance
on the following pages.
Short Trip/City Scheduled
Maintenance
The services shown in this schedule up to 100,000 miles
(166 000 km) should be repeated after 100,000 miles
(166 000 km) at the same intervals for the life of
this vehicle.
SeePart B: Owner Checks and Services on page 6-18
andPart C: Periodic Maintenance Inspections on
page 6-23.
6-6
Page 2088 of 5127
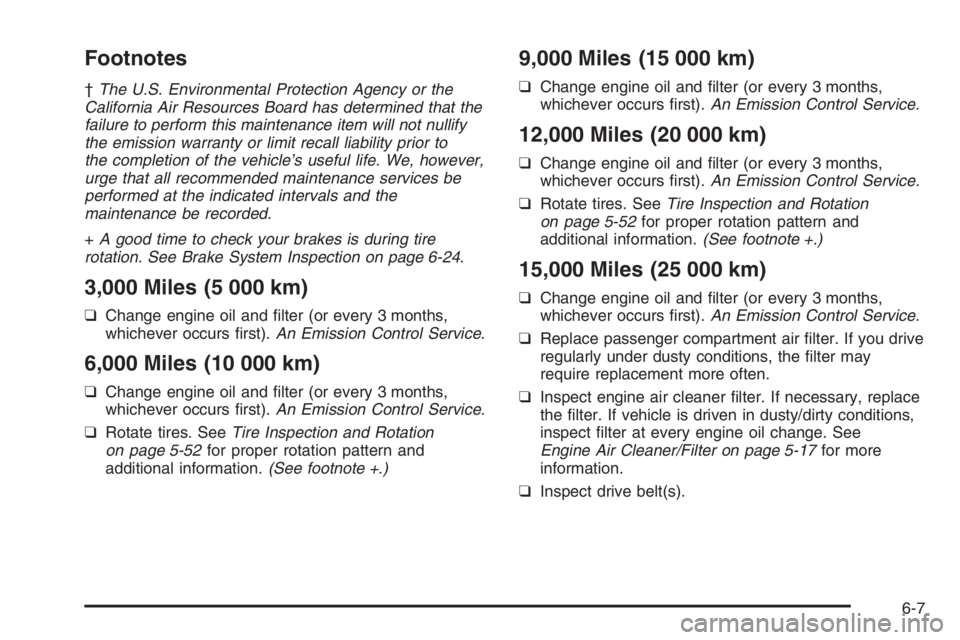
Footnotes
† The U.S. Environmental Protection Agency or the
California Air Resources Board has determined that the
failure to perform this maintenance item will not nullify
the emission warranty or limit recall liability prior to
the completion of the vehicle’s useful life. We, however,
urge that all recommended maintenance services be
performed at the indicated intervals and the
maintenance be recorded.
+ A good time to check your brakes is during tire
rotation. See Brake System Inspection on page 6-24 .
3,000 Miles (5 000 km)
❑Change engine oil and filter (or every 3 months,
whichever occurs first). An Emission Control Service.
6,000 Miles (10 000 km)
❑Change engine oil and filter (or every 3 months,
whichever occurs first). An Emission Control Service.
❑ Rotate tires. See Tire Inspection and Rotation
on page 5-52 for proper rotation pattern and
additional information. (See footnote +.)
9,000 Miles (15 000 km)
❑Change engine oil and filter (or every 3 months,
whichever occurs first). An Emission Control Service.
12,000 Miles (20 000 km)
❑Change engine oil and filter (or every 3 months,
whichever occurs first). An Emission Control Service.
❑ Rotate tires. See Tire Inspection and Rotation
on page 5-52 for proper rotation pattern and
additional information. (See footnote +.)
15,000 Miles (25 000 km)
❑Change engine oil and filter (or every 3 months,
whichever occurs first). An Emission Control Service.
❑ Replace passenger compartment air filter. If you drive
regularly under dusty conditions, the filter may
require replacement more often.
❑ Inspect engine air cleaner filter. If necessary, replace
the filter. If vehicle is driven in dusty/dirty conditions,
inspect filter at every engine oil change. See
Engine Air Cleaner/Filter on page 5-17 for more
information.
❑ Inspect drive belt(s).
6-7
Page 2090 of 5127
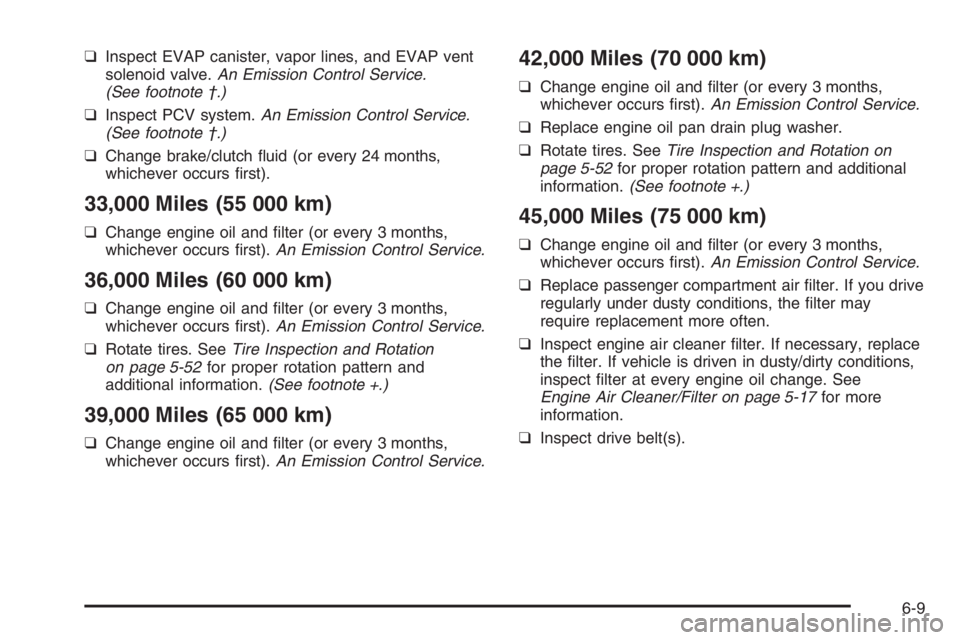
❑ Inspect EVAP canister, vapor lines, and EVAP vent
solenoid valve. An Emission Control Service.
(See footnote †.)
❑ Inspect PCV system. An Emission Control Service.
(See footnote †.)
❑ Change brake/clutch fluid (or every 24 months,
whichever occurs first).
33,000 Miles (55 000 km)
❑ Change engine oil and filter (or every 3 months,
whichever occurs first). An Emission Control Service.
36,000 Miles (60 000 km)
❑Change engine oil and filter (or every 3 months,
whichever occurs first). An Emission Control Service.
❑ Rotate tires. See Tire Inspection and Rotation
on page 5-52 for proper rotation pattern and
additional information. (See footnote +.)
39,000 Miles (65 000 km)
❑Change engine oil and filter (or every 3 months,
whichever occurs first). An Emission Control Service.
42,000 Miles (70 000 km)
❑Change engine oil and filter (or every 3 months,
whichever occurs first). An Emission Control Service.
❑ Replace engine oil pan drain plug washer.
❑ Rotate tires. See Tire Inspection and Rotation on
page 5-52 for proper rotation pattern and additional
information. (See footnote +.)
45,000 Miles (75 000 km)
❑Change engine oil and filter (or every 3 months,
whichever occurs first). An Emission Control Service.
❑ Replace passenger compartment air filter. If you drive
regularly under dusty conditions, the filter may
require replacement more often.
❑ Inspect engine air cleaner filter. If necessary, replace
the filter. If vehicle is driven in dusty/dirty conditions,
inspect filter at every engine oil change. See
Engine Air Cleaner/Filter on page 5-17 for more
information.
❑ Inspect drive belt(s).
6-9