2002 BMW Z3 oil
[x] Cancel search: oilPage 11 of 187

11n
Controls and features
Operation, maintenance
Cabin convenience:
Glove compartment90
Storage compartments90
Storage boxes90
Beverage holder91
Ashtray91
Cigarette lighter92
Loading and transporting:
coupe:
Roll-up cover93
Partition net93
Cargo loading94
Roof-mounted luggage
rack95
Special operating instructions:
Break-in procedure98
Driving notes99
Catalytic converter100
Antilock Brake System
(ABS)101
Disc brakes103
Brake system104
Winter operation105
Power steering106
Cellular phone107
Car radio reception107
Hardtop Ð roadster108
Wheels and tires:
Notes on inflation pressures110
Tire condition110
Tire replacement111
Tire rotation113
Wheel and tire
combinations114
Special features of winter
tires115
Snow chains115
Approved wheel and tire
specifications116
In the engine compartment:
Hood118
Engine compartment120
Fluids for the washer
systems122
Washer nozzles122
Engine oil123
Coolant125
Brake fluid126
Vehicle Identification127
Care and maintenance:
The BMW Maintenance
System128
Airbags130
Storing your vehicle130
Laws and regulations:
Technical modifications132
California Proposition
65 Warning132
OBD interface socket133
Page 19 of 187

19n
IndexDataTechnologyRepairsMaintenanceControlsOverview
Instrument cluster
1 Fuel gauge with indicator lamp
for reserve range68
2 Indicator lamp for turn signals23
3 Speedometer
4 Indicator and warning lamps for:
>
Battery charge current20
>
High beams23
>
Engine oil pressure20
5 Tachometer68
6 Coolant temperature gauge69
7 Indicator and warning lamps for:
>
Brake pad wear22
>
Brake hydraulic
system20, 21, 22
>
Parking brake21
>
Airbags21
8 Indicator and warning lamps for:
>
Service Engine Soon22
>
Automatic transmission
*
22
>
Safety belts21
>
Engine oil level21
>
Antilock Brake System (ABS)21
9 Indicator lamp for Automatic
Stability Control plus Traction
(ASC+T)/Dynamic Stability Control
(DSC
*
)22
10 Trip odometer/Gear indicator for
automatic transmission with
Steptronic
*
6811 Service Interval Display69, 128
12 Odometer68
13 Indicator and warning lamps for:
>
Front fog lamps
*
23
>
Engine electronics22
14 Trip odometer reset button68
The illustration shows the instrument
cluster in the US version. In the Cana-
dian models, some of the indicator and
warning lamps have a different appear-
ance, refer to pages 20 to 23.
Page 20 of 187

20n
Indicator and warning lamps
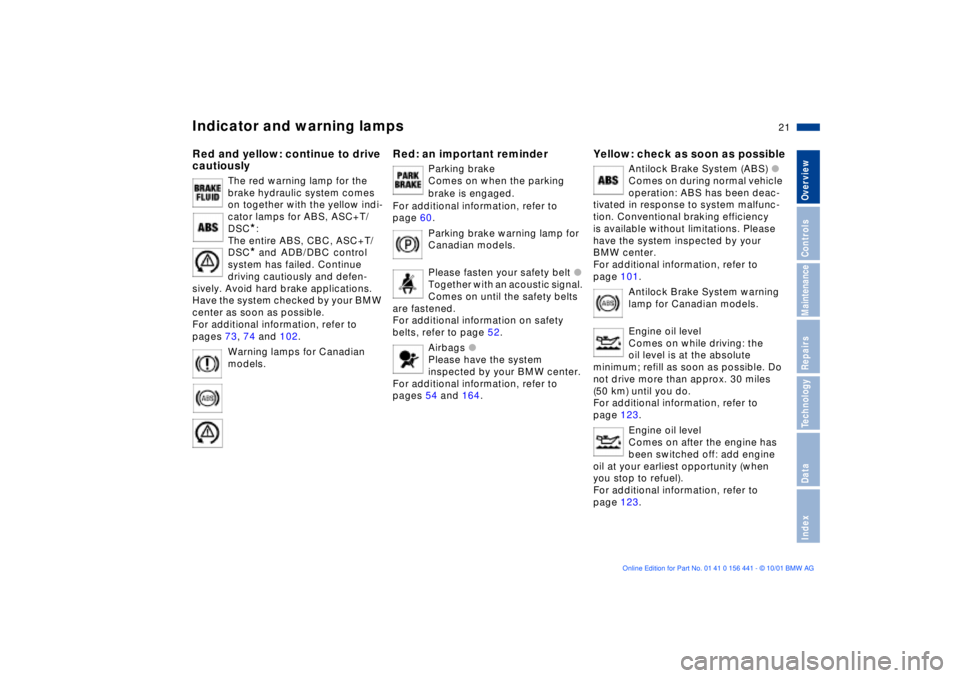
Technology that monitors itself
Indicator and warning lamps that are
identified by "
l
" are tested for proper
functioning whenever the ignition key is
turned. They each light up once for
different periods of time.
If a fault should occur in one of these
systems, the corresponding lamp does
not go out after the engine is started or
it lights up while the vehicle is moving.
You will see how to react to this in the
following section.
Red: stop immediately
Battery charge current
l
The battery is no longer being
charged. The alternator drive
belt is defective or there is a malfunc-
tion in the charging circuit of the alter-
nator. Please contact the nearest BMW
center.
If the drive belt is defective, stop
and switch off the engine immedi-
ately to prevent overheating and
serious engine damage. If the drive belt
is defective, increased steering effort is
also required.
<
Engine oil pressure
l
Stop the vehicle immediately
and switch off the engine.
Check the engine oil level and top off as
required. If the oil level is correct,
please contact the nearest BMW
center.
Do not continue driving, as the
engine could sustain serious
damage from inadequate lubrication.
<
Brake hydraulic system
l
The brake fluid level is too low.
Before driving further, be sure to
read the notes on pages 104 and 126.
Brake hydraulic system warning
lamp for Canadian models.
Page 21 of 187

21n
IndexDataTechnologyRepairsMaintenanceControlsOverview
Indicator and warning lamps
Red and yellow: continue to drive
cautiously
The red warning lamp for the
brake hydraulic system comes
on together with the yellow indi-
cator lamps for ABS, ASC+T/
DSC
*
:
The entire ABS, CBC, ASC+T/
DSC
*
and
ADB/DBC
control
system has failed. Continue
driving cautiously and defen-
sively. Avoid hard brake applications.
Have the system checked by your BMW
center as soon as possible.
For additional information, refer to
pages 73, 74 and 102.
Warning lamps for Canadian
models.
Red: an important reminder
Parking brake
Comes on when the parking
brake is engaged.
For additional information, refer to
page 60.
Parking brake warning lamp for
Canadian models.
Please fasten your safety belt
l
Together with an acoustic signal.
Comes on until the safety belts
are fastened.
For additional information on safety
belts, refer to page 52.
Airbags
l
Please have the system
inspected by your BMW center.
For additional information, refer to
pages 54 and 164.
Yellow: check as soon as possible
Antilock Brake System (ABS)
l
Comes on during normal vehicle
operation: ABS has been deac-
tivated in response to system malfunc-
tion. Conventional braking efficiency
is available without limitations. Please
have the system inspected by your
BMW center.
For additional information, refer to
page 101.
Antilock Brake System warning
lamp for Canadian models.
Engine oil level
Comes on while driving: the
oil level is at the absolute
minimum; refill as soon as possible. Do
not drive more than approx. 30 miles
(50 km) until you do.
For additional information, refer to
page 123.
Engine oil level
Comes on after the engine has
been switched off: add engine
oil at your earliest opportunity (when
you stop to refuel).
For additional information, refer to
page 123.
Page 42 of 187

42n
Manual convertible top, roadster4. Push the peripheral frame of the
cover under the edge of the convert-
ible top compartment
5. Check the convertible cover to be
sure it is properly secured.
In order to avoid damage and
soiling of the inside of the convert-
ible top, always drive with the cover
secured in place.<
Be sure that the cover is secured
properly on the vehicle. If it is not
firmly secured, the flow of air while
driving could loosen the cover at higher
speeds.< 367us077
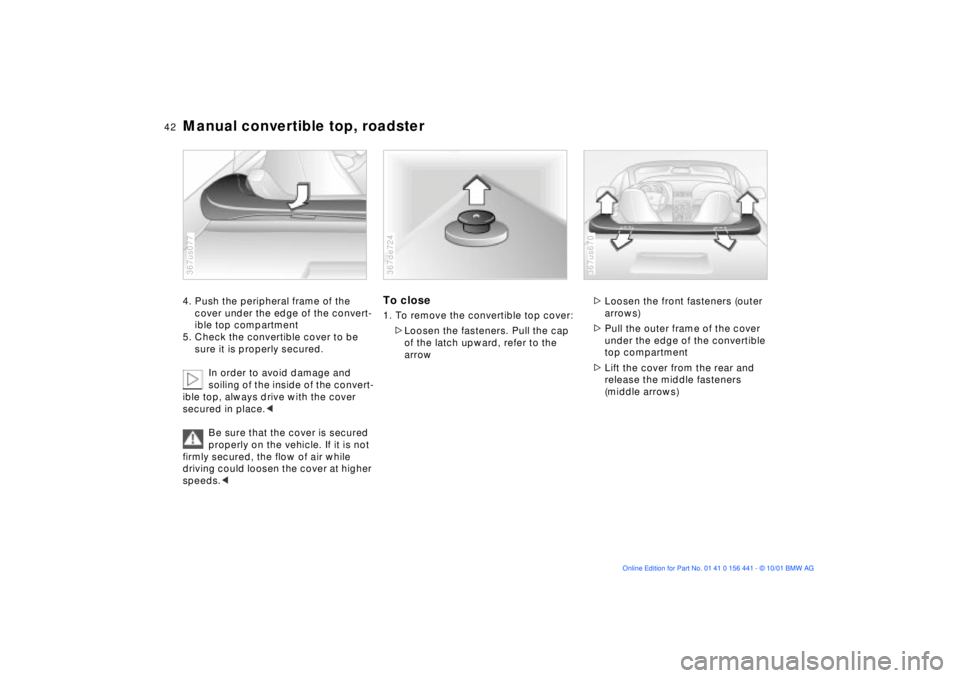
To close1. To remove the convertible top cover:
>Loosen the fasteners. Pull the cap
of the latch upward, refer to the
arrow367de724
>Loosen the front fasteners (outer
arrows)
>Pull the outer frame of the cover
under the edge of the convertible
top compartment
>Lift the cover from the rear and
release the middle fasteners
(middle arrows)367us670
Page 46 of 187

46n
Power convertible top, roadster
*
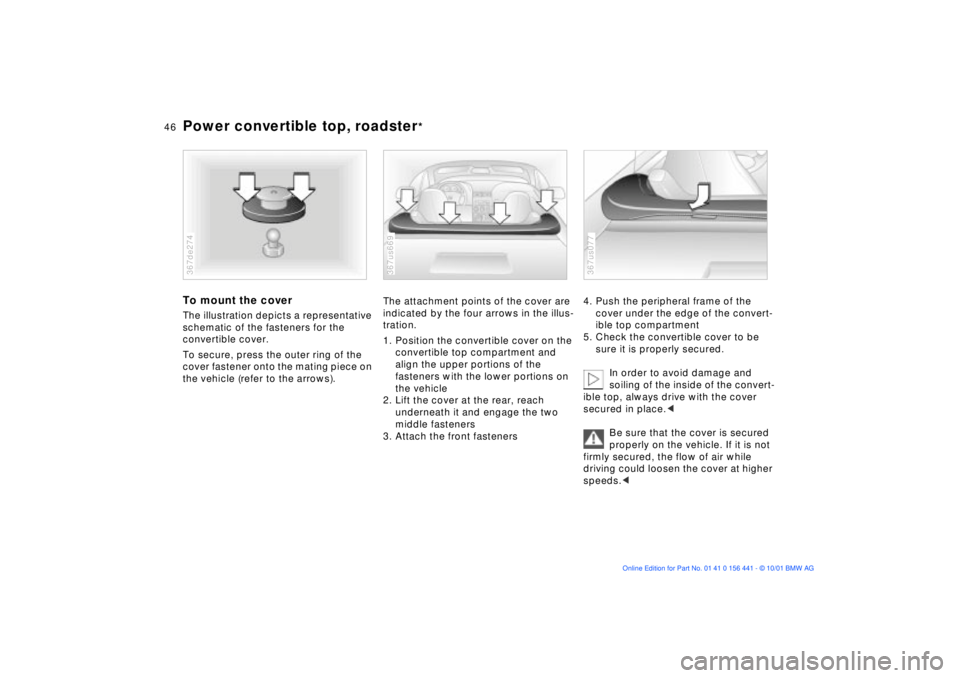
To mount the coverThe illustration depicts a representative
schematic of the fasteners for the
convertible cover.
To secure, press the outer ring of the
cover fastener onto the mating piece on
the vehicle (refer to the arrows).367de274
The attachment points of the cover are
indicated by the four arrows in the illus-
tration.
1. Position the convertible cover on the
convertible top compartment and
align the upper portions of the
fasteners with the lower portions on
the vehicle
2. Lift the cover at the rear, reach
underneath it and engage the two
middle fasteners
3. Attach the front fasteners367us669
4. Push the peripheral frame of the
cover under the edge of the convert-
ible top compartment
5. Check the convertible cover to be
sure it is properly secured.
In order to avoid damage and
soiling of the inside of the convert-
ible top, always drive with the cover
secured in place.<
Be sure that the cover is secured
properly on the vehicle. If it is not
firmly secured, the flow of air while
driving could loosen the cover at higher
speeds.< 367us077
Page 59 of 187

59n
IndexDataTechnologyRepairsMaintenanceControlsOverview
Starting the engineBefore starting>Engage the parking brake
>Be sure that the gearshift lever is in
"Neutral" (or the selector lever in "P"
if the vehicle is equipped with auto-
matic transmission)
>Depress the clutch pedal.
Do not run the engine in enclosed
spaces. The exhaust gases
contain carbon monoxide, an odorless
and colorless, but highly toxic gas.
Breathing the exhaust gases poses an
extreme health risk, and can lead to
unconsciousness and death.
Do not leave the vehicle unattended
with the engine running. An unattended
vehicle with a running engine repre-
sents a potential safety hazard.<
Starting the engine>Do not press the accelerator pedal
while starting the engine.
Do not actuate the starter for too
short a time. Do not turn it for
more than approx. 20 seconds. Release
the ignition key immediately after the
engine starts.
Do not allow the engine to warm up
by leaving it running while the vehicle
remains stationary. Instead, begin to
drive immediately at a moderate engine
speed.<
Should the engine fail to start on the
first attempt (if it is very hot or cold, for
instance):
>Press the accelerator pedal halfway
down while engaging the starter.
Cold starts at very low temperatures,
from approx. +5 7 (Ð15 6) and at
altitudes above approx. 3,300 ft
(1,000 m):
>On the first start attempt, engage the
starter for a longer period (approx.
10 seconds).
If these temperature conditions are
anticipated for a longer period, have the
engine oil changed to a special oil, refer
to page 124. Please contact your BMW
center for additional information.
Usually, it is not necessary to depress
the accelerator pedal. However, at high
altitudes or in very hot or very cold
weather, depress the pedal halfway
down when starting the engine.
Engine idle speed is controlled by the
engine computer system. Increased
speeds at start-up are normal and
should decrease as the engine warms
up. If engine speed does not decrease,
service is required.
To prevent the battery from
discharging, always switch off any
accessories which are not required.
Switch off the ignition when the vehicle
is not being driven.
Page 69 of 187

69n
IndexDataTechnologyRepairsMaintenanceControlsOverview
Coolant temperature gauge Service Interval DisplayBlueThe engine is still cold. Drive at
moderate engine and vehicle speeds.RedWhen you switch on the ignition, the
warning lamp comes on briefly to
confirm that the system is operational.
Comes on while driving: the engine is
overheated. Switch off the engine
immediately and allow it to cool down.367de007
Between the blue and red zonesNormal operating range. It is not
unusual for the needle to rise as far as
the edge of the red zone in response to
high outside temperatures or severe
operating conditions.
Checking coolant level, refer to
page 125.
Green lamps The number of illuminated lamps
decreases as the time for your next
maintenance visit approaches.Yellow lamp This field appears together with
OILSERVICE or INSPECTION.
This alerts you that maintenance is due.
Please arrange for an appointment with
your BMW center.Red lamp Maintenance is overdue.367us709