Page 129 of 187

129n
IndexDataTechnologyRepairsMaintenanceControlsOverview
The BMW Maintenance SystemService and Warranty Information
Booklet (US models)/Warranty
and Service Guide Booklet
(Canadian models)For detailed information on required
maintenance items and the work
involved, please refer to the Service
and Warranty Information Booklet (US
models) or to the Warranty and Service
Guide Booklet (Canadian models).
Depending upon operating conditions,
it may be advisable to have the body
checked for damage from rocks or
gravel as a precaution against rust.Have your BMW center perform
the maintenance and repair.
Your BMW center is always informed on
the latest maintenance work and repair
techniques and is equipped with the
required special tools. In addition,
checking parts known from experience
to be subject to wear is a permanent
part of the maintenance specifications.
Be sure that all maintenance work is
confirmed in the Service and Warranty
Information Booklet (US models) or the
Warranty and Service Guide Booklet
(Canadian models). These entries will
constitute your proof that the vehicle
has received regular maintenance. They
are also required for warranty claims.<
Page 130 of 187

130n
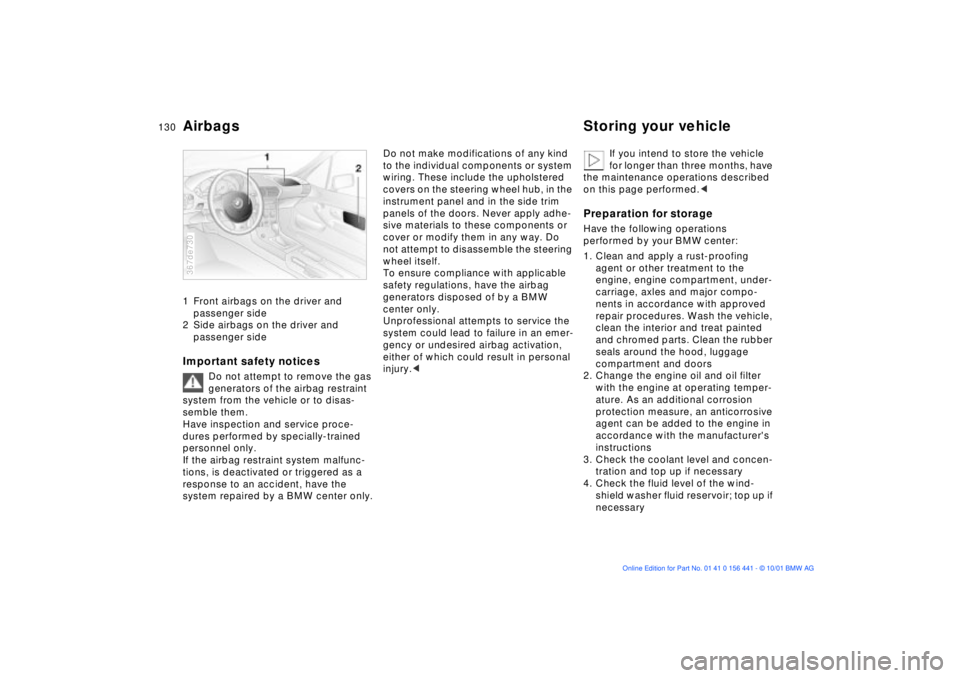
Airbags Storing your vehicle1 Front airbags on the driver and
passenger side
2 Side airbags on the driver and
passenger sideImportant safety notices
Do not attempt to remove the gas
generators of the airbag restraint
system from the vehicle or to disas-
semble them.
Have inspection and service proce-
dures performed by specially-trained
personnel only.
If the airbag restraint system malfunc-
tions, is deactivated or triggered as a
response to an accident, have the
system repaired by a BMW center only.
367de730
Do not make modifications of any kind
to the individual components or system
wiring. These include the upholstered
covers on the steering wheel hub, in the
instrument panel and in the side trim
panels of the doors. Never apply adhe-
sive materials to these components or
cover or modify them in any way. Do
not attempt to disassemble the steering
wheel itself.
To ensure compliance with applicable
safety regulations, have the airbag
generators disposed of by a BMW
center only.
Unprofessional attempts to service the
system could lead to failure in an emer-
gency or undesired airbag activation,
either of which could result in personal
injury.< If you intend to store the vehicle
for longer than three months, have
the maintenance operations described
on this page performed.<
Preparation for storageHave the following operations
performed by your BMW center:
1. Clean and apply a rust-proofing
agent or other treatment to the
engine, engine compartment, under-
carriage, axles and major compo-
nents in accordance with approved
repair procedures. Wash the vehicle,
clean the interior and treat painted
and chromed parts. Clean the rubber
seals around the hood, luggage
compartment and doors
2. Change the engine oil and oil filter
with the engine at operating temper-
ature. As an additional corrosion
protection measure, an anticorrosive
agent can be added to the engine in
accordance with the manufacturer's
instructions
3. Check the coolant level and concen-
tration and top up if necessary
4. Check the fluid level of the wind-
shield washer fluid reservoir; top up if
necessary
Page 131 of 187

131n
IndexDataTechnologyRepairsMaintenanceControlsOverview
Storing your vehicle5. Fill the fuel tank completely to
prevent the formation of condensa-
tion
6. Increase the tire inflation pressure to
51 psi (350 kPa).Before parking the vehicle for
storage1. Dry the parking brake and footbrake
by brake applications to prevent the
brake rotors and drums from
corroding
2. Park the vehicle in a covered, dry,
and well-ventilated room. Place the
transmission in 1st gear or set the
selector lever to the "P" position.
Chock the wheels to prevent the
vehicle from rolling if necessary. Do
not set the parking brake
3. Remove the battery, charge it
completely and store it in a cool (but
frost-free) room
Z3 roadster:
4. Remove the hardtop
* and store it
separately, refer to page 109
5. Close the convertible top.
During storageRecharge the battery every six months.
If it is not recharged, it will not be
serviceable. Every time the battery is
discharged, especially over extended
periods, its service life is reduced.
Removing the vehicle from
storageRecharge the battery if the "Magic Eye"
turns black, refer to page 154.
Then have Inspection I performed by
your BMW center, including a brake
fluid replacement if necessary, refer to
the Service Manual.
Page 133 of 187

133n
IndexDataTechnologyRepairsMaintenanceControlsOverview
OBD interface socketAccess to the interface socket for the
Onboard Diagnostic system (OBD):
Lift off the side cover in the center
console on the passenger's side
(arrow).
The purpose of the OBD system is to
ensure proper operation of the emis-
sion control system throughout the
vehicle's lifetime by monitoring emis-
sion-related components and systems
for deterioration and malfunction.367us235
An illuminated indicator informs
you of the need for service,
but not of the need to stop the
vehicle. However, the systems should
be checked by your BMW center at the
earliest possible opportunity.
Under certain conditions, the indicator
will blink or flash. This indicates a rather
severe level of engine misfire. When
this occurs, you should reduce speed
and consult the nearest BMW center as
soon as possible. Severe engine misfire
over only a short period of time can
seriously damage emission control
components, especially the catalytic
converter.
"Service Engine Soon" warning
lamp for Canadian models.
When the filler cap is not properly
tightened, the OBD system can
detect the vapor leak and the indicator
will light up. If the filler cap is subse-
quently tightened, the indicator should
go out within a few days.<
Page 135 of 187
Overview
Controls and features
Operation, maintenance
Owner service procedures
Technical data
Index Advanced technology
135n
IndexDataTechnologyRepairsMaintenanceControlsOverview
Replacement procedures:
Onboard tool kit136
Windshield wiper blades136
Lamps and bulbs137
Master key with battery
lamp143
Remote control144
Wheel change146
Battery153
Fuses156
In case of electrical
malfunction:
Power convertible top157
Fuel filler door157
Assistance, giving and
receiving:
Jump-starting158
Towing the vehicle159
Repairs
Page 137 of 187

137n
IndexDataTechnologyRepairsMaintenanceControlsOverview
Lamps and bulbsThe lamps and bulbs make essential
contributions to the safety of your
vehicle. Therefore, comply fully with the
following instructions during bulb
replacement. If you are not familiar with
any of the procedures, consult your
BMW center.
Do not touch the glass portion of
a new bulb with your bare hands
since even small amounts of impurities
burn in to the surface and reduce the
service life of the bulb. Use a clean
cloth, paper napkin, or a similar mate-
rial, or hold the bulb by its metallic
base.<
A replacement bulb set is available from
your BMW center.
Before working on the electrical
system, switch off the electrical
accessory you are working on or
disconnect the cable from the negative
terminal of the battery. Failure to
observe this precaution could result in
short circuits.
To prevent injuries and damage,
comply with any instructions provided
by the bulb manufacturer.<
The illustration depicts the right side
of the engine compartment.1 High beams HB3 bulb, 65 watts2 Low beams HB4 bulb, 55 watts
The bulb is pressurized. There-
fore, wear safety glasses and
protective gloves. Failure to comply
with these precautions could result in
physical injury if the bulb breaks.< 367us067
1. Turn the bulb holder with the bulb to
the left and remove toward the rear
2. Pull off the plug
3. Push the new bulb holder with the
bulb into the plug Ð ensure proper
locking
4. Reinstall in reverse order.
When cleaning the headlamps,
please observe the following:
>Do not wipe dry (this causes
scratches) and never use abrasives
or strong solvents to clean the covers
>Remove dirt and contamination (such
as insects) by soaking with BMW Car
Shampoo and then rinsing with plenty
of water
>Always use a deicer spray to remove
accumulated ice and snow Ð never
use a scraper.<
Page 139 of 187

139n
IndexDataTechnologyRepairsMaintenanceControlsOverview
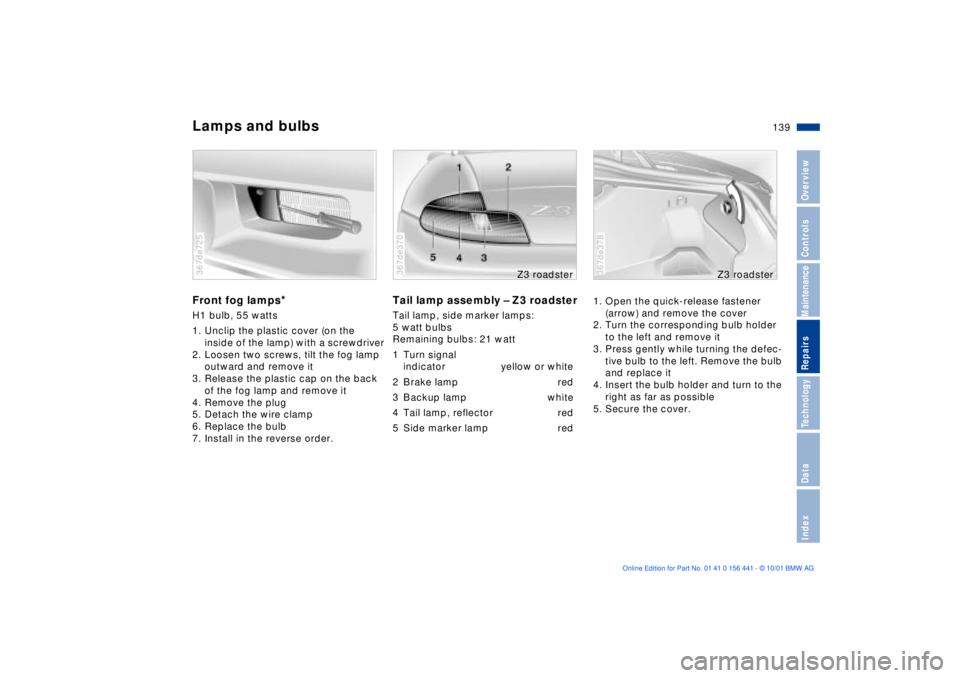
Lamps and bulbsFront fog lamps
*
H1 bulb, 55 watts
1. Unclip the plastic cover (on the
inside of the lamp) with a screwdriver
2. Loosen two screws, tilt the fog lamp
outward and remove it
3. Release the plastic cap on the back
of the fog lamp and remove it
4. Remove the plug
5. Detach the wire clamp
6. Replace the bulb
7. Install in the reverse order.367de725
Tail lamp assembly Ð Z3 roadsterTail lamp, side marker lamps:
5 watt bulbs
Remaining bulbs: 21 watt
1 Turn signal
indicator yellow or white
2 Brake lamp red
3 Backup lamp white
4 Tail lamp, reflector red
5 Side marker lamp red367de370
Z3 roadster
1. Open the quick-release fastener
(arrow) and remove the cover
2. Turn the corresponding bulb holder
to the left and remove it
3. Press gently while turning the defec-
tive bulb to the left. Remove the bulb
and replace it
4. Insert the bulb holder and turn to the
right as far as possible
5. Secure the cover.367de378
Z3 roadster
Page 141 of 187
141n
IndexDataTechnologyRepairsMaintenanceControlsOverview
Lamps and bulbsCenter (high-mount) brake lamp Ð
Z3 roadsterIn the event of a malfunction, please
consult your BMW center.367de369
Z3 roadster
Center (high-mount) brake lamp Ð
Z3 coupeIn the event of a malfunction, please
consult your BMW center.367de624
Z3 cou
pe
License plate lamps5 watt bulb
1. Press the lamp to the left and remove
it
2. Turn the bulb holder with the bulb to
the left and remove it from the lamp
3. Pull the bulb out of the bulb socket
and replace
4. Install in the reverse order.367de073