Page 16 of 208

At a glanceControlsDriving tipsCommunicationsNavigationEntertainmentMobilityReference
15
Indicator and warning lamps
Technology that monitors itself
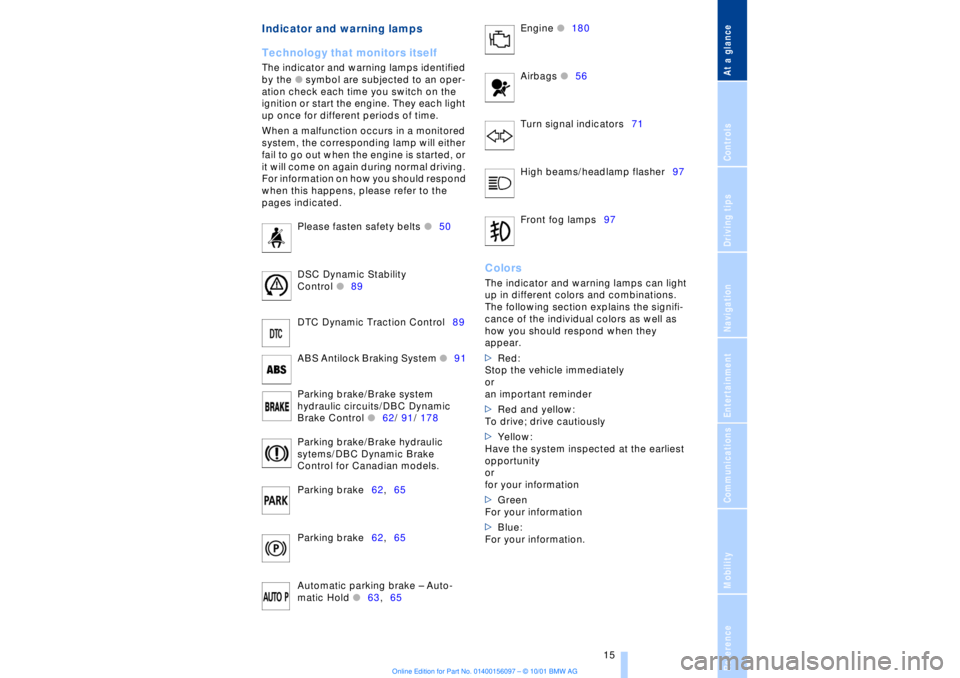
The indicator and warning lamps identified
by the
l
symbol are subjected to an oper-
ation check each time you switch on the
ignition or start the engine. They each light
up once for different periods of time.
When a malfunction occurs in a monitored
system, the corresponding lamp will either
fail to go out when the engine is started, or
it will come on again during normal driving.
For information on how you should respond
when this happens, please refer to the
pages indicated.
Please fasten safety belts
l
50
DSC Dynamic Stability
Control
l
89
DTC Dynamic Traction Control89
ABS Antilock Braking System
l
91
Parking brake/Brake system
hydraulic circuits/DBC Dynamic
Brake Control
l
62/ 91/ 178
Parking brake/Brake hydraulic
sytems/DBC Dynamic Brake
Control for Canadian models.
Parking brake62,65
Parking brake62,65
Automatic parking brake Ð Auto-
matic Hold
l
63,65 Engine
l
180
Airbags
l56
Turn signal indicators71
High beams/headlamp flasher97
Front fog lamps97
ColorsThe indicator and warning lamps can light
up in different colors and combinations.
The following section explains the signifi-
cance of the individual colors as well as
how you should respond when they
appear.
>Red:
Stop the vehicle immediately
or
an important reminder
>Red and yellow:
To drive; drive cautiously
>Yellow:
Have the system inspected at the earliest
opportunity
or
for your information
>Green
For your information
>Blue:
For your information.
Page 72 of 208

At a glanceControlsDriving tipsCommunicationsNavigationEntertainmentMobilityReference
71
vehicle could start to roll if parked on a
steep slope.< To re-engage the lockout 1.Disengage the release lever by pressing
it together with the red detent lever,
arrow 1
2.Guide the release lever all the way back
into its original position Ð the transmission
lockout is again engaged
3.Fold up and lock the cover panel. Now Ð
and not before Ð the key may be removed.
Once the transmission lockout has
been re-engaged, the warning in the
Check Control should disappear, and the
symbol in the Info Display should change
from N to P. Should this fail to happen,
there is a danger that the vehicle could
start to roll.<
Information on jump-starting, tow-starting
and towing begins on page 187. Turn signal indicators/
headlamp flasher1High beams Ð blue indicator lamp
2Headlamp flasher Ð blue indicator lamp 3Turn signal indicators Ð the green indi-
cator lamp flashes, accompanied by a peri-
odic ticking from the turn signal indicator
relay.
To use the turn signal indicatorsMove the lever beyond the detent position.
It then returns to the center position when
released. Press the lever as far as the
detent to switch off the turn signals. To signal brieflyPress the lever up to but not beyond the
detent. It then returns to the center position
when released.
If the flashing of the indicator lamp and the
ticking from the relay are both faster than
normal, this indicates that one of the bulbs
is defective; if a trailer is attached, this
could also indicate that one of its turn
signal indicator bulbs is defective. Wiper system1Standard wiper speed: press briefly one
time.
Fast wipe: briefly press twice
2To switch off wipers or for brief wipe
3To activate/deactivate rain sensor
4Cleaning windshield
5Adjusting rain sensor sensitivity level.
The lever automatically returns to its
initial position when released.<
Page 98 of 208
At a glanceControlsDriving tipsCommunicationsNavigationEntertainmentMobilityReference
97
Instrument lighting Turn the rotary dial to adjust the illumina-
tion intensity. High beams/standing lamps 1High beams Ð blue indicator lamp
2Headlamp flasher Ð blue indicator lamp
3Standing lamp Standing lamps, left and right*
You also enjoy the option of lighting up just
one side of your vehicle when parking:
With the ignition off, press the lever in the
desired direction 3, past the pressure
point.
Front fog lamps
The parking lamps or low beams
must be switched on for the fog
lamps to operate. The green indi-
cator lamp in the Info Display lights up
whenever the fog lamps are on.
The fog lamps are switched off whenever
the high beams are switched on.
If the automatic headlamp control is
activated, the headlamps (low beam)
will come on automatically when you
switch on the fog lamps.<
Interior lamps The interior lamps operate automatically.
Page 103 of 208

A congenial climate
102 heated air into the interior in accordance
with the selected distribution pattern while
the ignition is off.
Provided that the engine has warmed
to its normal operating temperature
and the battery is charged, you can use this
function for up to 15 minutes after
switching off the ignition. The LED within
the button lights up to confirm compliance
with both of these conditions.<
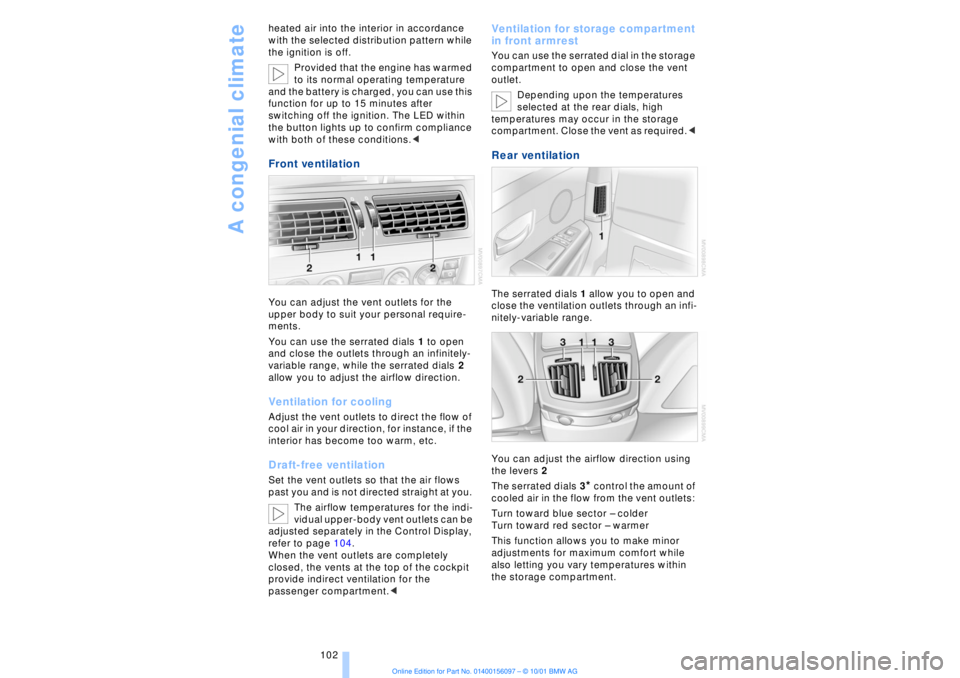
Front ventilation You can adjust the vent outlets for the
upper body to suit your personal require-
ments.
You can use the serrated dials 1 to open
and close the outlets through an infinitely-
variable range, while the serrated dials 2
allow you to adjust the airflow direction. Ventilation for cooling Adjust the vent outlets to direct the flow of
cool air in your direction, for instance, if the
interior has become too warm, etc.Draft-free ventilationSet the vent outlets so that the air flows
past you and is not directed straight at you.
The airflow temperatures for the indi-
vidual upper-body vent outlets can be
adjusted separately in the Control Display,
refer to page 104.
When the vent outlets are completely
closed, the vents at the top of the cockpit
provide indirect ventilation for the
passenger compartment.<
Ventilation for storage compartment
in front armrest You can use the serrated dial in the storage
compartment to open and close the vent
outlet.
Depending upon the temperatures
selected at the rear dials, high
temperatures may occur in the storage
compartment. Close the vent as required.< Rear ventilation The serrated dials 1 allow you to open and
close the ventilation outlets through an infi-
nitely-variable range.
You can adjust the airflow direction using
the levers 2
The serrated dials 3
* control the amount of
cooled air in the flow from the vent outlets:
Turn toward blue sector Ð colder
Turn toward red sector Ð warmer
This function allows you to make minor
adjustments for maximum comfort while
also letting you vary temperatures within
the storage compartment.