2002 BMW 525I SPORT WAGON battery
[x] Cancel search: batteryPage 6 of 186

Contents
Operation, maintenance
Owner service procedures
Technical data
Under the hood:
Hood137
Engine compartment
essentials138
Washer fluids139
Engine oil140
Coolant142
Brake fluid143
Maintenance:
The BMW Maintenance
System144
Laws and regulations:
Technical modifications145
California Proposition
65 Warning145
OBD interface socket146
Replacement procedures:
Onboard tool kit150
Windshield wiper blades150
Lamps and bulbs151
Changing a wheel156
Battery160
Fuses160
Assistance, giving and
receiving:
Jump-starting162
Towing the vehicle163Engine specifications168
Dimensions169
Weights171
Capacities173
Page 19 of 186

19n
OverviewControlsMaintenanceRepairsDataIndex
Indicator and warning lamps
Technology that monitors itself
The system runs a check on the
warning and indicator lamps marked by
"
l
" each time you switch on the igni-
tion. They each light up once for
different periods of time.
If a fault should occur in one of these
systems, the corresponding lamp does
not go out after the engine is started or
it lights up while the vehicle is moving.
The following section describes how
you should respond.
Red: stop immediately
Battery charge current
l
The battery is no longer being
charged. This indicates a defect
in the alternator drive belt or in the
charging circuit of the alternator. Please
contact the nearest BMW center.
Stop and switch off the engine
immediately to prevent over-
heating and serious engine damage. If
the drive belt is defective, increased
steering effort is also required.
<
Engine oil pressure
l
May be accompanied by the
message "STOP!ENGINE
OILPRESS" in the Check Control
display panel
*
: stop the vehicle imme-
diately and switch off the engine. Check
the engine oil level; top up as required.
If the oil level is correct: please contact
the nearest BMW center.
Do not continue driving, as the
engine could sustain serious
damage from inadequate lubrication.
<
Tire Pressure Monitor (RDC)
*
l
Accompanied by an acoustic
warning signal: a tire failure has
occurred. Reduce vehicle speed imme-
diately and stop the vehicle. Avoid hard
brake applications. Do not oversteer.
For additional information: refer to
page 98
Parking brake
*
/
brake system hydraulic circuits
l
Comes on when you engage the
parking brake.
For additional information: refer to
page 68
Comes on although the parking brake
is released: have the brake fluid level
checked. Before continuing your
journey, be sure to read the notes on
pages 132 and 143
Also comes on with the message
"CHECK BRAKE LININGS" in the
Check Control.
Parking brake warning lamp
*
/
brake system hydraulic circuits
for Canadian models.
Page 32 of 186

32n
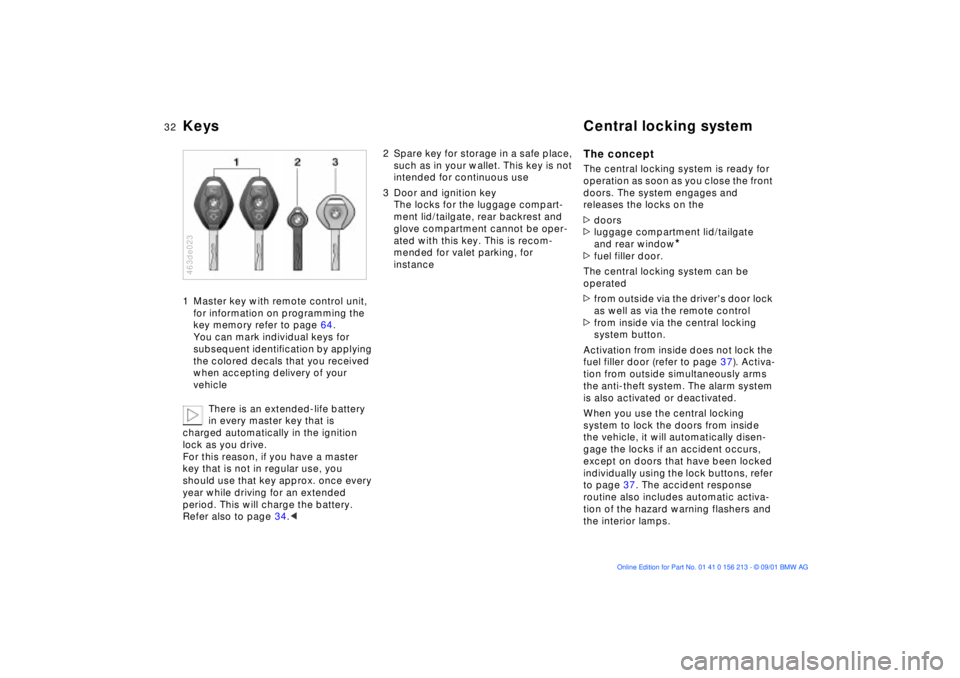
Keys Central locking system1 Master key with remote control unit,
for information on programming the
key memory refer to page 64.
You can mark individual keys for
subsequent identification by applying
the colored decals that you received
when accepting delivery of your
vehicle
There is an extended-life battery
in every master key that is
charged automatically in the ignition
lock as you drive.
For this reason, if you have a master
key that is not in regular use, you
should use that key approx. once every
year while driving for an extended
period. This will charge the battery.
Refer also to page 34.< 463de023
2 Spare key for storage in a safe place,
such as in your wallet. This key is not
intended for continuous use
3 Door and ignition key
The locks for the luggage compart-
ment lid/tailgate, rear backrest and
glove compartment cannot be oper-
ated with this key. This is recom-
mended for valet parking, for
instance
The conceptThe central locking system is ready for
operation as soon as you close the front
doors. The system engages and
releases the locks on the
>doors
>luggage compartment lid/tailgate
and rear window
*
>fuel filler door.
The central locking system can be
operated
>from outside via the driver's door lock
as well as via the remote control
>from inside via the central locking
system button.
Activation from inside does not lock the
fuel filler door (refer to page 37). Activa-
tion from outside simultaneously arms
the anti-theft system. The alarm system
is also activated or deactivated.
When you use the central locking
system to lock the doors from inside
the vehicle, it will automatically disen-
gage the locks if an accident occurs,
except on doors that have been locked
individually using the lock buttons, refer
to page 37. The accident response
routine also includes automatic activa-
tion of the hazard warning flashers and
the interior lamps.
Page 34 of 186

34n
Opening and closing Ð via the remote controlThe conceptThe remote control makes opening and
locking the doors of your vehicle very
convenient. Furthermore, it provides
three additional functions which you
can only execute via the remote control:
>To switch on interior lamps, refer to
page 35.
With this function, you can also
"search for" your vehicle, when
parked in an underground garage, for
instance
>To open the luggage compartment
lid/tailgate, refer to page 35.
The luggage compartment lid/tailgate
will open slightly, regardless of
whether it was previously locked or
unlocked
>Panic mode
In case of danger, you can trigger the
alarm.
Whenever you unlock (lock) the vehicle,
you simultaneously deactivate (activate)
the anti-theft system, disarm (arm) the
alarm system and switch the interior
lamps on (off).
You can have a signal set to
confirm that the vehicle's locks
have engaged securely.<
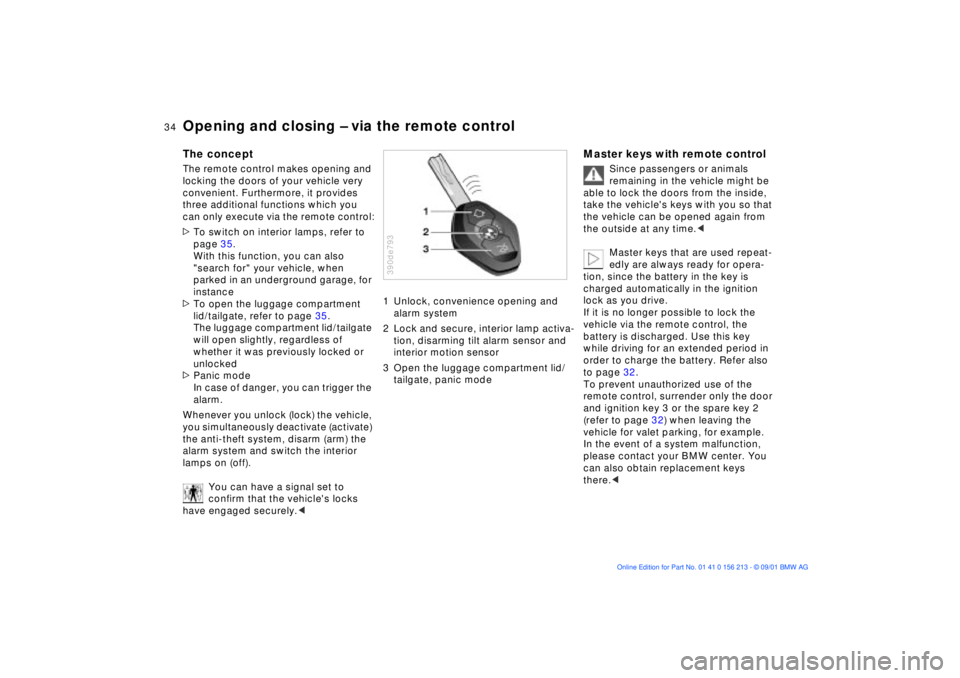
1 Unlock, convenience opening and
alarm system
2 Lock and secure, interior lamp activa-
tion, disarming tilt alarm sensor and
interior motion sensor
3 Open the luggage compartment lid/
tailgate, panic mode390de793
Master keys with remote control
Since passengers or animals
remaining in the vehicle might be
able to lock the doors from the inside,
take the vehicle's keys with you so that
the vehicle can be opened again from
the outside at any time.<
Master keys that are used repeat-
edly are always ready for opera-
tion, since the battery in the key is
charged automatically in the ignition
lock as you drive.
If it is no longer possible to lock the
vehicle via the remote control, the
battery is discharged. Use this key
while driving for an extended period in
order to charge the battery. Refer also
to page 32.
To prevent unauthorized use of the
remote control, surrender only the door
and ignition key 3 or the spare key 2
(refer to page 32) when leaving the
vehicle for valet parking, for example.
In the event of a system malfunction,
please contact your BMW center. You
can also obtain replacement keys
there.<
Page 42 of 186

42n
Luggage compartment Alarm systemLuggage strapsUse the straps on the floor of the
luggage compartment to secure smaller
items of luggage.
Movement is reduced when objects are
placed on the straps.
The fittings at the corners of the
luggage compartment provide you
with a convenient means of attaching
luggage nets
* and flexible straps for
securing suitcases and luggage.
Refer also to "Cargo loading" on
page 126.
394de302
HangerOn the left-hand side of the luggage
compartment is a hanger for fastening
shopping bags, packages and similar
items.394de144
The conceptThe vehicle alarm system responds
>when a door, the hood, the luggage
compartment lid/tailgate or the rear
window is opened
>to movement inside the vehicle (inte-
rior motion sensor)
>to variations in the vehicle's tilt angle
such as those occurring during
attempts to steal the wheels or tow
the vehicle
>to interruption of battery voltage.
The system responds to unauthorized
vehicle entry and attempted theft by
simultaneously activating the following
>an acoustic alarm for 30 seconds
>the hazard warning flashers, for
approx. five minutes
>the high beams flash on and off in the
same rhythm as the hazard warning
flashers.
Page 47 of 186

47n
OverviewControlsMaintenanceRepairsDataIndex
Sliding/tilt sunroof
*
Despite this safety feature, be
extremely careful that the travel
path of the sunroof is not obstructed
whenever it is closed. Remember that
the safety mechanism may not be able
to detect obstructions under all circum-
stances (with very thin objects, for
instance). You can disable this safety
feature by pressing the switch beyond
the pressure point and holding it.<
Sliding/tilt sunroof with glass
moonroof
*
The options and control procedures are
essentially the same as those previ-
ously described for the sliding/tilt
sunroof. In order to open the raised
roof, press the control switch towards
"Open" and maintain pressure until the
roof has reached the desired position.
The headliner insert slides back some-
what when you raise the sunroof, and
retracts along with the sunroof panel
when you slide it back. The insert then
remains open, and you can slide it back
and forth to adjust it whenever the
sunroof is not fully retracted.
Interruption in the electrical
supplyAfter interruptions in the electrical
supply (when the battery is discon-
nected, for instance), the sunroof may
only lift. To reinitialize the mechanism:
1. Raise the sliding/tilt sunroof fully
2. Press and hold the switch for approx
twenty seconds.390de725
Manual operationIn the event of an electrical malfunction,
you can also operate the sliding/tilt
sunroof manually:
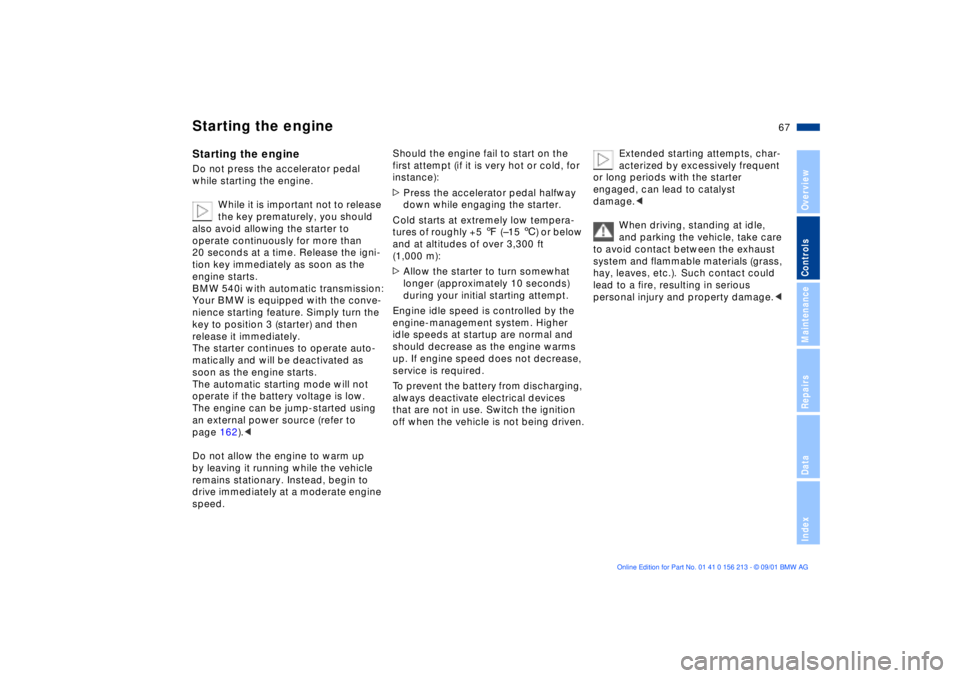
1. Remove the interior lamp, then reach
into the exposed opening and press
out the cover
2. Use the Allen key from the onboard
tool kit (refer to page 150) to turn the
sliding/tilt sunroof in the desired
direction.390de376
Page 67 of 186

67n
OverviewControlsMaintenanceRepairsDataIndex
Starting the engineStarting the engineDo not press the accelerator pedal
while starting the engine.
While it is important not to release
the key prematurely, you should
also avoid allowing the starter to
operate continuously for more than
20 seconds at a time. Release the igni-
tion key immediately as soon as the
engine starts.
BMW 540i with automatic transmission:
Your BMW is equipped with the conve-
nience starting feature. Simply turn the
key to position 3 (starter) and then
release it immediately.
The starter continues to operate auto-
matically and will be deactivated as
soon as the engine starts.
The automatic starting mode will not
operate if the battery voltage is low.
The engine can be jump-started using
an external power source (refer to
page 162).<
Do not allow the engine to warm up
by leaving it running while the vehicle
remains stationary. Instead, begin to
drive immediately at a moderate engine
speed.
Should the engine fail to start on the
first attempt (if it is very hot or cold, for
instance):
>Press the accelerator pedal halfway
down while engaging the starter.
Cold starts at extremely low tempera-
tures of roughly +5 7 (Ð15 6) or below
and at altitudes of over 3,300 ft
(1,000 m):
>Allow the starter to turn somewhat
longer (approximately 10 seconds)
during your initial starting attempt.
Engine idle speed is controlled by the
engine-management system. Higher
idle speeds at startup are normal and
should decrease as the engine warms
up. If engine speed does not decrease,
service is required.
To prevent the battery from discharging,
always deactivate electrical devices
that are not in use. Switch the ignition
off when the vehicle is not being driven.Extended starting attempts, char-
acterized by excessively frequent
or long periods with the starter
engaged, can lead to catalyst
damage.<
When driving, standing at idle,
and parking the vehicle, take care
to avoid contact between the exhaust
system and flammable materials (grass,
hay, leaves, etc.). Such contact could
lead to a fire, resulting in serious
personal injury and property damage.<
Page 87 of 186

87n
OverviewControlsMaintenanceRepairsDataIndex
Multi-Information Display (MID)
*
Central displayThe MID serves as the central display
and operation for the following onboard
systems:
>Digital clock (e. g. time display, date)
>Audio systems (radio, cassette, CD)
>Computer ( e.g. fuel consumption,
cruising range)
>Cellular phone ( e.g. dialing).
You will find explanations and informa-
tion on operating the digital clock and
the computer on the following pages.
Please refer to the separate Owner's
Manual instructions for operating the
audio systems, the cellular phone and
the computer.
The system rejects implausible
numerical entries.
Any interruption in the supply of elec-
trical power from the battery will result
in the loss of all stored data. Once the
power has been restored, you will need
to reset the clock and re-enter any
times for activating the auxiliary heater/
parked-car ventilation. Distance and
vehicle speed data must also be
entered again.<
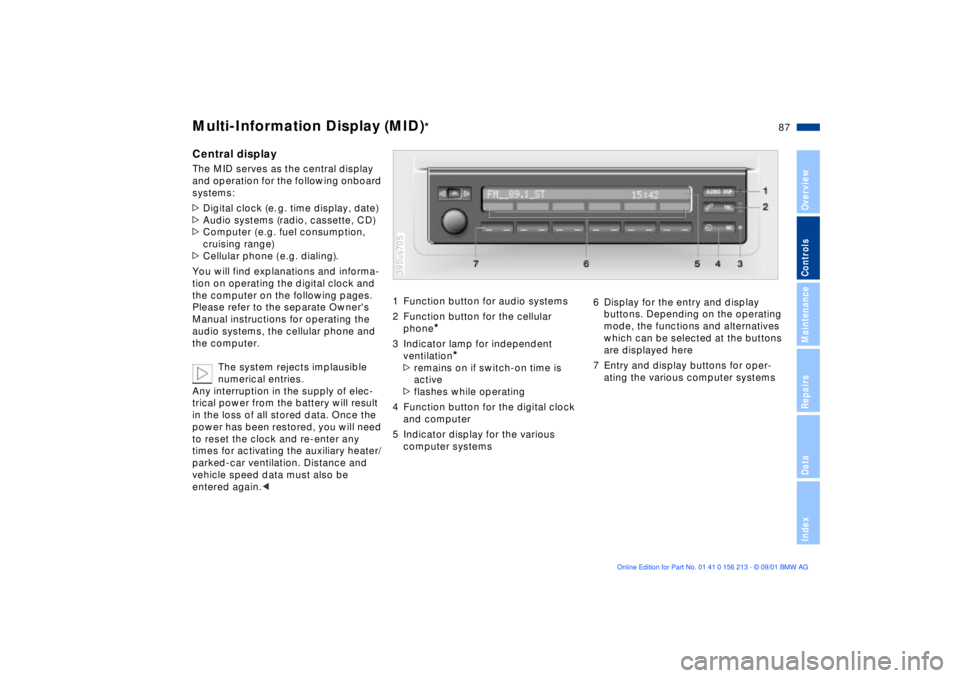
1 Function button for audio systems
2 Function button for the cellular
phone
*
3 Indicator lamp for independent
ventilation
*
>remains on if switch-on time is
active
>flashes while operating
4 Function button for the digital clock
and computer
5 Indicator display for the various
computer systems390us705
6 Display for the entry and display
buttons. Depending on the operating
mode, the functions and alternatives
which can be selected at the buttons
are displayed here
7 Entry and display buttons for oper-
ating the various computer systems