2002 BMW 525I SPORT WAGON seats
[x] Cancel search: seatsPage 4 of 186

Contents
© 2001 Bayerische Motoren Werke
Aktiengesellschaft
Munich, Germany
Reprinting, including excerpts, only with the
written consent of BMW AG, Munich.
Order No. 01 41 0 156 213
US English VIII/2001
Printed in Germany
Printed on environmentally friendly paper
(bleached without chlorine, suitable for recycling).
Overview
Controls and features
Cockpit14
Instrument cluster15
Indicator and warning lamps19
Steering wheel with multifunction
buttons22
Warning triangle23
First-aid kit23
Refueling24
Fuel specifications25
Tire inflation pressure26
Locks and security systems:
Keys32
Central locking system32
Opening and closing Ð via the
door lock33
Opening and closing Ð via the
remote control34
Opening and closing Ð from the
inside37
Luggage compartment lid/
Tailgate38
Rear window40
Luggage compartment42
Alarm system42
Electric power windows44
Sliding/tilt sunroof46
Adjustments:
Correct sitting posture48
Seats48
Manually-adjusted seat49
Electric power seats50
Head restraints52
BMW actice seat52
Safety belts53
Seat, mirror and steering wheel
memory54
Seat heating55
Adjusting steering wheel56
Heated steering wheel56
Mirrors57
Passenger safety systems:
Airbags58
Transporting children safely61
Vehicle Memory, Key
Memory64
Driving:
Steering/Ignition lock66
Starting the engine66
Switching off the engine68
Parking brake68
Manual transmission69
Automatic transmission70
Automatic transmission with
Steptronic73
Indicator/Headlamp flasher76
Washer/Wiper system/Rain
sensor76
Cruise control78
Everything under control:
Odometer, outside temperature
display80
Tachometer81
Energy control81
Fuel gauge81
Coolant temperature gauge82
Service Interval Display82
Check Control83
Computer86
Multi-Information Display
(MID)87
Digital clock in the MID89
Computer in the MID91
Contents
Page 48 of 186

48n
For relaxed and fatigue-free driving you
should select a sitting position that
reflects your personal requirements.
Correct posture combines with safety
belts and airbags to enhance occupant
safety in the event of an accident. To
ensure that the vehicle's safety systems
provide you with optimal protection, we
request that you direct your careful
attention to the following section.
For additional information on trans-
porting children, refer to page 61.
Sitting correctly with airbags
Always maintain an adequate
distance between yourself and the
airbags. Always hold the steering wheel
by the rim to keep any chance of injury
to hands or arms to an absolute
minimum should the airbag be
deployed. Never allow any objects,
individuals or animals to obstruct the
areas between passengers and airbags.
Never use the front airbag's cover as a
storage tray or support for objects of
any kind. Never allow front passengers
to rest their feet or legs on the airbag
cover.<
For airbag locations and additional
information on airbags refer to page 58.
Safe with safety belts
Never allow more than one person
to wear a single safety belt. Never
allow infants or small children to ride in
a passenger's lap. Avoid twisting the
belt while routing it firmly across the
pelvis and shoulder, wear it as snugly
against your body as possible. Do not
allow the belt to rest against hard or
fragile objects in your pockets. Do not
route the belt across your neck, or run it
across sharp edges. Avoid wearing
bulky clothing and pull on the lap belt
periodically to retention it over your
shoulders. In the event of a frontal
impact, a loose lap belt could slide over
the hips, leading to abdominal injury. In
addition, the safety belt's restraint
effectiveness is reduced if it is worn
loosely. Expectant mothers should
always wear their safety belts, taking
care to position the lap belt against the
lower hips, where it will not exert pres-
sure against the abdominal area.<
For information on using the safety
belts refer to page 53.
When adjusting your seat, always
observe the following precautions
Never try to adjust your seat while
operating the vehicle. The seat
could respond with an unexpected
movement, and the ensuing loss of
vehicle control could lead to an acci-
dent. Never ride with the backrest
reclined to an extreme horizontal angle
(important for front passengers to
remember), otherwise, there is a risk
that you will slide under the safety belt
in an accident, thus negating the
protection the safety belt provides.
Do not move the seats to the rear when
the vehicle is at an extreme angle (on
garage ramps or steep slopes, for
example). If you do so, the automatic
safety belt height adjustment can be
disengaged.<
Seat adjustment>Manually-adjusted seat, refer to
page 49
>Electric power seats, refer to page 50
>Head restraints, refer to page 52
>BMW active seat, refer to page 52
Correct sitting posture Seats
Page 49 of 186
49n
OverviewControlsMaintenanceRepairsDataIndex
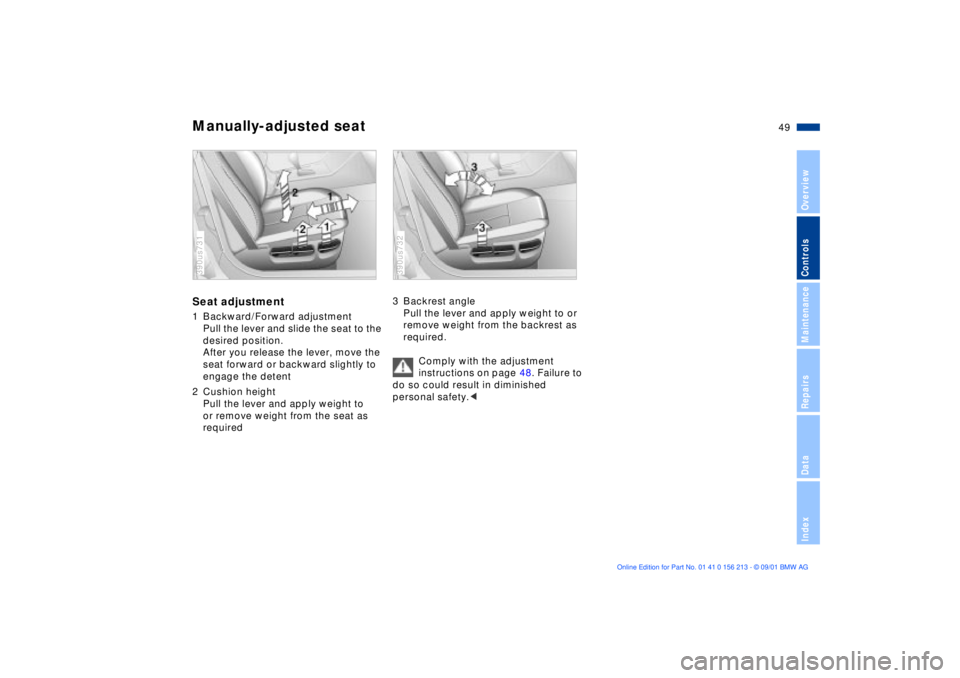
Manually-adjusted seatSeat adjustment1 Backward/Forward adjustment
Pull the lever and slide the seat to the
desired position.
After you release the lever, move the
seat forward or backward slightly to
engage the detent
2 Cushion height
Pull the lever and apply weight to
or remove weight from the seat as
required390us731
3 Backrest angle
Pull the lever and apply weight to or
remove weight from the backrest as
required.
Comply with the adjustment
instructions on page 48. Failure to
do so could result in diminished
personal safety.< 390us732
Page 50 of 186
50n
Electric power seats
*
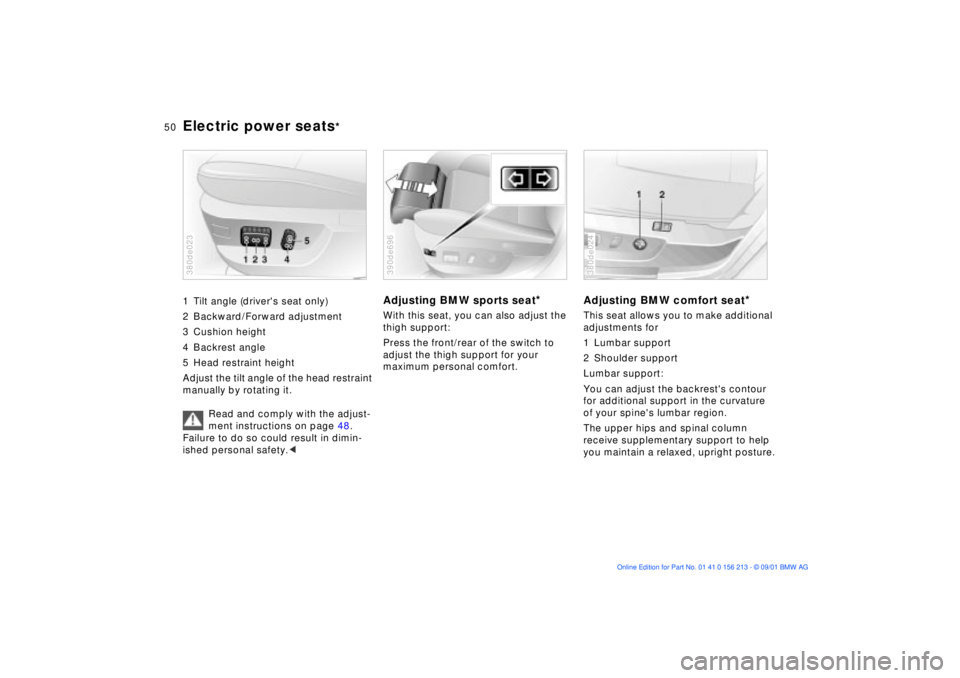
1 Tilt angle (driver's seat only)
2 Backward/Forward adjustment
3 Cushion height
4 Backrest angle
5 Head restraint height
Adjust the tilt angle of the head restraint
manually by rotating it.
Read and comply with the adjust-
ment instructions on page 48.
Failure to do so could result in dimin-
ished personal safety.< 380de023
Adjusting BMW sports seat
*
With this seat, you can also adjust the
thigh support:
Press the front/rear of the switch to
adjust the thigh support for your
maximum personal comfort.390de696
Adjusting BMW comfort seat
*
This seat allows you to make additional
adjustments for
1 Lumbar support
2 Shoulder support
Lumbar support:
You can adjust the backrest's contour
for additional support in the curvature
of your spine's lumbar region.
The upper hips and spinal column
receive supplementary support to help
you maintain a relaxed, upright posture.380de024
Page 51 of 186
51n
OverviewControlsMaintenanceRepairsDataIndex
Electric power seats
*
>Press the front/rear of the switch:
Increase/decrease curvature
>Press the upper/lower end of the
switch:
Increase the upper/lower curvature.
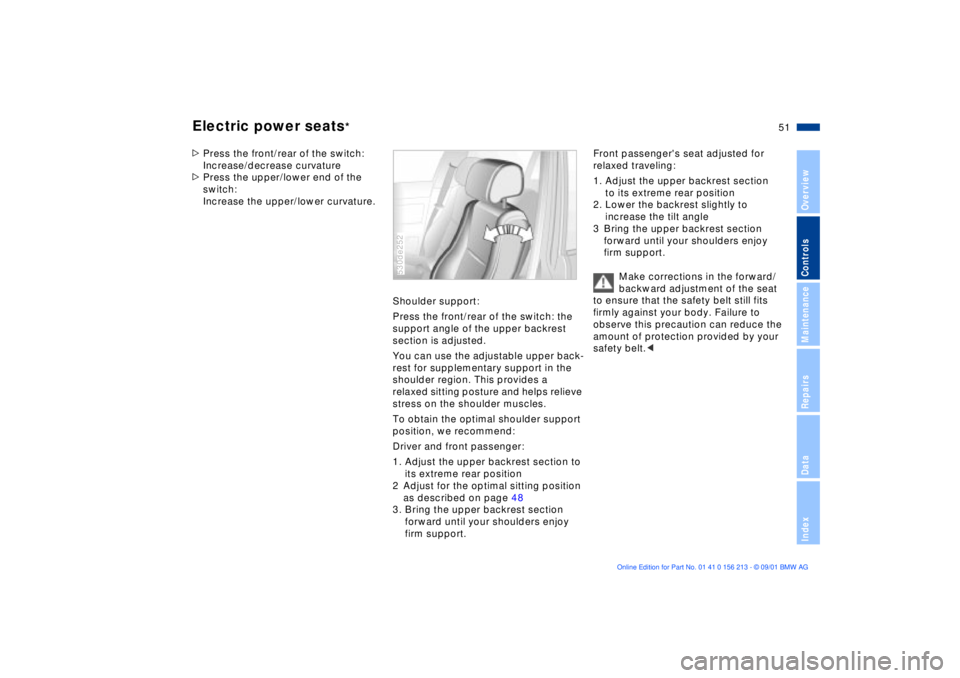
Shoulder support:
Press the front/rear of the switch: the
support angle of the upper backrest
section is adjusted.
You can use the adjustable upper back-
rest for supplementary support in the
shoulder region. This provides a
relaxed sitting posture and helps relieve
stress on the shoulder muscles.
To obtain the optimal shoulder support
position, we recommend:
Driver and front passenger:
1. Adjust the upper backrest section to
its extreme rear position
2 Adjust for the optimal sitting position
as described on page 48
3. Bring the upper backrest section
forward until your shoulders enjoy
firm support.
530de252
Front passenger's seat adjusted for
relaxed traveling:
1. Adjust the upper backrest section
to its extreme rear position
2. Lower the backrest slightly to
increase the tilt angle
3 Bring the upper backrest section
forward until your shoulders enjoy
firm support.
Make corrections in the forward/
backward adjustment of the seat
to ensure that the safety belt still fits
firmly against your body. Failure to
observe this precaution can reduce the
amount of protection provided by your
safety belt.<
Page 116 of 186
116n
Glove compartment Storage compartmentsTo openPull the handle and the lamp comes on.To closeFold the cover up.
To prevent injury in the event of an
accident, close the glove
compartment immediately after use.< 390de738
To lockUse one of the master keys. A master
key is also required for unlocking.
For example, if you turn over only
your door and ignition keys for
valet parking (refer to page 32), access
to the glove compartment is not
possible.< Rechargeable flashlight
*
Located on the left-hand side of the
glove compartment.
Features integral overload-protection,
so it can be left in its holder continu-
ously.
Be sure that the flashlight is
switched off when it is inserted
into its holder. To avoid completely
discharging and possibly damaging the
lamp, always ensure that it is switched
off before inserting it in the socket.<
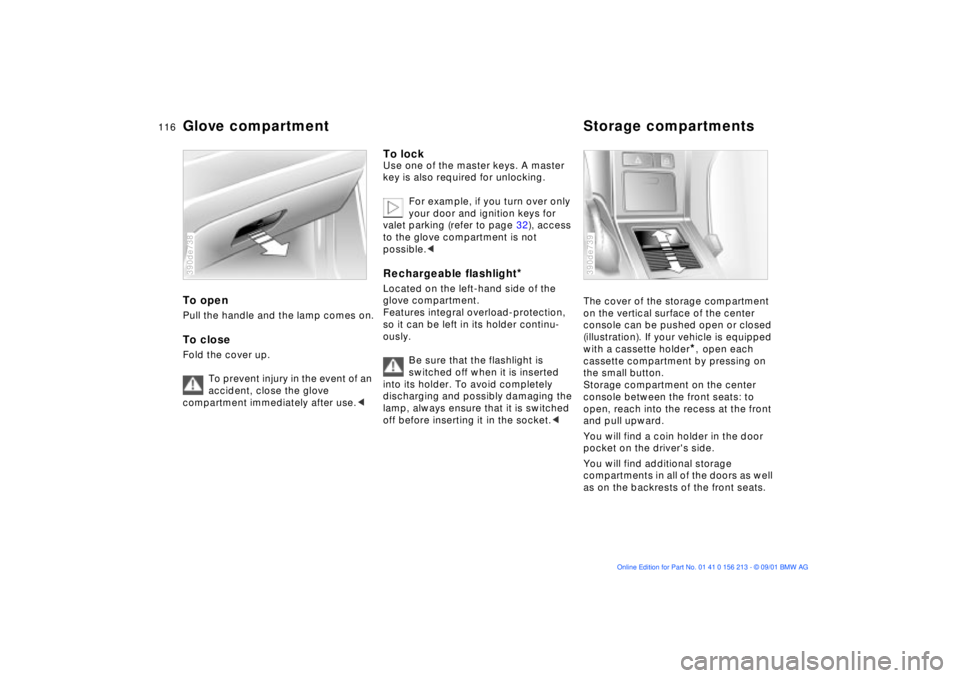
The cover of the storage compartment
on the vertical surface of the center
console can be pushed open or closed
(illustration). If your vehicle is equipped
with a cassette holder
*, open each
cassette compartment by pressing on
the small button.
Storage compartment on the center
console between the front seats: to
open, reach into the recess at the front
and pull upward.
You will find a coin holder in the door
pocket on the driver's side.
You will find additional storage
compartments in all of the doors as well
as on the backrests of the front seats.
390de739
Page 121 of 186
121n
OverviewControlsMaintenanceRepairsDataIndex
Ski bag
*
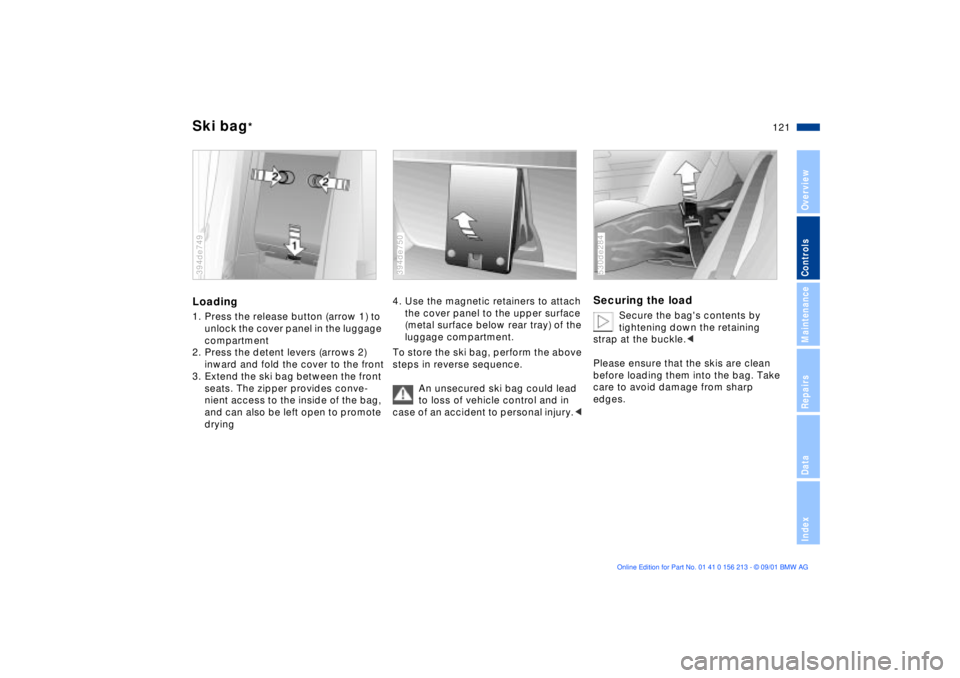
Loading1. Press the release button (arrow 1) to
unlock the cover panel in the luggage
compartment
2. Press the detent levers (arrows 2)
inward and fold the cover to the front
3. Extend the ski bag between the front
seats. The zipper provides conve-
nient access to the inside of the bag,
and can also be left open to promote
drying394de749
4. Use the magnetic retainers to attach
the cover panel to the upper surface
(metal surface below rear tray) of the
luggage compartment.
To store the ski bag, perform the above
steps in reverse sequence.
An unsecured ski bag could lead
to loss of vehicle control and in
case of an accident to personal injury.< 394de750
Securing the load
Secure the bag's contents by
tightening down the retaining
strap at the buckle.<
Please ensure that the skis are clean
before loading them into the bag. Take
care to avoid damage from sharp
edges.
530de284
Page 123 of 186
123n
OverviewControlsMaintenanceRepairsDataIndex
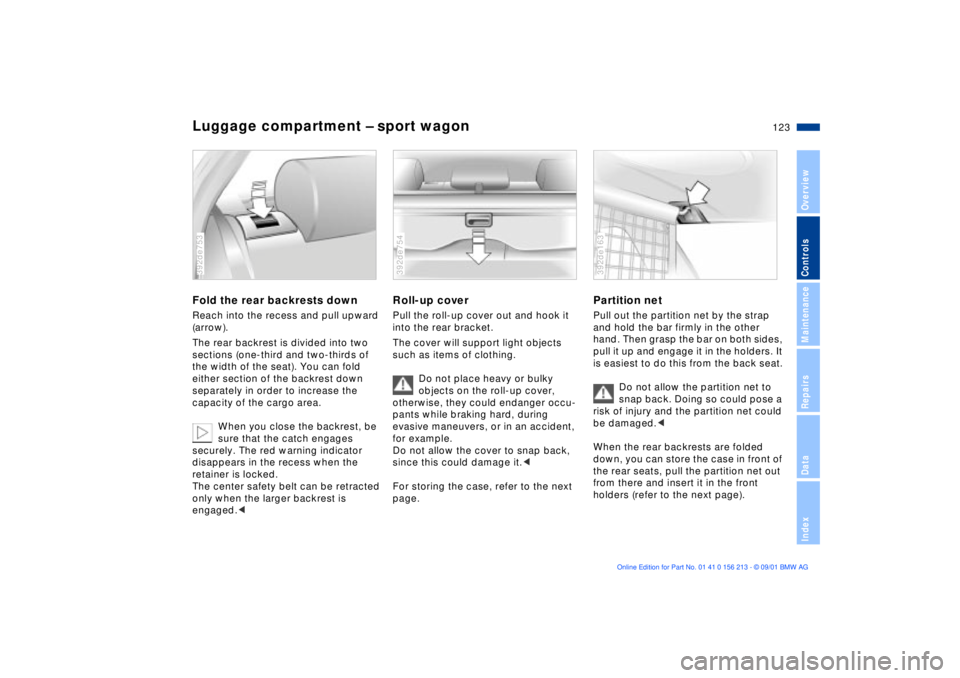
Luggage compartment Ð sport wagonFold the rear backrests downReach into the recess and pull upward
(arrow).
The rear backrest is divided into two
sections (one-third and two-thirds of
the width of the seat). You can fold
either section of the backrest down
separately in order to increase the
capacity of the cargo area.
When you close the backrest, be
sure that the catch engages
securely. The red warning indicator
disappears in the recess when the
retainer is locked.
The center safety belt can be retracted
only when the larger backrest is
engaged.<392de753
Roll-up coverPull the roll-up cover out and hook it
into the rear bracket.
The cover will support light objects
such as items of clothing.
Do not place heavy or bulky
objects on the roll-up cover,
otherwise, they could endanger occu-
pants while braking hard, during
evasive maneuvers, or in an accident,
for example.
Do not allow the cover to snap back,
since this could damage it.<
For storing the case, refer to the next
page.392de754
Partition netPull out the partition net by the strap
and hold the bar firmly in the other
hand. Then grasp the bar on both sides,
pull it up and engage it in the holders. It
is easiest to do this from the back seat.
Do not allow the partition net to
snap back. Doing so could pose a
risk of injury and the partition net could
be damaged.<
When the rear backrests are folded
down, you can store the case in front of
the rear seats, pull the partition net out
from there and insert it in the front
holders (refer to the next page).392de163