Page 162 of 626
3 - 10
INSP
ADJ
THROTTLE CABLE ADJUSTMENT
EC35A001
THROTTLE CABLE ADJUSTMENT
1. Check:
lThrottle grip free play a
Out of specification ® Adjust.
Throttle grip free play a:
3 ~ 5 mm (0.12 ~ 0.20 in)
2. Adjust:
lThrottle grip free play
Throttle grip free play adjustment steps:
lRemove the throttle cable cover 1.
NOTE:
lBefore adjusting the throttle cable free
play, the engine idle speed should be
adjusted.
lWhen the motorcycle is accelerating,
throttle cable #1 2 is pulled and throttle
cable #2 3 is pushed.
1st step:
lLoosen the locknuts 4 on throttle cable #2.
lAdjust the free play by changing their
tightening position.
2nd step:
lLoosen the locknuts 5 on throttle cable #1.
lAdjust the free play by changing their
tightening position.
lTighten the locknuts.
WARNING
After adjusting, turn the handlebar to
right and left and make sure that the
engine idling does not run faster.
lInstall the throttle cable cover.
Page 168 of 626
3 - 13
INSP
ADJ
ENGINE OIL LEVEL INSPECTION
6. Apply:
lLithium soap base grease
On the matching surface a on air filter
element.
7. Install:
lAir filter element 1
lWasher
lFitting bolt
NOTE:
Align the projection a on filter guide with the
hole b in air filter case.
T R..2 Nm (0.2 m · kg, 1.4 ft · lb)
ENGINE OIL LEVEL INSPECTION
1. Stand the motorcycle on a level surface.
NOTE:
lWhen checking the oil level make sure that
the motorcycle is upright.
lPlace the motorcycle on a suitable stand.
WARNING
Never remove the oil tank cap just after
high speed operation. The heated oil could
spurt out. causing danger. Wait until the oil
cools down to approximately 70 ˚C (158 ˚F).
2. Idle the engine more than 3 minutes
while keeping the motorcycle upright.
Then stop the engine and inspect the oil
level.
3. Remove:
lOil tank cap 1
Page 192 of 626

3 - 24
INSP
ADJ
CHASSIS/BRAKE SYSTEM AIR BLEEDING
EC360000
CHASSIS
EC361012
BRAKE SYSTEM AIR BLEEDING
WARNING
Bleed the brake system if:
l
The system has been disassembled.
l
A brake hose has been loosened or
removed.
l
The brake fluid is very low.
l
The brake operation is faulty.
A dangerous loss of braking performance
may occur if the brake system is not prop-
erly bleed.
1. Remove:
l
Master cylinder cap
l
Diaphragm
l
Protector (rear brake)
2. Bleed:
l
Brake fluid
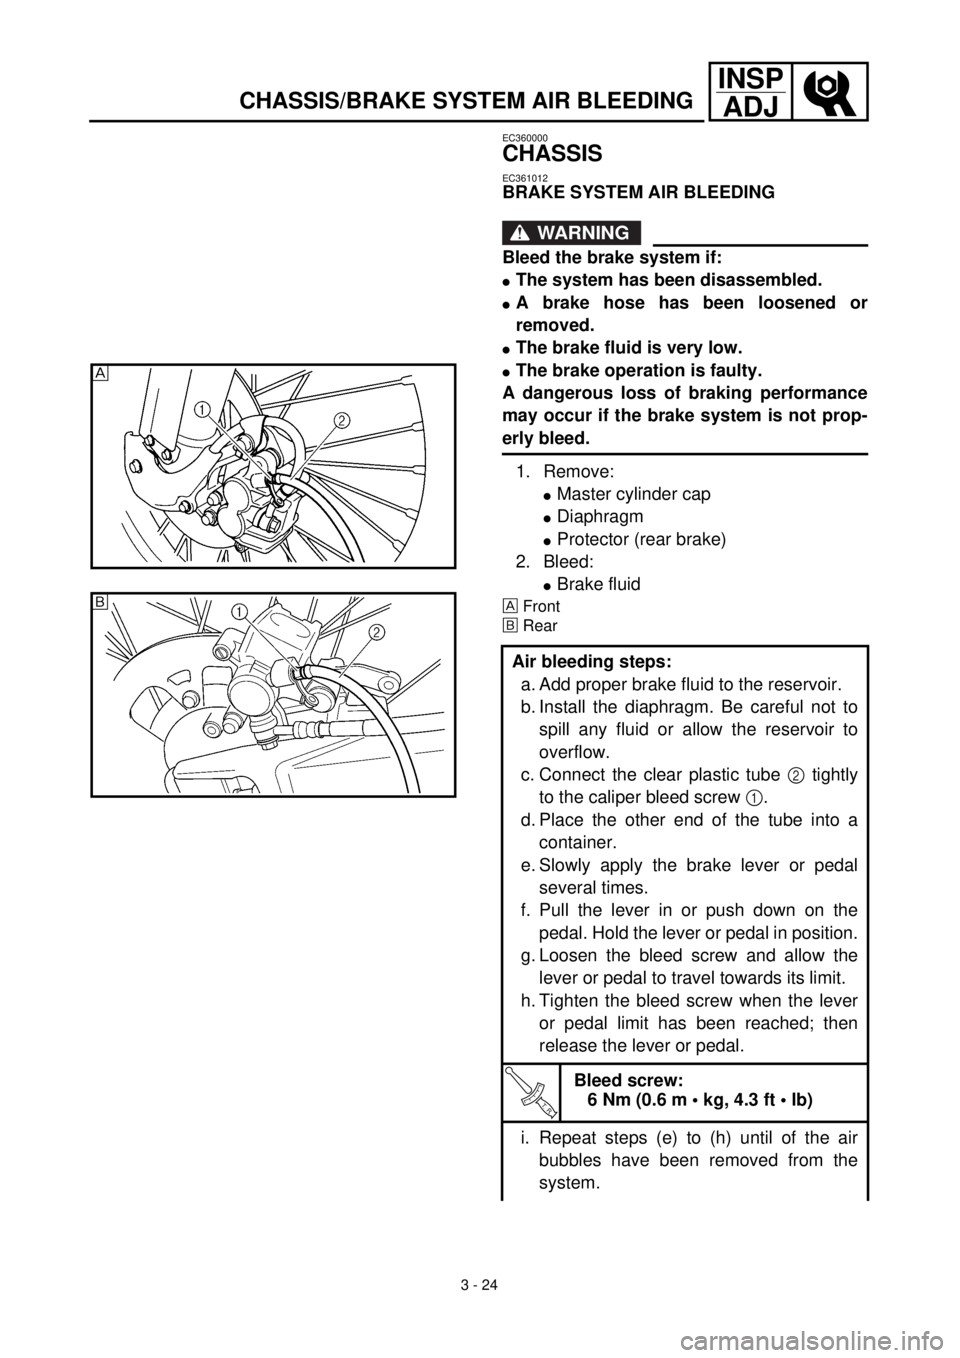
Front
õ
Rear
Air bleeding steps:
a. Add proper brake fluid to the reservoir.
b. Install the diaphragm. Be careful not to
spill any fluid or allow the reservoir to
overflow.
c. Connect the clear plastic tube
2
tightly
to the caliper bleed screw
1
.
d. Place the other end of the tube into a
container.
e. Slowly apply the brake lever or pedal
several times.
f. Pull the lever in or push down on the
pedal. Hold the lever or pedal in position.
g. Loosen the bleed screw and allow the
lever or pedal to travel towards its limit.
h. Tighten the bleed screw when the lever
or pedal limit has been reached; then
release the lever or pedal.
T R..
Bleed screw:
6 Nm (0.6 m • kg, 4.3 ft • lb)
i. Repeat steps (e) to (h) until of the air
bubbles have been removed from the
system.
õ
Page 194 of 626
3 - 25
INSP
ADJ
FRONT BRAKE ADJUSTMENT
3. Install:
l
Protector (rear brake)
l
Diaphragm
l
Master cylinder cap
NOTE:
If bleeding is difficult, it may be necessary to
let the brake fluid system stabilize for a few
hours. Repeat the bleeding procedure when
the tiny bubbles in the system have disap-
peared.
j. Add brake fluid to the level line on the
reservoir.
WARNING
Check the operation of the brake after
bleeding the brake system.
EC362040
FRONT BRAKE ADJUSTMENT
1. Check:
l
Brake lever position
a
Brake lever position
a
:
Standard position Extent of adjustment
95 mm (3.74 in)76 ~ 97 mm
(2.99 ~ 3.82 in)
2. Adjust:
l
Brake lever position
Brake lever position adjustment steps:
l
Loosen the locknut
1
.
l
Turn the adjusting bolt
2
until the lever
position
a
is within specified position.
l
Tighten the locknut.
T R..
Locknut:
5 Nm (0.5 m • kg, 3.6 ft • lb)
CAUTION:
Be sure to tighten the locknut, as it will
cause poor brake performance.
2
1
Page 196 of 626

3 - 26
INSP
ADJREAR BRAKE ADJUSTMENT/
FRONT BRAKE PAD INSPECTION AND REPLACEMENT
EC364002
REAR BRAKE ADJUSTMENT
1. Check:
lBrake pedal height a
Out of specification ® Adjust.
Brake pedal height a:
5 mm (0.20 in)
2. Adjust:
lBrake pedal height
Pedal height adjustment steps:
lLoosen the locknut 1.
lTurn the adjusting nut 2 until the pedal
height a is within specified height.
lTighten the locknut.
WARNING
lAdjust the pedal height between the
maximum and the minimum õ as
shown. (In this adjustment the bolt 3
end b should protrude out of the lower
adjusting nut 4 but not be less than
2 mm (0.08 in) c away from the brake
pedal 5).
lAfter the pedal height adjustment, make
sure that the rear brake does not drag.
õ
EC365080
FRONT BRAKE PAD INSPECTION AND
REPLACEMENT
1. Inspect:
lBrake pad thickness a
Out of specification ® Replace as a
set.
2. Replace:
lBrake pad
Brake pad thickness a:
Standard
4.4 mm (0.17 in) 1.0 mm (0.04 in)
Brake pad replacement steps:
lRemove the pad pin plug 1.
Page 204 of 626

3 - 30
INSP
ADJREAR BRAKE PAD INSULATOR INSPECTION/
BRAKE FLUID LEVEL INSPECTION
3. Inspect:
lBrake fluid level
Refer to “BRAKE FLUID LEVEL
INSPECTION” section.
4. Check:
lBrake pedal operation
A softy or spongy feeling ® Bleed
brake system.
Refer to “BRAKE SYSTEM AIR
BLEEDING” section.
EC36b000
REAR BRAKE PAD INSULATOR
INSPECTION
1. Remove:
lBrake pad
Refer to “REAR BRAKE PAD INSPEC-
TION AND REPLACEMENT” section.
2. Inspect:
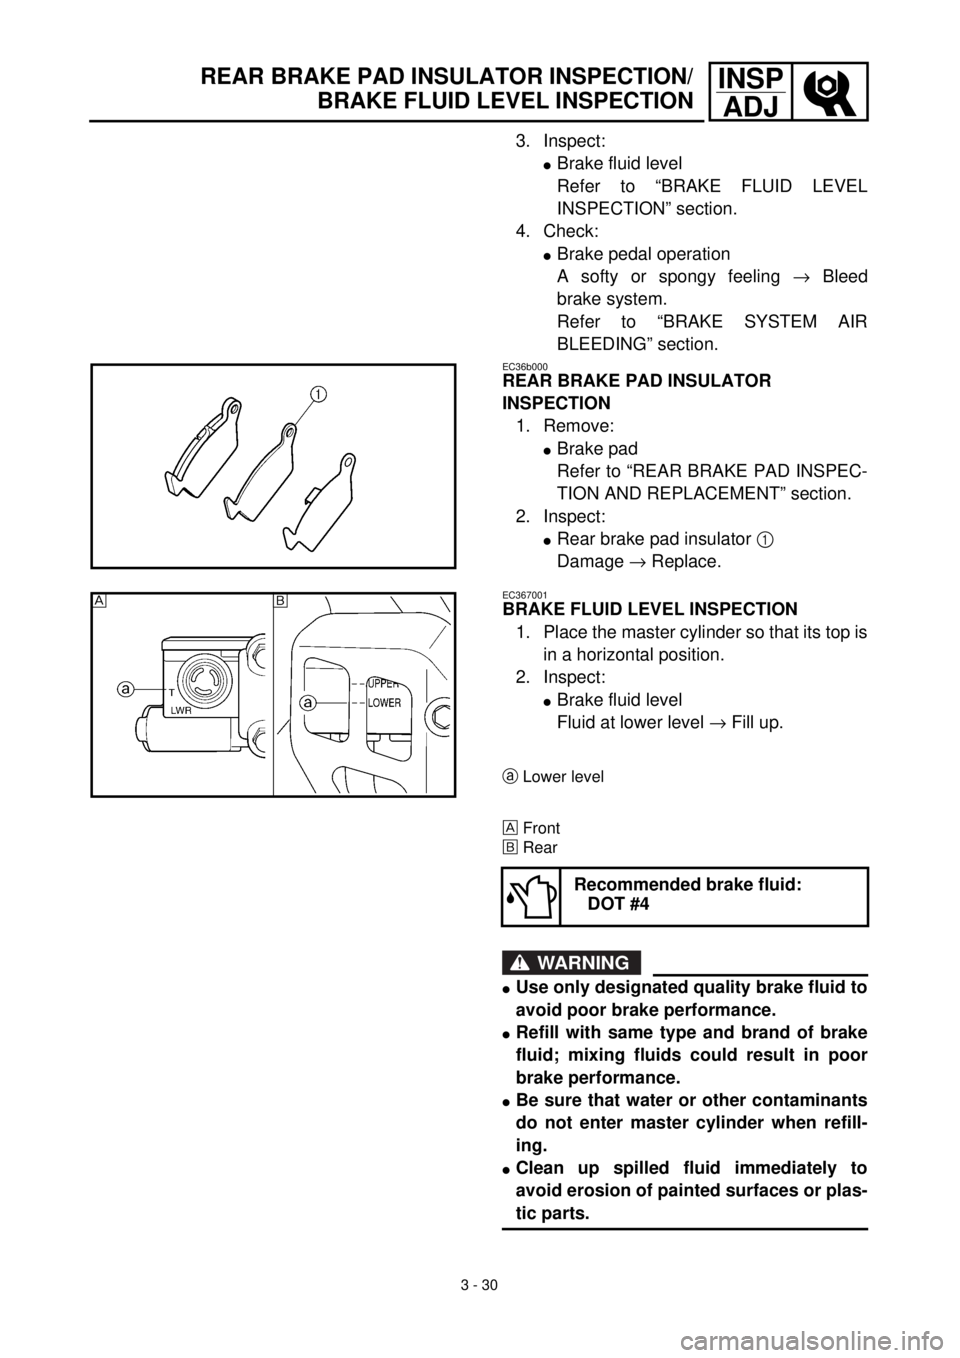
lRear brake pad insulator 1
Damage ® Replace.
EC367001
BRAKE FLUID LEVEL INSPECTION
1. Place the master cylinder so that its top is
in a horizontal position.
2. Inspect:
lBrake fluid level
Fluid at lower level ® Fill up.
aLower level
Front
õRear
WARNING
lUse only designated quality brake fluid to
avoid poor brake performance.
lRefill with same type and brand of brake
fluid; mixing fluids could result in poor
brake performance.
lBe sure that water or other contaminants
do not enter master cylinder when refill-
ing.
lClean up spilled fluid immediately to
avoid erosion of painted surfaces or plas-
tic parts.
Recommended brake fluid:
DOT #4
õ
Page 214 of 626
3 - 35
INSP
ADJFRONT FORK COMPRESSION DAMPING FORCE
ADJUSTMENT
CAUTION:
Do not force the adjuster past the minimum
or maximum extent of adjustment. The
adjuster may be damaged.
WARNING
Always adjust each front fork to the same
setting. Uneven adjustment can cause poor
handling and loss of stability.
EC36J001
FRONT FORK COMPRESSION DAMPING
FORCE ADJUSTMENT
1. Remove:
lRubber cap
2. Adjust:
lCompression damping force
By turning the adjuster 1.
Stiffer a ®Increase the compression
damping force. (Turn the
adjuster 1 in.)
Softer b ®Decrease the compression
damping force. (Turn the
adjuster 1 out.)
Extent of adjustment:
Maximum Minimum
Fully turned in
position20 clicks out
(from maximum
position)
Page 216 of 626
3 - 36
INSP
ADJ
REAR SHOCK ABSORBER INSPECTION
lSTANDARD POSITION:
This is the position which is back by the spe-
cific number of clicks from the fully turned-in
position.
* For EUROPE
CAUTION:
Do not force the adjuster past the minimum
or maximum extent of adjustment. The
adjuster may be damaged.
WARNING
Always adjust each front fork to the same
setting. Uneven adjustment can cause poor
handling and loss of stability.
3. Install:
lRubber cap
Standard position:
8 clicks out
*12 clicks out
EC36K000
REAR SHOCK ABSORBER INSPECTION
1. Inspect:
lSwingarm smooth action
Abnormal noise/unsmooth action ®
Grease the pivoting points or repair the
pivoting points.
Damage/oil leakage ® Replace.