2001 YAMAHA XVZ1300TF oil level
[x] Cancel search: oil levelPage 13 of 132

DESCRIPTION
2-2
2
Right view12. Muffler
13. Owner’s tool kit (page 7-1)
14. Helmet holder (page 3-15)
15. Travel trunk (page 3-17)
16. Passenger seat
17. Shock absorber assembly air valve (page 3-20)
18. Rider seat (page 3-15)
19. Fuel tank (page 3-12)
20. Front fork air valve (page 3-19)21. Headlight (page 7-35)
22. Front turn signal lights (page 7-36)
23. Fuse box 1 (page 7-33)
24. Brake pedal (page 3-11)
25. Engine oil level check window (page 7-12)
26. Rider footrest
27. Coolant reservoir (page 7-15)
28. Passenger footrest
E_5jc.book Page 2 Monday, January 22, 2001 12:12 PM
Page 18 of 132

INSTRUMENT AND CONTROL FUNCTIONS
3-3
3
EAU03034
Indicator and warning lights
EAU03299
1. Turn signal indicator lights
“” / “ ”
The corresponding indicator light flash-
es when the turn signal switch is
pushed to the left or right.
EAU00063
2. High beam indicator light “ ”
This indicator light comes on when the
high beam of the headlight is switched
on.
EAU03201
3. Oil level warning light “ ”
This warning light comes on when the
engine oil level is low.
The electrical circuit of the warning light
can be checked according to the fol-
lowing procedure.
1. Set the engine stop switch to “ ”
and turn the key to “ON”.
2. Shift the transmission into the neu-
tral position or pull the clutch lever.
3. Push the start switch. If the warn-
ing light does not come on while
pushing the start switch, have a
Yamaha dealer check the electri-
cal circuit.
NOTE:@ Even if the oil level is sufficient, the
warning light may flicker when riding on
a slope or during sudden acceleration
or deceleration, but this is not a mal-
function. @
EAU01774
4. Overdrive indicator light “O/D”
This indicator light comes on when the
transmission is in overdrive (5th gear).
EAU00091
5. Engine trouble warning light
“”
This warning light comes on or flashes
when an electrical circuit monitoring
the engine is defective. When this oc-
curs, have the Yamaha dealer check
the self-diagnosis system.
E_5jc.book Page 3 Monday, January 22, 2001 12:12 PM
Page 62 of 132

5-1
5
EAU01114
5-PRE-OPERATION CHECKSThe condition of a vehicle is the owner’s responsibility. Vital components can start to deteriorate quickly and unexpectedly,
even if the vehicle remains unused (for example, as a result of exposure to the elements). Any damage, fluid leakage or loss
of tire air pressure could have serious consequences. Therefore, it is very important, in addition to a thorough visual inspec-
tion, to check the following points before each ride.
EAU03439
Pre-operation check list
ITEM CHECKS PAGE
Fuel• Check fuel level in fuel tank.
• Refuel if necessary.
• Check fuel line for leakage.3-12
Engine oil• Check oil level in engine.
• If necessary, add recommended oil to specified level.
• Check vehicle for oil leakage.7-12
Final gear oil• Check vehicle for oil leakage. 7-15
Coolant• Check coolant level in reservoir.
• If necessary, add recommended coolant to specified level.
• Check cooling system for leakage.7-15–7-16
Front brake• Check operation.
• If soft or spongy, have Yamaha dealer bleed hydraulic system.
• Check lever free play.
• Adjust if necessary.
• Check fluid level in reservoir.
• If necessary, add recommended brake fluid to specified level.
• Check hydraulic system for leakage.7-25, 7-27–7-29
Rear brake• Check operation.
• If soft or spongy, have Yamaha dealer bleed hydraulic system.
• Check fluid level in reservoir.
• If necessary, add recommended brake fluid to specified level.
• Check hydraulic system for leakage.7-26–7-29
E_5jc.book Page 1 Monday, January 22, 2001 12:12 PM
Page 73 of 132

7
PERIODIC MAINTENANCE AND MINOR REPAIR
Owner’s tool kit .................................................... 7-1
Periodic maintenance and lubrication chart ......... 7-3
Removing and installing cowlings and panels ..... 7-6
Checking the spark plugs .................................. 7-11
Engine oil and oil filter cartridge ........................ 7-12
Final gear oil ...................................................... 7-15
Checking the coolant level ................................. 7-15
Cleaning the air filter elements .......................... 7-17
Adjusting the carburetors ................................... 7-19
Adjusting the engine idling speed ...................... 7-20
Adjusting the throttle cable free play .................. 7-21
Adjusting the valve clearance ............................ 7-21
Tires ................................................................... 7-21
Cast wheels ....................................................... 7-24
Clutch lever free play ......................................... 7-25
Adjusting the brake lever free play ..................... 7-25
Adjusting the brake pedal position ..................... 7-26
Adjusting the rear brake light switch .................. 7-26Checking the front and rear brake pads ............ 7-27
Checking the brake and clutch fluid levels ........ 7-28
Changing the brake and clutch fluids ................ 7-29
Checking and lubricating the brake and
shift pedals ...................................................... 7-29
Checking and lubricating the brake and
clutch levers .................................................... 7-30
Checking and lubricating the sidestand ............ 7-30
Checking the front fork ...................................... 7-31
Checking the steering ....................................... 7-31
Battery ............................................................... 7-32
Replacing the fuses .......................................... 7-33
Replacing the headlight bulb ............................. 7-35
Replacing a turn signal light bulb or the
tail/brake light bulb .......................................... 7-36
Replacing the license plate light bulb ................ 7-37
Troubleshooting ................................................. 7-37
Troubleshooting charts ...................................... 7-38
E_5jc.book Page 1 Monday, January 22, 2001 12:12 PM
Page 77 of 132

PERIODIC MAINTENANCE AND MINOR REPAIR
7-4
7
10
*Wheels• Check runout and for damage.ÖÖÖÖ
11*Tires• Check tread depth and for damage.
• Replace if necessary.
• Check air pressure.
• Correct if necessary.ÖÖÖÖ
12*Wheel bearings• Check bearing for looseness or damage.ÖÖÖÖ
13*Swingarm• Check operation and for excessive play.ÖÖÖÖ
• Lubricate with lithium-soap-based grease. Every 50,000 km
14*Steering bearings• Check bearing play and steering for roughness.ÖÖÖÖÖ
• Lubricate with lithium-soap-based grease. Every 50,000 km
15*Chassis fasteners• Make sure that all nuts, bolts and screws are properly tightened.ÖÖÖÖ Ö
16 Sidestand• Check operation.
• Lubricate.ÖÖÖÖ Ö
17*Sidestand switch• Check operation.ÖÖÖÖÖ Ö
18*Front fork• Check operation and for oil leakage.ÖÖÖÖ
19*Shock absorber
assembly• Check operation and shock absorber for oil leakage.ÖÖÖÖ
20*Rear suspension relay
arm and connecting arm
pivoting points• Check operation.ÖÖÖÖ
• Lubricate with lithium-soap-based grease.ÖÖ
21*Carburetors• Check starter (choke) operation.
• Adjust engine idling speed and synchronization.ÖÖÖÖÖ Ö
22 Engine oil• Change.ÖÖÖÖÖ Ö
23 Engine oil filter cartridge• Replace.ÖÖÖ
24*Cooling system• Check coolant level and vehicle for coolant leakage.ÖÖÖÖ Ö
• Change. Every 3 years NO. ITEM CHECK OR MAINTENANCE JOBODOMETER READING (´1,000 km)
ANNUAL
CHECK
1 10203040
E_5jc.book Page 4 Monday, January 22, 2001 12:12 PM
Page 78 of 132

PERIODIC MAINTENANCE AND MINOR REPAIR
7-5
7
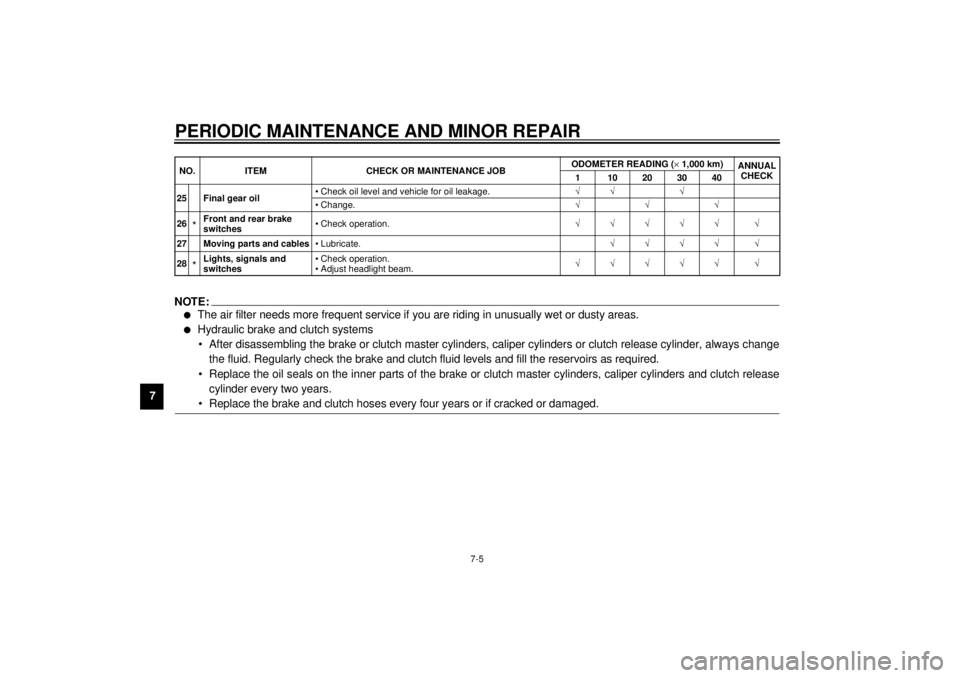
EAU03892
NOTE:_ l
The air filter needs more frequent service if you are riding in unusually wet or dusty areas.
l
Hydraulic brake and clutch systems
• After disassembling the brake or clutch master cylinders, caliper cylinders or clutch release cylinder, always change
the fluid. Regularly check the brake and clutch fluid levels and fill the reservoirs as required.
• Replace the oil seals on the inner parts of the brake or clutch master cylinders, caliper cylinders and clutch release
cylinder every two years.
• Replace the brake and clutch hoses every four years or if cracked or damaged.
_25 Final gear oil• Check oil level and vehicle for oil leakage.ÖÖ Ö
• Change.ÖÖÖ
26
*Front and rear brake
switches• Check operation.ÖÖÖÖÖ Ö
27 Moving parts and cables• Lubricate.ÖÖÖÖ Ö
28*Lights, signals and
switches• Check operation.
• Adjust headlight beam.ÖÖÖÖÖ Ö NO. ITEM CHECK OR MAINTENANCE JOBODOMETER READING (´1,000 km)
ANNUAL
CHECK
1 10203040
E_5jc.book Page 5 Monday, January 22, 2001 12:12 PM
Page 85 of 132

PERIODIC MAINTENANCE AND MINOR REPAIR
7-12
7
EAU01703
Engine oil and oil filter
cartridge The engine oil level should be checked
before each ride. In addition, the oil
must be changed and the oil filter car-
tridge replaced at the intervals speci-
fied in the periodic maintenance and
lubrication chart.
To check the engine oil level
1. Place the motorcycle on a level
surface and hold it in an upright
position.NOTE:Make sure that the motorcycle is posi-
tioned straight up when checking the oil
level. A slight tilt to the side can result in
a false reading. @2. Start the engine, warm it up for
several minutes, and then turn it
off.3. Wait a few minutes until the oil set-
tles, and then check the oil level
through the check window located
at the bottom-right side of the
crankcase.
NOTE:@ The engine oil should be between the
minimum and maximum level marks. @4. If the engine oil is below the mini-
mum level mark, add sufficient oil
of the recommended type to raise
it to the correct level.To change the engine oil (with or
without oil filter cartridge replace-
ment)
1. Start the engine, warm it up for
several minutes, and then turn it
off.
2. Place an oil pan under the engine
to collect the used oil.1. Engine oil level check window
2. Maximum level mark
3. Minimum level mark
1. Engine oil filler cap
E_5jc.book Page 12 Monday, January 22, 2001 12:12 PM
Page 87 of 132

PERIODIC MAINTENANCE AND MINOR REPAIR
7-14
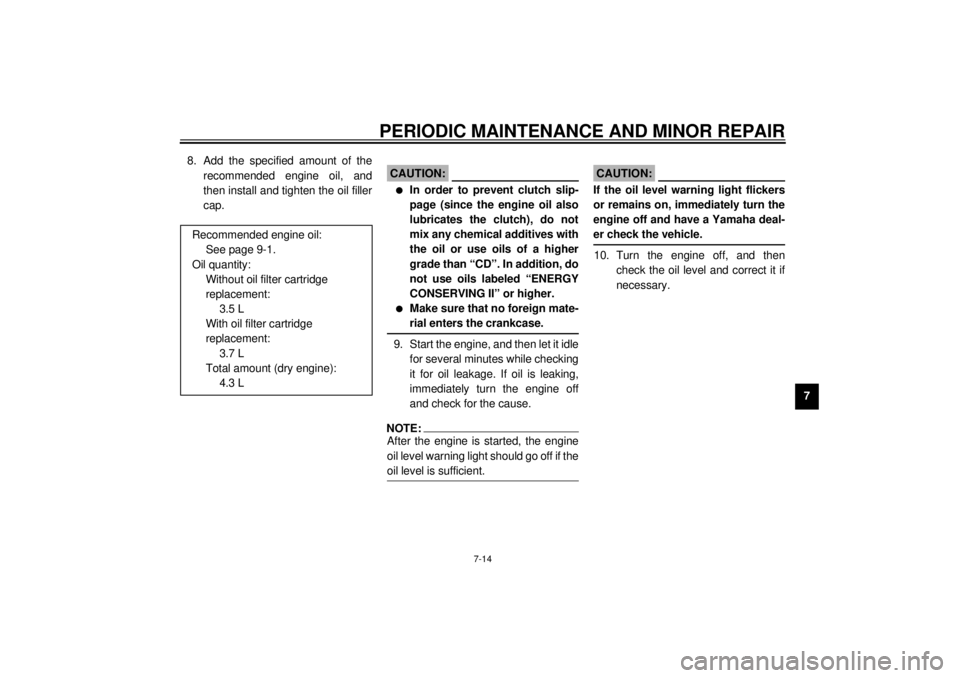
7 8. Add the specified amount of the
recommended engine oil, and
then install and tighten the oil filler
cap.
EC000072
CAUTION:@ l
In order to prevent clutch slip-
page (since the engine oil also
lubricates the clutch), do not
mix any chemical additives with
the oil or use oils of a higher
grade than “CD”. In addition, do
not use oils labeled “ENERGY
CONSERVING II” or higher.
l
Make sure that no foreign mate-
rial enters the crankcase.
@9. Start the engine, and then let it idle
for several minutes while checking
it for oil leakage. If oil is leaking,
immediately turn the engine off
and check for the cause.NOTE:@ After the engine is started, the engine
oil level warning light should go off if the
oil level is sufficient. @
EC000067
CAUTION:@ If the oil level warning light flickers
or remains on, immediately turn the
engine off and have a Yamaha deal-
er check the vehicle. @10. Turn the engine off, and then
check the oil level and correct it if
necessary. Recommended engine oil:
See page 9-1.
Oil quantity:
Without oil filter cartridge
replacement:
3.5 L
With oil filter cartridge
replacement:
3.7 L
Total amount (dry engine):
4.3 L
E_5jc.book Page 14 Monday, January 22, 2001 12:12 PM