2001 YAMAHA XVZ1300TF warning light
[x] Cancel search: warning lightPage 68 of 132

OPERATION AND IMPORTANT RIDING POINTS
6-3
6
ECA00031
CAUTION:_ The engine trouble warning light
should come on when the start
switch is pushed, and it should go
off when the start switch is released.
If the engine trouble warning does
not come on when pushing the start
switch, or it remains on after start-
ing, have a Yamaha dealer check the
self-diagnosis device. _6. After starting the engine, move the
starter (choke) knob back halfway.
ECA00045
CAUTION:_ For maximum engine life, never ac-
celerate hard when the engine is
cold! _7. When the engine is warm, turn the
starter (choke) off.NOTE:_ The engine is warm when it responds
normally to the throttle with the starter
(choke) turned off. _
EAU01258
Starting a warm engine Follow the same procedure as for start-
ing a cold engine with the exception
that the starter (choke) is not required
when the engine is warm.
EAU00423
Shifting Shifting gears lets you control the
amount of engine power available for
starting off, accelerating, climbing hills,
etc.
The gear positions are shown in the
illustration.NOTE:@ To shift the transmission into the neu-
tral position, press the shift pedal down
repeatedly until it reaches the end of its
travel, and then slightly raise it. @
E_5jc.book Page 3 Monday, January 22, 2001 12:12 PM
Page 87 of 132

PERIODIC MAINTENANCE AND MINOR REPAIR
7-14
7 8. Add the specified amount of the
recommended engine oil, and
then install and tighten the oil filler
cap.
EC000072
CAUTION:@ l
In order to prevent clutch slip-
page (since the engine oil also
lubricates the clutch), do not
mix any chemical additives with
the oil or use oils of a higher
grade than “CD”. In addition, do
not use oils labeled “ENERGY
CONSERVING II” or higher.
l
Make sure that no foreign mate-
rial enters the crankcase.
@9. Start the engine, and then let it idle
for several minutes while checking
it for oil leakage. If oil is leaking,
immediately turn the engine off
and check for the cause.NOTE:@ After the engine is started, the engine
oil level warning light should go off if the
oil level is sufficient. @
EC000067
CAUTION:@ If the oil level warning light flickers
or remains on, immediately turn the
engine off and have a Yamaha deal-
er check the vehicle. @10. Turn the engine off, and then
check the oil level and correct it if
necessary. Recommended engine oil:
See page 9-1.
Oil quantity:
Without oil filter cartridge
replacement:
3.5 L
With oil filter cartridge
replacement:
3.7 L
Total amount (dry engine):
4.3 L
E_5jc.book Page 14 Monday, January 22, 2001 12:12 PM
Page 99 of 132

PERIODIC MAINTENANCE AND MINOR REPAIR
7-26
7
EAU01746
Adjusting the brake pedal
position The top of the brake pedal should be
positioned approximately 100 mm
above the top of the footrest as shown.
Periodically check the brake pedal po-
sition and, if necessary, have a
Yamaha dealer adjust it.
EW000109
WARNING
@ A soft or spongy feeling in the brake
pedal can indicate the presence of
air in the hydraulic system. If there
is air in the hydraulic system, have a
Yamaha dealer bleed the system be-
fore operating the motorcycle. Air in
the hydraulic system will diminish
the braking performance, which
may result in loss of control and an
accident. @
EAU01799
Adjusting the rear brake light
switch The rear brake light switch, which is ac-
tivated by the brake pedal, is properly
adjusted when the brake light comes
on just before braking takes effect.
Since the brake light switch is a compo-
nent of the cruise control system, it
must be adjusted by a Yamaha dealer,
who has the necessary professional
knowledge and experience.
a. Distance between brake pedal and footrest
E_5jc.book Page 26 Monday, January 22, 2001 12:12 PM
Page 108 of 132

PERIODIC MAINTENANCE AND MINOR REPAIR
7-35
73. Turn the key to “ON” and turn on
the electrical circuit in question to
check if the device operates.
4. If the fuse immediately blows
again, have a Yamaha dealer
check the electrical system.
EAU01802
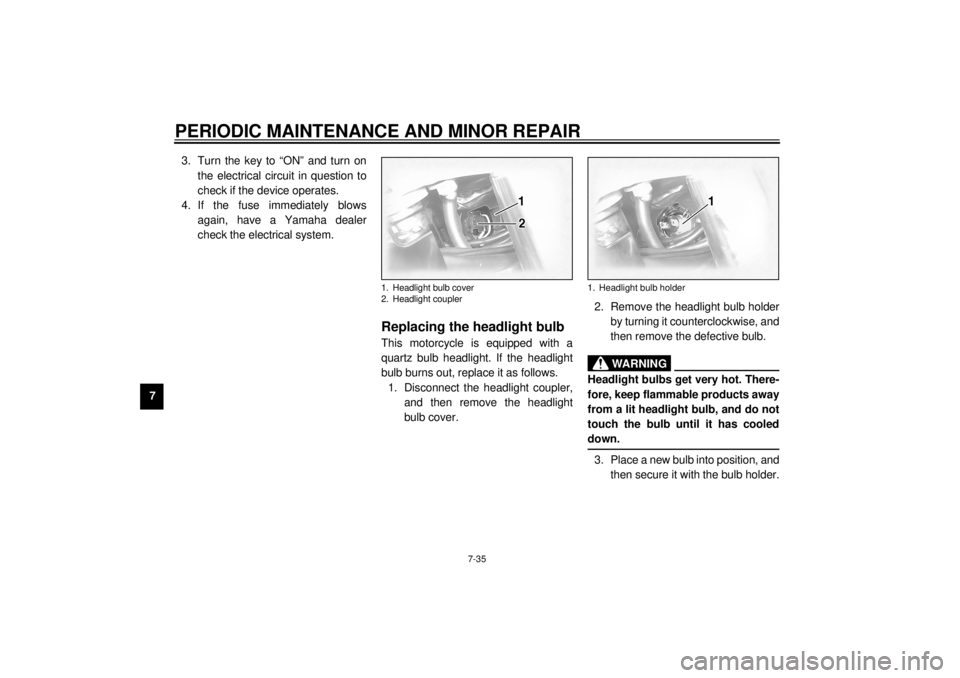
Replacing the headlight bulb This motorcycle is equipped with a
quartz bulb headlight. If the headlight
bulb burns out, replace it as follows.
1. Disconnect the headlight coupler,
and then remove the headlight
bulb cover.2. Remove the headlight bulb holder
by turning it counterclockwise, and
then remove the defective bulb.
EW000119
WARNING
@ Headlight bulbs get very hot. There-
fore, keep flammable products away
from a lit headlight bulb, and do not
touch the bulb until it has cooled
down. @3. Place a new bulb into position, and
then secure it with the bulb holder.
1. Headlight bulb cover
2. Headlight coupler
1. Headlight bulb holder
E_5jc.book Page 35 Monday, January 22, 2001 12:12 PM
Page 123 of 132

SPECIFICATIONS
9-4
9
Bulb voltage, wattage ´ quantity
Headlight 12 V, 60/55 W ´ 1
Tail/brake light 12 V, 5/21 W ´ 1
Turn signal light 12 V, 21 W ´ 4
Auxiliary light 12 V, 4 W ´ 1
License light 12 V, 5 W ´ 2
Neutral indicator light 12 V, 1.7 W ´ 1
High beam indicator light 12 V, 1.7 W ´ 1
Oil level warning light 12 V, 1.7 W ´ 1
Turn signal indicator light 12 V, 1.7 W ´ 2
Fuel level warning light 14 V, 3 W ´ 1
Coolant temperature warning
light 12 V, 1.7 W ´ 1
Engine trouble warning light 12 V, 1.7 W ´ 1
Overdrive indicator light 12 V, 1.7 W ´ 1
Cruise control “SET” indicator
light 12 V, 1.7 W ´ 1
Cruise control “RES” indicator
light 12 V, 1.7 W ´ 1
Cruise control “ON” indicator
light 12 V, 1.7 W ´ 1Audio system amplifier
Output power
Speaker 14 W ´ 4
Headset 1 W ´ 2
Auto-volume range 5 steps
Output impedance
Speaker 4 W
Headset 8–16 W
Fuses
Main fuse 30 A
Headlight fuse 15 A
Signaling system fuse 15 A
Ignition fuse 10 A
Radiator fan fuse 10 A
Odometer fuse 10 A
Cruise control fuse 10 A
Carburetor heater fuse 10 A
Audio system fuse 10 A
Auxiliary DC jack fuse 5 A
Auxiliary DC terminal fuse 5 A
E_5jc.book Page 4 Monday, January 22, 2001 12:12 PM
Page 128 of 132

11-INDEXAAir filter elements, cleaning .................... 7-17
Anti-theft alarm ........................................3-8
Audio settings (basic) ...............................4-5
Audio settings (modes) ............................4-5
Audio system parts, location of................4-1
Auxiliary audio source ............................ 4-18
Auxiliary DC jack and terminals.............. 3-24BBattery ................................................... 7-32
Brake and clutch fluid levels,
checking .............................................. 7-28
Brake and clutch fluids, changing........... 7-29
Brake and clutch levers, checking and
lubricating ............................................ 7-30
Brake and shift pedals, checking and
lubricating ............................................ 7-29
Brake lever............................................. 3-11
Brake lever free play, adjusting .............. 7-25
Brake light switch (rear), adjusting ......... 7-26
Brake pads, checking............................. 7-27
Brake pedal............................................ 3-11
Brake pedal position, adjusting .............. 7-26CCarburetors, adjusting............................ 7-19
Care.........................................................8-1
Cassette deck operation ..........................4-9
CD changer operation ............................ 4-17
Clutch lever ............................................ 3-10
Clutch lever free play ............................. 7-25
Conversion table ......................................9-5
Coolant level, checking .......................... 7-15
Coolant temperature warning light ........... 3-4
Cowlings and panels, removing and
installing................................................ 7-6
Cruise control indicator lights ................... 3-4
Cruise control switches .......................... 3-10
Cruise control system .............................. 3-6DDimmer switch ......................................... 3-9EEngine break-in ....................................... 6-5
Engine oil and oil filter cartridge ............. 7-12
Engine stop switch................................... 3-9
Engine trouble warning light .................... 3-3FFinal gear oil .......................................... 7-15
Front fork, adjusting ............................... 3-19
Front fork, checking ............................... 7-31
Fuel ....................................................... 3-12
Fuel cock ............................................... 3-13
Fuel consumption, tips for reducing ......... 6-4
Fuel gauge .............................................. 3-8
Fuel level warning light ............................ 3-4
Fuel tank breather hose ......................... 3-13
Fuel tank cap ......................................... 3-11
Fuses, replacing .................................... 7-33HHandlebar switches ................................. 3-9
Headlight bulb, replacing ....................... 7-35
Headsets ................................................. 4-2
Helmet holders ...................................... 3-15
High beam indicator light ......................... 3-3
Horn switch ..............................................3-9IIdentification numbers ............................10-1
Idling speed, adjusting ...........................7-20
Ignition circuit cut-off system ..................3-22
Indicator and warning lights......................3-3KKey identification number .......................10-1LLicense plate light bulb, replacing...........7-37
Light switch ..............................................3-9MMain switch/steering lock .........................3-1
Model label ............................................10-2NNeutral indicator light ...............................3-4OOil level warning light ...............................3-3
Overdrive indicator light............................3-3PParking.....................................................6-6
Part locations ...........................................2-1
Pass switch ..............................................3-9
Periodic maintenance and lubrication
chart ......................................................7-3
Pre-operation check list ............................5-1RRadio operation......................................4-12
Rider seat ..............................................3-15
E_5jc.book Page 1 Monday, January 22, 2001 12:12 PM