Page 407 of 474
SYSTEM
Selecting an individual CD*
CD changer Each in the magazine can be by
buttons 7.
The apear in the
Note
is in a magazine hear an
no magazine is chang
and
What you see in the display
when listening to a CD
-CD changer magazine tray
is present in a tray.
Refer
to page 15 for further information.
-Which CD track is
... ... ...
Refer to page 14 for further
-
Refer to page 13 for further
Error displays when using the
CD player
The
-=
= No disc in the
-= No magazi ne in
the changer
-=The scratched
or inserted upside down. The next
-= The changer mecha-
nism is malfunctioning.
this case, press the eject button-see
page 16.
Re-insert the magazine in the changer.
for assis
tan
ce.
Page 411 of 474
PREMIUM
Anti-theft coding
When the unit is turned off and the ignition
key is remo ved from the ignitio n switch, the
flashing
LED indicates that the radio is
equipped with
an anti-theft coding system. the Radio
Canceling the
Perform the steps in
Turn on the radio .
After 3 seconds, the number 1 will
appear in the display.
Use the radio station preset buttons 1 to
4 to enter the code number found on your Radio
ton 2 to en ter the second digit, etc. The ue range for each of the 4 digits is ...
After you finish entering the press
either the upper
you've entered the code number rectly,
Page 414 of 474

SYSTEM PREMIUM
locked whenever
the power source is
interrupted. can only
be returned to working condition by enter
ing the correct code number.
Frequency ranges
FM and AM
Band
Mom en tary-co ntac t butt ons
Fre qu ency, band, bass, balance. p re
s e t button, cassette functions. Dolby®
The cont rols and display are
AM1
and AM2. Manual tuning is possible in both
directions. Microprocesor-controlled stabi
lization of station frequencies (PLL quartz
tuning).
Cassette
Low-wear. high performance tape
auto-reverse. Music Search System
(MSS).
Dol by ® Noise Reduction, automatic
detec tion of metal cassettes.
CD changer*
Remote via radio sound system
unit.
bass controls. fader control inte
grated
in the
Watt (high)
2 x Watt (lo w)
2 x
outside interference in the FM band .
interference pulses from
the engine and other parts of the electrical
system such
as the heater wind
shield wipers and radiator fan.
® The Dolby Noise Reduction System is ma
nufactured under license from Dolby Licen
sing
Dolby and the double-D
symbol are trademark s of Dolby Laboratories
Licensing
2 2 ---- ------------
Page 423 of 474

Overview
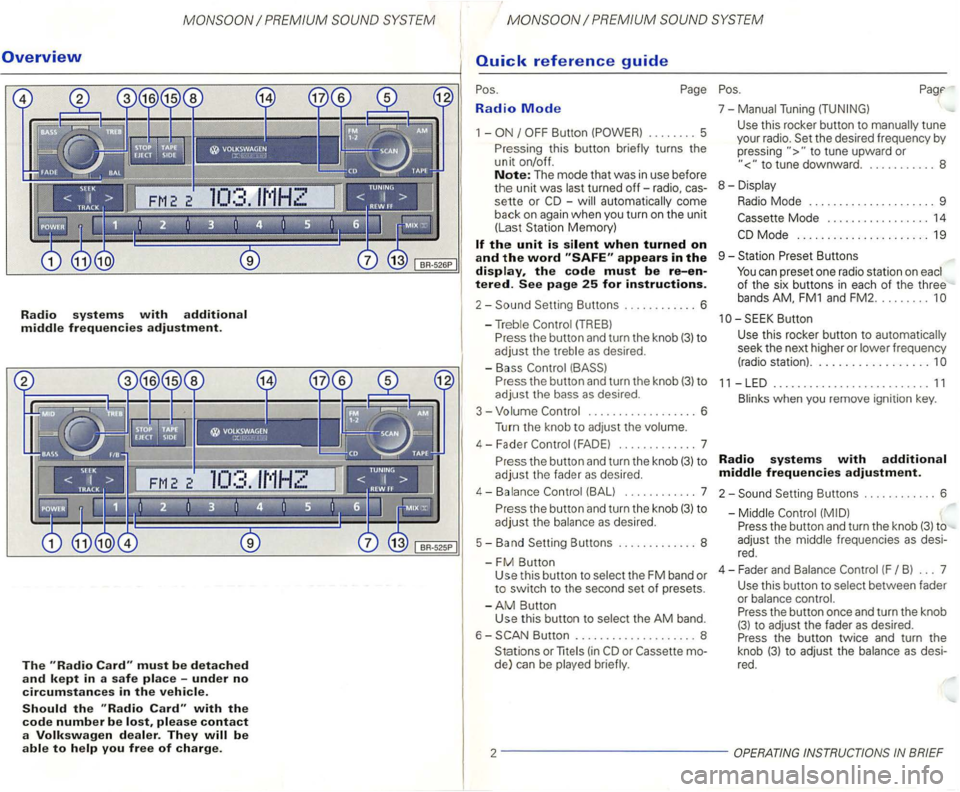
Radio systems with additional middle frequencies adjustment.
The must be detached
and kept in a safe place -under no
circumstances in the vehicle.
Should the with the
code number be please contact
a Volkswagen dealer. They
Radio Mode
1 -
-automatically come
back
on again when you turn on the unit
(Las t Station Memory)
appears in the display, the code must be re-entered. See page 25 for instructions.
2-
P ress the button and turn the knob (3) to
adjust the bass as desired .
3 - Volume
.................. 6
Turn the knob to
adjust the volume.
4 - F ader
(FAD E) ............. 7
P r
ess the button and turn the knob (3) to
adjust the fader as desired.
4-Balance (BALl ... ......... 7
P r
ess the button and turn the knob (3) to
adjust the balance as desired.
5 - Band Setting Buttons ..
........... 8
-
FM Button Use this button to select the FM band or to switch to the second set of presets.
-
AM Button
Use this button to selec t the AM band.
6 -
Button .................... 8
Stations or
lite (in
to tune upward or
to tune downward. . .......... 8
8 - Displa y
Radio Mode . . . . . . . . . . . . . . . . . . . . . 9
Mode . . . . . . . . . . . . . . . . . 14
Butt on
Use
this rocker button to automatica lly
seek the next higher or lower frequency
(radio station) ..................
11 -LED .......................... 11
Blinks when you remove ignition key.
Radio systems with additional
middle frequencies adjustment.
2-Setting Buttons ............ 6
-Middle
Press the button and turn the knob (3) to
adjust the middle frequenc ies
as desi
red .
4 - Fader an d Balance
(F B ) ... 7
Use this button to select between fader
or balance control.
Press the button once and turn the knob
(3) to adjust the fader as desired.
Press the button twice and turn the
knob
(3) t o adjust the balance as desi
red.
2 -------------
Page 428 of 474
4 -Fader (FADE)
The apparent source of the sound can be
moved from the center position (display:
REAR 1 ...
Press the FADE appear in the display.
Use the rotary knob 3 to adjust the fade
setting.
The normal display
LEFT 1 ... or toward the right (dis
play: 1 ...
Press the BAL button,-ap
pear in the display .
Use the rotary knob 3 to adjust the left
Radio systems with
toward the front (display: 1 ... or toward the rear
(display: REAR 1 ...
Press the F/B button once-
Use the rotary knob 3 to adjust the fade
setting.
T he normal displ
ay re-appear after
abou t 5 seconds.
The apparent source of the sound can be
moved from the center position (display:
LEFT 1 ... or toward the right (dis
play:
right speaker balance. Press the F/B button twice,-
The normal display re-appear after ab-appear in the display.
out 5 seconds. Use the rotary knob 3 to adjust the left
right speaker balance.
The normal display re-appear after about 5 seconds.
7
Page 429 of 474
5 -Band
appear in the display after you
press this button. The radio immediately be
gins to scan upwards to the next higher fre
quency . Scanning stops at the next station
received. After about 5 seconds, the radio
the FM button to select FM1 or FM2. 7 -
Either or in the
display .
AM Button
(AM = Amplitude Modulation) Use
this rocker button to manually tune
your radio.
Set the desired frequency by pressing
Tap this key to change the settings in
AM
Hold the key to change the setting rapidThe sound
Page 430 of 474
8 - Radio Mode
-Bands
Refer to page 8 for further
-
...
-Frequency Display
FM Band
9
Page 434 of 474
Fast Forward
(REW-FF)
Briefly press the REW-FF rocker button 7. The tape will begin to fast fo rward or re
wind.
The display will indicate the direction:
-Fast forward
Music
The Music
rock
er button
forward
or
rewind at any time.
When you briefly press the button
6
seconds, scanning will mov e ont o th e next
track. Pressing
the
press buttons
or 16 at any time.
Note
The pauses between music selections
must be at leas t 3 seconds long for the Mu
s ic
t o funct ion properly.
OPERATION---------------------13